SPEEDKEY SK-AC2000 Electric Room Thermostat
IMPORTANT NOTES
- This manual must be read before installation
Please read carefully this manual before installation; fully understand the principle and function of this product. - PRODUCT SAFETY
All SPEEDKEY products have been designed and produced in accordance with CE and RoHS requirements, with various performance indexes complying with BS4662 requirements. Incorrect wiring may cause burning-out or malfunctions. Please refer to the wiring diagram for specific details. Please check whether the wiring diagrams contravene local access wiring rules. - Electric Room Thermostat (integral)
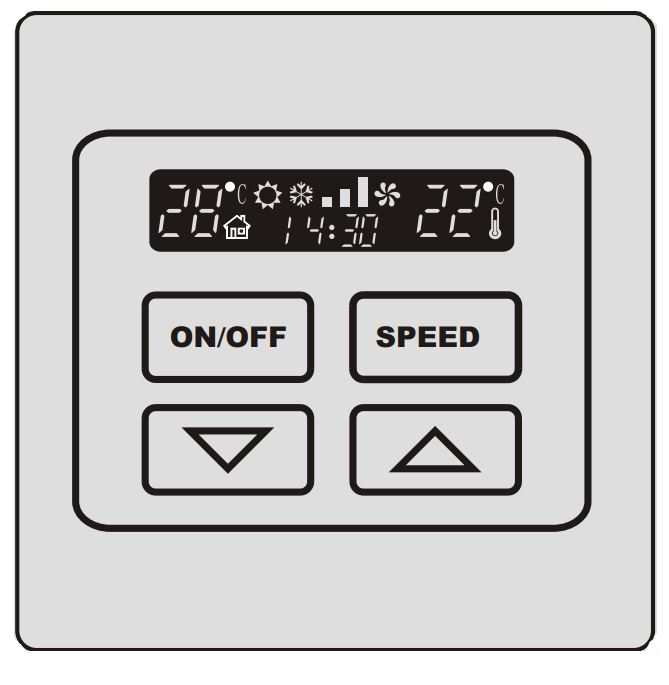
Electric Room Thermostat Touch Panel can be installed in the BS4662 switch box. It is recommended that the internal installation dimension of the base box is 65mm*65mm*50mm.Its external dimensions of the producuct is 86 mm*86mm*46mm. The wiring terminal can be either screw type or non-screw type. The switch can be used safely only when connected to a live line, neutral line and earthing line. - Room Temperature Controller (detachable)
Touch Panel can be installed in the BS4662 switch box. It is recommended that the internal installation dimension of the base box is 65mm*65mm*50mm.The external dimensions of the touch panel is 86 mm*86mm*18mm, which shall be connected to the host with 6-core cables. - SK-AirC-Remote Infrared remote controller
With an infrared transmitter in this remote controller, its operating range is more than 15m in free space, its remote control angle is less than or equal to 90 degrees, and the infrared ray can be reflected indoors. - PROPER POSITIONS FOR INSTALLATION
- The positions shall be convenient for easy installation and operation.
- The positions shall be away from water, moisture, direct sunlight, and dust.
- TROUBLESHOOTING GUIDE
If the product can not work properly after the installation, please refer to the TROUBLE SHOOTING GUIDE in this manual.
Please use dry, soft cloth material for cleaning. Do not clean the switch with anti-solvents such as alcohol, acetone, and ether etc. - WARRANTY
SPEEDKEY products come with two years, equipment-only warranty.
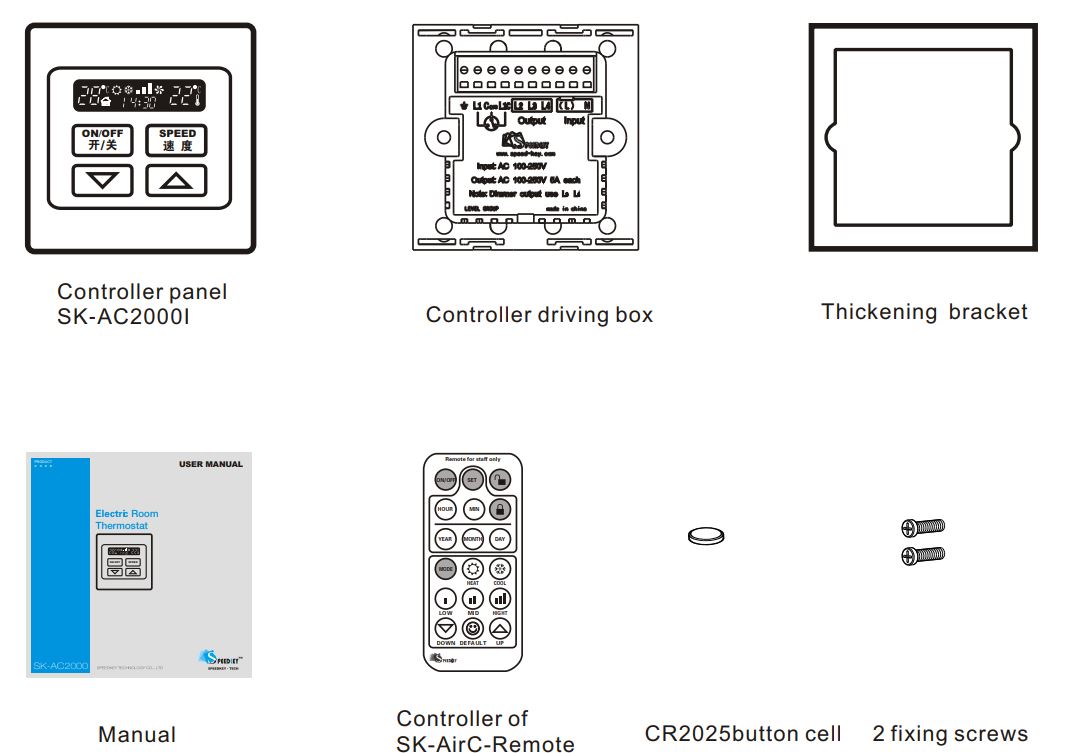
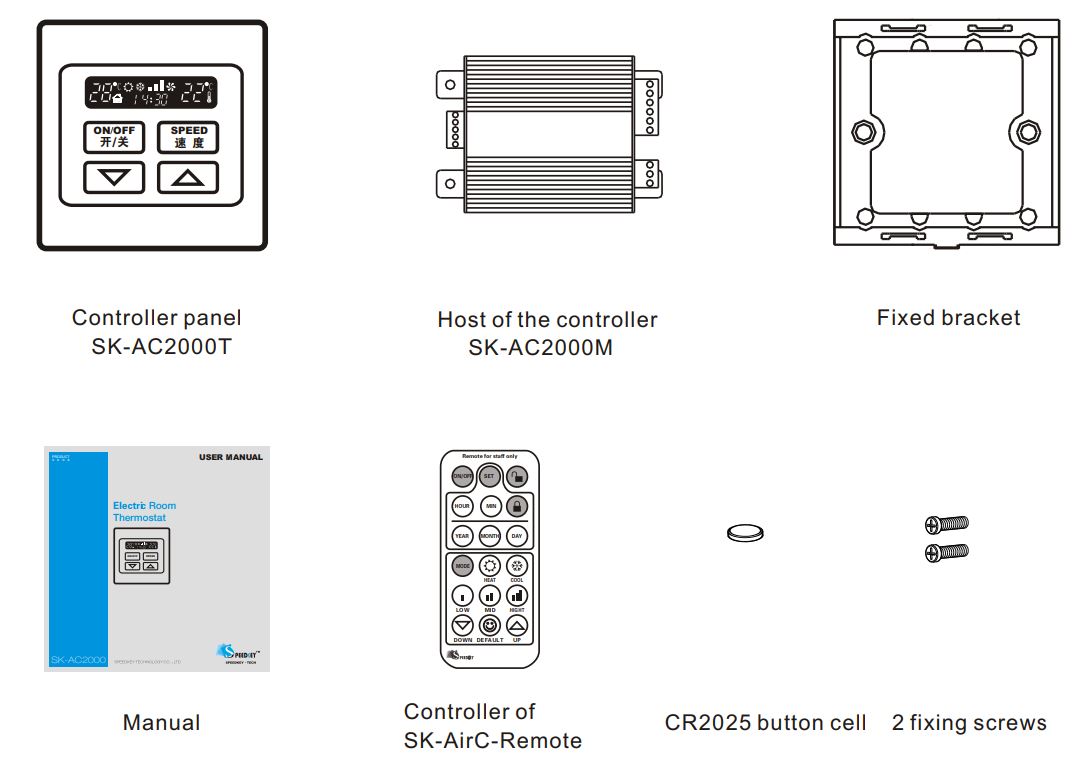
PACKAGE COMPONENTS
Electric Room Thermostat(integral)SK-AC2000I
Electric Room Thermostat(detachable)SK-AC2000SYS
INTRODUCTION
With SK-AC2000 , fan speed of central air conditioning fan coil and electric cool-hot valve switch can be adjusted to keep the room at a setting temperature.
SK-AC2000 intelligent Electric Room Thermostat is featured with unique design and easy operation.
- SK- AC2000 Electric Room Thermostat is super-luxuriously designed, and made of ABS fire resistant, insulating and precious metal materials with a plurality of optional colors which meet the design requirement of decorating the house, office building and high class hotels.
- There is backlight touch panel buttons. Its luminescent LCD screen can indicate indoor temperature, the digits stand for room temperature and user’ s setting temperature, setting temperature, wind speed and time.With multi-language indication and luminescent LCD screen, it is convenient to operate clearly in any environment, even it is dark.
- Its intelligent circuit control has 3 steps of wind speed control, there are 3 optional modes which is cooling mode, heating mode and automatic mode can be set by infrared remote. SK-AC2000 Electric Room Thermostat can replace traditional mechanical air conditioning temperature controller and it can effectively save more than 30% energy.
PRODUCT WIRING
- Electric Room Thermostat (integral SK-AC2000I) SR-Single valve circuit diagram(see figure)
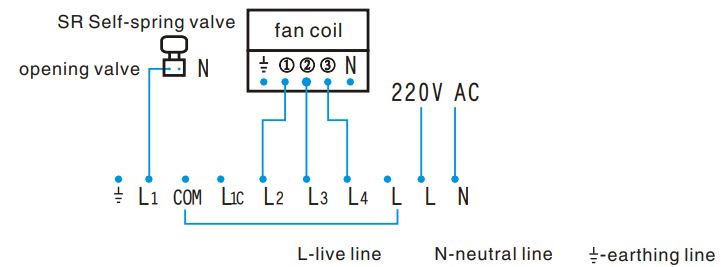
Remark: SR’s self-elastic spring valve can close automatically when the power is off. - Electric Room Thermostat (Integral SK-AC2000I) NSR-Single valve circuit diagram(see figure)
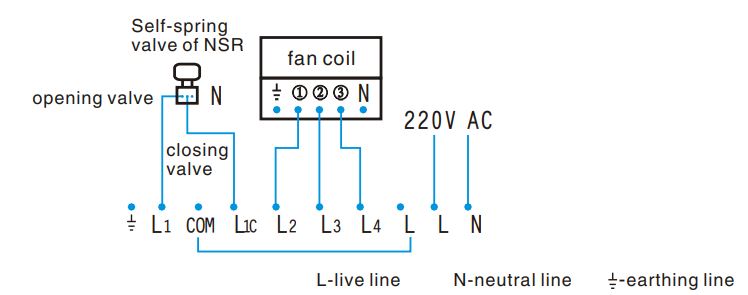
Remark: NSR has no self-elastic spring valve; the valve has to be closed with electrical control. - Electric Room Thermostat(detachable SK-AC2000SYS)SR-Single valve circuit diagram(see figure)
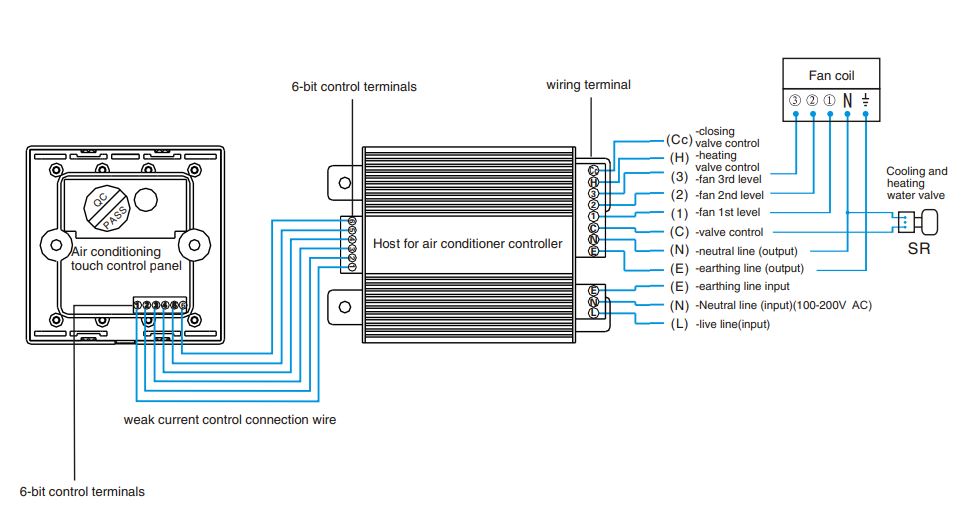
Remark: SR’s self-elastic spring valve can close automatically when the power is off. - Electric Room Thermostat (detachable SK-AC2000SYS) NSR-Single valve circuit diagram(see figure)
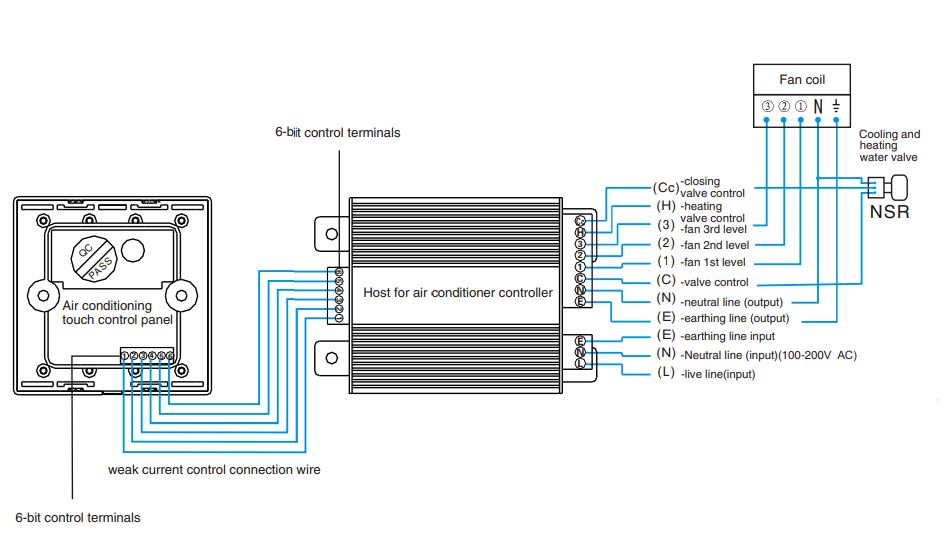
Remark: NSR has no self-elastic spring valve; the valve has to beclosed with electrical control - Electric Room Thermostat detachable SK-AC2000SYS) SR-Double valve circuit diagram(see figure)
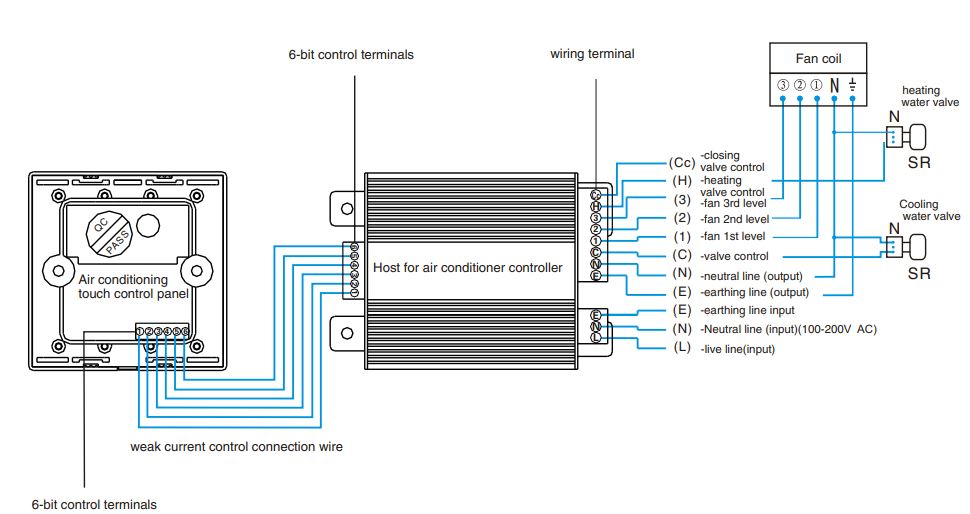
Remark: SR’s self-elastic spring valve can close automatically when the power is off. - Electric Room Thermostat (detachable SK-AC2000SYS) NSR-double valve circuit diagram(see figure)
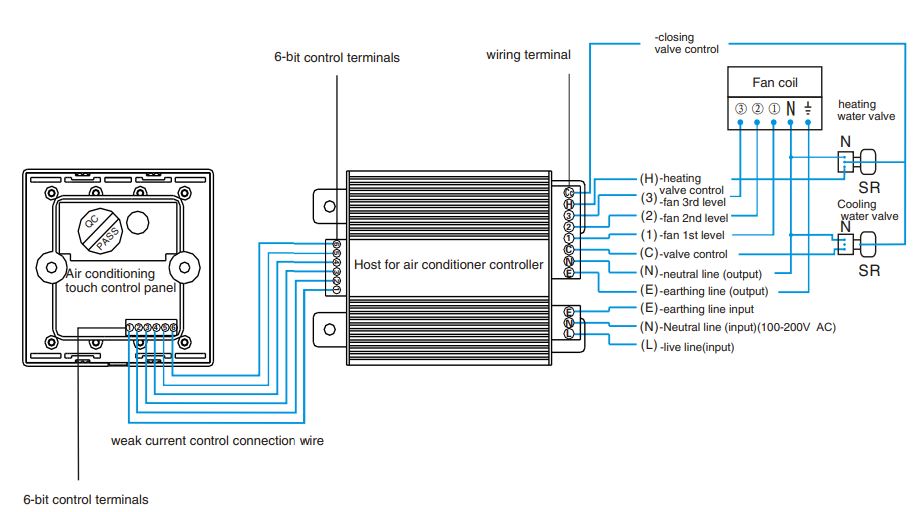
Remark: NSR has no self-elastic spring valve; the valve has to be closed with electrical control.
INSTALLATION
PRODUCT INSTALLATION(SK-AC2000I)
- Turn off main power supply of the circuit
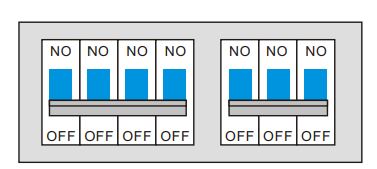
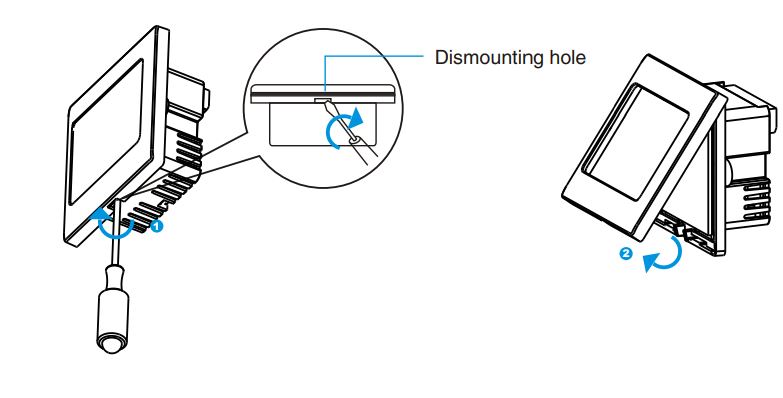
- Open the switch base box of touch screen panel with the screwdriver
- Check Bs4662 switch base box whether there is enough space (50mm)to install touch screen switch .If the space is not enough, the thickening bracket shall be used.
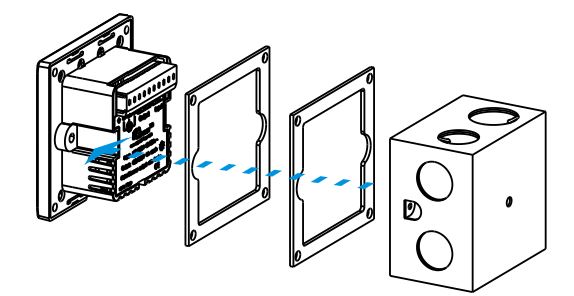
- Draw out strong electric cable and network cable from Bs4662 switch base box and trim up, press tightly on terminal block as illustration.
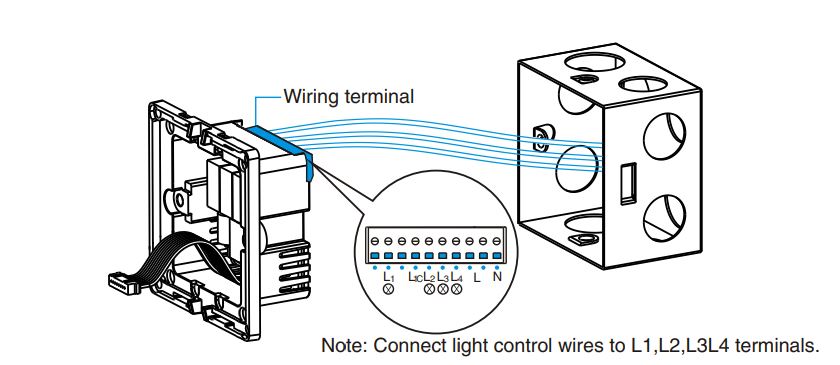
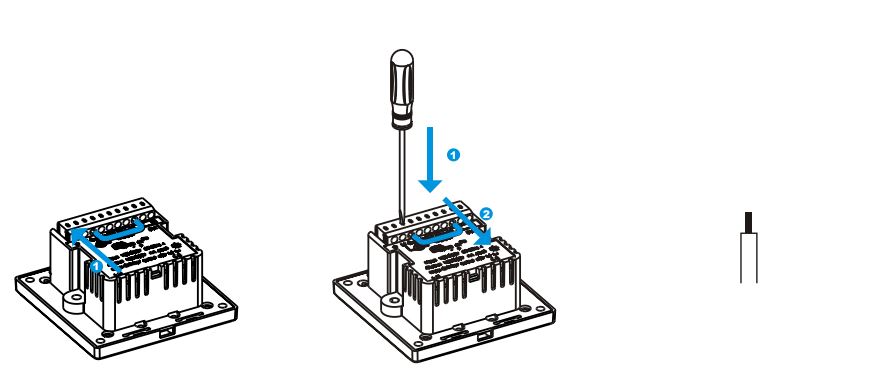
Note: Connect light control wires to L1,L2,L3L4 terminals- Connecting method of non-screw terminal
- Please use single wire of diameter of 1.6 or 2.0 to comply with non-screw terminals suitable cable.
- Connecting method of screw terminal
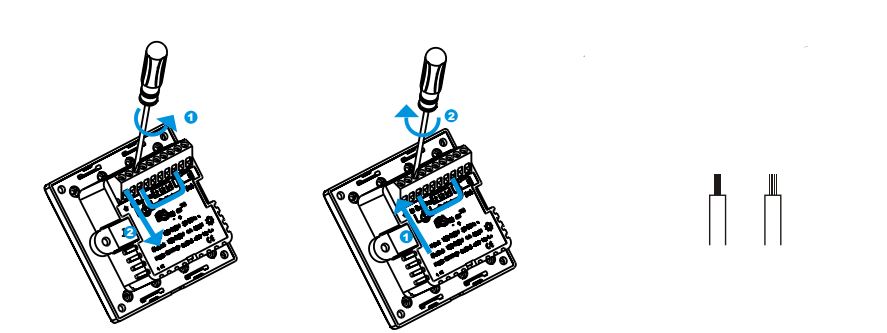
- Please use single or multi copper wire of diameter less than 4mm²to comply with screw terminals suitable cable.
- Mount the switch driving section into base box,and fix with 2 screws
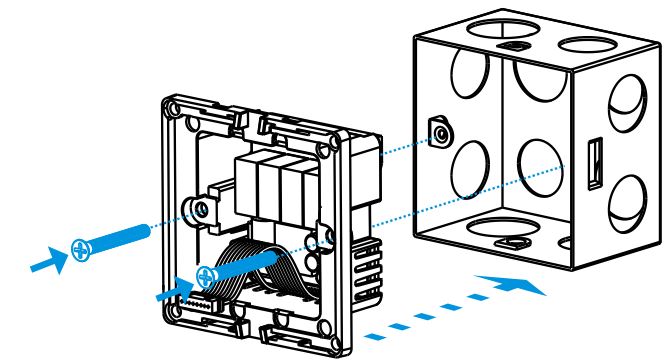
- Insert the wiring terminal of switch driving section into the touch screen panel
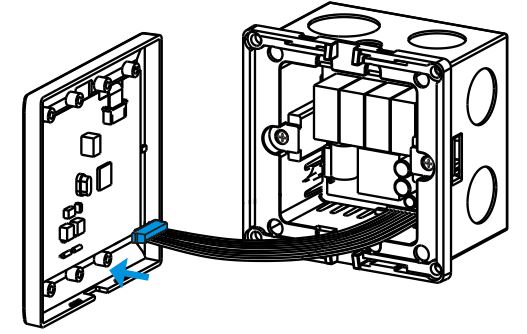
- Cover the touch screen panel
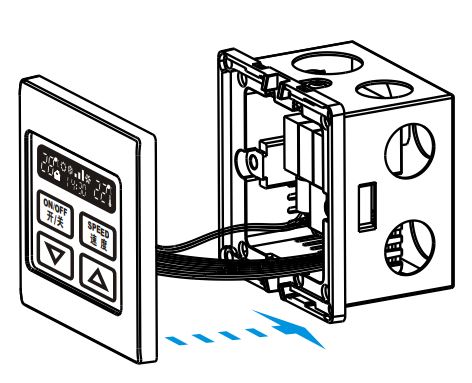
- Set program setting as you like
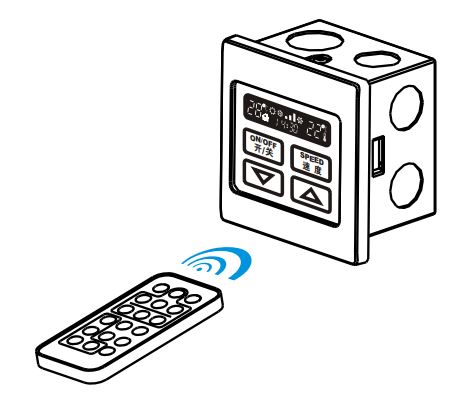
PRODUCT INSTALLATION(SK-AC2000SYS)
Illustration for installation of Electric Room Thermostat (detachable) SK-AC2000SYS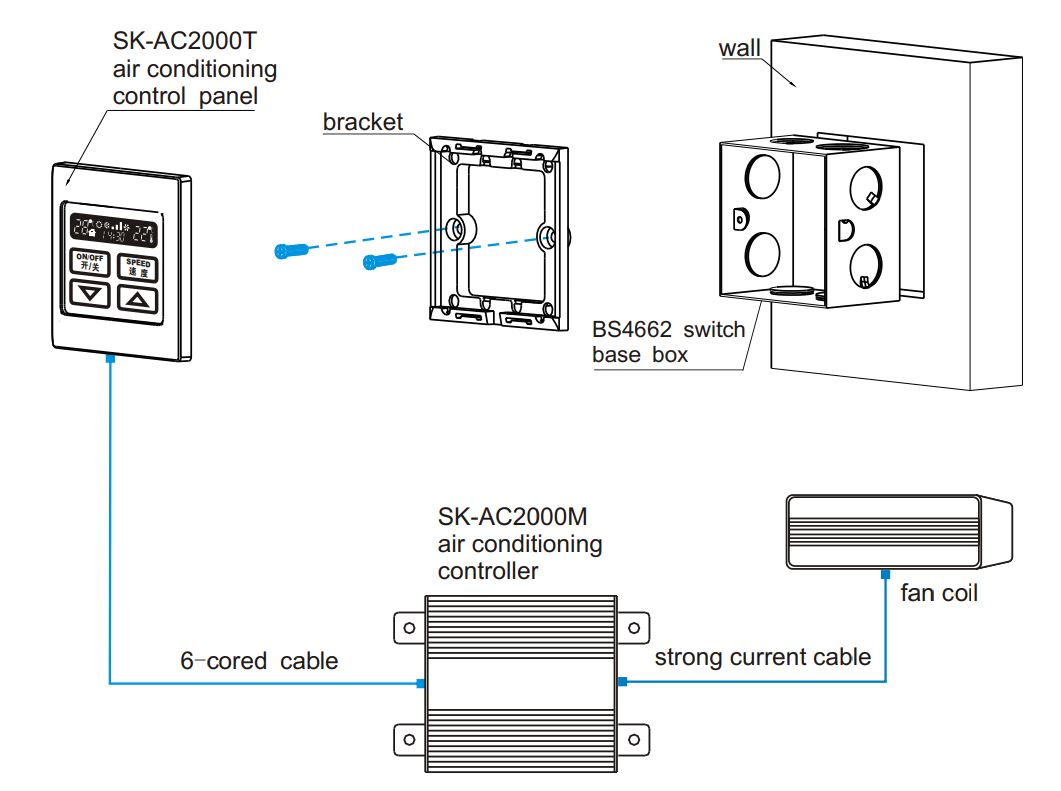
PRODUCT DESCRIPTION
Illustration of SK-AC2000 series
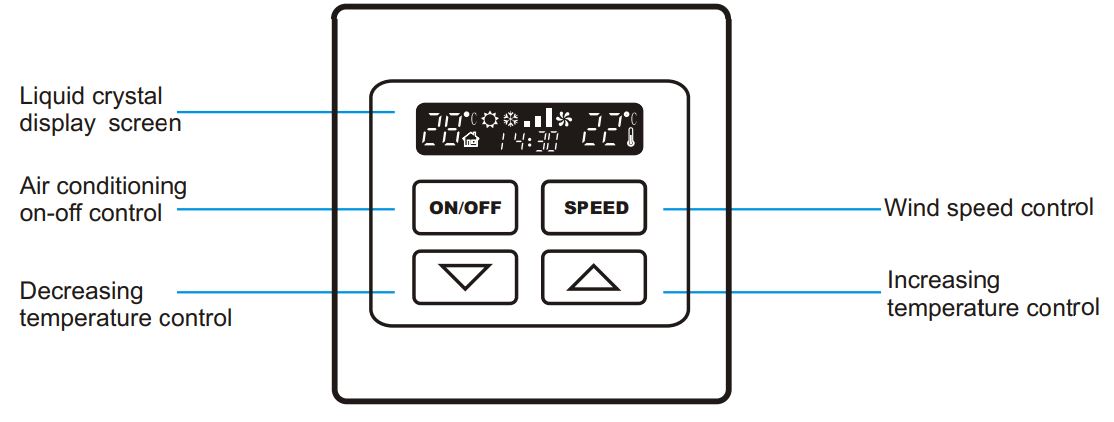
- The design of blue luminescence touch screen is very modern and it is also convenient to be identified at night
- With the design of touch button backlight indication, it is easy to find its switch control,wind speed setting, and temperature regulation function button.
- With the design of 24h clock and time control,it can achieve the function of timing and advanced time setting.
- EEPROM can permanently keep parameters set by the user during power cut.
- Various valves (SR&NSR) can be controlled.
- It can save effectively more than 30% energy
- SK-AC2000 intelligent is suitable for installation in standard Bs4662 switch base box.
Introduction of SK-AC2000 display screen
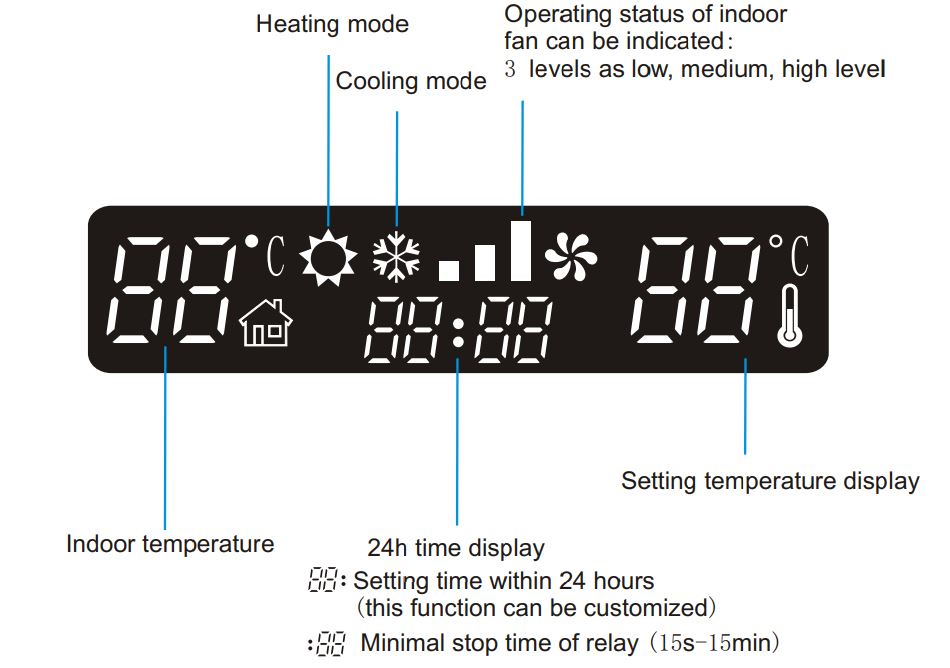
 The brightness of both indicators means auto-mode
- A flash of illustration indicator means its operation status
Remark: SK-AC2000I Electric Room Thermostat (integral)has no auto mode; it can be only controlled with one single valve.
SK-AC2000 Remote explanation
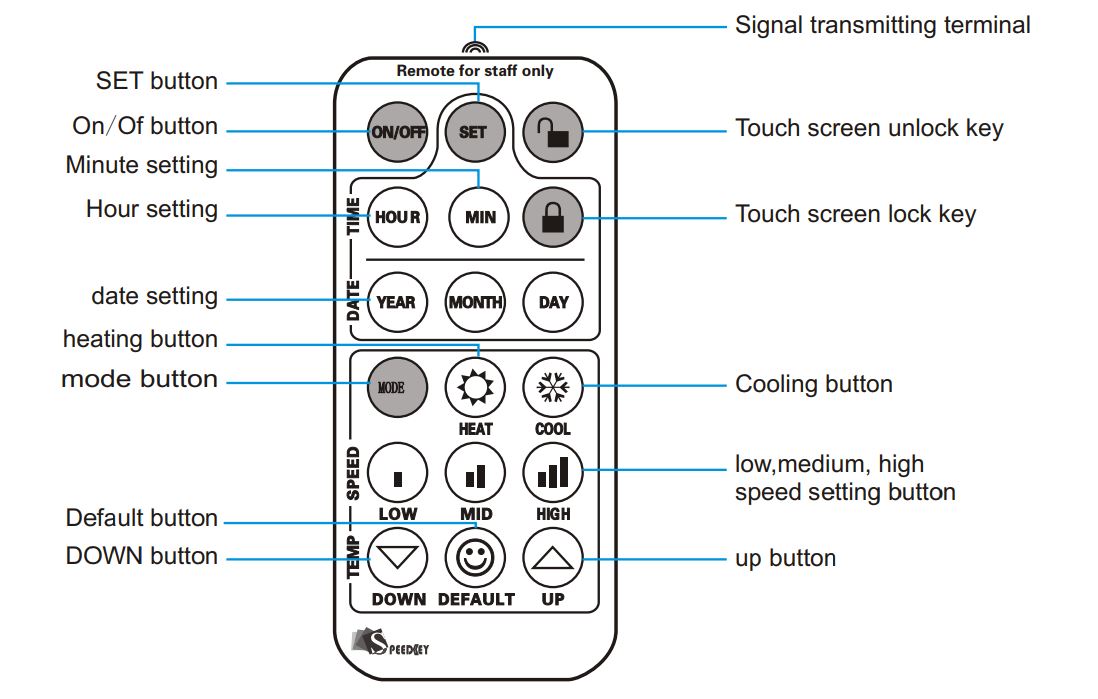
Note:When the touch screen is pressed, the corresponding indicator will be lighted.
The touch screen and LCD screen will automatically enter dim backlight mode if no operation in 1 5 seconds. The system control and setting can be achieved completely via the remote controller. Some special functions have to be achieved only by the remote control.
PARAMETER SETTING
- Time setting: the system must be set up with remote controller. Press the SET button on the remote at first, then press the HOUR button and set up the hour,and then press the MIN button and set up minute.
- Date setting: the date setting must be set up with a remote controller. Press the SET button on the remote at first, and then press the YEAR button and set up the year; then press the MONTH button and set up the month. Press the DAY button and set up the day ( customize) .
Note: Some advanced system can be set up with the year, month and day setting with remote controller. - Minimum relay closing time setting: This feature can prevent the relay to start in the setting time, the default setting is zero ( the relay only changes as the temperature changes) . Adjust minimum relay closing time with the remote controller, press SET button twice, and use the & button on the panel to set the minimum relay closing time from 0-15 minutes when the Minute indicator flashes on touch screen.
- Room temperature drift correction: When the room temperature drifts, correct the deviation of ± 2 º C with the remote controller, press the SET button three times , use the & button and correct the deviation( increase 2 or decrease 2 ) when the temperature display flashes on touch panel.
- Heating mode: the system must be set up a heating setting with the remote controller. Press the MODE button, and press the button and set winter heating mode. The default temperature is 2 0º C when this system restarts. The system will automatically affirm the setting in the LCD screen and display the corresponding static icon.
- Cooling mode: the system cooling setting must be set up with the remote controller. Press the MODE button, and press button and set summer cooling mode. Its default temperature is 2 6ºC when this system restarts. The system will automatically affirm the setting of the LCD screen and display the corresponding static icon.
- Auto mode: Press MODE button twice, the system shall enter the auto mode, and LCD screen will= display icons. When the setting temperature is higher than room temperature, its mode is heating mode; when the setting temperature is lower than room temperature, its mode is cooling mode, and thus it can achieve auto constant temperature ( Two valves must be installed for auto mode, namely, cooling valve and heating valve).
Note: if the icon flashes during system operation, it means the valves are open, flash means heating, and flash means cooling. - Hotel power-up scene function: when the guest enters room and inserts the card for power, the air conditioning system will automatically enters into its status.
- Set up temperature and wind speed for the room.
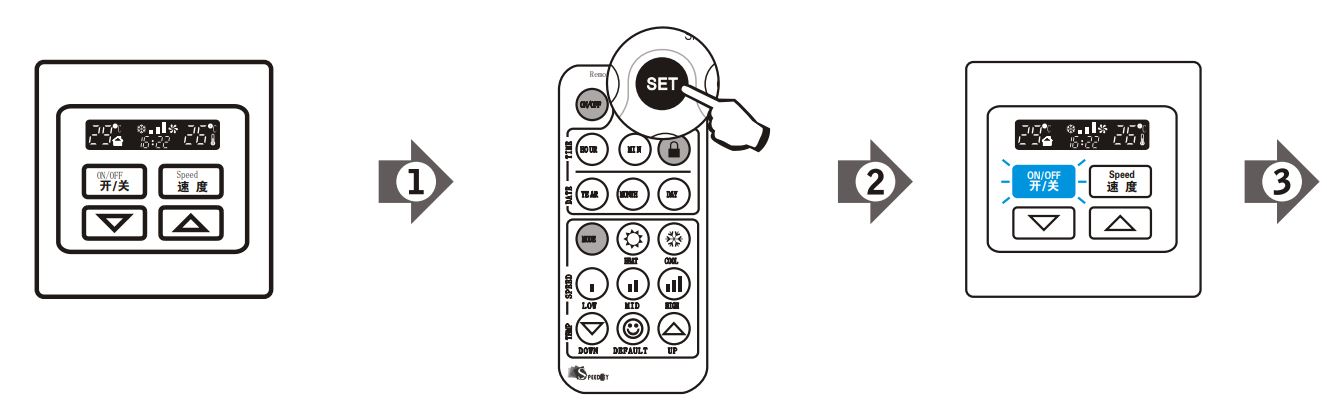
- Press the SET button on the remote, then the touch screen will flash.
- Press the ON/ OFF button on touch screen
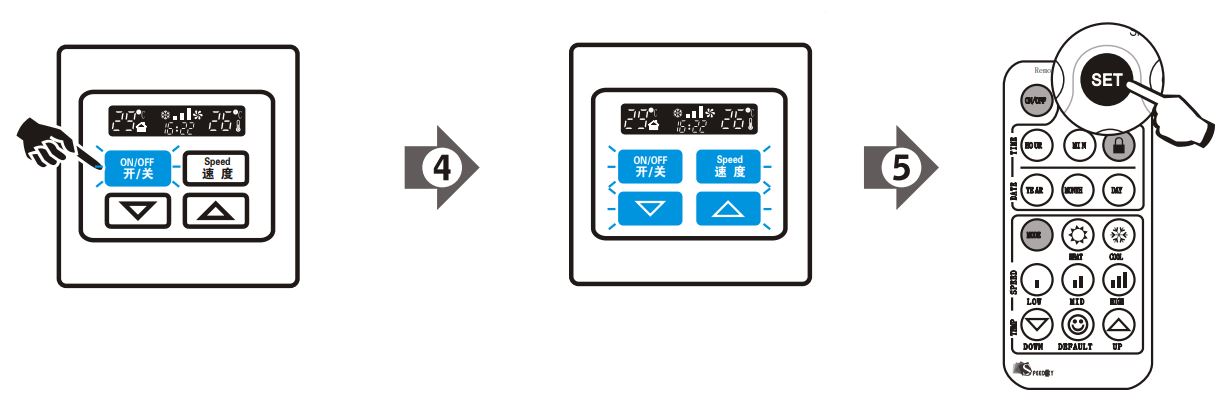
- Finally, press SET button to finish the power-up scene.
- Set up temperature and wind speed for the room.
- Lock setting:This system has special lock function to facilitate its management. It will lock the system if necessary.
- Lock: The lock function can be achieved only with the remote controller. Press the SET button once at first, then press the button to lock the system.
- Unlock: the unlock function can also be achieved only with the remote controller. Press on the remote controller and unlock the system.
Note: if the power is off, this setting will be canceled. - Timing Setting :This function can be achieved air conditioning timing switch. Press SET button twice, the minute digits flash; then press the HOUR button, the hour digits will display 88: flash; set up the time with & button. If the device is shut down within 15 seconds afer setting it will restart on the setting time. If the device continues the operation after setting time, it will shut down on the end of setting time ( customized.)
- Close-fitting service : Professional user can edit timing setting, and then the air conditioning system will run in accordance with the temperature setting and time setting, this shall save time and energy, but this is paid service. Please contact local agent or our company for detail.
PRODUCT SPECIFICATIONS
| Parameter | SK-AC2000I | SK-AC2000sys |
| Usage range
Temperature Control range Input power (DC) Display Method Temperature sensor Button Temperature control precision Dissipation power Current Loading Service life Installation Dimension Environment
Control Operate Mode Galvanothermy control |
Single 3 level wind speed fan coil, dynamoelectric water valve, heating control | |
| Regulation from 16℃ to 32℃ , auto default temperature,summer 26℃ ,winter 20℃ | ||
| 100 240V AC | ||
| Liquid Crystal Display | ||
| LM 75 | ||
| Multi-language touch panel button | ||
| ±1℃ | ||
| <1.2W | ||
| 5(3)A AC60/50HZ、110/240V、±10% | ||
| Touch Panel button 1 million times, touch point 100 thousand times | ||
| Install in the standard Bs4662 base box with screw and bracket | ||
| W86mm×H86mm×D46mm | ||
| Operate temperature range: 0℃—50℃.
Transport and store temperature range: -10℃ to 60℃ |
||
| Single valves | Single valves, double valves | |
| Heating Cooling | Heating Cooling Auto mode | |
| NO | Can be up to 10A | |
TROUBLESHOOTING GUIDE
| Symptom | Possible cause | Solutions |
| No backlight
of touch screen |
1 Incorrect wiring or poor contact. |
Make sure that input and output line is tightly connected on the terminal with correct connection. |
|
2 Main switch or creepage protection switch is off. |
Turn on the main switch or creepage protection switch, please check the equipment if the trip still occurs and ensure that there is no creepage. | |
| 3 No neutral line connected of the system | Connect the neutral line to the terminals correctly. | |
| 4 Burnt fuse | Replace the fuse with the same parameter. | |
| 5 Auto protection of the system | Turn off the power and restart | |
| Auto-shut of the controlled equipments |
1 Unstable Voltage, too much interference |
Stop using heavy interfering equipment, and ask local technician for check. |
| 2 Incorrect wiring | Fasten the wire, and ensure the correct connection. | |
|
3 Shut by remote controller |
Set the control setting of remote controller; and ensure light control method.( Remote setting) | |
| No shut-off of the air conditioner |
1 Overload current |
Reduce the load and turn on power again. If it doesn’ t work, please change the driving part. |
| Ceaseless Flash fo
r touch screen |
1 Broken or invalid for touch screen | Replace the touch screen. |
| 2 Entering the setting mode of touch screen | Exit the setting mode by remote controller. | |
| 3 Automatic protection status of touchscreen | Turn off the power. |
REFERENCE
DOWNLOAD MANUALS:
SPEEDKEY SK-AC2000 Electric Room Thermostat User Manual