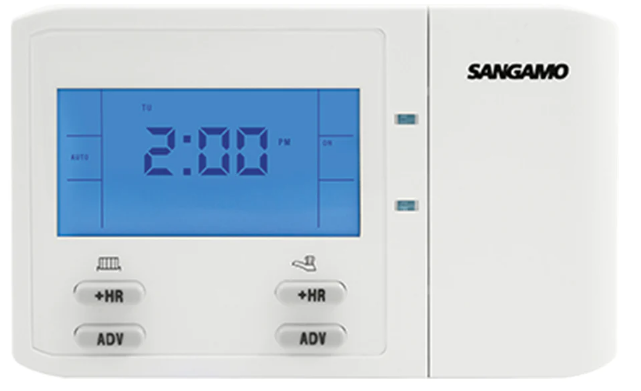
Sangamo PR1n Programmable Thermostat
Pre-Installation Set Up
Before installing, set the bank of 4 DIP Switches on the back to configure the unit according to the chart below:
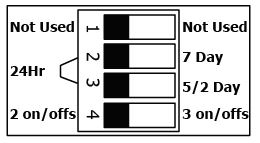
DIP Switches Shown in Factory Default Positions. (black = raised actuator of switch)
- 24 Hr Runs same programme every day.
- 5/2 Day Allows different on/off times at weekend.
- 7 Day Allows different on/off times every day.
Installation Safety Notes
This unit must be installed by a suitably qualified person in accordance with the latest IEE Wiring Regulations. Isolate mains supply before commencing installation. Please read all installation instructions before proceeding. Ensure that the fixed wiring connections to the mains supply is via a fuse rated at not more than 3 amps and a class ‘A’ switch having a contact separation of a minimum of 3mm in all poles. The recommended cable sizes are 1.0mm2 or 1.5mm2 If the unit is fitted to a metal surface, IT IS ESSENTIAL that the metal be earthed. DO NOT use a surface mounting box. No earth connection is required as the product is double insulated but ensure continuity of earth throughout the system
Technical Data
- Power Supply: 230V AC, 50Hz
- Operating Temperature: 0°C to 40°C
- Switch Rating: 230V AC, 2(1)A
- Contact Type: 1B , Micro-Disconnection (Voltage Free)
- Battery Type: Lithium Cell CR2032
- Enclosure Protection IP30
- Plastics Thermoplastic, flame retardant
- Insulation Class Double
- Wiring: For fixed wiring only
- Backplate Industry standard
- Dimensions: 140mm x 87mm x 37mm
- Clock 12 hour am/pm, 1 minute resolution
- Summer/Winter time change Automatic
- Clock Accuracy +/- 1.5 sec/day
- Program Cycle 24hr, 5/2day or 7day selectable.
- Program On/offs per day 2on/off, 3on/off selectable
- Program Resolution 10mins
- Program Selection Auto, On all day, On constant, Off
- Program Override +1,2 or 3 Hr Boost & Advance to next program
- Complies with EN60730-1, EN60730-2.7,
- EMC Directive 2004/108/EC,
- LVD Directive 2006/95/EC
Fitting Back Plate
Direct Wall Mounting
- Position the back-plate (terminals along top edge) with 100mm (min) clearance to its right, 25mm (min) above, 10mm (min) below and left. Ensure that the supporting surface will fully cover the back of the programmer.
- The ideal location would be 1.4M above floor level, easily accessible, reasonably lit and free from condensation or temperature extremes.
- Offer the back plate to the wall in the position where the programmer is to be mounted remembering that the back plate fits to the left hand side of the programmer. Mark the fixing positions through the slots in the backplate, drill and plug wall, then secure back plate in position using screws.
- All necessary electrical connections should now be made. Ensure that the wiring to the back-plate terminals leads directly away from the terminals and is completely enclosed within the back-plate aperture. Wire ends must be stripped and screwed to the terminals so that minimal bare wire is showing.
Wiring Box Mounting
- Fix the back-plate to a flush mounting single conduit box type UA1 (BS4662) using M3.5 x 14 screws. Take care to ensure the opening is adequate and will allow mounting of the unit onto the back-plate. The use of glue, mastic, or other sealants MUST NOT be used to secure the unit to the wall.
- All necessary electrical connections should now be made. Ensure that the wiring to the back-plate terminals leads directly away from the terminals and is completely enclosed within the back-plate aperture. Wire ends must be stripped and screwed to the terminals so that minimal bare wire is showing
New Installations
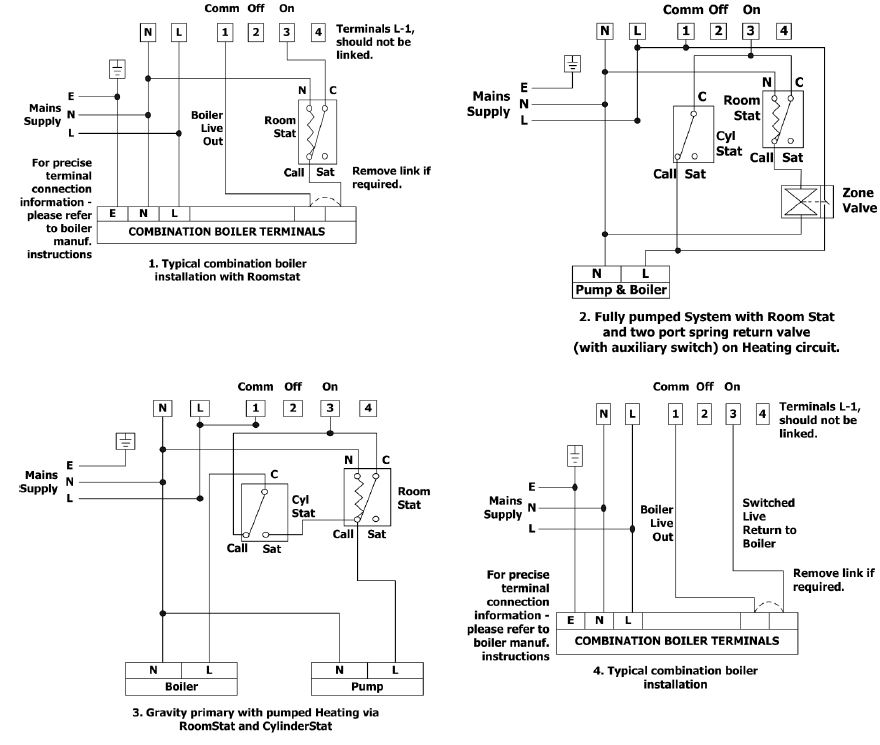
- Example circuit diagrams for typical installations are shown over. These diagrams are schematic and should be used as a guide only. Please ensure that all installations comply with the current IEE regulations.
- For reasons of space and clarity not every system has been included and the diagrams have been simplified, for instance some Earth connections have been omitted.
- Other control components shown in the diagrams i.e. Valves, Room Stats etc. are general representations only.
- However the wiring detail can be applied to the corresponding models of most manufacturers
Cylinder and Room Thermostat Key:
C=Common Call = Call for heat or break on rise SAT = Satisfield on rise N= Neutral
Existing Installations
- Remove old programmer from its back plate mounting loosening any securing screws as dictated by its design.
- Check compatibility of existing back plate & wiring arrangement with that of the new programmer.
- See online Programmer Compatibility Guide for direction.
- Make all necessary changes to back plate & wiring arrangement to suit new programmer
Electrical Connections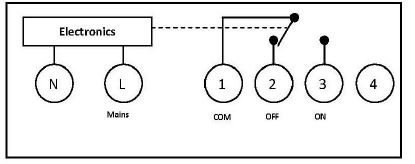
Fitting The Programmer
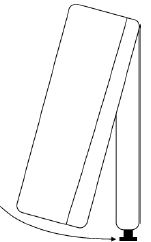
Loosen the two retaining screws on the bottom of the back plate. Now fit the programmer to the back plate, ensuring the lugs of the back plate engage with the slots on the programmer. Swing the bottom of the programmer into position ensuring the connection pins on the back of the unit locate into the terminal slots in the back plate. Tighten the two screws to fix the unit securely
Commissioning
- Use the buttons to ensure correct product functionality.
- Set timing and programme details in accordance with customer requirements.
- Normally unit will be left with channel in ‘Auto’ mode.
- Leave these installation instructions with customer for reference
Reference
Download Manual:
Sangamo PR1n Programmable Thermostat Installation Instructions
Owner’s Manual
Sangamo PR1n Programmable Thermostat Product Specification Guide
Sangamo PR1n Programmable Thermostat User Instructions

Sangamo PR1n Programmable Thermostat Installation Instructions