Lennox S30 Smart Thermostat

FEATURES
This iComfort® S30 Smart Thermostat is an electronic communicating, color display touchscreen and 7-day programmable interface which communicates directly with a Smart Hub. The Smart Hub controller stores system parameters and settings in non-volatile memory (i.e., retains data when electrical power fails or is turned off). After online registration is completed, the system may then be accessed by the homeowner from anywhere using a remote Internet connection via computer or personal communicating device. This home environmental control system also supports:
- Wireless bands 802.11b, 802.11g and 802.11n,
- Lennox wireless point-to-point connection to other iComfort® S30 Smart Thermostat Smart Hubs in home and other mobile devices running the iComfort Thermostat application.
- Three languages are supported (English, Français and Español),
- Smart Away™ – Uses the iComfort Thermostat application to control the home temperature while unoccupied (geo-fencing).
- Feels Like™ – Control the system using outdoor / indoor temperatures and indoor humidity to create the optimal comfortable conditions in the home. Climate IQ™ – Monitors current climate conditions and automatically removes excess humidity when necessary (requires iComfort® outdoor unit),
- Perfect Temperature (Single Set Point) – In non-zoning applications this allows a single temperature setting to be used to cool or heat the home.
- Air conditioning or heat pump units with up to four stages of heat / two stages of compressor operation (2 stages of heat pump heating, 2 stages of auxiliary back-up heating, 2 stages of emergency heating),
- Variable – capacity / multiple – stage heat/cool, universal compatibility (gas/electric/heat pump/air conditioner)
- Dual-fuel capable (iComfort® heat pump only) with two balance points.
- Indoor air quality with time‐based notification of consumables including media filters, UVC bulbs, humidifier pads, and PureAir system catalyst service / replacement,
- iHarmony® zoning system (2 – 4 zones),
- Humidification measurement and control,
- Dew point adjustment control,
- Humiditrol® Enhanced Dehumidification Accessory (EDA),
- Equipment maintenance reminders,
- Heat/Cool mode — Permits control of heating, cooling, humidification, and dehumidification without user involvement,
- All Lennox branded iComfort® outdoor units have a outdoor temperature sensor factory installed,
- Enhance defrost control options for Lennox communicating heat pumps using Intellifrost Adaptive Defrost Control, part number 103369-04 or later.
- Performance reports are available through the homeowner web portal.
- iComfort Thermostat application for your iComfort S30 Smart Thermostat is available for IOS 6.0 and higher (App Store) and Android 4.1 and higher (Google Play)
NOTE – Due to Lennox’ ongoing commitment to quality, features and options, are subject to change without notice and without incurring liability. Improper installation, adjustment, alteration, service or maintenance can cause property damage or personal injury. Installation and service must be performed by a qualified installer and servicing agency.
TEMPERATURE DIAL FEATURE
- A. This is the maximum heat position indicator on the dial. This object will be red/white in color. Selecting this object will bring up temperature adjustment dial for the heat-to setting adjustment.
- B. This is the maximum cool position indicator on the Dial. This object will be blue/white in color. Selecting this object will bring up temperature adjustment dial for the cool-to setting adjustment.
- C. This is the location where no system demand will be active. In figure 1, the example would be any temperature between 73°F and 77°F. For example in figure 1, the system would be off between A and B locations.
NOTE – By default the system is configured not to allow the heating and cooling settings to be any closer than 3°F when the system is running in heat / cool mode (auto-changeover). - D. When there is an active call for heating, this area of the dial will have a red background with yellow and dark red flames animation.
- E. When there is an active call for cooling, this area of the dial will have a blue background with snow flakes animation.
- F. The yellow line indicates the actual room temperature on the temperature dial indicator.
SCREEN ELEMENTS
- A. The square boxes icon which will be referred to in this instruction as the MENU is for accessing notifications and settings.
- B. A circle with a number indicates new notifications. Press on the menu > notifications to display active notifications. Types of notifications included critical, warnings reminders, info and all. This information can also be sorted by last 24 hours, last 30 days, last 12 months and all.
Table 1. Notifications TypesNotification Type Color What it means Critical
Red
Indicates something is broken and needs attention and the system is not operating correctly. Contact your service technician. Warnings
Orange
Indicates an emerging or developing issues that will require attention. One example is excessive run times. Contact your service technician. Reminders
Yellow
Is use for filter, UVA light replacement or maintenance based on either run time calendar schedule. See page 15 for service alert codes. Info Blue Indicates things such as system modes, for example away mode. NOTE – Selecting the ALL option displays all of the above.
Table 2. Reminders (Service Alerts)
Number Value 3000 Filter 1 3001 Filter 2 3002 Humidifier Pad 3003 UV Light 3004 Maintenance 3005 PureAir Maintenance 4001 User Wi-Fi state change, disable 4002 Firmware download failed 4003 Image file download failed - C. This is the current time, day of the week and date (month/day/year). This information can be adjusted from the menu > settings > general > date & time screen.
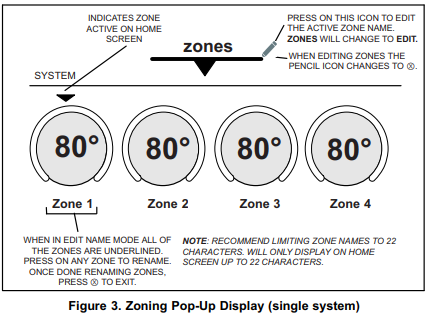
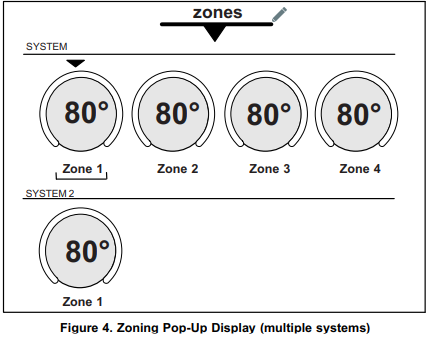
- D. This will be displayed when the system is configured for zoning or more than one iComfort S30 Smart Thermostat is installed in the home. The iHarmony system can support up to four zones. By default the zones are labeled Zone 1, Zone 2, Zone 3 and Zone 4. There are also four dots underneath the name that indicates which zone is being displayed on the HOME screen. Additional dots may be present if a second system is present. The zone being displayed will be a solid white circle. See figures 3 on how to rename each zone. Each zone can also be renamed from menu > settings > iharmony zoning.
- E. This area display various functions that are either pending or currently active. Indicators are humidifying, dehumidifying, cooling, heating, ambient lockout, emergency heat, cleaning air, transitioning to next schedule, load shedding and fan is running. What does the following mean:
- Heating – System is heating the home.
Cooling – System is cooling the home. - Humidifying – If humidification equipment is installed and configured, the system will display this message when adding humidity to the air in the home.
- Dehumidifying – The system may be overcooling the home to help removed excessive humidity in the home as determine by user setting. Go to menu > settings > humidity > and turn on dehumidify. Then adjust the acceptable low and high humidity levels in the home with the dehumidification set-point slider.
- Defrosting – The system is de-icing the outdoor unit coil.
- Emergency heat – All heat pumps operating in northern climates (below 35°F) normally need a supplemental heating source. Usually it is in the form of electric heating provided by the indoor unit. Other sources could be gas, oil, or hot-water back-up systems as well. The supplemental heat is also referred to as “second-stage” or “back-up” heating, with “first-stage” being the heat pump only. Emergency heat is when you use your supplemental heat (2nd stage) by itself, without the use of your heat pump (1st stage heat). Option is not available for non-heat pump systems.
- Aux. heat – Is only available with heat pump system. If outdoor temperature is above the high balance point, only the heat pump will operate (Default 50°F high). If outdoor temperature is below the low balance point, only auxiliary heating will operate (Default 25°F low). If outdoor temperature is in-between the high and low balance point, both the heat pump and auxiliary heat sources can operate.
- Will start soon – This indicates a safety feature to protection the outdoor unit is active. Typical duration before the system will start is five minutes.
- Ambient lockout – This is to keep your heat pump unit from running when outdoor temperature is below -4°F.
- Transitioning to next schedule – The system is following an active schedule and is transitioning to the next temperature setting based on a time indicator.
- Fan is running – This is displaying whenever the system is heating or cooling. See table 3 on page 6 for fan mode descriptions.
- Allergen Defender is working – When Internet weather is enabled and pollen count is high in the home’s location, the fan will run between heating or cooling systems to help clean the air. This feature can be turned on under modes / schedules on the home screen. Select the fan icon located in the upper right-hand of the screen.
- Heating – System is heating the home.
- F. Away – When away icon is touched (manually) the system will automatically use energy saving settings (heat-to 62 and cool-to 85). Temperatures can be adjusted by pressing on the available temperature setting (i.e., heat-to or cool-to). To exit away, press the cancel icon. In a zoning system, all zones are set to a single heat-to and cool-too setting. Note that when manually selecting Away from the home screen that the Smart Away feature (if enabled under settings) will be temporally is disabled until Away is cancelled. See page 10 for further details concerning Smart Away.
- G. Pressing on the heat-to area will allow the temperature setting to be changed. Press on either setting will bring up the temperature adjustment dial.
- H. Pressing on the cool-to area will allow the temperature setting to be changed. Press on either setting will bring up the temperature adjustment dial.
NOTE – If the system is running on a schedule, any adjustment will display the schedule will hold until next period or select duration of hold. Touch hold or duration to select the desired time duration. The hold period can be cancelled by pressing the cancel icon along the right side of the Home screen. - I. This is the location that to select the system mode of operation or run a schedule, fan mode and turn the system off. To exit this screen, press the house icon.
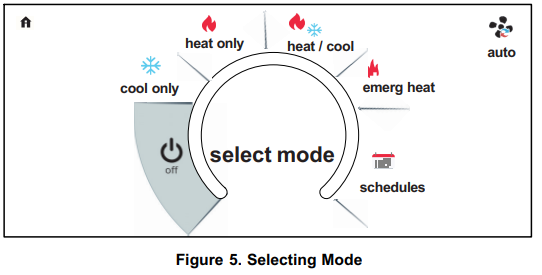
Select Mode
Figure 5 illustrates the various modes of operation. To select a mode for the system or a specific zone, press the desired operation. The gray shaded area indicates the item has been selected.
NOTE – Options are dependent on system configuration. For example, Emerg Heat will be auxiliary heat for heat pump systems only.
Fan Operation
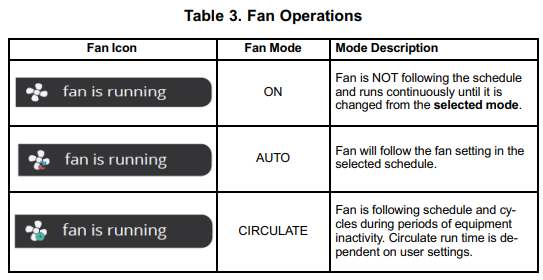
There are three fan modes of operation listed here which are auto, on and circulate. Pressing on the fan icon will allow selection of the desired fan mode.
Table 3. Fan Operations
Schedules
When selecting schedules, the available options are schedule IQ, summer, winter, spring/fall and save energy. Schedules are all predefined and can be change or renamed by selecting edit schedules.
- Schedule IQ – This schedule operating in heat / cool mode and answering a few simple questions will allow the system to know how to set the temperature for the home based on time settings.
By default there are two times and temperature settings which can be adjusted using the edit schedules option. - @ home day – default time is 7:00am and low temperature setting of 67°F and high temperature setting of 80°F. Start time can be adjusted by press on the current time setting and can be adjusted as exampled in figure 6
- @ home night – default time is 11:00PM and low temperature setting of 66°F and high temperature setting of 84°F.
- away – When away from home, Smart Away is used to set the temperature while the home is unoccupied. Default low temperature setting of 62°F and high temperature setting of 85°F.
Temperatures for any of the options above can be adjusted by sliding the low and high temperature circle left or right on the sliding scale.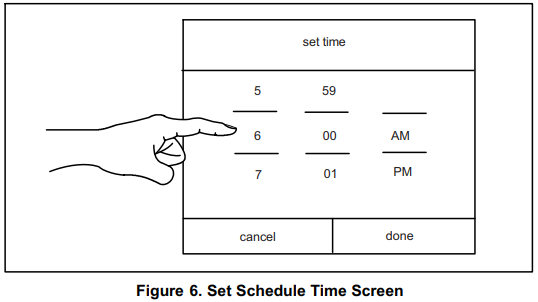
For each time setting, a specific fan operation can be set as well. Options are on, auto and circulate. Other options are rename the schedule and restore defaults. Press the house icon exit the screen.
- J. Indicates the actual mode of operation the system in running.
- K. This is the room temperature and will display inside above the temperature. If the feels like option is enabled, then the word feels like will appear above the number. The feels like feature can be enabled in the user settings area.
- L. This icon and number represents the humidity level inside the home at the thermostat location only. This will only be displayed if enabled in the user settings for display. The rain drop will be displayed as different levels based on humidity percentage detected in the home.
- M.Items that may appear in this area of the screen are as follows:
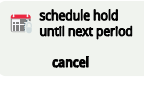 While running a schedule a manual adjustment to the temperature setting is done. To return back to the regular temperature setting govern by the schedule, press cancel.
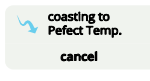 This will only appear in non-zoning system and it indicates the system is set to Perfect Temperature feature. The system was running in cooling mode and turned off to coast to the desired temperature setting.
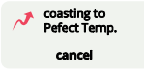 This will only appear in non-zoning system and it indicates the system is set to a single temperature. The system was in heating mode and turned off to coast to the desired temperature setting.
- N. This area of the screen will display either the outdoor temperature or weather forecast depending on how the system is set. The outdoor weather option under menu > settings > display > outdoor weather has to be ON and outdoor temperature is set to either Internet (AccuWeather) or sensor. Press on the weather section of the Home screen to display detail information concerning local weather. The weather displayed is also dependent on the user correctly adding the home info. Go to menu > settings > home info and verify or add the home information.
If only the outdoor sensor is to be used, go to outdoor temperature and set to sensor.
NOTE – If Internet and weather provider are selected, weather information will only be displayed once the iComfort S30 Smart Thermostat has been setup and connected to the Internet.
SETTINGS
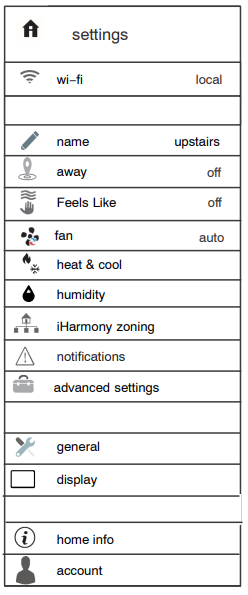
The setting screen will allow the homeowner to connect to their home Wi-Fi router, give the system a name, smart away and feels like features. Fan, heat & cool settings, humidity settings, notifications setup, general, display, home info and account.
WI-FI
This is for connecting the iComfort S30 Smart Thermostat to only a secure home wireless network.
NOTE – A router with Bonjour capabilities is required for this function. Check the router functions if Smart Hubs do not connect. Apple Bonjour® is a implementation of zero-configuration networking (Zeroconf), a group of technologies that includes service discovery, address assignment, and host name resolution.
NOTE – NEVER USE A HOME GUEST ACCOUNT.
NOTE – NEVER USE A OPEN ROUTER CONNECTION (NON-SECURE).
NOTE – ALWAY USE A SECURE CONNECTION PHYSICALLY LOCATED IN THE HOME THAT THE ICOMFORT S30 SMART THERMOSTAT IS BEING SETUP IN.
Access Point is Visible
- Slide the option to ON to enable Wi-Fi.
- Wi-Fi network will show not connected. Press on not connected.
- Select a network will be displayed listing all detected networks within range. Select your home network by pressing on the network name.
NOTE – The iComfort S30 Smart Thermostat can connect to a home wireless router that uses up to 32 characters in the access point name (visible or hidden). - When connecting to a secure home Wi-Fi network, a password will be requested. Enter your home Wi-Fi network password and press join to continue.
NOTE – If you wish to see the characters you are typing, check show password. The iComfort S30 Smart Thermostat will support up to a 63 character password.
Access Point is Hidden
- Slide the option to ON to enable Wi-Fi.
- Wi-Fi network will show not connected. Press on not connected.
- Select other.
- The “enter new network information” screen will appear. Enter the name of the hidden network.
NOTE – The iComfort S30 Smart Thermostat can connect to a home wireless router that uses up to 32 characters in the access point name (visible or hidden). - Select Security. Options are none, WEP, WPA and WPA2. If your home Wi-Fi connection is unsecured, then Wi-FI security must be enabled using WPE, WPA or WPA2 via the router before proceeding. Consult your router documentation on how to enable W-Fi security.
- Once security type is selected, a password field will appear. Enter the password to access your home Wi-Fi network.
NOTE – If you wish to see the characters you are typing, check show password. The iComfort S30 Smart Thermostat will support up to a 63 character password. - Press join.
Whether connecting to a visible or hidden network, if successful, a check mark will appear above both the the router and Internet icons.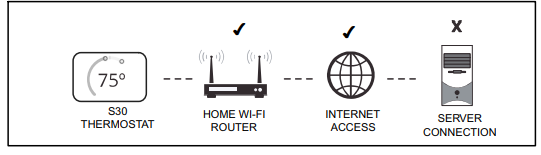
The following terminology is used in this troubleshooting section:
- Received Signal Strength Indication (RSSI). RSSI is an indication of the signal strength of the Wi-Fi router being received by the scanning device (i.e., smart phone). Therefore, the higher the RSSI number (or less negative in some devices), the stronger the signal.
- 802.11a, g and n are wireless networking specification that extends throughput up to 130mbps using the 2.4 GHz band.
- Internet Protocol Address (IP address). This is a numerical label assigned to each device (e.g., computer, printer, thermostat) participating in a computer network that uses the Internet Protocol for communication. An IP address serves two principal functions: host or network interface identification and location addressing.
Electromagnetic Interference Causing Poor Connectivity
Locate both the thermostat and router away from other devices that could possibility interfere with wireless communications. Some examples of other devices that could interfere are:
- Microwave ovens
- Wireless cameras
- Portable phones and bases
- Baby monitors
- Wireless speakers
- Bluetooth devices
- Garage door openers
- Neighbor’s wireless devices.
To eliminate a possible source of interference, temporally disable any devices and see if Wi-FI performance has improved.
Received Signal Strength Indication (RSSI)
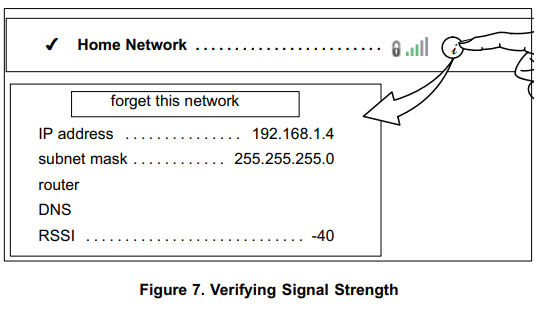
The ideal signal strength range for the iComfort® S30 Smart Thermostat is -1 to -69 RSSI. The signal strength can be viewed from the thermostat interface.
- Press NETWORK SETTINGS; this screen shows a graphical view of buttons representing Wi-Fi options OPEN and SECURE wireless networks and a button for adding a network.
- Select the access point that has already been establish and connected to. When selecting the info icon, a screen will appear which will display an option to forget the network and IP address assigned to the iComfort® S30 Smart Thermostat by your router, sub-net mask, router, DNS and RSSI. If the RSSI signal strength is anywhere between -9 to -69, then the signal strength is sufficient. If outside this range, then either locate the router closer to the thermostat, add a repeater or move the Smart Hub. Adjusting antennas on router and/or Smart Hub may resolve the issue.
HOME INFO
Selecting this option will allow the home information to be verify and corrected if necessary. If the home information is missing then enter the information now. This information is required to registered the system when creating an account. The information is also used to determine the local weather if the outdoor temperature display is set to AccuWeather.
Remove Home
There is also a selection option call remove home. Using this feature will remove the system information from the consumer portal account. This will only remove the system that is currently being access.
ACCOUNT
The account screen will allow the user to setup a account so they may access there system remotely and from the consumer portal. Reasons to create an account:
- To enable remote access to the system using a mobile device with the iComfort Thermostat application installed while away from home. This will allow remote adjustment for temperature settings and other features.
- To enable the Smart Away feature discussed later on in this instruction.
- To directly communicate to the Dealer any issues the system may be incurring.
This menu allows three options:
Using Existing Account
If an account has already been created, then use the sign in option to access your account. Enter your email address and password to connect your system to your online account.
NOTE – The iComfort S30® requires a different account than one that might have been used for the iComfort Wi-Fi®.
Creating a New Account
- Use this option to create an account. Enter your email and desired password to use. Select create new account.
- The new account screen will appear. Enter your first name, last name and phone number (optional).
- Enter an email address and repeat to verify email address.
- Create a password under the set password location. Retype the password to verify.
- Check the box that will allow your dealer to receive service alerts and possibility fix your issue remotely (recommended).
- Check that you agreed to the Lennox EULA. Press on LENNOX EULA to read the end-user license agreement.
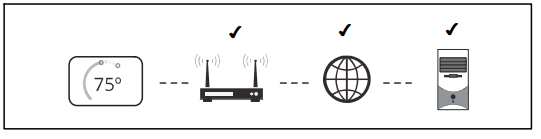
If the setup and connection to the Lennox server is successful, a green check mark will appear above the server icon under the wi-fi menu option.
Generate Pin
If you do not wish to create your account using the Creating a New Account screen, then you will need to select the Generate Pin option and write down the pin number that appears on the screen. The pin number will be use to associate your system to your user account. First create your account using either the iComfort Thermostat application (mobile application) or consumer website. The first time you login into your account the screen will indicate no iComfort detected. Press on the thermostat image and enter your pin number and press add. If you enter the number incorrectly the screen will indicate the number entered is invalid. Retry again. When successful the setup will continue on to the next applicable screen. If you are adding a additional system to your account, press on the menu and select add iComfort.
NOTE – The generate pin option is not required if the account is setup from the thermostat or if this is a new additional system, login to the account from the new thermostat
Move Out
There is also a selection option after the account is setup and active which is call move out. Using this feature just like the remove home feature will remove the system/home address information from the consumer portal account or mobile application. This will only remove the system that is currently being access. Your account is still valid.
AWAY
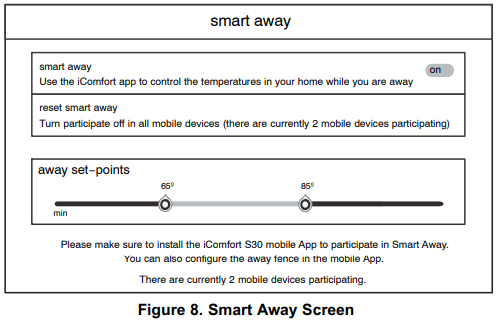
Away (Smart Away) is a feature that can be enabled once you have created and registered your account. Both Home Info and Account menu options must be completed for this option can be enabled. Once enabled, you can set the low and high temperature setting when smart away determines that no one is home. The Smart Away feature depends on the iComfort Thermostat application running on your mobile device (smart phone or tablet). Note that when Away is selected on the home screen (manually), that Smart Away is disabled until Away is cancelled from the home screen.
Smart Away can also be enable from your mobile device once you have install the Lennox iComfort Thermostat app and login. Go to the menu > settings > away and turn ON smart away. To allow the mobile device you are on to use this feature, turn ON participate. The away fence option will appear and by default the setting is for one mile. The range for this setting is .025 to 4 miles.
It is also recommended to enable location services on your mobile device to enhance the location accuracy when traveling away from home. Consult you mobile device user guide for instructions on how to perform this task.
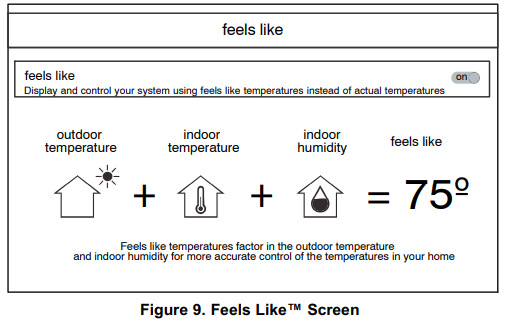
FEELS LIKE™
The “feels like” feature uses a combination of outdoor and indoor temperatures, indoor humidity to comes up with the “feels like” comfort level in the home.
NOTE – Feels like is not a temperature setting but the temperature that the space feels like based on current indoor temperature and humidity. To adjust Feels Like, lower either or both temperature and indoor humidity percentage settings.
FAN
- Allergen Defender: When Internet weather is enabled and pollen count is high in the home’s location, the fan will run between heating or cooling systems to help clean the air. This feature can be turned on under modes / schedules on the home screen. Select the fan icon located in the upper right-hand of the screen.
- Fan Mode Options: When the circulate option is selected under the home screen modes / schedules screen. This will allow adjustments between 9 to 27 minutes on how long the air will circulated each hour. The circulate option runs during any mode selected except when the system is turned off.
HEAT & COOL
This screen allows changes to how the system operates. Options are single set-point, heat pump mode (normal or comfort), auxiliary heat and safety protection.
- Perfect Temperature: Option will only be available in non-zoning systems. This option allows the user to control both heating and cooling temperatures with one single temperature setting. Default is off.
- Select Heat Pump Mode: (only available with system using a heat pump). Options are normal and comfort. Default is normal. Descriptions for what each setting does is displayed on the screen.
- Wider Set-Point Range: Changes the default low and high maximum temperature setting from 60-90°F to 40-99°F.
- Auxiliary Heat: (only on heat pump systems): Additional heat source will be used automatically when the indoor temperature drops to temperature that can be adjusted using the slider temperature setting tool.
- Safety Protection: Alerts you if the house gets too cold or hot which is set under this menu option on the setting for both low and high temperatures. The system will automatically turn on either cooling or heating if the home’s interior temperature reaches either the low or high setting. A notification is also sent to the Home screen notification area and iComfort Thermostat application.
MORE ON AUXILIARY HEAT
Auxiliary heat:
Is the use of an additional heating source to help or run when the heat pump BTU capacity is not enough to keep up with the home heating demand; sometimes it is also called supplemental heat.
When used in a dual-fuel mode auxiliary heating is accomplished with a gas or oil fired unit. In this mode of operation the heat pump must shut down and uses just the auxiliary heating unit for heating.
If the system is an air handler with electric heat, the auxiliary heat will be in conjunction with the heat pump when the home heating requires it.
Another use of auxiliary heating with electric systems that include a setting called balance points. Balance point put limits on when the heat pump and electric heat will work together or independently. When the outdoor temperature is above the default high balance point of 50°F (default), only the heat pump will be allowed to run (no auxiliary heat will be allow to run). When the outdoor temperature is below the default low balance point of 25°F (default), only the auxiliary heat source is allowed to run (no heat pump operation). When the outdoor temperature is between the low and high balance point settings, then either or both heat sources are allowed to run.
HUMIDITY
Some options that are available under this section are dependent on whether humidification or dehumidification accessories are installed. In addition, modulating outdoor units (XC20, XP20, XC25 and XP25) will affect availability of various menu options as well. Possible options are:
HUMIDITY CONTROL
- off
- humidity (option available when humidification accessory is installed)
- dehumidify
- humidify + dehumidify (option available when humidification accessory is installed)
HUMIDIFICATION CONTROL CENTER
When humidify is enabled, the options are as follows and are dependent on equipment type and accessory installed.
- Normal — Recommend for moderate climes. Runs the humidifier when there is a call for heat and humidification.
- Max — Recommend for drier climates. Runs the humidifier when there is a call for humidification only.
DEHUMIDIFICATION CONTROL CENTER
When dehumidify is enabled, the options are as follows and are dependent on equipment type and accessory installed.
- Normal — Recommend when the air outside is not too humid.
Max —- Single and Two-Stage Outdoor Units or Modulating outdoor units without a Discharge Air Temperature Sensor (DATS) Installed. Recommend when outdoor air is excessively humid. May cool your home below the set temperature.
- Modulating Outdoor Units with DATS installed. Recommended when outdoor air is excessively humid. Adjusts cooling based on duct sensor data. May cool your home below the set temperature.
- Climate IQ (Auto) — Automatically adjusts fan speeds and cooling power based on local climate conditions, using Climate IQ technology. May cool your home below the set temperature.
OVERCOOLING
Slide bar adjust with a range of 0°F to 4°F. Only available when Max or Climate IQ (Auto) is selected.
DEHUMIDIFICATION SET POINT
Slide bar adjust with a range of 40% to 60%.
HUMIDIFICATION ACCESSORY INSTALLED
- Humidity Control: Options are off, humidify, dehumidify and humidify + dehumidify when a humidifier is installed. When installed, a dew point adjust bar option will appear under the humidity menu. By default the dew point adjust bar is set to OFF.
HUMIDIFY
- When Humidify is selected, options under Humidification Control Center are normal, max and dew point option to ON or OFF. Default is OFF..
- Humidification set-point are adjustable. Range is 15% to 45% humidity. Default is 40%.
- When dew point is set to ON, the slide bar adjust appears with a valid range of -15% to 15%. Default is 0%. The humidification set-point adjust bar will disappear.
DEHUMIDIFY
- When Dehumidify is selected, options under Dehumidification Control Center – Depending on hardware configuration the following options are normal, max and Climate IQ (Auto).
- In addition, dehumidification set-point is adjustable. Range is 40% to 60 %humidity. Default is 50%.
HUMIDIFY + DEHUMIDIFY
- When Humidify + Dehumidify is selected, options under Humidification Control Center are normal and max
- Options under Dehumidification Control Center – Options are normal, max, and depending on hardware configuration Climate IQ (Auto).
- In addition, when dew point is off, the option for dehumidification set-point is (left) + humidification set-point (right) are adjustable. Range is 15% to 60 % humidity.
- When dew point is set to on, the option is low and high dew point range setting. Range is -15% to 15%. Dehumidification set-point slider bar will disappear.
Table 4. Humidity Control Modes of Operations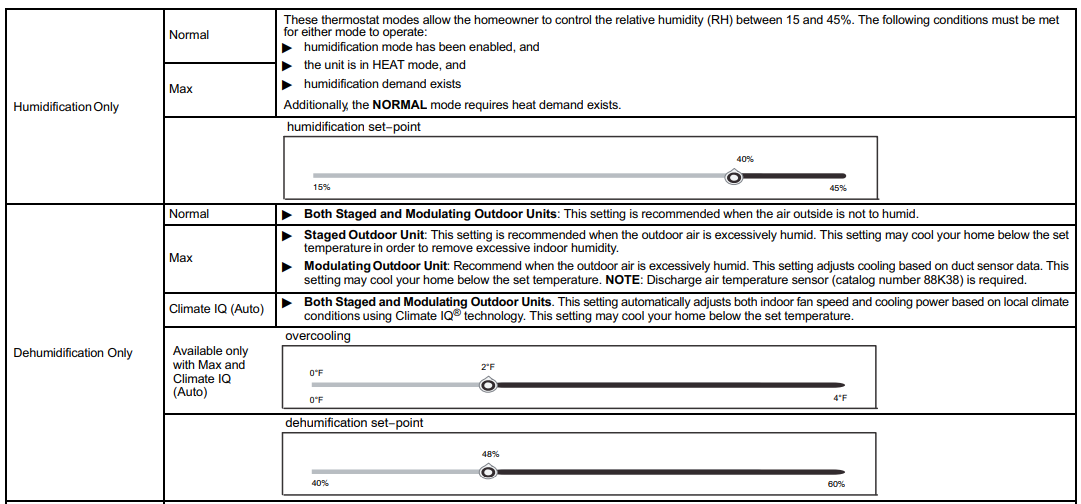
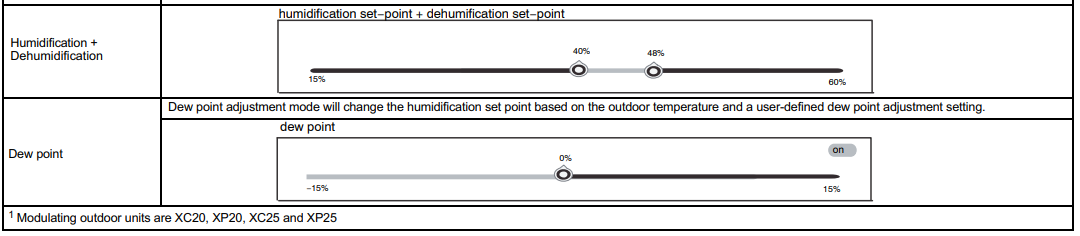
NOTE – The above information is applicable only for non-zoning systems. For the iComfort S30 Smart Thermostat using firmware version 3.15 or later. There is no dehumidification capacity in zoning systems.
IHARMONY ZONING
- Zoning: This section allows the user to turn ON or OFF zoning. If zoning is automatically detected by the system, the default is ON.
- Zones 1 through 4: Pressing on the right arrow will bring up a screen so that each zone can be renamed if desired.
NOTIFICATIONS
The section allow the user to setup reminders for various accessories. By default all listed items are disabled. The reminders can be set for 3, 6, 12 , 24 months can a custom reminder by specific date.
ADVANCED SETTINGS
This section is for installers and technicians ONLY to customized system settings and run various diagnostic tests.
- View dealer control center – allows installers and technicians to perform custom configurations tailor for the homeowners unique requirements.
- Restart – Options are to restart Smart Hub or thermostat or both.
- Pair Smart Hub to iComfort dealer mobile app – this allows a installer to pair their mobile device to start the initial commissioning of the system or technician to use a mobile device to perform custom configurations or troubleshooting.
GENERAL
This section provides information and setting changes for various displayed items.
About
This page will provide detailed information concerning the HD-Display (thermostat info) and Smart Hub. Information provided are model number, serial number, hardware, software and Wi-Fi revisions.
In addition, for thermostat and Smart Hub, a software update option is listed. Select software update for either and here you and set Automatic Updates to YES or NO (default is ON). You can also select check for updates now.
Dealer Info
This page will display or allow information to be changed concerning the dealer. Items included on this page are name, address1, address2, city, state, zip code, country/region, phone, email and website. There is a dealer access option at the bottom of the page. Press the > button to access the dealer access page.
Dealer Access
- Remote View: This option allows the dealer access to remotely view your system only. Options are ON and OFF. Default is OFF.
- Remote Control: There are two options under this section, OFF and ON/ALWAYS. Selecting the desired option will place a green check mark next to the feature.
- Alerts and Notifications: Default is OFF. Turning on this feature will allow automatic notification to your dealer that your system needs maintenance.
Screen Lock
There are three options for screen locking. Default is unlocked.
- Unlocked – Changes can be made to any settings.
- Partially Unlocked – Screen is locked but temperature settings can be changed.
- Locked – No changes can be made.
To unlock partially locked or locked, press anywhere on the screen and hold for five seconds.
Date & Time
The following items can be set on this screen:
- This page will allow the clock to be changed to 24 hour (military). Default is ON.
- The following settings are only available if the system is not connected to the Internet. At the bottom of the screen a message indicating “your thermostat is not connected to the Internet – you can set the day and time manually.”
- Daylight Savings – ON or OFF. Default is ON.
- Time Zone: Options are Pacific, Mountain, Central and Eastern. Default is Central. Select time zone and press SET.
- Set Time – Local time can be adjusted. Press SET to finish.
- Set Date – Current date can be set. Press SET to finish.
NOTE – If the system is connected to the Internet, only changing to 24 hour clock can be selected.
Language
This allow the language used on the screen to be changed. Options are English, French and Spanish. Default is English.
DISPLAY
The following setting options available are:
- Outdoor Weather – Turn ON to display weather on the HOME screen.
- Outdoor Temperature Display – Options are:
- Internet (AccuWeather) – Will display weather from provided by AccuWeather for the local area based on the homeowner zip code. NOTE: Thermostat has to be connected to the Internet and system is registered and you are logged into myicomfort.com for this feature to work. See menu > system settings > account to verify.
- Sensor – Display outdoor temperature only from installed remote outdoor sensor.
- Outdoor Air Quality – Turn ON to display outdoor air quality on the weather screen.
- Indoor Humidity – Turn ON to display indoor humidity above the indoor temperature on the HOME screen.
- Proximity Sensor – When turned ON, the display will wake up automatically upon approach.
- Screen Saver – Options for this feature are:
- Off – Screen is on all the time.
- Weather – If turned on, will allow up to 26 animated weather screen savers based on the AccuWeather outdoor weather forecast for the local zip code. NOTE: Thermostat has to be connected to the Internet and system is registered and you are logged into myicomfort.com for this feature to work. See menu > system settings > account to verify.
- Power Save – Screen is blank until the screen is touched or activated by proximity sensor if enabled.
- Logo – Displays the Lennox Logo.
- Screen Brightness – Options are ON or OFF.
- If set to ON, control of screen brightness is automatically controlled by the system.
- If set to OFF screen brightness can be adjusted using the sliding scale adjustment tool.
- Temp Scale – User can set to either Fahrenheit or Celsius temperature display.
- Clean Screen – Locks out screen and allows user 30 seconds to clean the screen. During this period, the screen will not respond to any touches.
USING THE SECURE WEB PORTAL
Access all the great Wi-Fi enabled features on your iComfort® thermostat from our secure web portal. www.myicomfort.com
After signing in, you will be able to view your iComfort system settings, adjust the temperature and view reminders and alerts – just as you would on your iComfort thermostat at home. With a familiar look and settings this simple, you should feel right at home.
From the web portal welcome page, you may also click on links to launch an interactive demo or learn more about iComfort.
MOBILE APPLICATIONS
iComfort® Thermostat (Homeowner)
The free iComfort® Thermostat app is available for use on iPhone®, iPad® and Android™ devices.
Apple, the Apple logo, iPhone and iPad are trademarks of Apple Inc. registered in the US and other countries..
Android is a trademark of Google Inc. Use of this trademark is subject to Google permission.
SERVICE ALERT CODES
| # | Value | # | Value | # | Value | # | Value | # | Value |
| 3000 | Filter 1 | 3002 | Humidi fier Pad | 3004 | Main tenance | 4000 | User Wi-Fi state change, disable | 4002 | Image file down load failed |
| 3001 | Filter 2 | 3003 | UV
Light |
3005 | PureAir Main tenance | 4001 | Firmware download failed |
FCC COMPLIANCE STATEMENT —
PART 15.19 This device complies with Part 15 of the FCC Rules.
Operation is subject to the following two conditions:
- This device may not cause harmful interference, and
- This device must accept any interference received, including interference that may cause undesired operation.
FCC INTERFERENCE STATEMENT — PART 15.105 (B)
This equipment has been tested and found to comply with the limits for a Class B digital device, pursuant to Part 15 of the FCC Rules. These limits are designed to provide reasonable protection against harmful interference in a residential installation. This equipment generates, uses and can radiate radio frequency energy and, if not installed and used in accordance with the instructions, may cause harmful interference to radio communications. However, there is no guarantee that interference will not occur in a particular installation. If this equipment does cause harmful interference to radio or television reception, which can be determined by turning the equipment off and on, the user is encouraged to try to correct the interference by one of the following measures:
- Reorient or relocate the receiving antenna.
- Increase the separation between the equipment and receiver.
- Connect the equipment into an outlet on a circuit different from that to which the receiver is connected.
- Consult the dealer or an experienced radio/TV technician for help.
RF EXPOSURE INFORMATION
This equipment complies with FCC radiation exposure limits set forth for an uncontrolled environment. In order to avoid the possibility of exceeding the FCC radio frequency exposure limits, human proximity to the antenna shall not be less than 20cm during normal operation.
References:
Download Manual
Lennox S30 Smart Thermostat User Guide
OTHER MANUAL
Lennox S30 Smart Thermostat Installation and Setup Guide
Lennox E30 Smart Thermostat Installation Guide
