
klima C16 WiFi ELECTRIC THERMOSTAT

Introduction
Study this manual carefully and keep it with the warranty documents. The connection must be carried out by a qualified fitter in accordance with local regulations. Before mounting or dismounting the thermostat, always switch off the electricity in the meter cupboard. This thermostat can be mounted in a single flush-mounting box 50 mm deep in accordance with standard DIN formats. These regulations describe the C16 Basic and the C16 WiFi version.
Technical Specifications
- Voltage: 230V – 50/60 Hz
- Max. load: Max. 16 Amp / 230V
- Standby voltage: C16 Basic: 1W / C16 WiFi: 2W
- Temp. range: +5/+40ºC
- Housing: IP21
- Standard colour: Polar white (RAL 9010)
- Sensor: Floor sensor and build in Air sensor
- Warranty: 2 years manufacturer’s warranty
- Approvals: FI / CE
- Manufacturer: MHGroup B.V. Netherlands
Dimension

Assembly
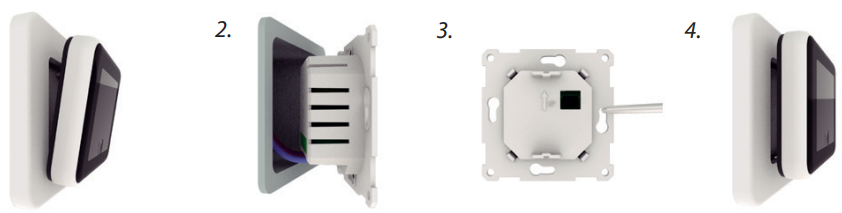
- Press with your fingers at the top of the display and pull it towards you.
- Connect the thermostat according to the connection diagram (point 4).
- Mount the thermostat on the flush-mounting box.
- Put the frame on it and click the display back into place.
Wiring diagram
- Connection must be carried out by a qualified fitter in accordance with local regulations.
- Before mounting or dismounting the thermostat, always switch off the electricity in the meter cupboard.
- Recommendation: Keep the maximum load around 90% of the 16A to extend the service life.

- FLOOR SENSOR: Floor sensor connection
- ROOM OUT SENSOR: External room sensor connection
- N1: Heating cable connection wire
- L1: Heating cable connection wire
- N: Power supply (Neutral)
- L: Power supply (Phase)
- EARTH: Connect the earth of the heating cable and the earth of the power supply outside the thermostat using the supplied terminal block.
Order HEATING L or N does not apply.
Explanation of symbols
When the thermostat is connected, turn the on/off switch down to turn the thermostat on. The thermostat is operated by means of the 3 touch-sensitive buttons on the bottom of the screen and has a series of fixed symbols in the display.


- Confirm (touch-sensitive key)
- Down (touch-sensitive key)
- Up (touch-sensitive key)
- WiFi indicator
- Hello
- Clock
- Room temperature
- Floor temperature
- Set up

- Current temperature
- Heating
- Percentage
- Current period (Smart Mode)
- Key lock
- Frost protection mode
- Manual mode
- Office
- House
- At the first startup, the following settings need to be entered. With the WiFi version it will be updated automatically after connection.
Clock (CLK)
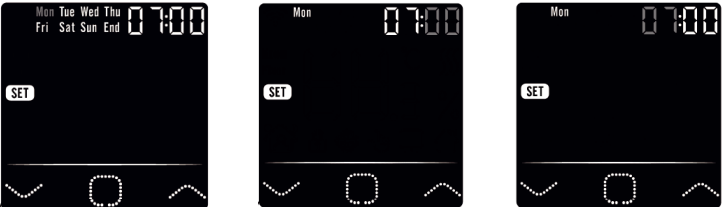
- Choose Day
- Choose Hour
- Choose Minutes
Sensor selection (5 options)
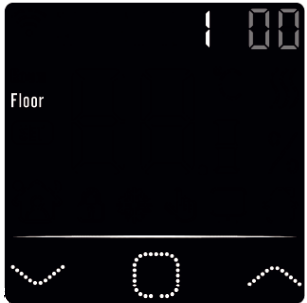
- Floor sensor
- Room sensor
- Room sensor with floor sensor limit
- External room sensor
- External room sensor with floor sensor limit
Limit floor temperature
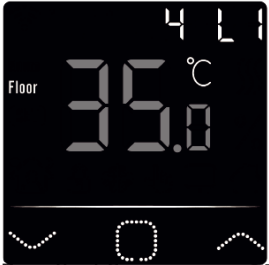
- For tiled floors up to 35 degrees.
- PLEASE NOTE: For wooden floors set to a maximum of 28 degrees!
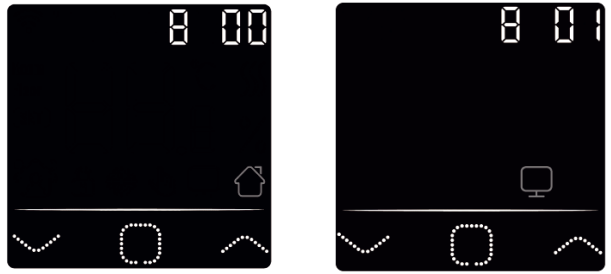
Home or office situation (00 = Home, 01 = Office)
WiFi Connection (C16 WiFi version only)

- Step 1: Download the App via the QR code or by searching for “Warmme” in the App Store or Google Play store.
- Step 2: Start the App and create or log in with an existing account.
- Step 3: Click on “Add device” at the bottom of the screen.
- Step 4: Make sure the WiFi symbol on the thermostat is flashing.
- Step 5: Fill in the WiFi network password on the smartphone and click “Confirm”.
- Step 6: Click “Done” after the App has connected to the thermostat and the connection is complete.
- Step 7: You can check, adjust or set the current temperature, turn the thermostat on or off and perform other operations from the main screen on your smartphone.
You can use the App to give other people in your family access to or exclude multiple thermostats.
Function and operation
Temporary temperature
- On the main screen, press
 or
or  to set the temporary temperature. This temporary temperature is active until the start of the next heating period.
Mode
On the main screen, press to select the following modes:

- Smart mode: This is the default mode. The thermostat operates on the basis of the set heating schedule in order to save energy.
- Manual mode: Thermostat operates on the basis of the manually set temperature.
- Frost protection mode: The thermostat will operate with the low set temperature. The maximum is 15oC.
Key lock
- Lock all keys to prevent settings from being changed. On the main screen, press and simultaneously for 3 seconds to lock or unlock.
Menu
On the main screen press and hold for 3 seconds to activate the menu.
- CLK: Set day and time (8.4.1)
- EVE: Set schedule (8.4.2)
- READ: Read consumption in % (8.4.3)
- SET: Advanced settings (8.4.4)
- END: Return to main screen
Clock (CLK)
- Day, hour and minutes can be adjusted here via or and confirmed with .
- With the WiFi version it is automatically updated after connection.
Programming periods (EVE)
In MENU, press or to select EVE. The standard program can be adjusted on the thermostat via or . Each choice can be confirmed with .
- First choose the day via or (This can be done per day or as a cluster monday to friday and saturday/sunday separately).
- Then choose an event:
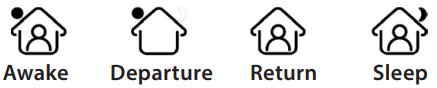
- Next step is to set the (start or end time).
- Then you can choose the desired temperature. The difference between the desired temperature and the lowering temperature may be approx. 3oC as main heating and max. 5oC as auxiliary heating.
Repeat this until all periods and days have been programmed. If you have a WiFi thermostat, you can do this easily via the App.
Standard program for home use:
| Home | Start period 1
|
Eind period 1
|
Start period 2
|
Eind period 2
|
| Mon – Fri | 06:00
20.0oC |
08:30
15.0oC |
17:00
20.0oC |
23:00
15.0oC |
| Sat – Sun | 06:00
20.0oC |
08:30
20.0oC |
17:00
20.0oC |
23:00
15.0oC |


Standard program for office use:
| Office | Start work day
|
End work day
|
| Mon – Fri | 07:00
20.0oC |
18:00
15.0oC |
| Sat – Sun | 07:00
20.0oC |
18:00
15.0oC |

Consumption (READ)
- Displays the warm-up time (in percent) within a given period (1.30 or 365 days). In MENU, press or to select READ.
- Press o to view the previous day’s consumption. Press or to display the consumption of 1 day, 30 days or 365 days.
Example
- The consumption is 20% and the installed power 300 Watt 20% x 300Watt = 60 Watt consumption per hour.
- 60W x 24 hours = 1.440 Watt consumption per day.
- Press to return to the main menu.
Advanced Settings (SET)
- PLEASE NOTE: Settings in this menu may only be adjusted in consultation with the supplier/installer to prevent unwanted results.
- In MENU, press or to select SET.
- Sensor selection
- Room temp. calibration
- Floor temperature calibration
- Floor temperature limit
- Schedule selection
- Used for heating or cooling
- Intelligent function. This function ensures that the requested temperature has already been reached when the period starts.
- Location: Select Home or Office
- Reset to factory settings
Each setting can be adjusted via or and confirmed with .
Full Schedule
| No. | Function | Default setting | Options |
|
1. |
Sensor selection |
00: Floor sensor |
00: Floor sensor
01: Room sensor 02: Room sensor with floor sensor limit 03: External room sensor 04: External room sensor with floor sensor limit |
| 2. | Room temperature calibration | 0.0oC | -5.0oC – 5.0oC |
| 3. | Floor temperature calibration | 0.0oC | -5.0oC – 5.0oC |
| 4. | Limit floor temperature | 35.0oC | 20.0oC – 50.0oC |
|
5. |
Schedule |
00: 7 days |
00: 7 days
01: Mon to Fri + Sat + Sun |
|
6. |
Used for |
00: Heating |
00: Heating
01: Cooling (only for water-based systems) |
|
7. |
Intelligent function |
00: On |
00: On
01: Off |
|
8. |
Location |
00: Home |
00: Home
01: Ofice |
|
9. |
Reset |
00: Nee |
00: No
01: Reset |
Open window detection
This function only works if the room sensor or room sensor with floor sensor limit is connected and selected (see point 6). This function switches the thermostat off automatically for 15 minutes when it detects a rapid drop in temperature.
Error messages
- E1: Room sensor fault
- E2: Floor sensor fault
- E3: Sensor error external sensor
Reference
Download Manual:
klima C16 WiFi ELECTRIC THERMOSTAT User Manual
Other Manual:
klima C16 WiFi ELECTRIC THERMOSTAT Instruction Manual