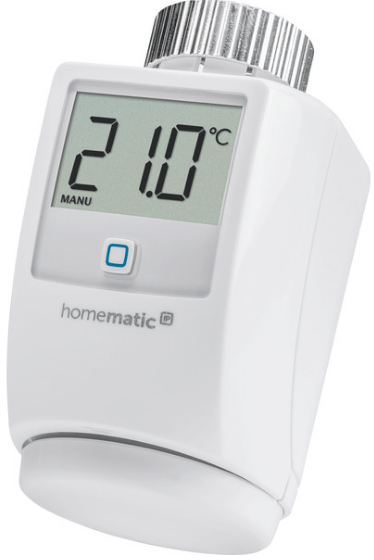
Homematic 105155 Wireless Radiator Thermostat
Information about this manual
Read this manual carefully before beginning operation with your Homematic components. Keep the manual handy for later consultation! If you hand over the device to other persons for use, please hand over the operating manual as well.
Symbols used:
Attention! This indicates a hazard.
Note: This section contains important additional information.
Note: This section contains additional important information about using the device in connection with the Homematic Central Control Unit.
Note: This section contains additional important\ information about using the device in connection with the QIVICON Home Base.
Hazard information
Warning
- The device may only be operated indoors and must be protected from the effects of damp and dust, as well as solar or heat radiation.
- Using the room thermostat for any purpose other than that described in this operating manual does not fall within the scope of intended use and shall invalidate any warranty or liability.
- This also applies to any conversion or modification work. This device is intended for private use only.
- The device is not a toy; do not allow children to play with it. Do not leave packaging material lying around, as it can be dangerous in the hands of a child.
- Do not open the device: it does not contain any components that need to be serviced by the user.
- In the event of an error, please return the device to our service department.
- The system is only suitable for control of heaters (radiators, convection heaters, heater bars) heated by heat carriers.
- Any other use, e.g. on cooling systems, in-floor heating, etc., is not permitted and can lead to severe damages.
Scope of supply
- 1 x Homematic Room Thermostat (HM-TC-IT-WM-W-EU)
- 2 x plugs
- 2 x adhesive strips
- 2 x screws 3.0 x 30 mm
- 2 x LR03/micro/AAA batteries
- 1 x operating manual
Operation and display
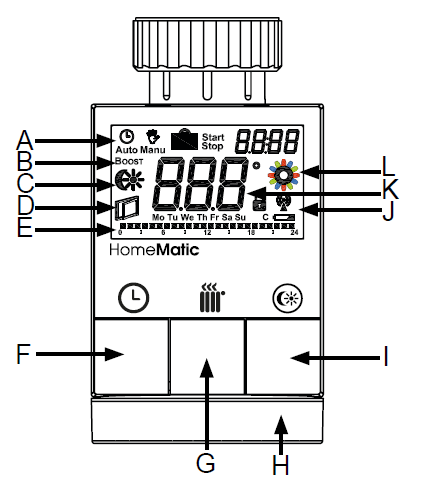
Display symbols and device buttons have the following meaning and functions:
- A Auto mode (
 ) manu mode (
  ), holiday mode (
 ), date/time (
 )
) - B Boost function ( BOOST)
- C Comfort / eco temperature (
 )
) - D Open window function (
 )
) - E Bar chart of programmed heating phases of current day
- F Auto / manu button ( ): Switch between auto, many and holiday mode
- G Boost button (
 ): Activate the boost function; confirm, start teach-in procedure
 - H Handwheel: Temperature settings; select and set menu items
- I Comfort / eco button (
 ): Switch between comfort and eco temperature
 - J Operating lock (
 ), antenna symbol (radio synchronic ity) (
  ), empty battery symbol (
  )
) - K Display of setpoint or actual temperature and humidity
- L Activity symbol

Function
With the electronic Homematic Wireless Radiator Thermostat the room temperature is conveniently regulated according to individually tailored heating phases. Therefore, the radiator thermostat directly controls the heat flow of the radiator. Temperature can be automatically reduced during ventilation using the integrated open-window detection or a Homematic Window Contact that can be taught-in. The radiator thermostat fits to all common radiator valves and is easy to mount – without having to drain any water or intervene in the heating system. With the additional Boost function the heating valve opens and cool rooms are heated within short. The radiated heat immediately provides a pleasant temperature in the room.
General information about the Homematic system
This device is part of the Homematic home control system and works with the bidirectional Homematic wireless protocol. All devices are delivered in a standard configuration. The functionality of the device can also be configured with a programming device and software. The additional functions that can be made available in this way and the supplementary functions provided by the Homematic system when it is combined with other components are described in the Homematic WebUI Manual. You can find the latest versions of all technical documents and the latest updates at: www.homematic.com
General information about radio operation
Radio transmission is performed on a non-exclusive transmission path, which means that there is a possibility of interference occurring. Interference can be caused by e.g. switching operations, electrical motors or defective electrical devices.
The range of transmission within buildings can differ greatly from that available in the open air. Besides the transmitting power and the reception characteristics of the receiver, environmental factors such as humidity in the vicinity have an important role to play, as do on-site structural/ screening conditions.
Hereby, eQ-3 AG declares that this device conforms with the essential requirements and other relevant regulations of Directive 1999/5/EC. The full declaration of conformity is provided under www.homematic.com.
Start-up
Inserting (replacing) batteries
To insert or replace the batteries, proceed as follows:
- Remove the battery compartment cover by pushing it backwards.
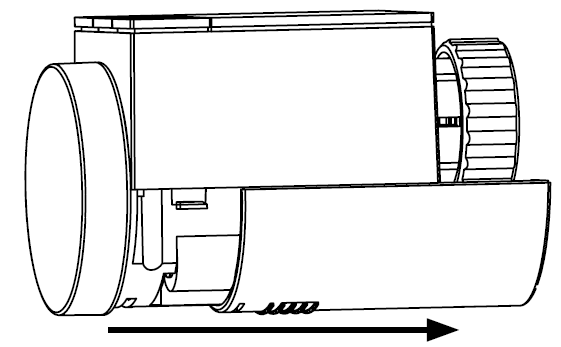
- Insert 2 new LR6 (Mignon/AA) batteries in the battery compartment, making sure they are the right way round.
- Reattach the battery compartment cover and latch it into place.
Information
- A battery symbol ( ) indicates that the batteries need to be replaced.
- The service life of new alkaline batteries is approximately two years.
- This device does not support operation with rechargeable batteries.
- Never recharge standard batteries. Do not throw the batteries into a fire. Doing so will present a risk of explosion. Do not short-circuit batteries.
- There is a risk of explosion if the battery is not replaced correctly. Used batteries are not to be disposed of with the household waste! Instead, take them to your local battery disposal point
Setting the date and time
- After inserting or replacing batteries the firmware version number will be shown briefly. Accordingly, date and time will be requested automatically.
- Set the year, month, day, hour and minute with the handwheel and confirm with the Boost button ( ). The motor moves the control pin backwards during the setting of date and time.
- If „InS“ and the rotating activity symbol „ “ are displayed, the motor still reverses. If only „InS“ is shown in the display, the radiator thermostat can be mounted on the valve (see sec. „7.3 Mounting on a radiator“).
- The radiator thermostat can be configured already before installation. Therefore, press the Auto/Manu button ( ) longer than 3 seconds, while „InS“ is still displayed. For further details, please see sec. „14 Configuration menu“. After finishing the configuration, „InS“ is displayed again and the radiator thermostat can be mounted (see sec. „7.3 Mounting on a radiator“).
- Date and time can be adjusted via the configuration menu also after installation.
- If the device has already been taught-in to a Central Control Unit or to another radiator thermostat, the radiator thermostat will be receiving date and time from one of there devices. In this case, entering date and time will not be requested.
Mounting On A Radiator
The Homematic Radiator Thermostat is easy to install, and can be done without draining heating water or intervening in the heating system. No special tools are required, nor does the heating have to be switched off. The union nut attached to the radiator thermostat can be used universally and without accessories for all valves with a thread size of M30 x 1.5 from the most popular manufacturers such as
- Heimeier
- MNG
- Junkers
- Landis&Gyr (Duodyr)
- Honeywell-Braukmann
- Oventrop
- Schlösser
- Comap
- Valf Sanayii
- Mertik Maxitrol
- Watts
- Wingenroth (Wiroflex)
- R.B.M
- Tiemme
- Jaga
- Siemens
- Idmar
By means of the adapters in the delivery, the device can be installed on radiator valves of type Danfoss RA, Danfoss RAV and Danfoss RAVL.
Removing the old dial
In case of visible damage of the existing radiator, valve or heating pipes, please consult a specialist.
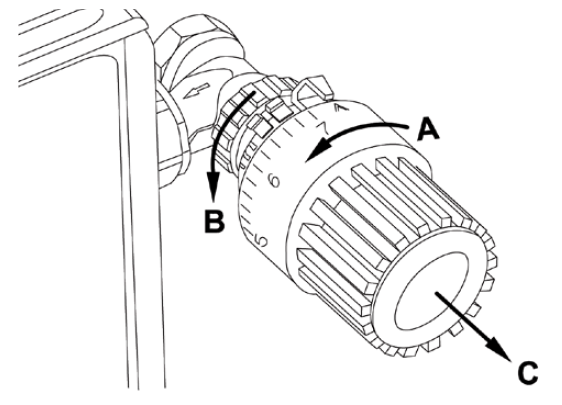
Rotate the thermostat dial to the maximum value (A) (anti-clockwise) (see fig. p. 67). The thermostat dial then no longer presses against the valve spindle, making it easier to remove. There are different ways of fixing the position of the thermostat dial:
- Union nut: Unscrew the union nut in an anticlockwise direction (B). The thermostat dial can then be removed (C).
- Snap-on fastenings: Thermostat dials that have been attached using this method can be easily released by giving the lock/union nut a slight turn in the anticlockwise direction. The thermostat dial can then be removed (C).
- Compression fitting: The thermostat dial is held in place by a mounting ring which is held together with a screw. Slacken this screw and remove the thermostat dial from the valve (C).
- Threaded connection with set screw: Slacken the grub screw and remove the thermostat dial (C).
Adapter for Danfoss
- One of the provided adapters is needed to attach to Danfoss valves.
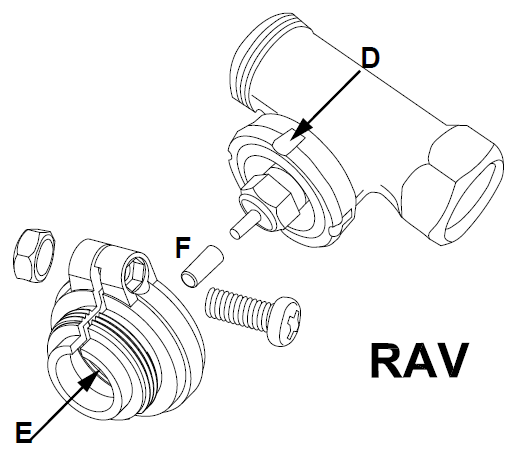
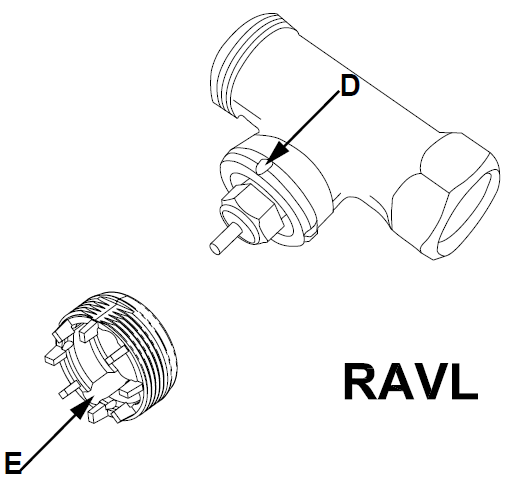
- The assignment of the suitable adapter ring to the relevant valve can be found in the following illustrations.
- Please ensure that you do not trap your fingers between the two halves of the adapter!
- The Danfoss valve bodies have elongated notches (D) around their circumference (see p. 68), which also ensure that the adaptor is properly seated when it snaps on.
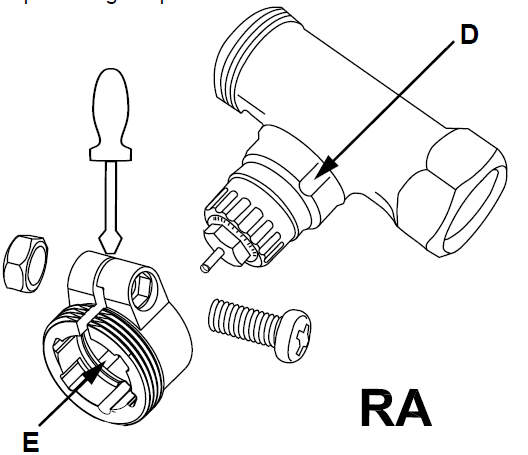
- During installation, please ensure that the pins inside the adapter (E) are lined up with the notches (D) on the valve. Ensure that a suitable adapter for the valve is properly clipped on.
- The lifter extension (F) must be fitted to the valve pin of RAV valves prior to installation.
- The RAVL adapter does not have to be screwed in place
Support ring
The valves from different manufacturers may have tolerance fluctuations that make the radiator thermostat more loosely seated on the valve. In this case, the provided support ring (G) should be placed into the flange before mounting the radiator thermostat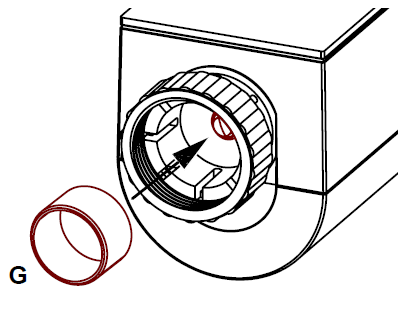
Adapter run
- Once the batteries have been inserted, the motor reverses; meanwhile, „InS“ and the activity symbol ( ) are displayed. As soon as „InS“ is displayed without the activity symbol ( ) the radiator thermostat can be mounted.
- After the radiator thermostat has been mounted successfully, an adapter run („AdA“) has to be performed to adapt the thermostat to the valve. To do this, proceed as follows:
- Press the Boost button ( ) when „InS“ is displayed.
- Now the actuator performs an adapter run. „AdA“ and the activity symbol ( ) are displayed; during this time, operation is not possible. Afterwards, the display will change to normal.
- If the adapter run has been initiated prior to mounting or if an error message (F1, F2, F3) is displayed, press the Boost button; the motor reverses to the „InS“ position.
- Teach-in mode can be activated even whilst „InS“ is still displayed. Therefore, please proceed as explained in sec. „8 Teaching-in“.
Teach-in
Before being able to use your device with QIVICON, it has to be taught-in to your QIVICON Home Base. Therefore, please log-in to „My QIVICON“ at www.qivicon.com/login. There, please select „Add device“ and follow the instructions.
To integrate the room thermostat into your Homematic system and enable it to communicate with other Homematic devices (e.g. Homematic Radiator Thermostat), you must teach-in the room thermostat first. You can teach-in the room thermostat directly to other Homematic devices or to the Homematic Central Control Unit.
Teaching-in to Homematic devices
- If you would like to teach-in the room thermostat to one or more Homematic devices, you must put the devices to be connected into teach-in mode and select the required teach-in channel. To do this, proceed as follows:
- During teach-in, please make sure you maintain a distance of at least 50 cm between the devices.
- Activate the teach-in mode of your room thermostat.
- Therefore, press and hold the boost button ( ) for at least 3 seconds
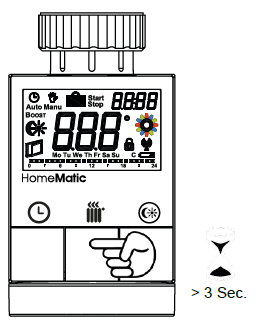
- The antenna symbol (
 ) is displayed, along with the teach-in time remaining in seconds. The teach-in time is 30 seconds.
 - Now put the device you wish to teach-in to the room thermostat (e.g. Homematic Radiator Thermostat, see the following fig.) into teach-in mode.
- Please follow the relevant operating manual instructions of the corresponding device.
- After teaching-in has been successful, “AC” appears and the display returns back to normal display
Information
- If you have already configured a Homematic
- Radiator Thermostat and would like to teach-in the device to the room thermostat, please put the radiator thermostat into teach-in mode first. All your settings will be saved and transmitted to the room thermostat.
- The teach-in mode can be interrupted at any time by pressing the boost button again shortly.
- If “nAC” appears in the display, the teach-in procedure has not been successful. In this case, please try again.
- Please repeat the teach-in procedure for all devices that communicate with each other.
Teaching-in to a Homematic Central Control Unit
Your device can be conveniently
- controlled and configured,
- connected directly to other devices or
- used in central control programs
via the Homematic software „WebUI“. Therefore, your radiator thermostat has to be taught-in to the Homematic Central Control Unit first. New devices are taught-in to the Central Control Unit via the Homematic „WebUI“.
To teach-in your device to the central control unit, proceed as follows:
- Open the “WebUI” user interface in your browser. Click the “Teach in devices” button on the right-hand side of the screen.

- To activate teach-in mode, click “Teach-in HM device”.
- Teach-in mode remains activated for 60 seconds. An information box shows how much teach-in time remains.
- Meanwhile, please activate the teach-in mode of the Homematic Room Thermostat to teach-in as well.
- Therefore, press and hold the boost button ( ) for at least 3 seconds until the display switches back to teaching mode.
- The antenna symbol (
 ) is displayed, along with the teach-in time remaining in seconds. The teach-in time is 30 seconds.
 - After a short time, the newly taught-in device will appear in the inbox of your software interface.
- The button „Inbox (x new devices)“ indicates how many new devices have been taught-in successfully.
- If required, you can teach-in additional devices by repeating the steps described above for each device.
- Now configure the newly taught-in devices in the inbox as described in the next section „Configuring newly taught-in devices“.
Configuring newly taught-in devices
Once you have taught-in your room thermostat to the Homematic Central Control Unit, it will be moved to the inbox. Here, you must configure the device and its associated channels in order to make them available for operating and configuration tasks. Give the device a name and assign it to a room. You can also make individual parameter settings. Now you can use the „WebUI“ user interface to control your device, configure it, connect it directly to other devices, or use it in central control unit programs. Please refer to the „WebUI“ manual for more details (you can find this in the „Downloads“ area of the website www.homematic.com).
Teach-out/Reset
The factory settings of the room thermostat can be restored manually. Restoring the factory settings deletes all settings and information about taught-in devices.
- First remove the batteries from the battery compartment.
- Press the three buttons (
 ) and re-insert the batteries at the same time. Once “rES” is displayed, you can release the buttons and the factory settings will be restored.
 - Alternatively, you can restore the factory settings via the configuration menu (see sec. „15.9 Restore factory settings (rES)“ auf Seite 74).
Operating modes (auto/manu/holiday)
By pressing the auto/manu button ( ) shortly you can switch between the following operating modes:
- Auto: Week programme – automatic temperature regulation in accordance with the time profile saved (heat/ reduce).
- Manu: Manual operation – the temperature set manually using the handwheel is maintained permanently.
- Holiday ( ): In holiday mode, the set temperature is maintained up to an end time, at which point the device switches to auto mode automatically.
Comfort and eco temperature
The comfort and eco temperature button ( ) makes switching between comfort and eco temperature simple and user friendly. The factory setting for the comfort temperature is 21.0 °C and the eco temperature 17.0 °C. The comfort and eco temperature can be changed individually. If the room thermostat is used in connection with a Homematic Central Control Unit, settings can also be made via the user interface WebUI.
- Press down the comfort/eco button ( ) for a few seconds (> 3s).
- The display shows the symbol (
 ) and the comfort temperature as defined.
 - Change the temperature with the handwheel and confirm with the boost button ( ).
- The display shows the symbol (
 ) and the eco temperature as defined.
 - Change the temperature with the handwheel and confirm with the boost button ( ).
Information
In auto mode, the comfort and eco temperature remain activated until the next point at which the week programme changes.
Setting the holiday function
- If you want to maintain a fixed temperature for a certain period, e.g. during your holidays or a party, the holiday function can be used.
- Briefly press the auto/manu button ( ) repeatedly, until the suitcase symbol ( ) appears in the display.
- Change the time for starting the temperature with the handwheel and confirm with the boost button ( ).
- Change the date for starting the temperature with the handwheel and confirm with the boost button ( ).
- Change the time and date until which the temperature is supposed to remain with the handwheel and confirm with the boost button ( ).
- Change the temperature with the handwheel and confirm with the boost button ( ). The display will flash to confirm.
- The set temperature will remain for the defined period of the holiday function.
- Otherwise, the room thermostat will change to auto mode.
- Radio control commands like those from a window contact or the weekly de-scaling run of a radiator thermostat will still be performed.
Boost function
With the boost function, cool rooms can be heated within short at the touch of a button. When the function is activated, the heating valves of the taught-in radiator thermostats open immediately for 5 minutes at 80 % (factory setting). There will be a pleasant room temperature right away because of the radiated heat. By the end of the 5 minute boost phase, the radiator thermostat automatically changes back to the prior operating mode.
Activate Boost function:
- Press the boost button ( ) shortly to activate the boost function.
- The remaining time for the function is counted down in seconds (“300” to “000”). Whilst the function is active, is displayed.
- Once the set time has elapsed, the room thermostat switches back to the mode that was active previously (auto/manu), with the temperature that was set previously.
- The function can be deactivated prematurely at any time by pressing the boost button again.
Information
- If the room thermostat is used in connection with a Homematic Central Control Unit, the duration of the
- Boost function and the valve opening can also be configured via the user interface WebUI.
- The radiant heat will not have an immediate effect if the radiator is covered or concealed (e.g. by a sofa).
Settings of the room thermostat can be changed in the configuration menu of your device. The menu can be accessed by pressing the auto/mode button ( ) for more than 3 seconds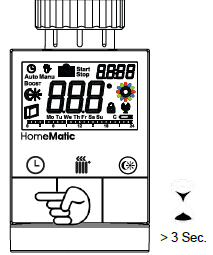
Menu items can be selected with the handwheel and confirmed with the boost button ( ). By pressing the auto/ menu button ( ) again, you can return to the previous level. After successfully changing a menu item the display switches back to normal. The menu automatically closes without applying changes if there is no operation for more than 1 minute.
The following settings can be made:
- Pro: Set week programme
- dAt: Change time and date
- SFA Recall error messages of single devices
- dSt: (De-)Activate automatic switching between summer and winter time
- tOF: Set temperature offset
- S-A Display of setpoint and actual temperature
- t-H Change between actual temperature and humidity
- dEL Delete taught-in devices
- rES Restoring the factory settings
Setting the week programme (Pro)
In the week programme, for each weekday up to 6 heating phases (13 change settings) can be set separately. The programming is carried out for the days chosen, whereby temperature settings have to be set for the entire period between 00:00 and 23:59.
- Press the auto/manu button ( ) longer than 3 seconds. The display will show “Pro”. Confirm the setting with the boost button ( )
- “dAy” appears on the display. You can use the handwheel to select a single day of the week, all weekdays, the weekend, or the entire week. Confirm the setting with the boost button ( ) (example: Monday).
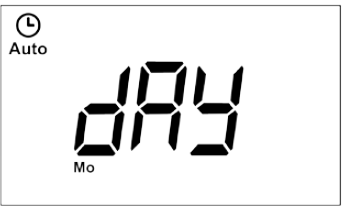
- The display will show the start date (00:00 h). First set the desired temperature (example: 17.0°) for your start date. Confirm the setting with the boost button ( ).
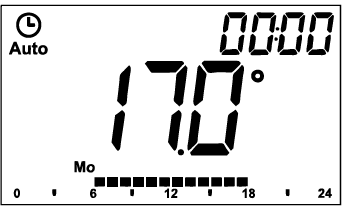
- Now the start time 6:00 h will appear in the display. You can change the start time with the handwheel. Confirm the setting with the boost button ( ).
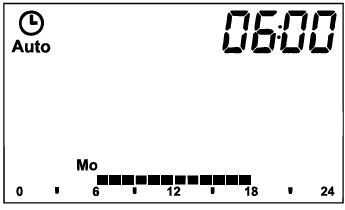
- Set the desired temperature with the handwheel for the next phase. Confirm the setting with the boost button ( ).
- Repeat this procedure until temperatures are stored for the entire period between 0:00 and 23:59 h.
Week programme: Example
For each day of the week up to 6 heating phases (13 change settings) with individual temperature settings can be saved with the room thermostat. The factory settings of the week programme are as follows:
Monday – Friday:
- from 00:00to 06:00 17.0 °C
- from 06:00to 09:00 21.0 °C
- from 09:00to 17:00 17.0 °C
- from 17:00to 23:00 21.0 °C
- from 23:00to 23:59 17.0 °C
Saturday – Sunday:
- from 00:00to 06:00 17.0 °C
- from 06:00to 22:00 21.0 °C
- from 22:00to 23:59 17.0 °C
The configured heating phases for one day are displayed by the bars. The displayed bars refer to the change settings. E.g. there are no bars displayed until the first change setting, this is followed by bars displayed until the second change setting, etc.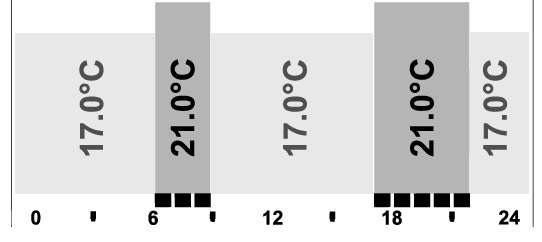
Changing date and time (dAt)
- In the configuration menu, date and time can be adjusted.
- Press the auto/manu button ( ) longer than 3 seconds.
- Choose the menu item „dAT“ with the handwheel.
- Confirm the setting with the boost button ( ).
- Set the year, month, day, hour and minute with the handwheel and confirm with the boost button ( ).
Query error messages of single devices (SFA)
In the menu item “SFA” you can recall the status of taughtin devices to assign error messages directly to the devices (e.g. empty battery symbol of a taught-in window contact).
- Press the auto/manu button ( ) longer than 3 seconds.
- Choose the menu item “SFA” with the handwheel.
- Confirm the setting with the boost button ( ).
If there are no error messages, “—” appears in the display. The error messages have the following meanings
|
 |
|
| rt | communication error of taught-in radiator ther- mostat | – |
| Sc | – | battery of taught-in window contact almost empty |
| rc | – | battery of taught-in remote control almost empty |
| CCU | communication error of taught-in central con- trol unit | – |
| Ac | communication error of taught-in switching ac- tuator | – |
Switching between summer and winter time (dSt)
- An automatic switching between summer and winter time can be activated and deactivated. The automatic switching is activated in the factory settings.
- Press the auto/manu button ( ) longer than 3 seconds.
- Choose the menu item „dSt“ with the handwheel.
- Confirm your setting using the boost button ( ).
- Set the option „On“ to activate automatic switching or set the option „OFF“ to deactivate automatic switching with the handwheel.
- Confirm with the boost button ( ).
Setting offset temperature (tOF)
- As the temperature is measured on the room thermostat, the temperature distribution can vary throughout a room.
- To adjust this, a temperature offset of ±3.5 °C can be set.
- If a nominal temperature of e.g. 20 °C is set but the room presents with only 18 °C,an offset of -2.0 °C needs to be set. The offset temperature can be adjusted individually.
- An offset temperature of 0.0° is set in the factory settings.
- Press the auto/manu button ( ) longer than 3 seconds.
- Select the menu item „tOF“ with the handwheel and confirm with the boost button ( ).
- Turn the handwheel and set the desired offset temperature (max. ±3.5 °C).
- Confirm the setting with the boost button ( ).
Teach-out devices (dEL)
- Devices that are taught-in to the room thermostat can be taught-out with the function “dEL”. All taught-in devices are deleted simultaneously.
- Press the auto/manu button ( ) longer than 3 seconds.
- Use the handwheel to select the menu item “dEL” and confirm this with the boost button.
- The display will show “no”. Select “YES” with the handwheel.
- Confirm with the boost button ( ) to delete all taught-in devices.
- The menu item “dEL” will only be displayed as long as the devices are not taught-in to the central control unit.
Restore factory settings (rES)
- The factory settings of the room thermostat can be restored manually. If you do this, you will lose all your settings.
- Press the auto/manu button ( ) longer than 3 seconds.
- Choose the menu item „rES“ with the handwheel and confirm with the boost button ( ).
- The display will show “no”. Select “YES” with the handwheel.
- Confirm with the boost button ( ) to reset the device.
Open-window function
The radiator thermostat reduces the temperature in the room automatically during ventilation, in order to save on heating costs. Whilst this function is active, the “window open” symbol ( ) appears on the display.
Without Homematic Window Contact:
The radiator thermostat is able to automatically detect a sharp fall in temperature caused by ventilation (temperature fall detection). The temperature is then reduced to 12°C for 15 minutes (default factory setting).
With Homematic Window Contact:
If a Homematic Window Contact is used, the opening and closing of a window is detected at the precise time it occurs. Whilst the window is open the temperature of all radiator thermostats installed in the room is reduced to 12°C (default factory setting). If the window contact detects the closing of the window, all radiator thermostats installed in the room are immediately reset to their original mode.
Information
- Adjust reduced temperature and duration: A reduced temperature of 12° C is set as default. Both values can be configured individually via the WebUI user interface.
- Temperature fall detection without a Homematic Window Sensor can also be deactivated (by setting the duration to 0 minutes) via the software.
Operating lock
Operation of the device can be locked to avoid settings being changed unintended (e.g. through involuntary touch).
- To activate and deactivate the operating lock briefly press the Auto/Mode ( ) and the Comfort/Eco button ( ) simultaneously for at least 3 seconds.
- Once activated, the operating lock symbol „“ is shown on the display. Afterwards, the symbol will be displayed permanently. Operation of the device is now locked.
- To deactivate the operating lock, press both buttons once again for at least 3 seconds.
- If you have taught-in several radiator thermostats the operating lock has to be activated and deactivated manually on each device.
- In connection with a Homematic Central Control
- Unit an advanced global operating lock function can be set via the Homematic WebUI user interface.
- Thus, any operating on the device will be locked. The advanced global operating lock can only be deactivated via the WebUI (not on the device).
Activating heat pause (to prolong battery life and relief valve seal)
- Battery life can be prolonged and the valve seal can be relieved by switching the heating off in summer. To achieve this, the valve is opened fully.
- However, the calcification protection function is still active.
- Press the Auto/Manu button ( ) shortly until Manu appears in the display.
- In manual mode (Manu), turn the handwheel clockwise until „On“ is displayed.
- To save changes and leave manual mode, press the Auto/Manu button ( ) again.
Activating frost protection operation (radiator switched off)
- If the room does not need to be heated, the valve can be closed. The valve is only opened if there is a risk of frost.
- However, the calcification protection function isstill active.
- Press the Auto/Manu button ( ), until Manu appears in the display.
- In manual mode (Manu), turn the handwheel anticlockwise until „OFF“ is displayed.
- To save changes and leave manual mode, press the Auto/Manu button ( ) again.
Additional functions in connection with CCU
If the radiator thermostat is used in connection with a Homematic Central Control Unit, additional functions can be used via the software interface WebUI (You will find further information in the download area of the website www.Homematic.com):
Setting valve protection function
The radiator thermostat can be protected against valve calcification automatically. Therefore, an automatic routine descaling is performed once a week. The valve completely opens and closes once. This avoids that the valve pin gets stuck due to calcification. During this period, operation is not possbile. Routine descaling is factory-set to run once a week on Saturdays at 11:00 h.
Information
- In connection with the Homematic Central Control
- Unit the time for the routine descaling can individually be adjusted.“CAL” is displayed during descaling.
Switching time/date display
The factory setting will show the time on the display. The display of date and time can be switched via the WebUI.
Maximum valve opening
A maximum valve opening of 100% is set in the factory settings. The maximum valve opening position (0-100 %) can be adjusted via the WebUI.
Maximum setpoint temperature
A maximum setpoint temperature of 30.5°C is set in the factory settings. The maximum setpoint temperature (15.0 to 30.5°C) can be adjusted via the WebUI
Minimum setpoint temperature
A minimum setpoint temperature of 4.5°C is set in the factory settings. The minimum setpoint temperature (4.5 to 25.0°C) can be adjusted via the WebUI.
Valve error position
If an empty battery has not been recognized, the radiator thermostat moves back into a „valve error position“. This avoids, that the set temperature in the room increases due to a low battery. A valve error position of 15 % is set in the factory settings. The value can individually be adjusted (0 to 100 %) via the WebUI.
Valve offset
If several radiators in one room are operated with a Homematic Radiator Thermostat some radiators may heat more than others. In certain cases, some radiators might be hot while others are still cold. To compensate this, you can set a valve offset for the radiator that stays cold. A valve offset of 0% is set in the factory settings. The value can individually be adjusted (0 to 100 %) via the WebUI. If the valve is set to 0 % it still closed (regardless of whether the offset function is activated or not).
Troubleshooting and maintenance
| Error code on the dis- play | Problem | Solution |
| F1 | Valve drive sluggish | Check the installation; check whether the pin on the heating valve is stuck |
| F2 | Actuating range too wide | Check the fastening of the actuator |
| F3 | Actuating range too narrow | Check the heating valve; check whether the valve pin is stuck |
| F4 | Conflict during tea- ching-in: CCU has al- ready been taught-in | Delete radiator thermostat from CCU; perform teach- out function |
| F6 | Conflict during tea- ching-in: max. number of 7 radiator thermo- stats already taught-in | perform teach-out function |
| F7 | Conflict during tea- ching-in: max. number of 8 window contacts already taught-in | perform teach-out function |
| F8 | Conflict during tea- ching-in: no more de- vices can be taught-in | perform teach-out function |
| Battery symbol | battery voltage too low | replace batteries of radiator thermostat |
| Battery symbol
+ F9 |
battery voltage too low, valve moved to error position | replace batteries of radiator thermostat |
| Battery symbol
+ F10 |
battery voltage too low | replace batteries of radiator thermostat |
| Battery symbol
+ C symbol |
battery voltage or one or more taught-in de- vices too low | replace batteries of taught-in device |
| Antenna sym-
bol flashing |
connection to one or more taught-in de- vices is lost | / |
| nAC | Teach-in procedure failed | Restart teach-in mode |
| Lock symbol | local operating lock active | deactivate opera- ting lock |
| Lock symbol
+ C |
global operating lock active | deactivate operating lock via CCU |
| Lock symbol
+ rES |
local reset deacti- vated | activate local reset via CCU |
| Err | Duty cycle exceeded | the device will com- municate again after one hour, no action required |
| Syn | Attempts to synchro- nize with know HM device | / |
| CRC | CRC error after firm- ware update | Repeat firmware
update |
| FUP | The firmware update
is in progress |
/ |
| tSd | Temperature sensor value defect or out of range | replace device or operate device in current temperature range |
| trd | transceiver module defect | replace device |
Connectable components
The following Homematic components can be taughtin to the Radiator Thermostat:
- max. 1 Homematic Central Control Unit
- max. 7 Homematic Radiator Thermostats
- max. 8 Homematic Door/Window Contact / Window Rotary Handle Sensors
- max. 8 button pairs of Homematic Remote Controls or Display Push-Buttons
- max. 1 Homematic Temperature Sensors
Scope of supply
- Radiator thermostat
- Adapters Danfoss RA / RAV / RAVL
- Plunger extension Danfoss RAV
- Cylinder head screw M4 x 12, nut M4
- Support ring
- 2x 1.5 LR6/Mignon/AA
Technical specifications
- Short name: HM-CC-RT-DN
- Supply voltage: 2x 1.5V LR6/Mignon/AA
- Battery life: 1.5 years (typ.)
- Current consumption: 180 mA (max.)
- Degree of protection: IP20
- Protection class: III
- Ambient temperature: 0°C to +55°C
- Dimensions (W x H x D): 54 x 65 x 93 mm
- Weight: 180 g (not incl. batteries)
- Radio frequency: 868.3 MHz
- Receiver class: SRD Class 2
- Typ. open area RF range: 300 m
- Duty cycle: < 1% per h
- Valve connection: M30 x 1.5 mm
- Method of operation: Type 1
Instructions for disposal:
- Do not dispose of the device with regular domestic waste. Electronic equipment must be disposed of at local collection points for waste electronic equipment in compliance with the Waste Electrical and Electronic Equipment Directive.
- The CE sign is a free trading sign addressed exclusively to the authorities and does not include any warranty of any properties.
REFERENCE
DOWNLOAD MANUALS:
Homematic 105155 Wireless Radiator Thermostat Installation And Operating Manual
OTHER MANUALS:
Homematic 105155 Wireless Radiator Thermostat Product Data Sheet

Homematic 105155 Wireless Radiator Thermostat Installation And Operating Manual