American Standard AZON1050AC52ZA with NEXIA

Congratulations!
Thank you for choosing the Platinum 1050 Smart Control. The intuitive interface and powerful features incorporated into this large color touch screen control represent the latest in climate control technology from the industry’s leader in residential heating and air conditioning systems.
This guide will introduce you to many of the Platinum 1050’s features and get you started using your Smart Control right away.
To enjoy the full benefit of your Platinum 1050 Smart Control, it should be connected to a Nexia™ Smart Home System account. Nexia is a cloud based platform that helps the smart products in your home work together in a single, convenient application. The XL1050 ships ready to serve as the central hub of an entire network of home automation devices. When connected to Nexia smart home system you can control your home’s heating and cooling system and over 200 Z-Wave devices from a web enabled smart phone, PC or tablet.
For online user guide support, go to www. mynexia.com, scroll to the bottom of the page and select Help.
Features Include:
- Wi-Fi or Ethernet Connectivity
- Nexia™ climate service
- Built in Nexia Bridge
- Weather Forecast, Radar and Alerts
- Home Screen Widget Options
- Allergy Clean/Quick Clean Cycles
- Screen Lock & Guest Access Security
- Ten Year Registered Warranty
- User Setup Wizard
- Self Guided Scheduling
- One Touch Presets
- Runtime History
- System Alerts
- Screen Saver
- Clean Screen
- Color Themes

Nexia™ Benefits
The Platinum 1050 is designed to work in concert with Nexia smart home systems to provide the convenience and advantages of a Smart Home.
Voice Control
Control your Platinum 1050, lights and small appliances by voice command with Amazon Echo.
- Adjust the thermostat by saying, “Alexa, set the <thermostat name> to 68 degrees.”
- Turn lights on or off with simple commands such as, “Alexa, turn on the front porch light.”
- Set custom lighting settings such as, “Alexa, set the dining room light to 50 percent.”
- Activate small appliances using a plug-in module such as, “Alexa, turn on the coffee pot.”
Simplified Scheduling
Log into the Nexia smart home website. Simply point and click and your customized schedule is set straight away.
Runtime History
Keep track of your system by downloading the cooling and heating system runtime history from Nexia1.
Nexia Diagnostics
With your approval, Nexia Diagnostics allows your local dealer to remotely monitor your home’s heating and cooling system using real-time performance data, ensuring you receive the highest possible level of Customer Service from American Standard and your American Standard Dealer. Ask your dealer about Nexia Diagnostics.
Automations
By connecting additional devices to the Platinum 1050’s built in bridge, you will unleash the full capabilities of Nexia smart home systems with automations. Automations allow your smart devices to operate automatically based on specific conditions or time of day. For example, with the addition of a compatible touchpad door lock you can automatically change your thermostat when entering or leaving home to reduce energy use. You can also add window and door sensors to automatically adjust the Platinum 1050’s temperature setting whenever a door or window is left open to reduce enegy use.
Nexia Remote Climate Access is included with the purchase of American Standard Smart Connected Controls. Up to four American Standard smart controls, of any combination, may be connected to a Nexia smart home system account without a monthly service fee. Additional Smart Controls and home automation devices may require a monthly subscription for remote access via most web-enabled smartphones, tablets and computers. Internet service and Nexia registration required. Ask your American Standard dealer for details.
All of the Platinum 1050 features may be accessed via the Home, Menu, and Settings screens

Home Screen
Menu Screen
Settings Screen
Home Screen Customization
You may choose to use the Default home screen or customize the interface with the following features.
Default (Scheduling is Disabled)
Out of the box the Platinum 1050’s home screen is set up with a basic thermostat interface. Simply adjust the HEAT TO or COOL TO setting up or down and the setting remains at that temperature until you adjust it again. Scheduling is disabled.
Press the SYSTEM or FAN MODE button to select your preferred operation.
Default + Presets (Scheduling is Disabled)
In the Default configuration, you may also choose to set up 3 presets. Using presets permits changing the heating and cooling settings by pressing one button.
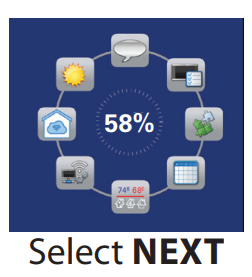
Add Optional Widgets (Scheduling may be Enabled or Disabled)
In example below, scheduling is Enabled

Users may choose to display up to 3 of 7 available widgets on the home screen.
In addition, you may customize a schedule to fit your needs using the convenient Scheduling Wizard which guides you through the process.
Default + Presets
1-Touch Presets provide predetermined Set Points for Home, Away and Sleep time periods.
Note: 1-Touch Presets requires Scheduling to be disabled. To disable Scheduling, go to MENU>SCHEDULES and select DISABLE.
When scheduling is disabled, heating and cooling set points are maintained indefinitely. When a temperature change is desired, the user must manually adjust the temperature to the new setting.
Configuring 1-Touch Preset
- Press the PRESET button from the home screen (If a Preset is not selected it will display OFF).

- To edit the parameters, press the EDIT button, and first, select AWAY.
- To change the Cooling Set Point, press the blue COOLING SET POINT to activate the setting. The current System Mode indicator will display blue wavy lines.
Use the UP and DOWN Arrows to adjust the Set Point to the desired temperature. - To change the Heating Set Point, press the red HEATING SET POINT area to activate the setting. The current System Mode indicator will display red wavy lines.
Use the UP and DOWN Arrows to adjust the Set Point to the desired temperature. - Repeat the process for Home and Sleep settings.
- When editing is complete, press APPLY.
- Choose the desired preset and press APPLY. The preset temperature settings will be displayed on the Home Screen. The selected preset will display at bottom right:


Adding Widgets
User Setup Wizard
The User Setup Wizard guides you through the Platinum 1050’s User configurable settings.
To complete the Setup Wizard and connect the Platinum 1050 to Nexia Smart Home Systems, you need the following:
- Internet service
- Your Wi-Fi network name and password
- An internet browser
- A valid email address
To access the User Setup Wizard, select MENU > SETTINGS > USER SETUP WIZARD.
The User Setup Wizard will guide you through the following screens:
- Display
- Screen Layout
- Scheduling
- (A) Guided Schedules OR (B) 1-Touch Presets
- Network
- Nexia
- Weather
Note: You may skip any section of the Wizard by pressing Cancel. It is not possible to exit or go back to a completed section after starting the process.
Tip: Any settings can be changed at a later date either manually, or by running this Wizard again.
After each step, the Wizard will show your progress. Press Next to begin the next section.

Begin User Wizard
From Home Screen, Press: MENU > SETTINGS
Select User Setup Wizard to begin.
Press NEXT and set your preferred display brightness, backlight, screen saver and color theme settings.
Display


Screen Layout
Select up to 3 apps (widgets) from the layout screen and press Apply . These widgets will be displayed on the home screen.
Screen Layout Options
- Outdoor Temperature – Displays outdoor temperature on home screen.1 Press widget to display 5 day weather forecast, alerts and radar.
- Indoor Humidity – Displays indoor relative humidity on home screen.
- Dealer Contact – The servicing American Standard dealer’s name will be displayed on the home screen widget.1, 2 Press the dealer widget for contact information.
- Runtime History – Displays runtime history widget on home screen. Press the widget to display daily and monthly runtime history with average indoor and outdoor temperature1,3.
- Air Cleaner – Displays air cleaner widget on home screen. Press the widget to display and select air cleaning options:
Auto – operates whenever system fan is on
Quick Clean – 3 hour air cleaner power cycle
Allergy Clean – 24 hour air cleaner power cycle - System Status – The system status widget is displayed on the home screen. Press the widget to display cooling or heating, accessory4 and zoning5 system status.
- Compressor Speed – Displays American Standard’s AccuComfort™ variable speed compressor speed as a percent of maximum speed.

- Requires internet service and registration with Nexia™ smart home system.
- Requires the servicing American Standard dealers code to be entered in the control.
- Requires weather service to be enabled or an outdoor temperature sensor installed.
- Requires accessories to be installed.
- Requires American Standard zoning system to be installed.
Scheduling

Scheduling Options in Wizard
- Enabled – Guided Scheduling will begin. See 4A: Guided Scheduling
- Disabled – 1–Touch Preset Options of Away, Home and Sleep can be set.
See 4B: 1-Touch Presets
Guided Scheduling
(If Scheduling Enabled Chosen)
After pressing Scheduling Enabled, the welcome to Guided Scheduling screen is displayed.
Guided Scheduling is a convenient way to quickly revise the default schedule and customize a schedule with your preferred settings for comfort or energy savings. Press NEXT.
Select the days you want to schedule. Press NEXT.
Select STAY HOME or LEAVE. Press NEXT. Stay Home will set up 2 periods per day, wake and sleep. Leave will set up four periods: Wake, Away, Home and Sleep. Each period’s cooling and heating temperature setting was pre-programmed at the factory for comfort.
Adjust the time you would prefer the Wake Period to Start using the up and down arrows. Press NEXT.
Adjust the cooling and heating system Wake Period Temperature setting by adjusting the UP and DOWN arrows. To change the cooling setting press the blue Cool To button. To change the heating setting press the red Heat To button. Press and follow the onscreen instructions to complete Guided Scheduling.
1-Touch Presets
(If Scheduling Disabled Chosen)
1-Touch Presets provide predetermined Heating and Cooling Set Points for Home, Away and Sleep time periods.
See page 9 for detailed instructions how to configure 1-Touch presets.
Network Setup
There are three ways to connect the Platinum 1050 Control to a local network:
- Wireless Wi-Fi connection

Select your network Enter your Password then press CONNECT.
 - Wireless Wi-Fi connection using WPS
 Press the WPS button on your router, then return to your Platinum 1050 Control and press the WI- FI PROTECTED SETUP button on the Wireless Network screen. Press NEXT.
 - Wireless Wi-Fi connection using a “hidden network.
Press “Hidden Network” which will be at the end of the list of available networks. If there are more than eight networks, you will need to scroll to the next page.

Enter your SSID, which is the name of the router, then select NEXT.
- If you select WPA or WEP, you will need to enter a password, then CONNECT.

- The Platinum 1050 also features an Ethernet jack and may be connected to a router using CAT5 cable. The control will recognize an Ethernet connection and the User Wizard will skip the Wireless setup screens and display the American Standard Home Registration screen next.

Nexia Registration

To control your home climate system from your web enabled smartphone, tablet or computer go to www.mynexia.com and set up a Nexia account. If you already have an account, log in and select ADD DEVICES.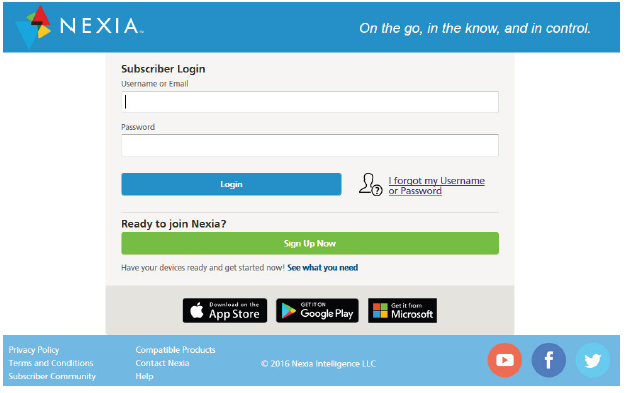
Select SIGN UP NOW to set up an account or log in to an existing account.
From the Nexia Dashboard select ADD DEVICES.
Select the THERMOSTATS drop down arrow. 
Select the ENROLL button for Platinum 824, 850 or 1050 Control. 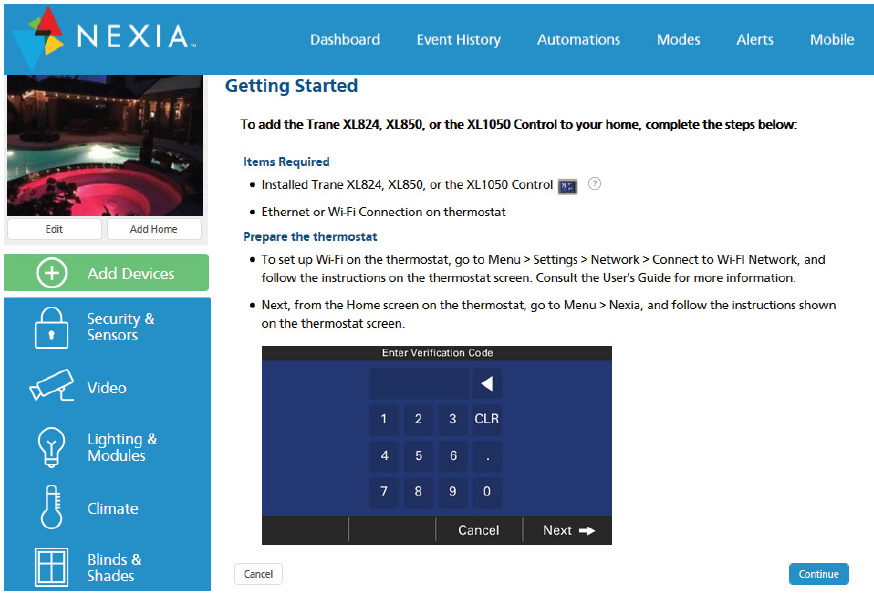
Press CONTINUE.
Nexia will generate a Pin Code. Record the Pin Code.
Return to the Platinum 1050 control and Press NEXT.
Enter the Pin Code and Press NEXT. 
Read the License Agreement, then ACCEPT or DECLINE.
Registration successful. Press DONE.

Weather Setup
To view your local weather press LOCATION.
To change the Weather Zip Code Press Location.
Use the backspace button to delete the current zip code. Enter the new zip code and press APPLY.
To view the 5 day forecast press FORECAST.
To view the weather map press RADAR.
To view weather warnings press ALERTS
Manual Scheduling
To Enable Scheduling, select the following: MENU > SCHEDULES > ENABLE SCHEDULE.
After pressing ENABLE SCHEDULE, the factory default week-long schedule screen will be displayed. The schedule displayed is a 7 day schedule with up to 4 periods per day.
The four periods include: Wake, Away, Home and Sleep. Each period’s cooling and heating temperature setting was pre-programmed at the factory for comfort.
The schedule can be changed in the following ways:
- Guided Scheduling – See the Guided Scheduling portion in the User Wizard. A series of screens will aid you in setting up a schedule.
- Manual Scheduling – To manually schedule, press anywhere on the Weekly Schedule screen to begin modifying the schedule. You may modify, add and delete periods. See the samples on the following pages.

Changing the Schedule

Changing Period Start or End Times
- Press anywhere in the Period to make it active. Other Periods will dim and Start and End times for this Period will be in a black box on the left hand side of the screen.
- Press TIME START or TIME END and adjust the time using the UP and DOWN arrows. Note: The Platinum 1050 uses intelligent technology and will not allow setting an illogical start or end time. Periods must be at least 30 minutes in duration.
Changing Period Set Points
- Press the active Period’s Cooling or Heating Temperature Set Point.
- Adjust the Set Point using the UP or DOWN arrows.
Changing the Period Name
- Press the PERIOD NAME (Wake, Away, etc.).
- Select a predefined name or press NEW and select NEXT.
- If selecting a new name, enter the name using the on-screen keyboard.
- Press NEXT.

Adding Periods
The Platinum 1050 Smart Control is capable of adjusting the temperature settings throughout the day according to a user-programmable schedule.
Each day of the week can have its own unique schedule, and each day can have a maximum number of four periods.
Periods define the time of day when the target temperature is adjusted. Each day can have from one to four periods, and each day can have a different number of periods. The Scheduling Screen shows the start time for each Period highlighted across the top row.
Important: Scheduling must be enabled before a schedule can be defined. To verify that scheduling is enabled, navigate to MENU>SCHEDULES and verify scheduling is enabled. If enabled a Weekly Schedule will be displayed. If not, a message will indicate scheduling is disabled.
- Press ADD PERIOD, the Add Period Screen is displayed.
- Press the green circle where you would like to insert a Period.
- Choose a name for the new Period or select New to define a custom name and press NEXT.
- If selecting a new name, enter the name using the on-screen keyboard.
- Press NEXT.
Press one of the plus signs to insert a new period. - Press APPLY to save your changes and return to the Schedule screen. The new period should be displayed.
- Press APPLY to save your changes and return to the Schedule Screen. The new period should be displayed.

Deleting Periods
- From the Schedule Screen press DELETE PERIOD, the Delete Periods Screen is displayed.
- Press the TRASH CAN icon in the Period(s) you wish to delete.
- Press APPLY to save your changes and return to the Schedule Screen. The changes should be reflected in the display.

Screen Lock and Guest Access
The Platinum 1050 features several options to lock the screen so users cannot make unwanted changes.
Turning on Guest Access allows Users to make up to 5 degree changes to temperature settings. All other settings will remain locked.
Applying screen lock will cause the screen to lock after 1 minute of inactivity. Press and hold the Menu button for 5 seconds to temporarily unlock a locked screen.
Enabling Screen Lock and Guest Access
- Press Menu>Settings>Screen>Screen Lock
- Press On to enable Screen Lock.
- To enable Guest Access press On.
Disabling Screen Lock and Guest Access
- To disable Screen Lock or Guest Access temporarily unlock the feature and navigate to the Screen Lock and Guest Access feature screen.
- Press Off to disable Guest Access or Screen Lock.

Nexia™ smart home system
When enrolled to a Nexia™ smart home account, the Platinum 1050 is a Z-Wave Plus security-enabled device that can serve as a central hub for an entire network of home automation devices, including all non-battery powered devices that will act as repeaters on your network. Your Platinum 1050 can also display local weather conditions, five-day forecasts and National Weather Service warnings and alerts. See the section on Adding Z-Wave Devices for more information on taking advantage of this functionality. A basic Nexia™ smart home account subscription is included with the Platinum 1050 Control at no additional charge.
Note: Adding additional devices may add charges to your Nexia™ smart home account.
To create your Nexia™ smart home account go to www.mynexia.com.
Adding/Removing Z-Wave Devices (via 1050)
Your Platinum 1050 is designed to integrate seamlessly with a Nexia™ smart home system.
Adding Z-Wave Devices
- From the HOME Screen, press MENU on the Platinum 1050 Control, then press NEXIA.
- Press ADD DEVICE and follow the device manufacturer’s instructions for setting the Z-Wave device into learn mode. You will have four minutes to set the device into learn mode after pressing the ADD DEVICE button.
Removing Z-Wave Devices
- From the HOME Screen, press MENU on the Platinum 1050 Control, then press NEXIA.
- Press REMOVE DEVICE and follow the manufacturer’s instructions for setting the Z- Wave device into learn mode. You will have four minutes to set the device into learn mode after pressing the REMOVE DEVICE button.

Advanced Z-Wave Settings
Press ADVANCED for advanced Z-Wave functions including unregistering your bridge from Nexia or factory resetting your bridge. See the Advanced Z-Wave Settings section for more information.
Adding Z-Wave Devices (via mobile app)
Alternatively, your Platinum 1050 allows you to add Z-Wave devices using the Nexia app on your mobile device.
- Start the Nexia app.
- Press the menu button in the top left corner.
- At the bottom of this slide out menu, press Connect New Device.

- Select Z-Wave Device.

- When prompted, prepare the device to be added to the Z-Wave network by following the device manufacturer’s instructions to put device into add mode. You will have four minutes to complete this process.

Advanced Z-Wave Settings
Nexia’s ADVANCED SETTINGS screen contains three very powerful functions. Each of these functions is very specific and should be approached with a measure of caution. They
cannot be “undone.”
Learn
This function copies a new Z-Wave network to the bridge from another controller. In addition, it removes all current devices from the bridge.
Unregister
Removes the bridge from Nexia. All remote control features will be disabled.
Factory Reset
Resets all Z-Wave information and removes all devices from the bridge. If this bridge is the primary controller for your network, resetting it will result in all the devices in your network being removed. Following the reset, it will be necessary to remove and then add all of the devices back to your network.
Bridge Information
If this bridge is being used as a secondary or inclusion controller in the network, please reset this bridge only in the event that the primary controller is missing or otherwise inoperable.
| Association Group Information Table | |||||
|
Group |
Profile |
Command Class and Command List | Group Name | Max Number of Devices |
Trigger |
|
1 |
General: Lifeline | Device Reset Locally Notification |
Lifeline |
5 |
Factory Reset |
| Terminology | |
| The following terms may be used interchangeably by other devices, manufacturers, and Nexia. | |
| ADD | Add, include, inclusion, enroll, connect |
| REMOVE | Remove, exclude, exclusion |
| COPY | Copy, learn, replicate, replication |
| Other Information | |
| • Basic Command Class: | This device ignores Basic Set/Get commands. |
Quiet Mode
Quiet Mode limits compressor operation (heating and cooling mode) to minimum speed from 10 p.m. to 9 a.m. This is to support local noise ordinances in the upper northwest and other regions.
Characteristics of Quiet Mode
- For use with American Standard’s AccuComfort™ variable speed systems.
- During heating mode, indoor heat is allowed if the system cannot maintain space conditions while Quiet Mode is active
- Quiet Mode is only available for VSPD systems using a 1050 control
- Quiet Mode is disabled by default. To enable, from the home screen press SYSTEM MODE, then select SYSTEM OPTIONS and then ENABLE.
- When active, Quiet will be displayed below the indoor temperature on the Platinum 1050 home screen
Notices
FCC Notice
INFORMATION TO USER
This device complies with Part 15 of the FCC Rules. Operation is subject to the following two conditions: (1) This device may not cause harmful interference and (2) This device must accept any interference received, including interference that may cause undesired operation. The antenna(s) used for this transmitter must be installed to provide a separation distance of at least 20 cm from all persons and must not be co-located or operating in conjunction with any other antenna or transmitter.
This equipment has been tested and found to comply with the limits for Class B Digital Device, pursuant to Part 15 of the FCC Rules. These limits are designed to provide reasonable protection against harmful interference in a residential installation. This equipment generates and can radiate radio frequency energy and, if not installed and used in accordance with the instructions, may cause harmful interference to radio communications. However, there is no guarantee that interference will not occur in a particular installation. If this equipment does cause harmful interference to radio or television reception, which can be determined by turning the equipment off and on, the user is encouraged to try to correct the interference by one or more of the following measures.
- Reorient or relocate the receiving antenna
- Increase the separation between the equipment and the receiver
- Connect the equipment into an outlet on a circuit different from that to which the receiver is connected
- Consult the dealer or an experienced radio/TV technician for help
Any changes or modifications not expressly approved by the party responsible for compliance could void the user’s authority to operate the equipment.
IC NOTICE
This device complies with Industry Canada license-exempt RSS standard(s). Operation is subject to the following two conditions: (1) this device may not cause interference, and (2) this device must accept any interference, including interference that may cause undesired operation of the device.
The manufacturer has a policy of continuous product and product data improvement and it reserves the right to change design and specifications without notice. Representative-only illustrations included in this document.
Reference
Download Manual:
American Standard AZON1050AC52ZA with NEXIA User Manual
OTHER MANUALS:
American Standard AZON1050AC52ZA Programmable Thermostat Installation Guide