
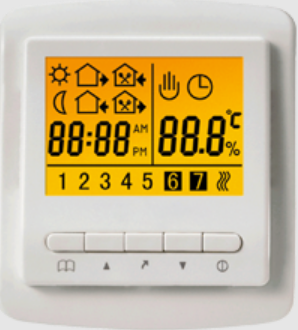
WUNDATRADE E03 Programmable Thermostat
Over View
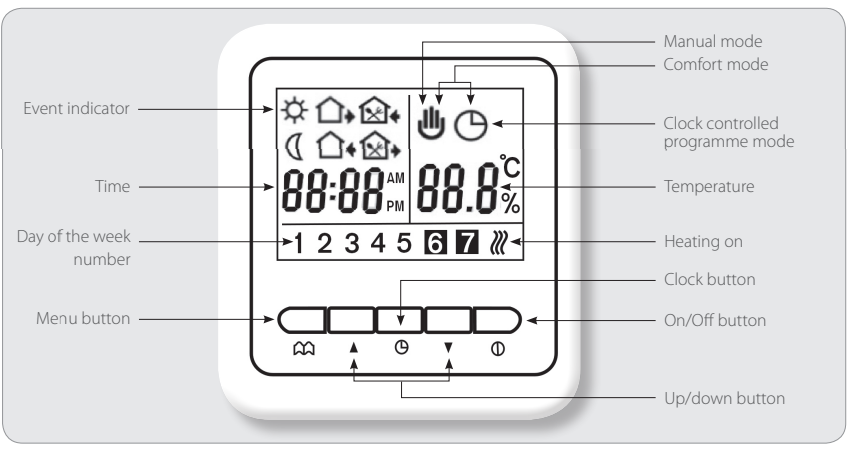
To turn on/off: Press on/off button![]() fully until it clicks to alternate between on/off
fully until it clicks to alternate between on/off
Set day of the week and the time
Press the clock button![]() for 5 seconds. A number between 1 to 7 will start flashing indicating day of the week number.
for 5 seconds. A number between 1 to 7 will start flashing indicating day of the week number.
1 = Monday 7 = Sunday. Use the ![]() up and down
up and down![]() buttons to change to the correct day of the week.
buttons to change to the correct day of the week.
Confirm your choice by pressing the![]() clock button. The time will then start flashing – use the
clock button. The time will then start flashing – use the![]() up and down
up and down![]() buttons to change as required and confirm by pressing
buttons to change as required and confirm by pressing![]() clock button.
clock button.
Repeat the same when the minutes start flashing and again confirm by pressing clock![]() button.
button.
Choose either a 5, 6 or 7 day cycle
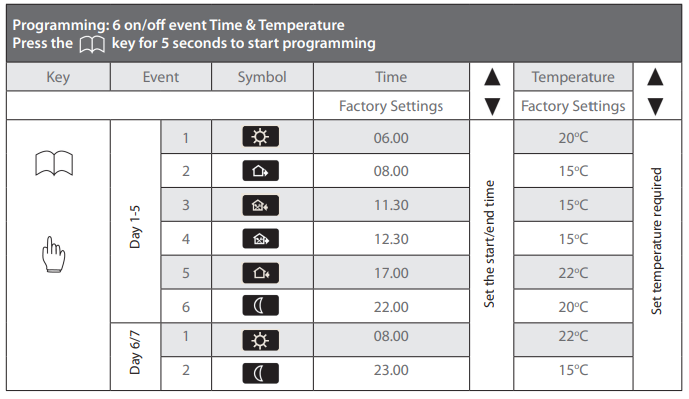
The programmer offers you the choice of 6 individual on/off events per day of the week with the choice of different temperatures in each event – either for 5 days of the week plus all day heating on days 6 and 7 (the weekend).
OR the same on/off timing for days 1 – 6 plus day 7 with all day heating.
OR the same 6 on/off events for all 7 days. The programmer is set at the factory for the 5 day plus 2 day event cycle.
Copying the 1- 5 settings for 6 or all 7 days
PRESS ON/OFF BUTTON![]() TO TURN OFF then press and hold menu
TO TURN OFF then press and hold menu![]() button whilst switching on, you are now in advanced settings. Now press
button whilst switching on, you are now in advanced settings. Now press![]() menu button once to reach PrG – you can now set days 6 or days 6 & 7 to be the same as days 1- 5 by pressing
menu button once to reach PrG – you can now set days 6 or days 6 & 7 to be the same as days 1- 5 by pressing ![]() buttons. When the screen shows day 6 with days 1 – 5 OR days 6 & 7 with days 1- 5 you are finished. Switch unit OFF and back ON using clock
buttons. When the screen shows day 6 with days 1 – 5 OR days 6 & 7 with days 1- 5 you are finished. Switch unit OFF and back ON using clock ![]() button to return to main screen.
button to return to main screen.
Set the on off times days 1- 5
To start programming press the menu![]() button for 5 seconds – the sunrise
button for 5 seconds – the sunrise![]() symbol and 1-5 will appear on the left hand side of the screen together with the time that the first event will start. You can change the time by using the
symbol and 1-5 will appear on the left hand side of the screen together with the time that the first event will start. You can change the time by using the ![]() up and down
up and down![]() buttons as required and confirm by pressing the menu
buttons as required and confirm by pressing the menu![]() button.
button.
Next is the temperature you require during the first period session – use the up and down arrow buttons until satisfied and then confirm by pressing the menu symbol. There are 6 on and off times to input and 6 temperature settings to confirm – if you make a mistake press the menu![]() button repeatedly and go through the complete cycle again until you return to the required place.
button repeatedly and go through the complete cycle again until you return to the required place.
Function
![]() Manual override mode
Manual override mode
Press menu![]() button until hand symbol appears. The scheduled period is overridden, set the temperature to your individual requirements using
button until hand symbol appears. The scheduled period is overridden, set the temperature to your individual requirements using ![]() up and down
up and down![]() buttons and the thermostat will operate at this temperature continuously until manual mode is cancelled by pressing menu
buttons and the thermostat will operate at this temperature continuously until manual mode is cancelled by pressing menu![]() button.
button.
![]() Clock controlled programme mode.
Clock controlled programme mode.
Press menu![]() button until clock symbol appears.
button until clock symbol appears.
![]() &
&![]() single period comfort mode
single period comfort mode
While in![]() clock controlled mode press
clock controlled mode press ![]() buttons until the
buttons until the ![]() clock and
clock and ![]() hand symbols appear together. This enables you to manually override the scheduled time period temperature setting, so the temperature can be temporarily changed for a single event, the ‘comfort mode’ temperature is reset at the next event when the thermostat will return to the scheduled program.
hand symbols appear together. This enables you to manually override the scheduled time period temperature setting, so the temperature can be temporarily changed for a single event, the ‘comfort mode’ temperature is reset at the next event when the thermostat will return to the scheduled program.
![]() Keylock.
Keylock.
Once settings are complete to engage keylock anti-tampering function. Press![]() buttons together for 5 seconds to lock or unlock the button keypad.
buttons together for 5 seconds to lock or unlock the button keypad.
Programming: 6 on/off event Time & Temperature
Please note:
If using an external floor probe to limit floor temperature, then advanced settings ‘SENSOR MODE’ must be set to ‘ALL’ and the ‘MAX TEMPERATURE’ be set to the desired limit temperature, i.e. 270C for wood flooring.
Advanced settings
Turn the thermostat OFF by pushing the ON/OFF![]() button. Then press and hold menu
button. Then press and hold menu![]() button while turning the thermostat back on (by pushing
button while turning the thermostat back on (by pushing![]() symbol once) until the thermostat enters the ‘advanced settings’ mode. Press
symbol once) until the thermostat enters the ‘advanced settings’ mode. Press![]() menu button to advance to the required function. Press
menu button to advance to the required function. Press ![]() button to change individual
button to change individual
function settings. To save settings and EXIT this mode, press ON/OFF![]() button.
button.
| Key/ symbol to open | No. of times to press | Symbol | Function | |

|
1 |
SEN |
Sensor Mode |
IN : Built in sensor – shows & ONLY measures air temp OUT : Flood sensor – shows & ONLY measures probe temp
(can be in floor or probe housing) ALL : Both sensors – shows air temp or set probe temperature (can be in floor or probe housing) |
| 2 | PRG |
Set Weekly Sequence |
2: 5/2 day mode 1: 6/1 day mode 0: 7 day mode | |
| 3 | HI | Max Temperature | Max: Limitation temperature setpoint (99OC) (Probe limit temperature, i.e. 270C for wood floors) | |
| 4 | LO | Min Temperature | min: Limitation temperature setpoint (4OC) | |
| 5 | ADA | 30 min Preheating mode Adaptive Function | On: preheating 30mins early Off: cancel adaptive function | |
| 6 | ADJ | Temperature Calibration | Adjust measured temperature | |
| 7 | ECE | Monitoring of energy consumption | Total switch-on time in percentage in the last 3 days | |
| 8 | FAC | Reset to factory settings | Press |
|
|
N/A This Model |
DEA |
Auxiliary potential-free output |
00: O/P when the thermostat is switched on. 01: O/P together with main loop. 02: O/P built in sensor control main loop floor sensor control auxiliary loop 03: O/P, NOP 30s alternately by the main loop 05: O/P 5mins, NOP 10 mins in turn 10: O/P 10mins, NOP 20mins in turn 15: O/P 15mins, NOP 30 mins in turn |
|
| N/A This Model |
Bar |
Model selection |
YES: RTC75.7XXT NO: RTC75.7xx |
NOTE: If “ERR” is displayed on the screen when the thermostat is first turned on – enter advanced settings (as described above) and advance to function “2SEN” . Press ![]() symbol so that “IN” reads on the screen. Switch the unit OFF and back ON to clear and the thermostat will return to normal working.
symbol so that “IN” reads on the screen. Switch the unit OFF and back ON to clear and the thermostat will return to normal working.
Most other adjustments should be made by a qualified person.
Tech support opening hours are subject to change – please visit our website for the latest information
www.wundatrade.co.uk
0800 083 2677
Reference
Download Manual:
WUNDATRADE E03 Programmable Thermostat User Manuals
Leave a Reply