
WATTS BT-D03 RF Wireless Digital Room Thermostat

GENERAL INFORMATION
Safety warnings and operating instructions
- This product should be installed preferably by a qualified professional. Subject to observation of the above terms, the manufacturer shall assume the liability for the equipment as provided by legal stipulations.
- All instructions in this Installation & Operation manual should be observed when working with the thermostat. Failures due to improper installation, improper use or poor maintenance are voiding manufacturer liability.
- Any attempt to repair voids the responsibility and the obligation to guarantee and replacement from the manufacturer.
- Do not cover the thermostat for accurate measurement of ambient temperature. Therefore the sensor must never be hidden behind thick curtains, furniture, etc… Alternatively, a remote sensor should be used.
- Batteries may explode or leak, and cause burn injury, if recharger, disposed of fire, mixed with a different battery type , inserted backwards or disassembled. Replace all used batteries at the same time. Do not carry batteries loose in your pocket or purse. Do not remove the battery label. Keep batteries away from children. If swal-lowed, consult a physician at once.
- 2012/19/EU (WEEE directive): Products marked with this symbol cannot be dis-posed of as unsorted municipal waste in the European Union. For proper recy-cling, return this product to your local supplier upon the purchase of equivaent new equipment, or dispose of it at designated collection points. For more information see: www.recyclethis.info
- 2006/66/EC (battery directive): This products contains a battery that cannot be disposed of as unsorted municipal waste in the European Union. See the product documentation for specific battery information. The battery is marked with this symbol, which may include let-tering to indicate cadmium (Cd), lead (Pb), or mercury (Hg). For proper recycling, return the battery to your supplier or to a designated collection point. For more information see: www.recyclethis.info
Application
The thermostat have been designed for use in residential rooms, office spaces and industrial facilities. Verify that the installation complies with exist-ing regulations before operation to ensure proper use of the installation.
Please refer to “Quick Installation Guide” for thermostat installation
PRESENTATION
- Connected thermostat WATTS Vision® system compatibility.
- 3 sensitive touch buttons.
- Wireless bidirectional communication 868 MHz.
- Different temperature modes setting.
- Anti freeze function.
- Configurable Hysteresis or PWM regu-lation.
- Pin Code & screws lock for public area.
- EEPROM non volatile memory.
- 2×1,5V AAA batteries (LR3).
- 2 parameter menus: User and Installer.
In option
External sensor with several possibilities of regulation (Floor, remote, combined…).
BOX CONTENTS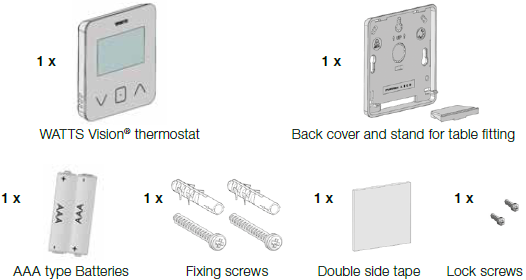
FIRST INSTALLATION
See quick installation guide for installation.
Batteries installation
- Open the cover and insert the 2 AAA supplied batteries.
- Close the cover.
Thermostat pairing, RF wireless communication initialization. You must put your receiver or WATTS Vision® touch screen in radio pairing mode (refer to the device leaflet).
On the back, push 5 sec the button for direct access to initialization menu.
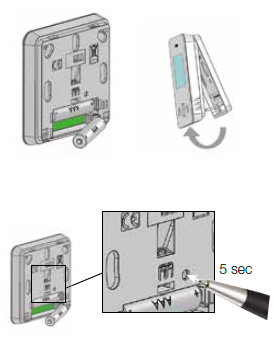
Following screens are displaying:

Other method from parameter menu:
- Press
 key to wake-up the thermostat
 - press 5 seckey to enter parameter menu
- Presskey to enter in initialization
Following screens are displaying:
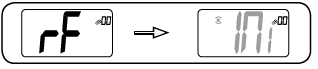
Note:
After few seconds, the thermostat and the receiver/touch screen should exit from the RF init mode, this is the normal procedure to confirm a correct pairing.
To make the installation easier, it will be better to have the thermostat near to the receiver or touch screen during the configuration mode.
PRODUCT DESCRIPTION
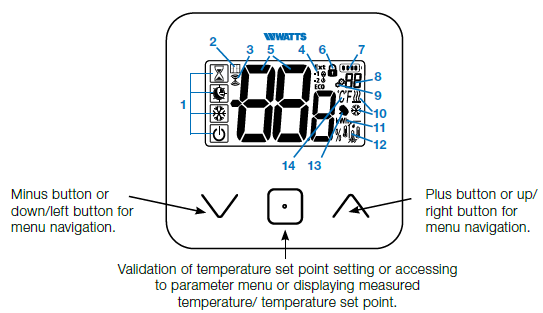
LCD logo description:
- Icon showing current operating mode of thermostat with left to right:
-
 Boost/timer mode
  Auto mode
 Comfort mode
 Reduced / ECO mode
 Frost protection mode
 Off mode
-
 Open window function
 RF communication
- Displaying of pilot wired order or reduced auto mode,
 order is applied to heating system
 order of comfort minus 1°C
 order of comfort minus 2°C
 order of reduced set point or Auto
reduced mode order of anti-freeze set point
 order of stop
 Measured temperature/ temperature set point / remaining time for boost mode.
 Locked keyboard.
 Battery level.
 Parameter menu number.
 Parameter menu.
 Indication of heating & cooling demand
 Unit for power consumption.
- Type of measured data & sensor used for system regulation:
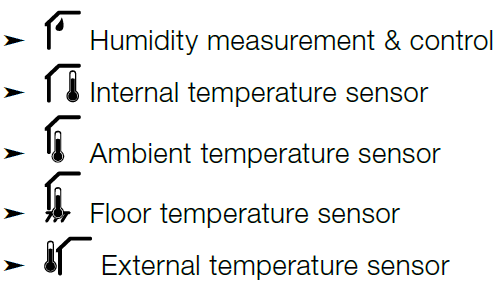
 User derogation or “adaptive start” during Auto mode application
- Temperature units
 measurement of humidity rate.
MODE SELECTION
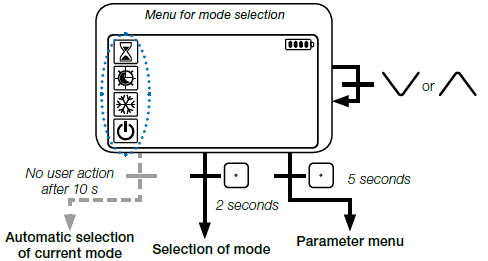
- Press any
 key to wake-up the thermostat and activates the back- light.
 - Hold
 key for 2 second to access to menu for selection of mode.
 - Press
 permits to change navigate in different mode.
If “basic navigation” is activated (menu #03), navigation menu will be:
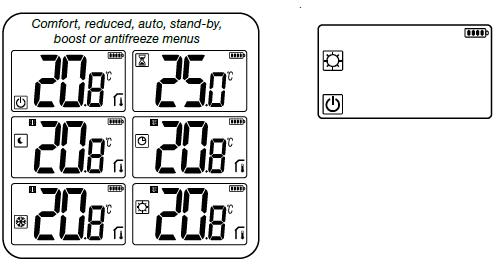
Change temperature setting
- Wake-up the thermostat by pressing any key.
- Press , to change the temperature set point (digits starts to blink).
- By pressing key, temperature set point value is validated.
Boost/Timer mode
- In mode boost, set point temperature is applied during a selected time.
- After this time, thermostat will return to former mode.
- You can first adjust, the desired setting temperature with, press key, to validate, default value 24°C.
- In a second time, you can adjust the duration in hours “H” if below 24H, then in day “d”.
AUTO mode
- This mode is activated only when thermostat is paired with a WATTS Vision® touch screen BT-CT02.
- In Auto mode, the heating system will follow program according to the current time and the Comfort and Reduced setting temperatures. By pressing keys,
- Boost/timer mode is selected, it override the temperature set point (1h).
Comfort mode
In this mode, comfort temperature set point will be followed all the time.
Reduced / ECO mode
This mode is activated only when thermostat is paired with a WATTS Vision® touch screen BT-CT02.
In this mode, reduced temperature set point will be followed all the time.
Note: In cooling mode, reduced mode acts like the OFF mode (system is stopped, NC actuators close).
Anti-freeze mode
Use this mode if you want to protect your installation against freezing. (default value 7°C).
Remark: in cooling mode, Anti-freeze mode acts like the OFF mode (installation is stopped).
OFF mode
Use this mode if you need to switch off your installation.
Be Careful: In this mode your installation can freeze.
FUNCTIONS HIGHLIGHTS
Access user parameter menu
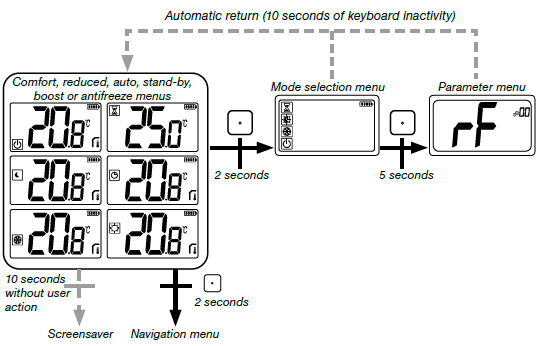
Press any key to wake-up the thermostat and activates the backlight.
By pressing keyduring 5 seconds, user can access to parameter menu. The menu scroll is done with keys  . Menu is selected by pressing key ,
value starts blinking. Once in the menu, the parameter value is changed with the keys .
Pressing again key sets the parameter value.
Note: Thermostat parameters are divided into two groups: user and installer (advanced menu).
Reversible mode
Reversible menu access is only possible on two conditions:
- thermostat isn’t associated to a touch screen or 6Z master
- « reversible menu » is activated in the user parameter menu.
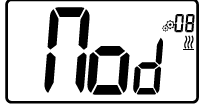
Enter user parameter 08, use keys , to select operating mode of the thermostat:
- Hot: Heating regulation mode
- CLd: Cooling regulation mode
- rEv: activation of reversible mode in menu
- Aut: automatic Heat/Cool mode.
Pressing keyconfirms the selection and switches to comfort mode. A user inactivity of some seconds confirms current selection and returns to old selected mode.
By pressingkey, temperature set point value is validated.
Opened windows detection
Enter user parameter 07.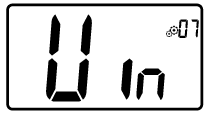
When activated and a detection is running, the iconwill appear and blink on the screen!; This function is done by measuring and recording the temperature evolution.
When an opened window is detected, the thermostat applies to heating system antifreeze temperature set point. User can restart heating system, and stops window detection by pressing on a key.
Reset
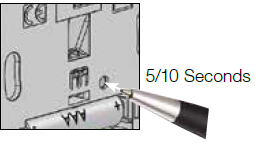
By holding the button on the back of thermostat, user can:
- Unlock pin code
- Go directly to pairing menu (5 seconds)
- Reset thermostat with user parameter value equal to factory setting. (10 seconds).
Keyboard locking
Wake-up the thermostat (lighted backlight), Press and hold keys simultaneously. Once locking is activated, logo appears on the LCD screen: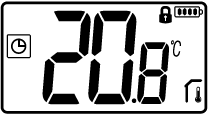
PIN code
To activate this function enter user parameter 10.
The PIN code protect the thermostat from any change of the setting as temperature or mode.
When user pushes a key, “PIN” will be displayed.
If user press another time a touch, he has to enter PIN number.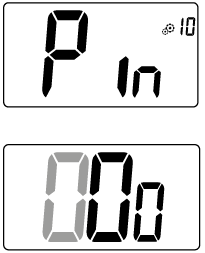
Other informations
Heating and cooling indications
Logos used to indicate than system requires:
- heating is ;
- cooling is .
LED indication
When user modify set point temperature in functioning mode, behavior information is displayed with a LED RGB located on the middle of validation key.
- Blue < 18°C
- Azure < 20°C
- Green < 22°C
- Yellow < 24°C
- Red < 37°C
Wireless communication functioning
When digital thermostat sends an RF frame, LCD logo blinks during transmission.
RF frame is sent:
- When user press any key of the thermostat.
- When user press key in Central Touch screen to update the thermostat.
- Automatically every 3-4 minutes.
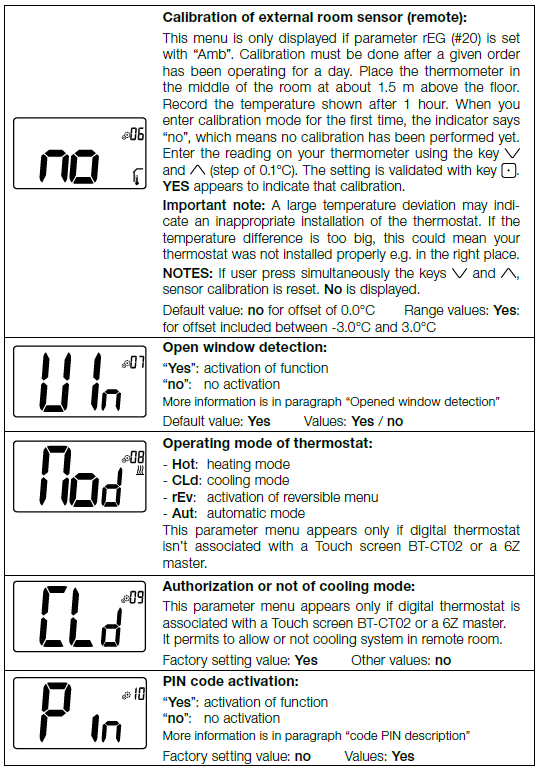
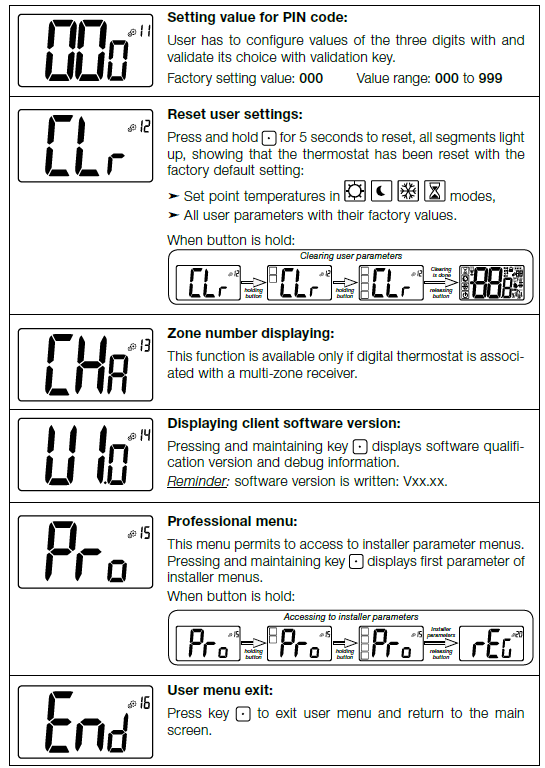
USER PARAMETER DESCRIPTION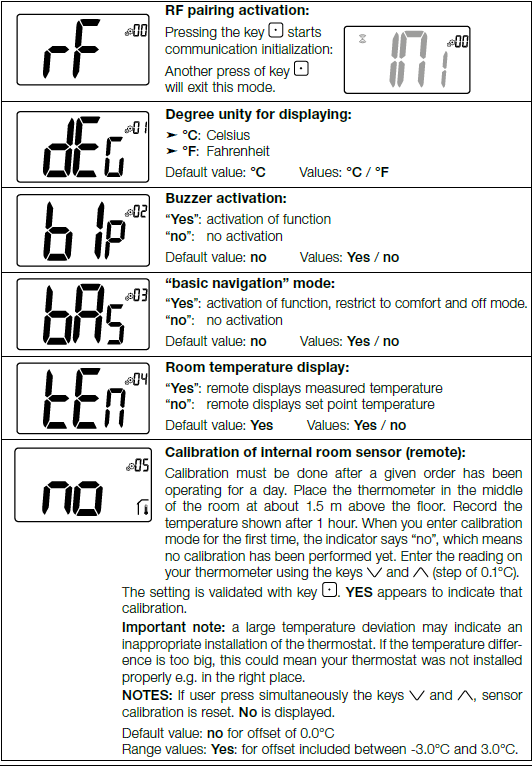
INSTALLER PARAMETER DESCRIPTION
To access to these installer parameters, installer has to go to user parameter number 15.
After, he presses and holds validation key during 5 seconds:
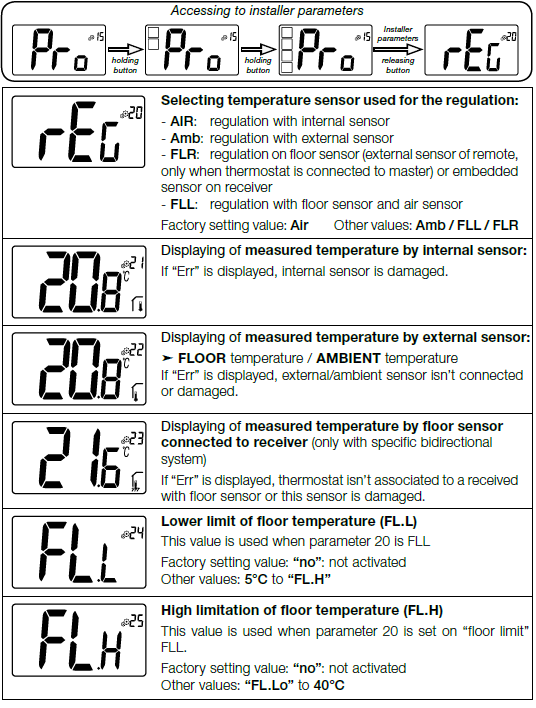
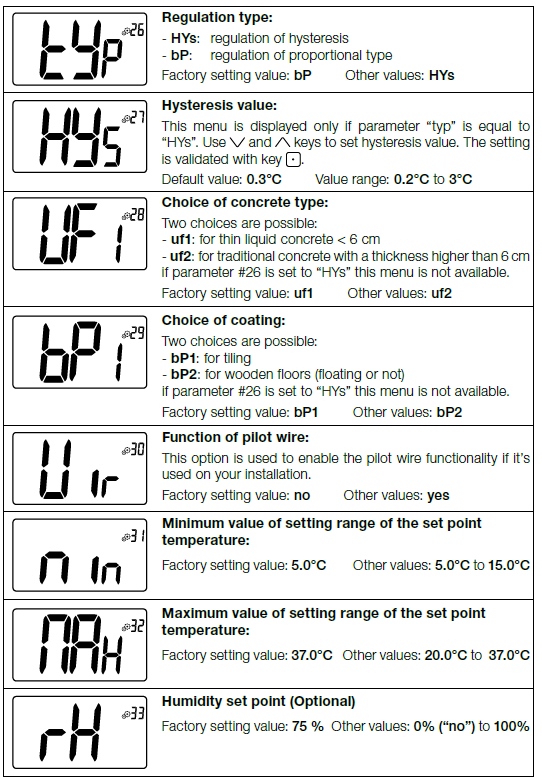
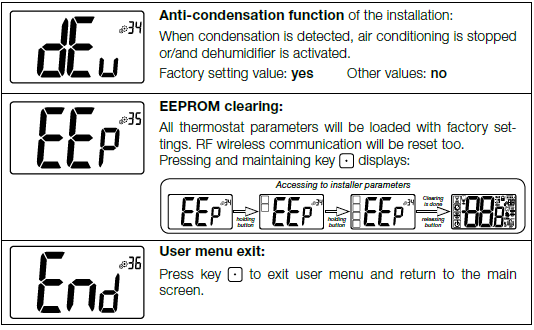
TROUBLESHOOTING & SOLUTION
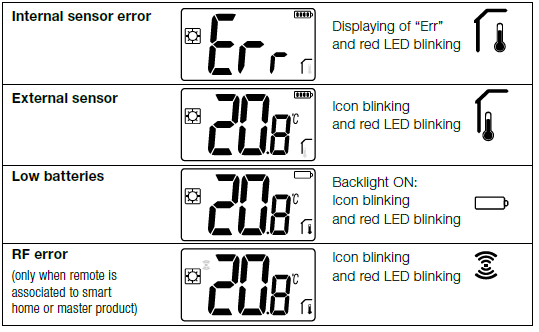
Description of thermostat errors displaying
Remote errors are:
- Error of temperature measurement
- Internal sensor;
- External sensor.
- Low batteries
- Loss of RF communication (only when remote is associated to Touch E3 or to master product).
| My Thermostat seems work correctly but the heating or the cooling doesn’t work correctly | |
| Output | On the receiver:
– Check the good reception of RF signal. – Check the connections. – Check the power supply of the heating element. – Contact your installer. |
| RF communication | Check the following points:
– The receiver must be put at a minimum distance of 50 cm of all others electrical or wireless materials (GSM, Wi-Fi..) – The receiver shouldn’t be fixed on a metallic part or too close of hydraulic pipes… (Copper…) |
| Sensor calibration | – Try to calibrate your thermostat (refer to user parameter 05).
– Contact your installer, to check & adjust the regulation parameters with your heating system. |
| Configuration | The logo blinks:
– Cooling request is made by the central (BT-CT02) but the thermostat doesn’t allow (refer to user parameter 08). |
MAINTENANCE
Battery level indication
The batteries are considered weak when voltage level is too low for a correct product functionning.
The icon will blinked on LCD screen.
Cleaning of the thermostat
Gently dust the outside of the thermostat with a soft, lint-free cloth. If the thermostat needs a more thorough cleaning:
- Lightly dampen a soft and clean cloth with water.
- Wring out any excess water from the cloth.
- Gently wipe the display and sides of the thermostat, making sure no drops of water accumulate around the product.
Important: Do not spray thermostat directly with water, or use cleaning solutions or polishes, as doing so may damage the thermostat.
TECHNICAL CHARACTERISTICS
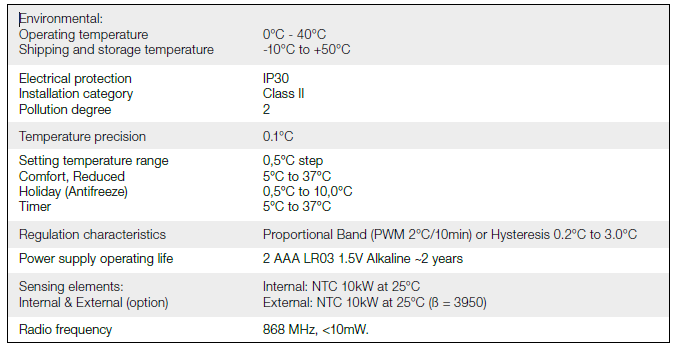
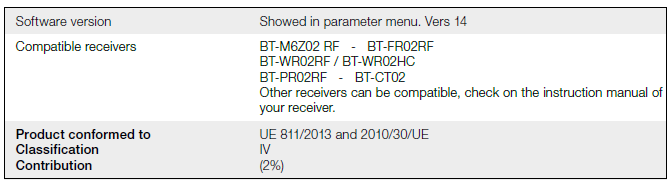
Dimensions & weight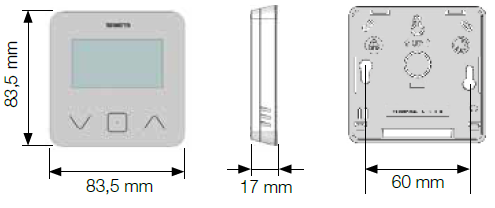
Weight: 115g (thermostat only) – all inluding box 220g
DIRECTIVES
| Designation | Description | Link |
| Low Voltage Directive (LVD) | The Low Voltage Directive (LVD) (2014/35/EU) | 2014/3 |
| 2014/35/EU | ensures that electrical equipment within certain | 5/UE |
| voltage limits provides a high level of protection | ||
| for European citizens, and benefits fully from the | ||
| Single Market. | ||
| Electromagnetic | The Electromagnetic Compatibility (EMC) Directive | 2014/3 |
| Compatibility (EMC) | 2014/30/EU ensures that electrical and electronic | 0/UE |
| Directive 2014/30/EU | equipment does not generate, or is not affected by, | |
| electromagnetic disturbance. | ||
| Radio Equipment
Directive (RED) 2014/53/EU |
The Radio Equipment Directive 2014/53/EU (RED) establishes a regulatory framework for placing radio equipment on the market. | 2014/5
3/EU |
| Restriction of the use of cer- tain hazardous substances Directive (RoHS) 2011/65/ EU | Directive on the restriction of the use of certain hazardous substances in electrical and electronic equipment. | 2011/6
5/EU |
| Waste Electrical
& Electronic Equipment Directive (WEEE) |
The WEEE Directive (2012/19/EU) aims to reduce the amount of waste electrical and electronic equipment that ends up in landfill. | 2012/1
9/EU |
| Ecodesign Commission Regulation (EU) 2015/1188 | Ecodesign requirements for local space heaters. | 2015/1
188 |
United Kingdom
- Watts Industries UK Ltd
- Colmworth Business Park
- Eaton Socon St. Neots
- PE19 8YX United Kingdom
- T: +44 (0) 1480 407074
- F: +44 (0) 1480 407076
- Email: w[email protected]
- http://wattswater.co.uk
Germany, Austria and Switzerland
- Watts Industries Deutschland GmbH Godramsteiner Hauptstr. 167 76829 Landau Germany
- T: +49 (0) 6341 9656 0
- F: +49 (0) 6341 9656 560
- Email: [email protected]
- http://wattswater.de
Poland
- Watts Industries Polska sp.z o.o.
- Puławska 40A
- 05-500 Piaseczno
- T: + 48 22 702 68 60
- F: + 48 22 702 68 61
- Email: [email protected]
- http://wattswater.pl
Russia
Контакты
Denmark, Sweden, Norway and Finland Watts Industries Nordic AB Godthåbsvej 83
DK-8660 Skanderborg
T: +45 86520032
F: +45 86520034
E-mail: w[email protected]
http://wattswater.eu
The descriptions and photographs contained in this product specification sheet are supplied by way of information only and are not binding. Watts Industries reserves the right to carry out any technical and design improvements to its products without prior notice.” Warranty: All sales and contracts for sale are expressly conditioned on the buyer’s assent to Watts terms and conditions found on its website at www.wattswater.eu Watts hereby objects to any term, different from or additional to Watts terms, contained in any buyer communication in any form, unless agreed to in a writing signed by an officer of Watts
Reference
DOWNLOAD MANUAL:
WATTS BT-D03 RF Wireless Digital Room Thermostat User guide