VIVE Comfort TP-W150W Thermostat

Thermostat Operation

- LCD Display
- Glow in the dark light button
- Fan Switch
- temperature Setpoint Buttons
- System Switch
- User Buttons
- LCD Display
See page 4 for details about this display readout. - Glow in the dark light button
The glow-in-the-dark light button will self-illuminate for several hours after exposure to ambient light. This button turns on the display light when pressed. - Fan Switch
Select ON or AUTO. ON will run the fan continuously. AUTO will cycle the fan on only when the heating or cooling system is on.
- Temperature Setpoint Buttons
Press the + or – buttons to select the desired room temperature. - System Switch
Selects the operation mode on your HVAC system.
Selecting HEAT turns on the heat mode. Selecting COOL turns on the cool mode. Selecting OFF turns both heating and cooling off. Selecting EmH (for heat pumps with auxiliary heat) will lockout the compressor and control emergency/ auxiliary heat. - User Buttons
Use these buttons to set up your programming options. Refer to the next page for detail.
Caution:
When the battery icon LOW appears replace your AA batteries immediately. Failure to do so may result in your heating & cooling system becoming inoperable. Freezing or over heating can occur.
Thermostat Quick Reference
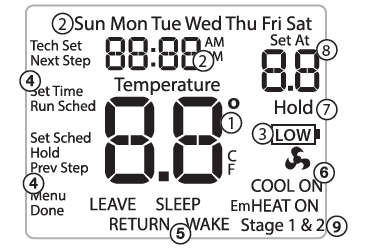
- Indicates the current room temperature
- Time and day of the week
- Low Battery Indicator: Replace batteries when this indicator is shown.
- Button Options
- Program Time Periods: This thermostat has 4 programmable time periods per day.
- System Operation Indicators:
The COOL ON, HEAT ON or icon will display when the COOL, HEAT, or (fan) is on.
Note: The Compressor delay feature is active if these are flashing. - Hold is displayed when the thermostat program is permanently overridden.
- Setpoint: Displays the user selectable setpoint temperature.
- Stages: Indicates the stages of heat that are active.
Important:
The low battery indicator is displayed when the AA battery power is low. If the user fails to replace the battery within 21 days, the screen will only show the low battery indicator but maintain all functionality. If the user fails to replace the batteries after an additional 21 days (days 22-42 since first “low battery” display) the set points will change to 55˚F(Heating) and 85˚F(Cooling). If the user adjusts these setpoints away from these it will hold for 4 hours then return to either 55˚F or 85˚F. After day 63 the batteries must be replaced immediately to avoid freezing or overheating because the thermostat will shut the unit off until the battery is changed.
Battery Door Information

Temporary and Permanent Hold Feature
- Temporary Hold: The thermostat will display HOLD and RUN SCHED on the left of your screen when you press the or key. If you do nothing, the temperature will remain at this setpoint temporarily until the next time period. Your program setpoint will then replace your temporary setpoint.
- Permanent Hold: If you press the HOLD key at the left of your screen, you will see HOLD appear below the setpoint temperature in the display. The thermostat will now permanently stay at this setpoint and can be adjusted using the or keys.
- To return to the program: Press the RUN SCHED key at the left of your screen to exit either temporary or permanent hold.
Understanding Your Thermostats Staging:
This thermostat controls 2 stages of heating. For reasons of energy efficiency, the thermostat will try to maintain your comfort setting using only 1 stage. If the 2nd stage is necessary it will be used and you will see Stage 2 in the display.
Filter Change Reminder
If your HVAC contractor has configured the thermostat to remind you when the air filter needs to be changed, you will see FILT in the display when your air filter needs to be changed.
Resetting the filter change reminder: When FILT reminder is displayed, you should change your air filter and reset the reminder by holding down the second button from the top left side of the thermostat for 3 seconds.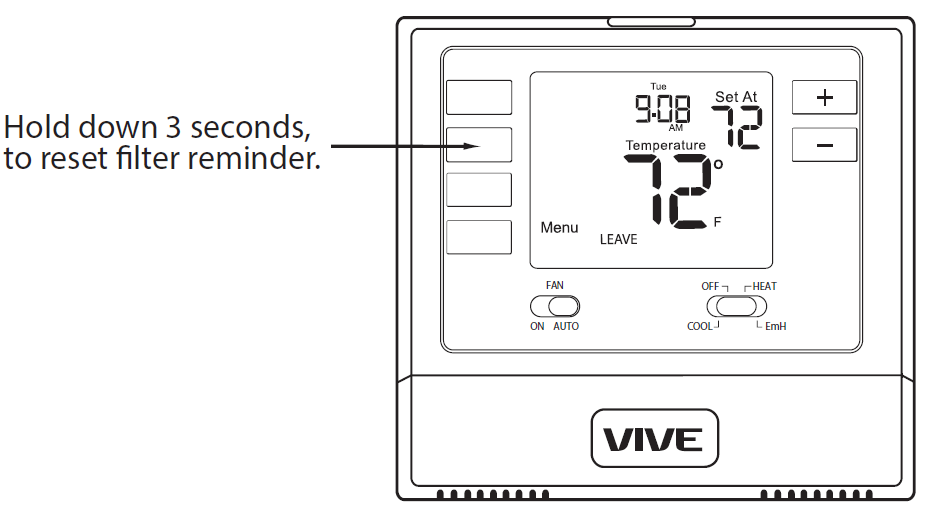
Programming The Thermostat
Set Time
- With system switch set to OFF, press the MENU button
- Press SET TIME
- Day of the week will be flashing. Use the or key to select the current day of the week.
- Press NEXT STEP
- The current hour is flashing. Use the or key to select the current hour. When using 12-hour time, make sure the correct a.m. or p.m. choice is selected.
- Press NEXT STEP
- Minutes are now flashing. Use the or key to select current minutes.
- Press DONE when completed.
Set Program Schedule 5+1+1 or 7 Day
To customize your program schedule, follow these steps:
- Select HEAT or COOL with the system switch. Note: You have to program heat and cool each separately.
- Press the MENU button (If the menu does not appear first press RUN SCHED)
- Press SET SCHED. Note: Monday-Friday or (Monday if in 7 Days) is displayed and the WAKE icon is shown. You are now programming the wake time period for that day.
- Time is flashing. Use the or key to make your time selection for that day’s WAKE time period.
- Press NEXT STEP
- The setpoint temperature is flashing. Use the or key to make your setpoint selection for that day’s WAKE time period.
- Press NEXT STEP
- Repeat steps 4 thru 7 for that day’s LEAVE time period, RETURN time period, and SLEEP time period.
Saturday:
Repeat steps 4 through 7 for the Saturday WAKE time period, LEAVE time period, RETURN time period, and for the Saturday SLEEP time period.
Sunday:
Repeat steps 4 through 7 for the Sunday WAKE time period, LEAVE time period, RETURN time period, and for the Sunday SLEEP time period.
If using 7-Day Programming use previous steps for every individual day.
You can also use these time saving functions. You must be in Set Sched Programming Mode (Press Menu >> Press Set Sched) for the following functions to work:
- To copy ALL time periods and temperatures of current system and day to ALL days, Press and Hold 2nd button down on left until the Days and Time flash.
- To copy ALL time periods (only times) for ALL days to the opposite system (Heat to Cool / Cool to Heat), Press and hold the Glow in the Dark Light button down until Set Time and Time flash.
Warranty Information
Warranty Registration
Your new thermostat has a 2 year limited warranty. You must register your thermostat within 60 days of installation. Without this registration the warranty period will begin on date of manufacture. For warranty issues please contact the HVAC professional that installed this product. You can register your new thermostat in 2 ways:
- Online
Go to the company website, select warranty registration and fill out a short registration form. - Mail
Complete the form below and mail it to the address shown.
Warranty Registration
- Name:
- Address:
- City:
- State:
- Zip:
- Thermostat Model:
- Date Installed:
Complete the form and mail it to:
Thermostat Warranty Registration
- Online
- Pro1iaq
- P.O. Box 3377
- Springfield, MO 65808-3377
REFERENCE
Download Manual
VIVE Comfort TP-W150W Thermostat OPERATIONAL MANUAL
OTHER MANUALS:
VIVE Comfort TP-W150W Thermostat INSTALLATION MANUAL