Vive Comfort TP-S-955C Non-Programmable Thermostat
Wall Locations
Thermostat Application Guide
| Description | |
| Gas or Oil Heat | Yes |
| Electric Furnace | Yes |
| Heat Pump (No Aux. or Emergency Heat) | Yes |
| Heat Pump (With Aux. or Emergency Heat) | Yes |
| Multi-Stage Systems | Yes |
| Heat Only Systems | Yes |
| Cool Only Systems | Yes |
| Millivolt | Yes |
Power Type
- Battery Power
- Hardwire (Common Wire)
- Hardwire (Common Wire) with
- Battery Backup
Subbase Installation
- Horizontal Mount
- Vertical Mount

Mount Thermostat
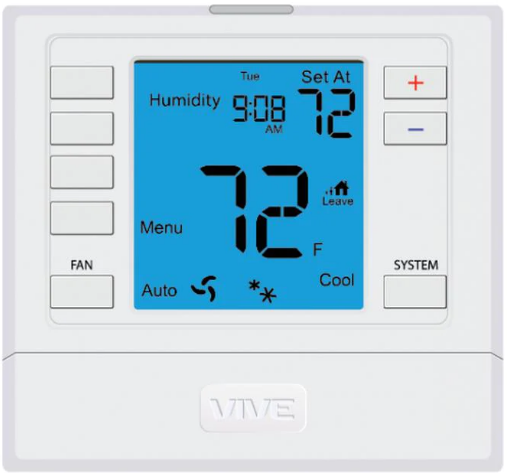
Thermostat Quick Reference
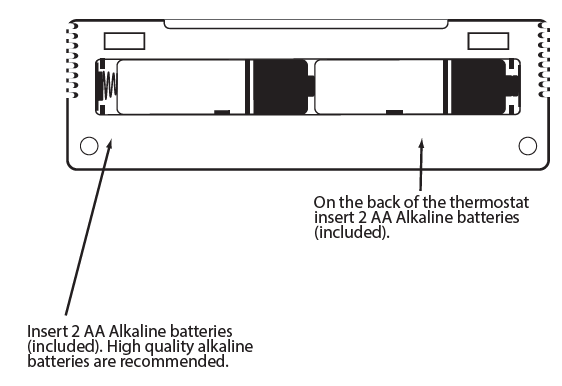
Battery Installation
Battery installation is recommended even if the thermostat is hardwired (C terminal connected). When the thermostat is hardwired and batteries are installed, the thermostat will activate a compressor delay of 5 minutes when it detects a power outage from the hardwired power supply.
Getting to know your thermostat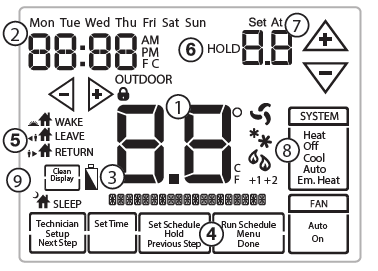
- Indicates the current room temperature
- Time and day of the week
- Low Battery Indicator: Replace batteries when this indicator is shown.
- Program Menu Options: Show different options during programming
- Period Icons – This thermostat can have 2 or 4 programmable time periods per day. Icons are displayed for 4 time periods. Occupied and Unoccupied will display in the text field for 2c and 4c time periods.
- HOLD is displayed when thermostat program is permanently overriden
- Setpoint: Displays the user selectable setpoint temperature
- System Operation Indicators: The COOL, HEAT or FAN icon will display when the COOL, HEAT or FAN is on. NOTE: The compressor delay feature is active if these icons are flashing. The compressor will not turn on until the 5 minute delay has elapsed
- Clean Display: Will disable screen for 30 seconds to allow cleaning
Wiring
- If you are replacing a thermostat, make note of the terminal connections on the thermostat that is being replaced.
- In some cases the wiring connections will not be color coded. For example, the green wire may not be connected to the G terminal.
- Loosen the terminal block screws.
- Insert wires then retighten the terminal block screws.
- Place nonflammable insulation into the wall opening to prevent drafts
Terminal Designations
|
Terminal |
2 Heat 2 Cool Conventional System | 2 Heat 2 Cool Heat Pump System | 3 Heat 2 Cool Heat Pump System |
| RC | Transformer power (cooling) | Transformer power (cooling) | Transformer power (cooling) |
| RH | Transformer power (heating) | Transformer power (heating) | Transformer power (heating) |
| C | Transformer common | Transformer common | Transformer common |
| B | Energized in heating | Heat pump changeover valve energized in heating | Heat pump changeover valve energized in heating |
| O | Energized in cooling | Heat pump changeover valve energized in cooling | Heat pump changeover valve energized in cooling |
| G | Fan relay | Fan relay | Fan relay |
| W/E | First stage of heat | First stage of emergency heat | First stage of emergency heat |
| Y | First stage of cool | First stage of heat & cool | First stage of heat & cool |
| Y2 | Second stage of cool | Second stage of cool | Second stage of cool & second stage of heat |
| W2 | Second stage of heat | Auxiliary heat relay, second stage of heat | Auxiliary heat relay, third stage of heat |
Getting to know your thermostat
Private Label Badge
Wiring Diagrams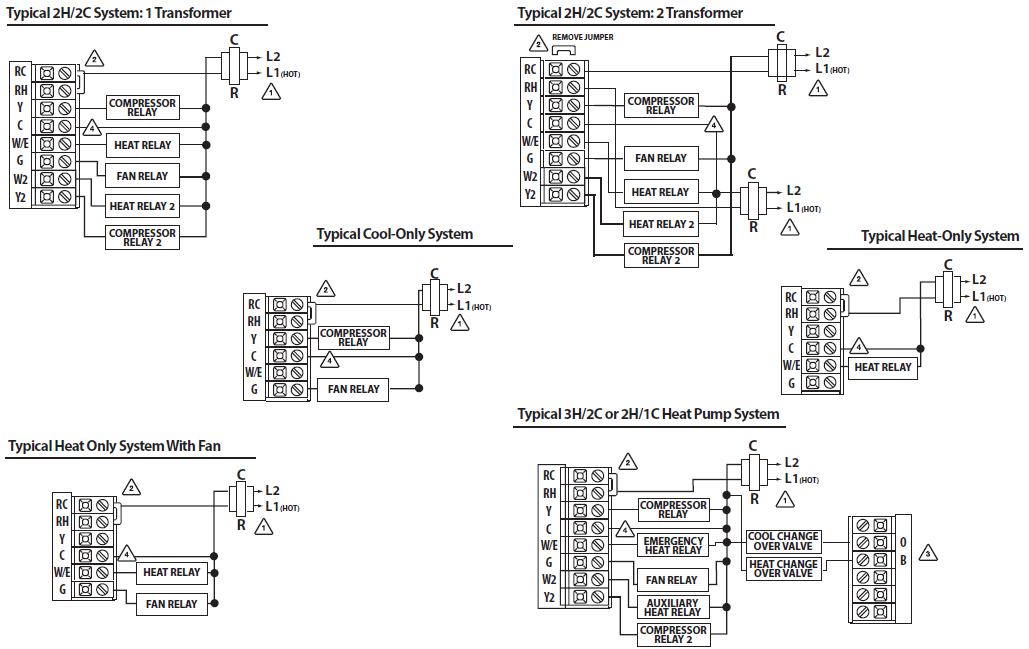
Technician Setup Menu
- Press the MENU button.
- Press and hold the TECHNICIAN SETUP button for 3 seconds.
- This 3 second delay is designed so that homeowners do not acci dentally access the installer settings.
- Configure the installer options as desired using the table below.
- Use the
 keys to change settings and the NEXT STEP or PREV STEP key to move from one step to another. Note: Only press the DONE key when you want to exit the Technician Setup options.
 - Press the DONE key to exit
| Tech Setup Steps | LCD Will Show | Adjustment Options | Default | |
|
Filter Change Reminder |
This feature will flash a reminder after the elapsed run time to remind the user to change the filter. A setting of “OFF” will disable this feature. | OFF
|
You can adjust the filter change reminder from “OFF” to 2000 hours of runtime in 50 hour increments. |
OFF |
|
Room Temperature Calibration |
This feature allows the installer to change the calibration of the room temperature display. For example, if the thermostat reads 70˚ and you would like it to read 72˚ then select +2. | 0
CALIbRATE |
You can adjust the room temperature display to read up to 4˚above or below the factory calibrated reading. | 0˚F |
|
Minimum Compressor On Time |
This feature allows the installer to select the minimum run time for the compressor. For
example, a setting of 4 will force the compressor to run for at least 4 minutes every time the compressor turns on, regardless of the room temperature. |
OFF
MIN COMP |
You can set the minimum compressor run time to “OFF”, “3”, “4”, or “5” minutes. If 3,4 or 5 is selected, the compressor will run for
at least the selected time before turning off. |
OFF |
| Tech Setup Steps | LCD Will Show | Adjustment Options | Default | |
|
Compressor Short Cycle Delay |
The compressor short cycle delay protects the compressor from “short cycling”. This feature will not allow the compressor to be turned on for 5 minutes after it was last turned off. | ON OF | Selecting “ON” will not allow the compressor to be turned on for 5 minutes after the last time the compressor was on. Select “OF” to remove this delay. | ON |
| CO | ||||
| COMP DELAY | ||||
|
Cooling Swing |
The swing setting often called “cycle rate”, “differential” or “anticipation” is adjustable. A smaller swing setting will cause more frequent cycles and a larger swing setting will cause fewer cycles. | 0.5 dF
CO COOL SWING |
The cooling swing setting is adjustable from 0.2˚ to 2˚. For example: A swing setting of 0.5˚ will turn the
cooling on at approximately 0.5˚ above the setpoint and turn the cooling off at approximately 0.5˚ below the setpoint. |
0.5˚ |
|
Heating Swing |
The swing setting often called “cycle rate”, “differential”, or “anticipation” is adjustable. A smaller swing setting will cause more frequent cycles and a larger swing setting will cause fewer cycles. | 0.4 dF
HE HEAT SWING |
The heating swing setting is adjustable from 0.2˚ to 2˚. For example: A swing setting of 0.5˚ will turn the heating on at approximately 0.5˚ below the setpoint and turn the heating off at 0.5˚ above the setpoint. |
0.4˚ |
|
Keypad Lockout |
Keypad lockout allows you to configure the thermostat so that some or all of the keys don’t function. | PA
KEY LOCK |
PA= partial keypad lockout, which locks all the keys except the or keys.
FU= full keypad lockout, which locks out all the keys.
See Keypad Lockout Note |
OFF |
| Tech Setup Steps | LCD Will Show | Adjustment Options | Default | |
|
Heat Pump |
When turned on the thermostat will operate a heat pump.
1. EM. Heat will show as an option in the system switch. 2. Y will be first stage of heat & cool, W/E will be emergency heat relay & W2 will be auxiliary heat relay. |
OFF
HEAT PUMP |
OFF configures the thermostat for non heat pump systems.
ON configures the thermostat for heat pump systems. |
OFF |
|
System Set |
You can configure the system switch for the particular appli- cation.
Heat – Off – Cool, Heat – Off, Cool – Off, Heat – Off – Cool – Auto Note: EM. Heat will show if in heat pump mode. |
SYSTEM SET |
Use the or key until the desired application is flashing.
AUTO= Autochangeover |
HEAT OFF COOL |
|
Fan Operation |
Select GAS for systems that control the fan during a call for heat.
Select ELEC to have the thermostat control the fan during a call for heat. |
GAS
FAN SET |
GAS
or ELEC |
GAS |
|
Dual Fuel Auxiliary for Heat Pump Will only appear if Heat Pump setting is turned ON |
For Dual Fuel applications (Gas/ Fossil fuel Auxiliary Heat), turn this setting ON to LOCKOUT the Heat Pump (Y) when Auxiliary Heat (W2) is on. If desired – This can also be used with Electric Auxiliary. |
A6 GAS AUX |
OFF will allow Y(1st stage of Heat) and W2 (Aux Heat) to run together if called for.
ON Will de-energize Y termi- nal 45 seconds after a call for Auxiliary Heat (W2). |
OFF |
|
Cooling Fan Delay |
The cooling fan delay setting will delay the fan from coming on in cool mode and keep it running after the compressor shuts off for a short time to save energy in some systems. | OFF
COOL FAN DELAY |
You can set the cooling fan delay to OFF, 15, 30, 60 or 90
seconds. If 15, 30, 60, or 90 is selected the fan will not turn on for that many seconds when there is a call for cool and will run for that many seconds after satisfying a call for cool. |
OFF |
| Tech Setup Steps | LCD Will Show | Adjustment Options | Default | |
|
Stages of Heat |
You can configure the thermostat to operate a 3 stage heat pump system.
2H 2C = 2 heat, 2 cool 3H 2C = 3 heat, 2 cool This feature is shown only if the HEAT PUMP technician setup step is ON. |
2H2C
STAGE |
Use the or key to change between 2 or 3 stages of heat. 2 heat will use Y1 as first stage and W2 as auxiliary.
3 heat will use Y1 as the first stage, Y2 as the second stage and W2 as the auxiliary. |
2 STAGES |
|
Satisfy Setpoint |
This feature allows the thermostat to keep multiple stages of heat or cool energized until the setpoint is satisfied. |
SS STAGING |
Use the or key to turn on or off. | OFF |
|
Staging Delay |
This feature allows a delay to occur if an additional stage is needed. This allows the previous stage extra time to satisfy the setpoint. | 5
STAGING dl |
Use the or key to select OFF, 5, 10, 15, 30, 45,
60, or 90 minutes. |
OFF |
| Tech Setup Steps | LCD Will Show | Adjustment Options | Default | |
| Heating Temperature Setpoint Limit | This feature allows you to set a maximum heating setpoint limit. The setpoint temperature cannot be raised above this value. | 90
HE |
Use the or key to select the maximum heat setpoint. | 90˚F |
| Cooling Temperature Setpoint Limit | This feature allows you to set a minimum cooling setpoint limit. The setpoint temperature cannot be lowered below this value. | 44
CO |
Use the or key to select the minimum cool setpoint. | 44˚F |
|
˚F or ˚C |
This feature allows you to display temperatures in either Fahrenheit or Celsius. |
O 74F |
˚F for Fahrenheit
˚C for Celsius |
˚F |
| 12 or 24 Hour Clock | You can select either a 12 or 24 hour clock setting. | 12H
CLOCK SET |
Use the or key to select 12 or 24 hour clock. | 12 |
| HOUR CLOCK | ||||
|
Morning Recovery |
This feature will start heating early to bring the building temperature to its programmed setpoint by the beginning of the WAKE, OCCUPIED time period. |
MORN RECOV |
Use the or key to turn on or off. | ON |
| Program Options | You can configure this thermostat to have a 7 day program, a 5+1+1 program or as nonprogrammable. | 5d
PROGRAM |
Use the or key to select 7d for 7 day, 5d for 5+1+1, or 0d for nonprogrammable. | 5d |
|
Time Periods |
You can configure this thermostat to have 2 or 4 programmable time periods per day. 4 time periods are Wake, Leave, Return & Sleep. 2C time periods are Occupied
& Unoccupied. 4C time periods are Occupied 1, Unoccupied 1, Occupied 2, & Unoccupied 2. |
4
TIME PERIOD |
Use the or key to select 4, 2c, or 4c time periods per day. |
4 |
| Tech Setup Steps | LCD Will Show | Adjustment Options | Default | |
|
Pre-Occupancy Fan |
The pre-occupancy fan settings will energize the fan before
the occupied time to provide ventilation prior to scheduled occupancy. This feature only shows if the technician setup step for time periods is set to 2C or 4C. |
OFF
PRE OCCUPY FAN |
You can select the
pre-occupancy fan from OFF, 1, 2, or 3 hours. If 1, 2, or 3 is selected, the fan will turn on that many hours prior to the scheduled occupied time period. |
OFF |
|
Always ON Light |
The display light can be configured to stay on all the time or come on when any key is pressed.
NOTE: HARDWIRE ONLY Keeping the display light continually “ON” will greatly reduce battery life. |
dL ALWAYS ON |
Use the or key to to turn on or off.
OFF configures the display light to come on when the light key or any button is pressed. ON configures the display light to stay on. |
OFF |
|
Contractor Call Number |
Allows you to put your phone number in the display.
You can choose ON or OFF. |
OFF
PHONE NUM |
If selected ON, you will see the input screen after pressing NEXT STEP.
Use the or key to select the desired number and the or key to move from one character to another. See note below for operation. |
OFF |
|
Beep |
When any key is pressed an audible beep will sound.
You can choose ON or OFF. |
b |
If ON is selected the beep will sound.
If OFF is selected there is no sound. |
ON |
Set Time (If using programming)
- Press the MENU button.
- Press SET TIME.
- Day of the week is flashing. Use the key to select the current day of the week.
- Press Next Step.
- The current hour is flashing. Use the key to select the current hour. When using 12-hour time, make sure the correct a.m. or p.m. choice is selected.
- Press Next Step.
- Minutes are now flashing. Use the key to select current minutes.
- Press DONE when completed
Programming
Your thermostat can be programmed to have each day of the week programmed uniquely (7 days), all the weekdays the same with a separate program for Saturday and a separate program for Sunday (5+1+1), or non-programmable. For the 7-day and 5+1+1 programming modes, there are three time period options.
- “4” Residential (WAKE, LEAVE, RETURN, SLEEP)
- “2C” Commercial (OCCUPIED, UNOCCUPIED)
- “4C” Commercial (OCCUPIED 1, UNOCCUPIED 1, OCCUPIED 2, UNOCCUPIED 2)
Default Programming
| Day of the Week | Events | Time | Setpoint Temperature (HEAT) | Setpoint Temperature (COOL) |
|
Weekday |
Wake/OCC1 | 6 AM | 70˚F (21˚C) | 75˚F (24˚C) |
| Leave/UNOCC1 | 8 AM | 62˚F (17˚C) | 83˚F (28˚C) | |
| Return/OCC2 | 6 PM | 70˚F (21˚C) | 75˚F (24˚C) | |
| Sleep/UNOCC2 | 10 PM | 62˚F (17˚C) | 78˚F (26˚C) | |
|
Saturday |
Wake/OCC1 | 6 AM | 70˚F (21˚C) | 75˚F (24˚C) |
| Leave/UNOCC1 | 8 AM | 62˚F (17˚C) | 83˚F (28˚C) | |
| Return/OCC2 | 6 PM | 70˚F (21˚C) | 75˚F (24˚C) | |
| Sleep/UNOCC2 | 10 PM | 62˚F (17˚C) | 78˚F (26˚C) | |
|
Sunday |
Wake/OCC1 | 6 AM | 70˚F (21˚C) | 75˚F (24˚C) |
| LeaveUNOCC1 | 8 AM | 62˚F (17˚C) | 83˚F (28˚C) | |
| Return/OCC2 | 6 PM | 70˚F (21˚C) | 75˚F (24˚C) | |
| Sleep/UNOCC2 | 10 PM | 62˚F (17˚C) | 78˚F (26˚C) | |
| Day of the Week | Events | Time | Setpoint Temperature (HEAT) | Setpoint Temperature (COOL) |
|
Weekday |
OCCUPIED | 8 AM | 70˚F (21˚C) | 72˚F (22˚C) |
| UNOCCUPIED | 6 PM | 64˚F (18˚C) | 80˚F (27˚C) | |
|
Saturday |
OCCUPIED | 8 AM | 70˚F (21˚C) | 72˚F (22˚C) |
| UNOCCUPIED | 6 PM | 64˚F (18˚C) | 80˚F (27˚C) | |
|
Sunday |
OCCUPIED | 8 AM | 70˚F (21˚C) | 72˚F (22˚C) |
| UNOCCUPIED | 6 PM | 64˚F (18˚C) | 80˚F (27˚C) | |
Set Program Schedule For Two Time Periods
- Select HEAT or COOL with the SYSTEM key.
- Note: You have to program heat and cool each separately.
- Press the MENU button (If menu does not appear first, press RUN SCHED).
- Press SET SCHED. Note: Monday-Friday is displayed and the OCCUPIED text is shown. You are now programming the OCCUPIED time period for the weekday setting.
- Use the key to make your time selection for the weekday OCCUPIED time period.
- Note: If you want the fan to run continuously during this time period, select ON with the FAN key.
- Then use the key to make your setpoint selection for the weekday OCCUPIED period.
- Press Next Step.
- Repeat steps 4 through 7 for the weekday UNOCCUPIED time period.
Weekday:
- Select HEAT or COOL with the SYSTEM key.
- Note: You have to program heat and cool each seperately.
- Press the MENU button (If menu does not appear first press RUN SCHED).
- Press SET SCHED. Note: Monday is displayed and the OCCUPIED text is shown. You are now programming the OCCUPIED time period for that day.
- Time is flashing. Use the key to make your time selection for that day’s OCCUPIED time period.
- Note: If you want the fan to run continuously during this time period, select ON with the FAN key.
- Then use the key to make your setpoint selection for that day’s OCCUPIED period.
- Press NEXT STEP.
- Repeat steps 4 through 7 for that day’s UNOCCUPIED time period.
Monday:
- Select HEAT or COOL with the SYSTEM key.
- Note: You have to program heat and cool each seperately.
- Press the MENU button (If menu does not appear first press RUN SCHED).
- Press SET SCHED. Note: Monday is displayed and the OCCUPIED text is shown. You are now programming the OCCUPIED time period for that day.
- Time is flashing. Use the key to make your time selection for that day’s OCCUPIED time period.
- Note: If you want the fan to run continuously during this time period, select ON with the FAN key.
- Then use the or key to make your setpoint selection for that day’s OCCUPIED period.
- Press NEXT STEP.
- Repeat steps 4 through 7 for that day’s UNOCCUPIED time period.
Features
Temporary & Permanent Hold Feature
- Temporary Hold: The thermostat will display HOLD and Run Schedule on the bottom of the screen when you press the or key.
If you do nothing, the temperature will remain at this setpoint temporarily for 4 hours. The program setpoint will then replace the temporary setpoint. - Permanent Hold: With a temporary hold set, If you press the HOLD key at the bottom of your screen, you will see HOLD appear next to the setpoint temperature in the display. The thermostat will now
permanently stay at this setpoint and can be adjusted using the or keys. - To Return To Program: Press the Run Schedule key at the bottom of the screen to exit temporary and permanent holds
Filter Change Reminder
If your installing contractor has configured the thermostat to remind you when the air filter needs changed, you will see a reminder in the display when your air filter needs changed. the reminder will be shown in the display after your system has run long enough to require an air filter change. Resetting the filter change reminder: When the reminder is displayed, you should change your air filter and reset the reminder by holding down the “Clean” key on the left side of the thermostat for 3 seconds.
Specifications
- The display range of temperature … 41˚F to 95˚F (5˚C to 35˚C)
- The control range of temperature…. 44˚F to 90˚F (7˚C to 32˚C)
- Load Rating……………………………………….. 1 amp per terminal, 1.5 amp maximum all terminals combined
- Swing (cycle rate or differential) …… The heating is adjustable from 0.2˚ to 2.0˚
- Cooling is adjustable from 0.2˚ to 2.0˚
- Power source …………………………………….18 to 30 VAC, NEC Class II, 50/60 Hz for hardwire
- Battery power from 2 AA Alkaline batteries
- Operating ambient …………………………. 32˚F to +105˚F (0˚C to +41˚C)
- Operating humidity ………………………… 90% non-condensing maximum
- Dimensions of thermostat …………….. 4.7” W x 4.3” H x 1.1” D
Reference
Download Manual:
Vive Comfort TP-S-955C Non-Programmable Thermostat Installation Manual
OTHER MANUALS
Vive Comfort TP-S-955C Non-Programmable Thermostat Operational Manual

Vive Comfort TP-S-955C Non-Programmable Thermostat Installation Manual