Vive Comfort TP-P-625 Programmable Thermostat
Installation Tips
Wall Locations
The thermostat should be installed approximately 4 to 5 feet above the floor. Select an area with average temperature and good air circulation.
Installation Tip
Pick an installation location that is easy for the user to access. The temperature of the location should be representative of the building.
Do not install thermostat in locations:
- Close to hot or cold air ducts
- That are in direct sunlight
- With an outside wall behind the thermostat
- In areas that do not require conditioning
- Where there are dead spots or drafts (in corners or behind doors)
- Where there might be concealed chimneys or pipes
Subbase Installation
- Horizontal Mount
- Vertical Mount

Mount Thermostat
Align the 4 tabs on the subbase with corresponding slots on the back of the thermostat, then push gently until the thermostat snaps in place

All of our products are mercury-free. However, if the product you are replacing contains mercury, dispose of it properly. Your local waste management authority can give you instructions on recycling and proper disposal.
Battery Installation
Battery installation is recommended even if thermostat is hardwired (C terminal connected). When the thermostat is hardwired and batteries are installed, the thermostat will activate a compressor delay of 5 minutes when the thermostat detects a power outage from the hardwired power supply.
Important:
High quality alkaline batteries are recommended. Rechargeable batteries or low quality batteries do not guarantee a 1-year life span.
Thermostat Quick Reference
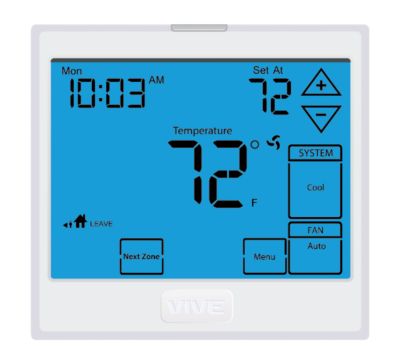
Getting to know your thermostat

- LCD Display
- Glow in the dark light button
- Fan Switch
- System Switch
- Easy change battery door
- Temperature Setpoint Buttons
Getting to know your thermostat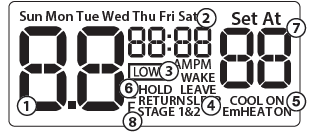
- Indicates the current room temperature
- Time and day of the week
- Low Battery Indicator: Replace batteries when this indicator is shown.
- Button Options
- Program Time Periods: This thermostat has 4 programmable time periods per day.
- System Operation Indicators:
- The COOL ON, HEAT ON or
 icon will display when the COOL, HEAT, or (fan) is on.
 - Note: The Compressor delay feature is active if these are flashing.
- Hold is displayed when the thermostat program is permanently overridden.
- Setpoint: Displays the user-selectable setpoint temperature.
- Stages: Indicates the stages of heat that are active.
Important
The low battery indicator is displayed when the AA battery power is low. If the user fails to replace the battery within 21 days, the screen will only show the low battery indicator but maintain all functionality. If the user fails to replace the batteries after an additional 21 days (days 22-42 since first “low battery” display) the setpoints will change to 55˚F (Heating) and 85˚F (Cooling). If the user adjusts the setpoint away from either of these, it will hold for 4 hours and then return to either 55˚F or 85˚F. After day 63 the batteries must be replaced immediately to avoid freezing or overheating because the thermostat will shut the unit off until the batteries are changed.
Wiring
- If you are replacing a thermostat, make note of the terminal connections on the thermostat that is being replaced. In some cases, the wiring connections will not be color coded. For example, the green wire may not be connected to the G terminal.
- Loosen the terminal block screws. Insert wires then retighten terminal block screws.
- Place non-flammable insulation into the wall opening to prevent drafts.
Warning
All components of the control system and the thermostat installation must conform to Class II circuits per the NEC Code.
Installation Tip
Do not overtighten terminal block screws, as this can damage the terminal block. A damaged terminal block can keep the thermostat from fitting on the subbase correctly or cause system operation issues.
Max Torque = 6in-lbs.
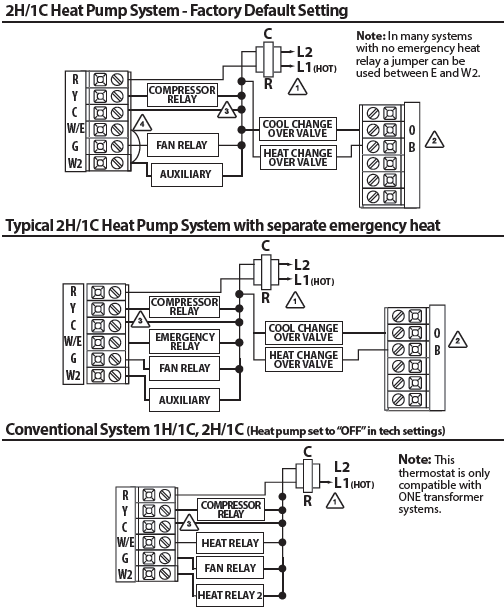
Terminal Designations
| R | Transformer Power | Transformer Power |
| C | Transformer Common | Transformer Common |
| B | Changeover Valve Energized in HEAT | Energized in HEAT |
| O | Changeover Valve Energized in COOL | Energized in COOL |
| G | Fan Relay | Fan Relay |
| W/E | First Stage of Emergency HEAT | First Stage of HEAT |
| W2 | Second Stage of HEAT/ EMERGENCY HEAT | Second Stage of HEAT |
| Y | First Stage of HEAT and COOL | First Stage of COOL |
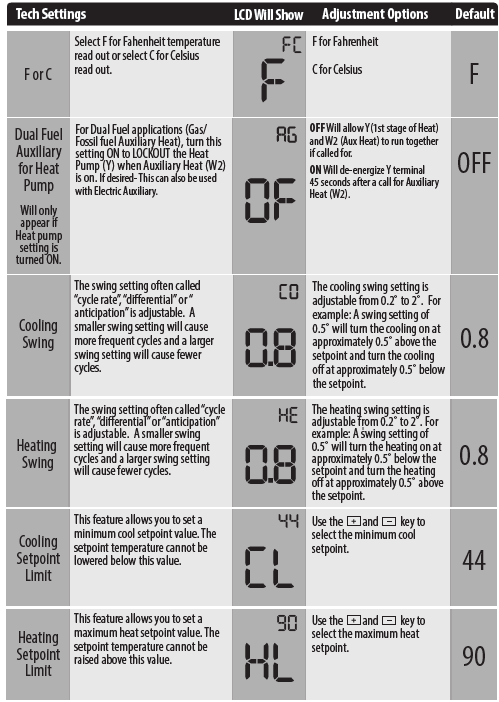
Tech Settings
This thermostat has a technician setup menu for easy installer configuration. To set up the thermostat for your particular application:
- To enter all other steps press and hold and buttons together for 3 seconds. This 3 second delay is designed so that homeowners do not accidentally access the installer settings.
- Use and buttons to set.
- Press the Program button to advance to the next step.
- Press the time button to go back to the previous stop.
- Press the Hold/Run button to exit
Swing Setting Tip
The temperature swing, sometimes called differential or cycle rate, can be customized for this individual application. For most applications choose a swing setting that is as long as possible without making the occupants uncomfortable.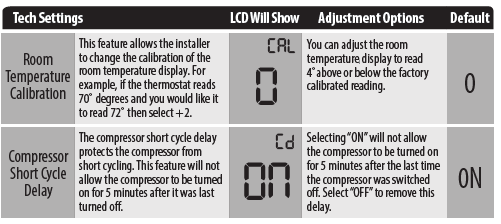
Wiring Diagrams
- Power supply
- Use either O or B terminals for the changeover valve.
- Optional 24 VAC common connection when the thermostat is used in battery power mode.
- Factory-supplied jumper
Features & Private Label Badge
Temporary and Permanent Hold Feature (If using programming)
Temporary Hold: At this time if you do nothing, the temperature will remain at this setpoint temporarily until next time period.
Permanent Hold: If you press the HOLD key on the left of your screen, you will see HOLD appear below the setpoint temperature in the display. The thermostat will now permanently stay at this setpoint and can be adjusted using the  keys.
keys.
To Return to Running Schedule: Press the RUN SCHED button on the left of your screen to exit either temporary or permanent hold.
About The Badge
All of our thermostats use the same universal magnetic badge. Visit the company website to learn more about our free private label program.
Tech Settings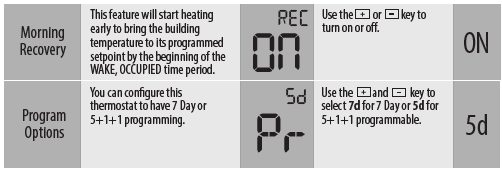
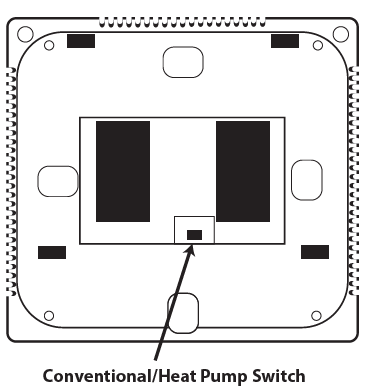
Conventional & Heat Pump
Programming
Set Time
- Press TIME
- Day of the week will be flashing. Use the or key to select the current day of the week.
- Press PROGRAM
- The current hour is flashing. Use the or key to select the current hour. Make sure the correct a.m. or p.m. choice is selected.
- Press PROGRAM
- Minutes are now flashing. Use the or key to select current minutes.
- Press the TIME button in order to go back a step.
- Press HOLD/RUN when completed.
Programming
All of our programmable thermostats are shipped with an energy-saving pre-program. You can customize this default program by following the steps on page 15.
There are four time periods for each program (WAKE, LEAVE, RETURN, SLEEP).

You can use the table below to plan your customized program schedule
Set Program Schedule
Weekday:
- Select HEAT or COOL with the system switch. Note: You have to program heat and cool each seperately.
- Press PROGRAM
- Monday-Friday is displayed and WAKE is shown. You are now programming the wake-time period for the weekday setting.
- Time is flashing. Use the or key to make your time selection for the weekday WAKE time period.
- Press PROGRAM
- The setpoint temperature is flashing. Use the or key to make your setpoint selection for the weekday wake period.
- Press PROGRAM
- Repeat steps 4 thru 7 for weekday LEAVE time period, for weekday RETURN time period, and for weekday SLEEP time period.
Saturday:
Repeat steps 4 thru 7 for the Saturday WAKE time period, LEAVE time period, RETURN time period, and for the Saturday SLEEP time period
Sunday
Repeat steps 4 thru 7 for the Sunday WAKE time period, LEAVE time period, RETURN time period, and for the Sunday SLEEP time period.
Specifications
- The display range of temperature … 41˚F to 95˚F (5˚C to 35˚C)
- The control range of temperature…. 44˚F to 90˚F (7˚C to 32˚C)
- Swing (cycle rate or differential) …… The heating is adjustable from 0.2˚ to 2.0˚
- Cooling is adjustable from 0.2˚ to 2.0˚
- Power source …………………………………….18 to 30 VAC, NEC Class II, 50/60 Hz for hardwire
- Battery power from 2 AA Alkaline batteries
- Operating ambient …………………………. 32˚F to +105˚F (0˚C to +41˚C)
- Operating humidity ………………………… 90% non-condensing maximum
- Dimensions of thermostat …………….. 4.7”W x 4.4”H x 0.8”D
Reference
Download Manual:
Vive Comfort TP-P-625 Programmable Thermostat Installation Manual
OTHER MANUALS
Vive Comfort TP-P-625 Programmable Thermostat IOperational Manual

Vive Comfort TP-P-625 Programmable Thermostat Installation Manual