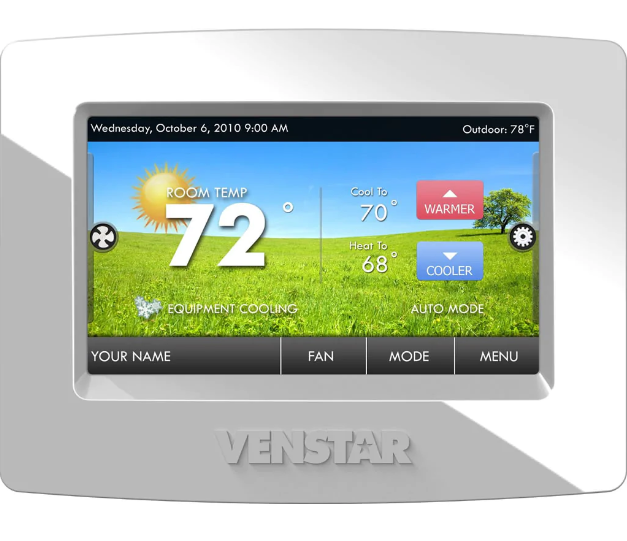
Venstar T5900 Touchscreen Digital Thermostat
CAUTION Follow the Installation Instructions before proceeding. Set the thermostat mode to “OFF” prior to changing settings in setup or restoring Factory Defaults. This device complies with Part 15 of the FCC Rules. Operation is subject to the following two conditions:
- this device may not cause harmful interference, and
- this device must accept any interference received, including interference that may cause undesired operation. This color touchscreen has the ability to receive updates to its firmware. Periodically firmware updates are released by the manufacturer to add features and/or performance enhancements. This manual was produced reflecting the most current firmware/feature set at the time of publication, firmware rev. 3.04. Firmware releases after rev. 3.04 may not be adequately depicted in this manual. Please refer to the appropriate website or contact your place of purchase to learn about changes to the thermostat after firmware release 3.04.

Glossary of Terms
- Auto-Changeover: A mode in which the thermostat will turn on the heating or cooling based on room temperature demand.
- Cool Setpoint: The warmest temperature that the space should rise to before cooling is turned on (without regard to deadband).
- Deadband: The number of degrees the thermostat will wait, once a setpoint has been reached, before energizing heating or cooling.
- Differential: The forced temperature difference between the heat setpoint and the cool setpoint.
- Heat Setpoint: The coolest temperature that the space should drop to before heating is turned on (without regard to deadband).
- Icon: The word or symbol that appears on the thermostat display. Mode: The current operating condition of the thermostat (i.e. Off, Heat, Cool, Auto, Program On).
- Non-Programmable Thermostat: A thermostat that does not have the capability of running Time Period Programming. Programmable Thermostat: A thermostat that has the capability of running Time Period Programming.
- Temperature Swing: Same as Deadband.
- Time Period Programming: A program that allows the thermostat to automatically adjust the heat setpoint and/or the cool setpoint based on the time of the day. Same as Schedule.
Get To Know Your Thermostat
Home Screen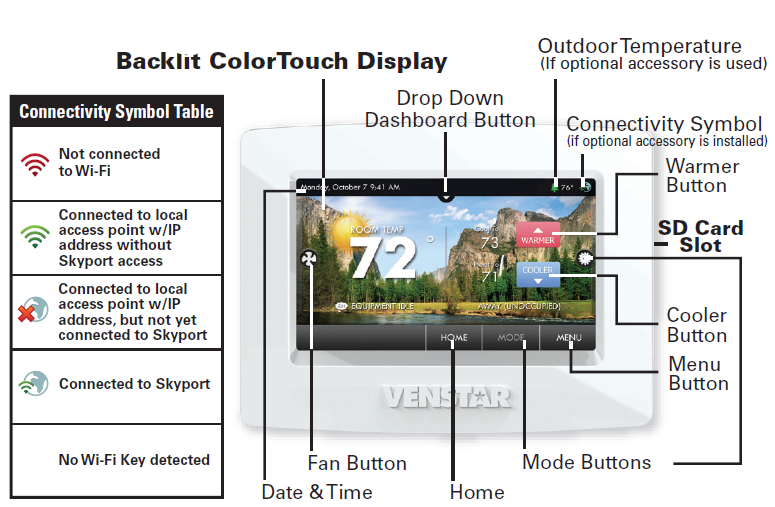
Main Menu Screen
Sub Menu Screen
Dropdown Dashboard
The Dropdown Dashboard displays temperature, humidity, and other readings. It will also show the high and low readings of the day.

Care and Use of Your Thermostat
Pencils, pens and other sharp objects should never be used on your thermostat; these may damage your touchscreen. Only use your fingertip to press the touchscreen buttons.

DO NOT USE ABRASIVE CLEANERS OR CLEANERS THAT CONTAIN SOLVENTS. DO NOT SPRAY ANYTHING DIRECTLY ONTO THE THERMOSTAT.
Quick Start
Temperature, Modes & Fan
Selecting Your Desired Temperature and Mode
Press or
or  to adjust the temperature
The Heat or Cool Setpoint is the temperature the room has to reach before heating or cooling will turn off. (Without regard to deadband)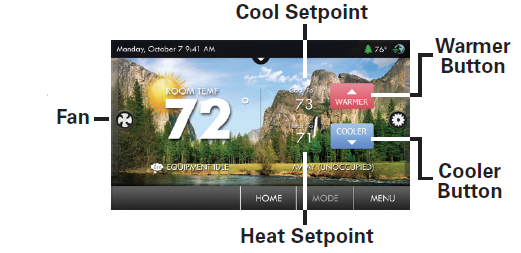
Press  or the MODE Icon

- HEAT will allow only heat operation.
- COOL will allow only cool operation.
- AUTO will allow both Heat and Cool operation. OFF – heating and cooling systems are turned off.
- AUTO-CHANGEOVER MODE – Pressing the WARMER or
- COOLER buttons in Auto mode will adjust both the heat and cool setpoints simultaneously. To adjust heat and cool setpoints individually, choose HEAT mode to adjust the heat setpoint and COOL mode to adjust the cool setpoint, then return to AUTO mode.
- HEAT OR COOL MODE – Pressing the WARMER or COOLER buttons in Heat or Cool mode will adjust only the heat or cool setpoints.
Press the FAN Icon 
FAN ON fan runs constantly even in OFF Mode.
FAN AUTO fan only runs with a heating or cooling demand.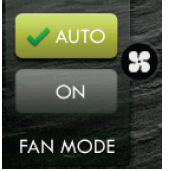
Set Time & Date
NOTE: When the thermostat is connected to the Skyport; the Time & Date are automatically synchronized to the Skyport Cloud, including automatic Daylight Savings adjustments.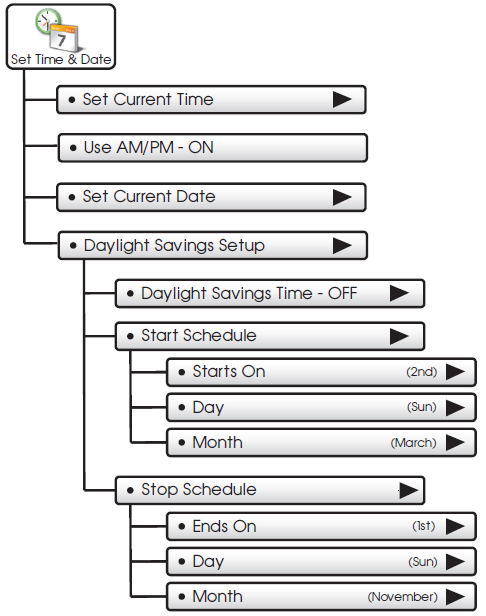
Setting the Time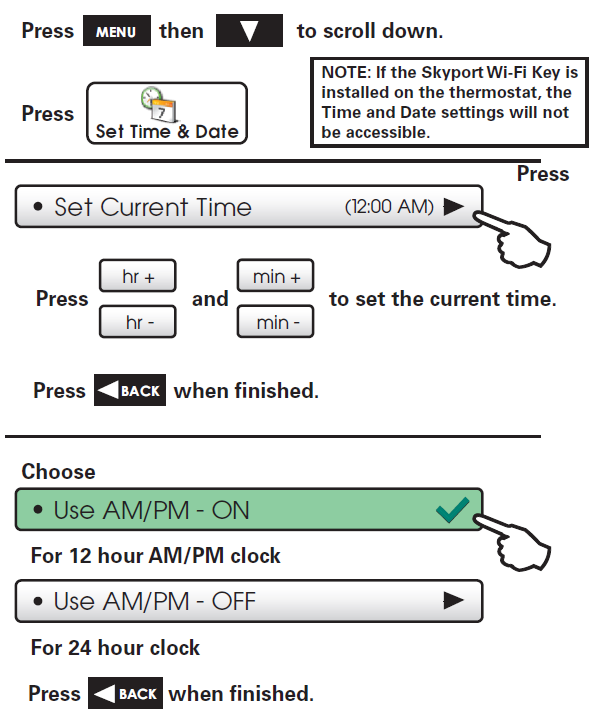
Setting the Date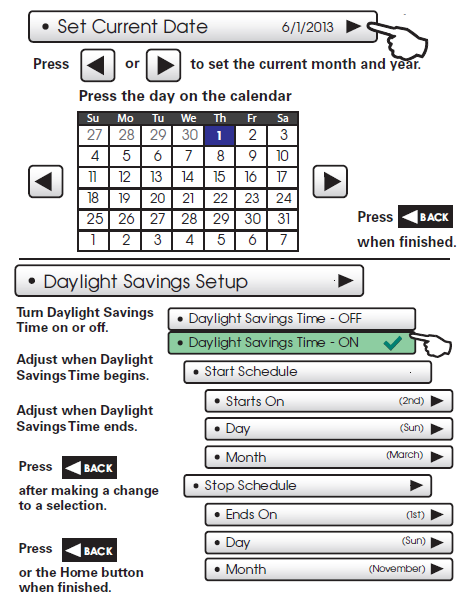
Schedule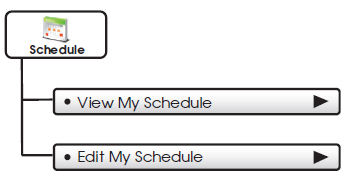
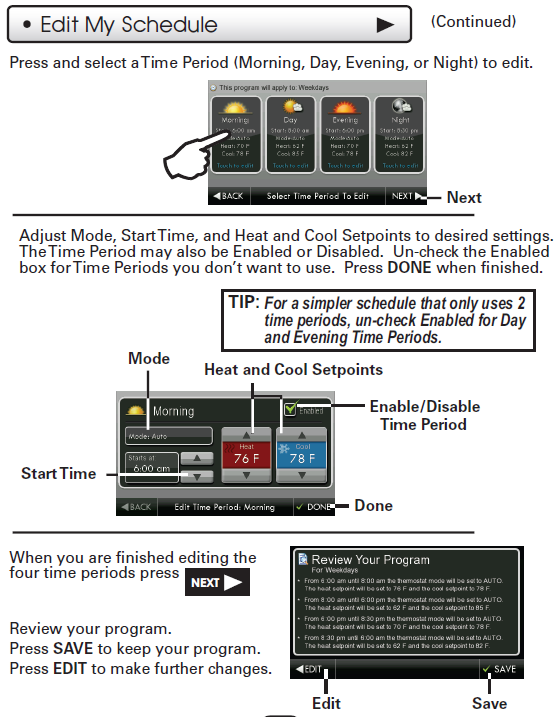
This thermostat features up to four programmable time periods per 24-hour day: Morning, Day, Evening, and Night. The start time for each time period is adjustable. The stop time for each time period is the start time for the next period.
Smart Fan

The fan may be programmed to turn on automatically for a specified period during the day.
Screensaver
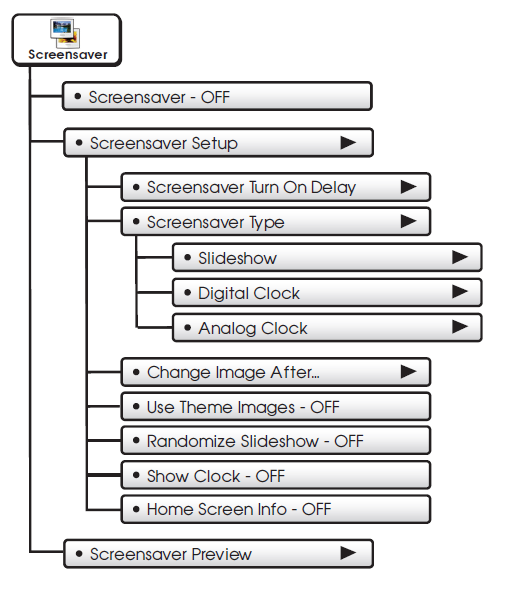
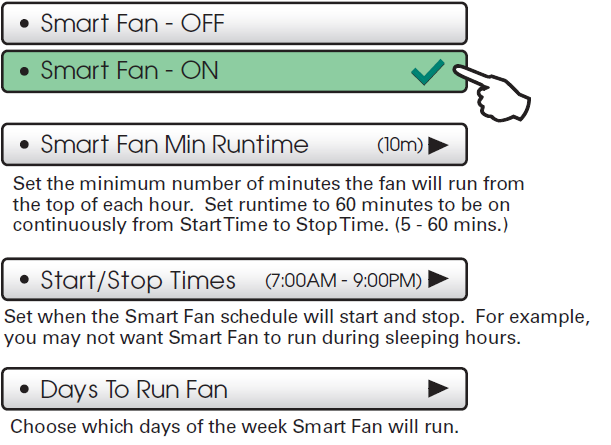
The Screensaver allows you to create custom slideshows.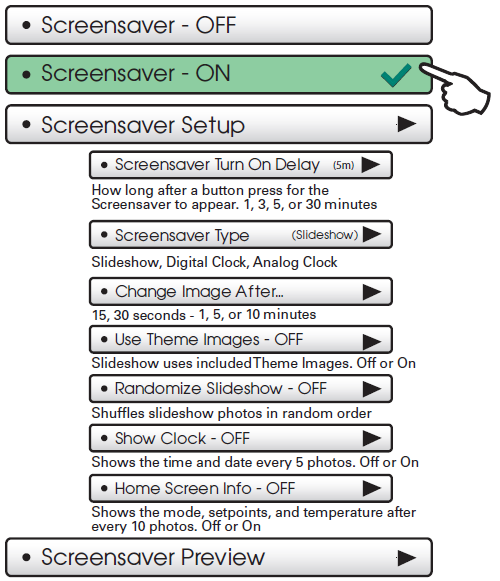
Press this button to preview your screensaver operation before returning to the Home Screen. After the preview, press anywhere on the screen to return to the sub menu.
Alerts
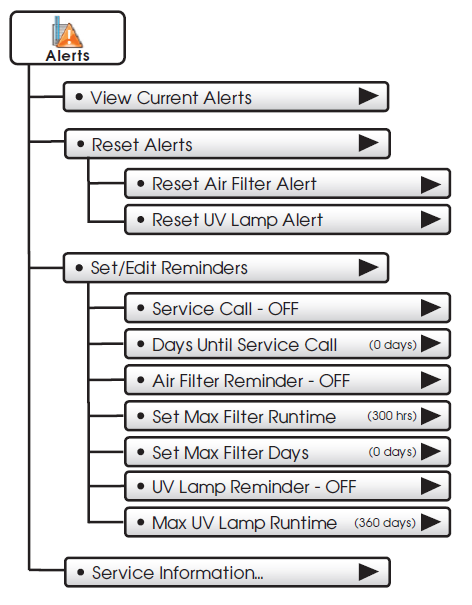
The alerts let you know when your system needs service.
Display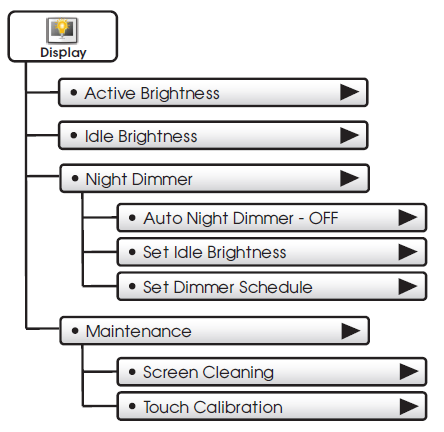
The display brightness options may be adjusted in this menu. 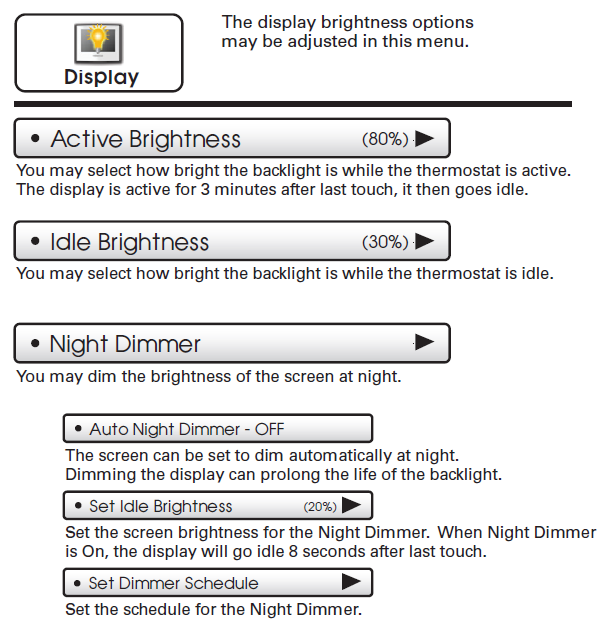
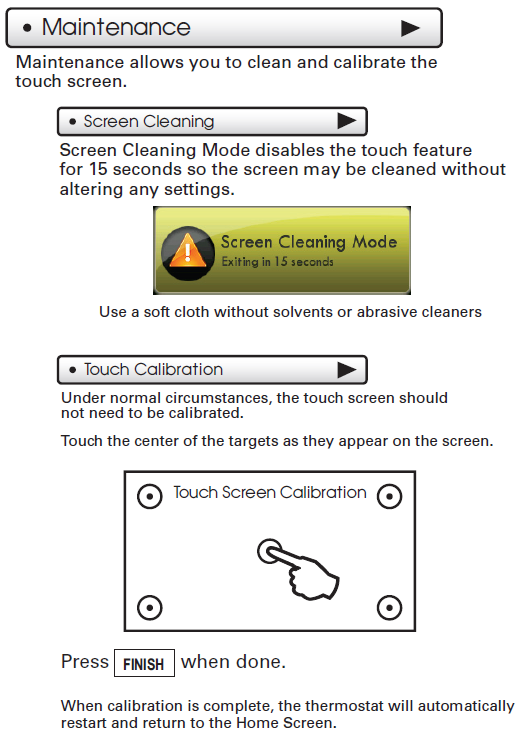
Preferences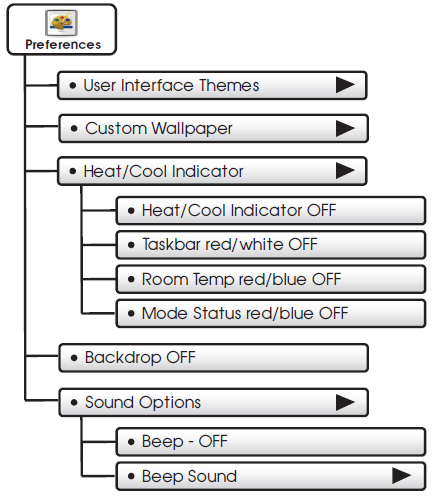
You may set the type of background that appears on the thermostat Home Screen.
Humidity The Humidity feature allows the thermostat to control a humidifier or use your air conditioner Humidity to dehumidify the space.
Vacation/Away
Vacation or pressing the AWAY button will use temporary, energy-saving settings without changing the regular schedule. Pressing the HOME button will return the thermostat to normal comfort settings.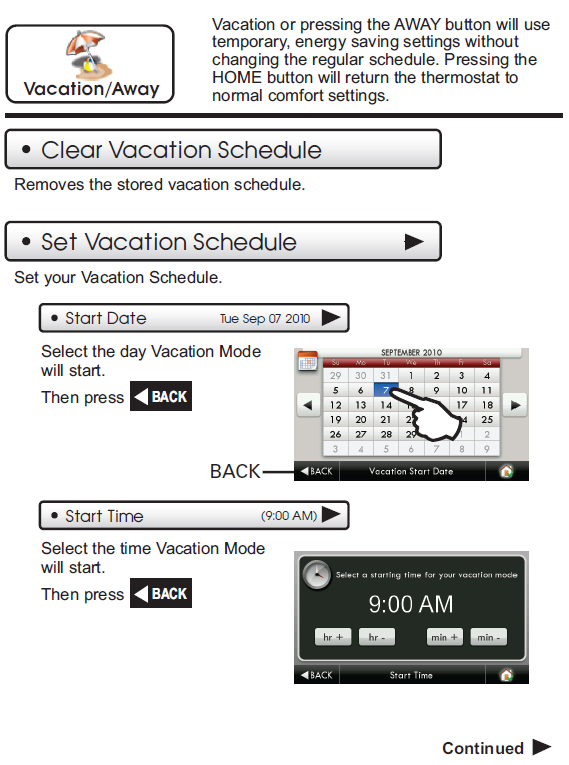

Security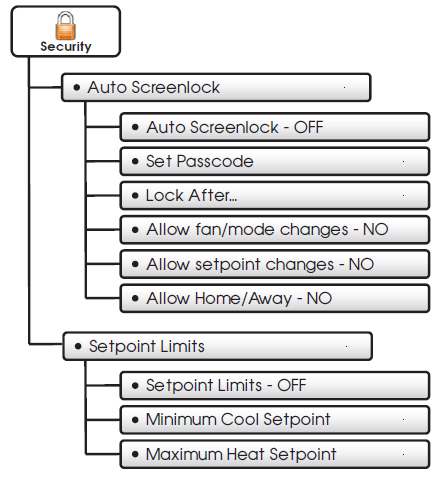
Security settings may be set to limit or prevent changes to your thermostat. 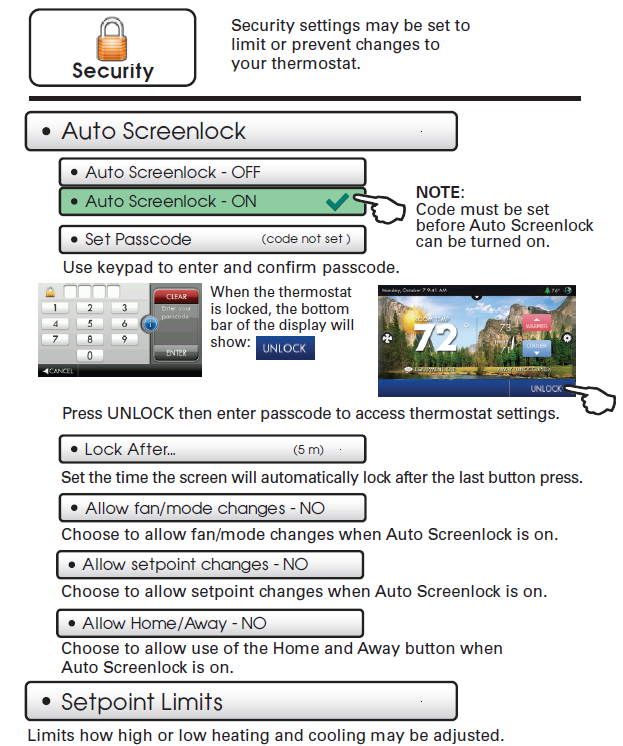
Information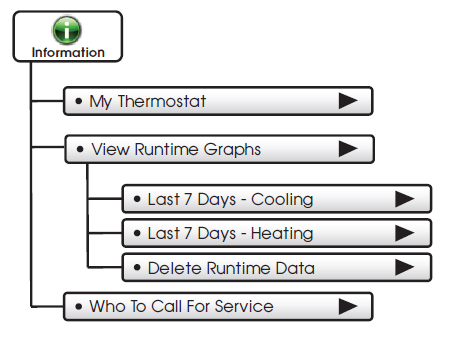
This button contains valuable service and system runtime information.
Settings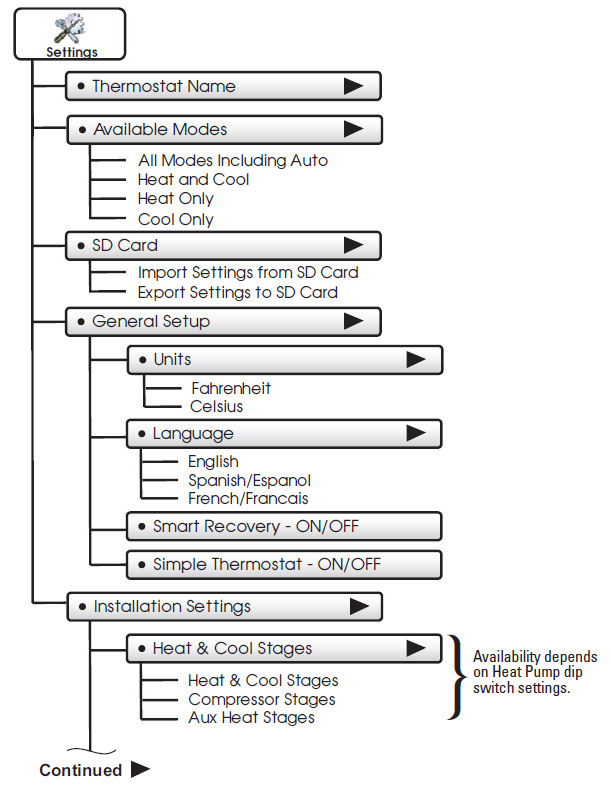
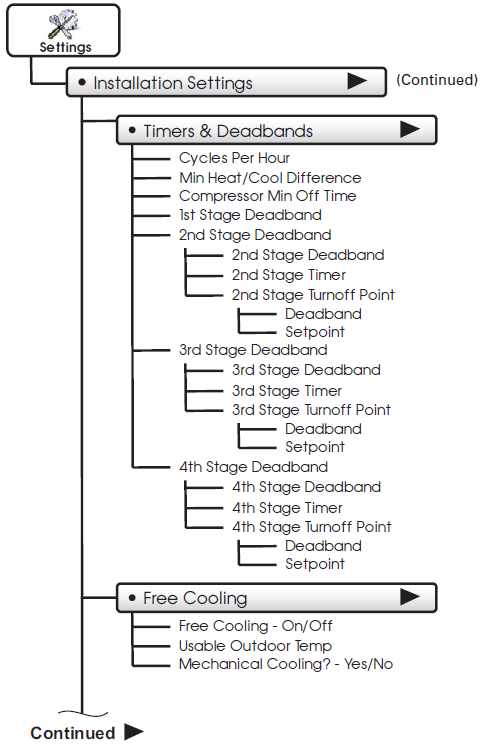
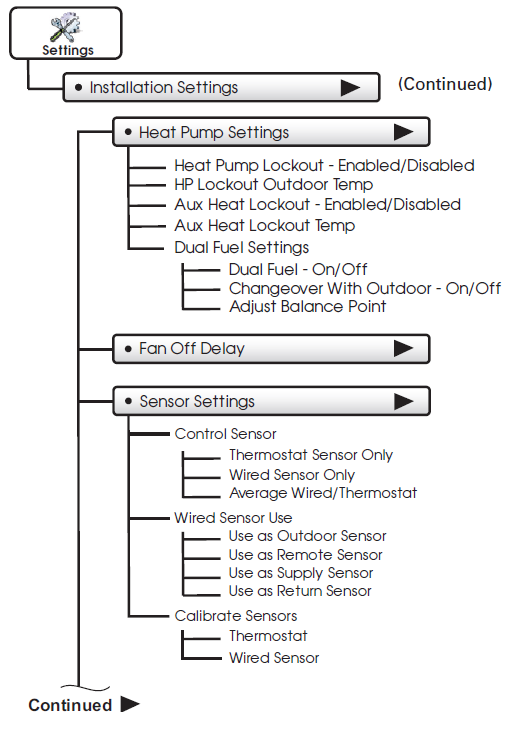
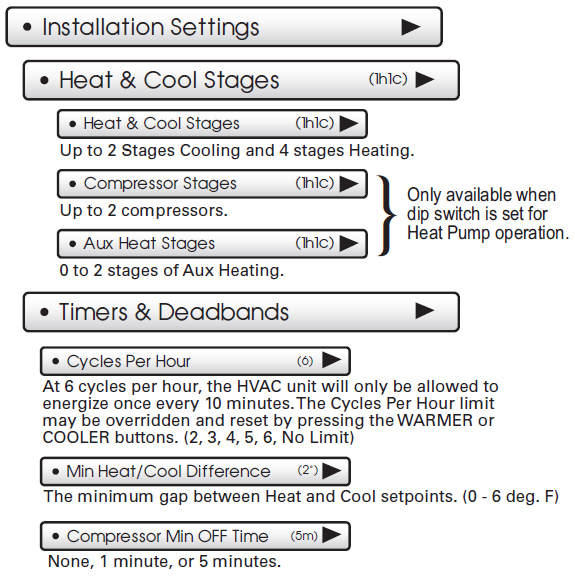
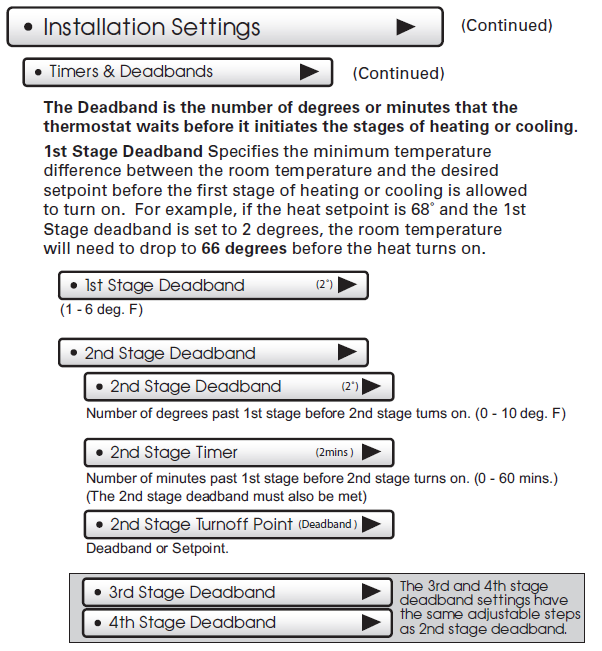
Thermostat heating and cooling options are found in this menu



Accessories

Emergency Heat
The Emergency Heat function is only available if your thermostat is set to control a Heat Pump.
To initiate the Emergency Heat feature, press the Emergency Heat button. During Emergency Heat operation, the thermostat will turn on the fan and auxiliary stages of heat when there is a demand for heat. The 1st stage of heating and all stages of cooling will be unavailable. To exit Emergency Heat, press the Emergency Heat button.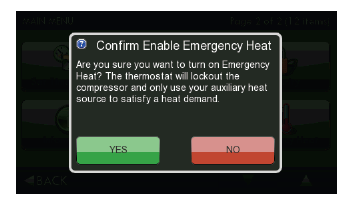
The ColorTouch Assistant
ColorTouch Assistant may be downloaded at no charge at: www.venstar.com/thermostats/colortouch/assistant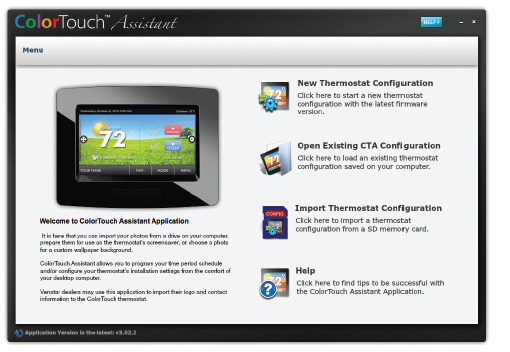
Every time the user runs the ColorTouch Assistant software, it automatically connects to Venstar ColorTouch website in the background and updates the software and firmware (the operating system for ColorTouch) at no cost.
The ColorTouch Assistant allows you to use your computer to:
- Upload photos for background and slideshow images
- Configure installation settings
- Update thermostat firmware
- Program a time period schedule
- Upload dealer and service contact information and company logo
Uploading Photos and Settings to your thermostat
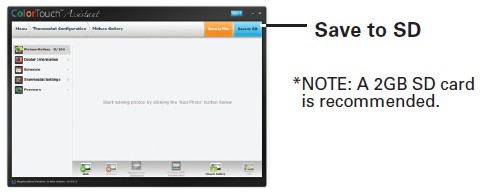
When you are finished adding and editing photos and settings, click on Save to SD. When prompted, remove the SD card from the SD card reader on your computer.
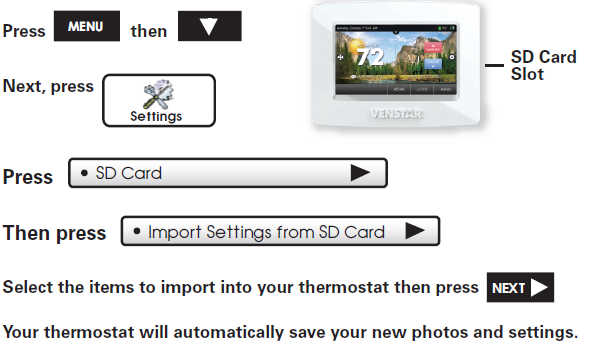
At the thermostat:
Insert the SD card into the SD Card Slot.
Installation Instructions
Remove and Replace the old thermostat
To install the thermostat properly, please follow these step-by-step instructions. If you are unsure about any of these steps, call a qualified technician for assistance.
- Assemble tools: Flat blade screwdriver, wire cutters, and wire strippers.
- Make sure your Heater/Air Conditioner is working properly before beginning the installation of the thermostat.
- Carefully unpack the thermostat. Save the screws, any brackets, and instructions.
- Turn off the power to the Heating/Air Conditioning system at the main fuse panel. Most residential systems have a separate breaker for disconnecting power to the furnace.
- Remove the cover of the old thermostat. If it does not come off easily, check for screws.
- Loosen the screws holding the thermostat base or subbase to the wall and lift away.
- Disconnect the wires from the old thermostat. Tape the ends of the wires as you disconnect them, and mark them with the letter of the terminal for easy reconnection to the new thermostat.
- Keep the old thermostat for reference purposes, until your new thermostat is functioning properly.
Wire Connections
If the terminal designations on your old thermostat do not match those on the new thermostat, refer to the chart below or the wiring diagrams that follow.
| Wire from the old thermostat terminal marked | Function | Install the new thermostat connector marked |
| G or F | Fan | G |
| Y1, Y or C | Cooling | Y1 |
| W1, W or H | Heating | W1/0/B |
| Rh, R, M, Vr, A | Power | R |
| C | Common | C |
| O/B | Rev. Valve | W1/O/B* |
| W2 | 2nd Stage Heat | W2 |
| Y2 | 2nd Stage Cooling | Y2 |
| W3 | 3rd Stage Heat | W3 |
| OUT – | Outdoor Sensor | SENSOR |
| OUT + | Outdoor Sensor | SENSOR |
Note: O/B is used if your system is a Heat Pump.
The T5800 Thermostat Backplate
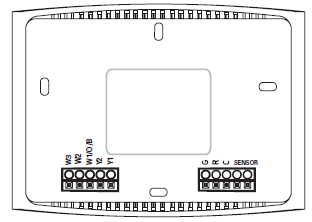
NOTE: The backplate does not fully cover a full size vertical junction box. The ACC-WPLWH ColorTouch Wallplate or a single-gang, horizontally mounted junction box would be needed for that type of installation.
To remove the thermostat backplate:
Using the Finger Pull Areas, pull the front housing away from the backplate.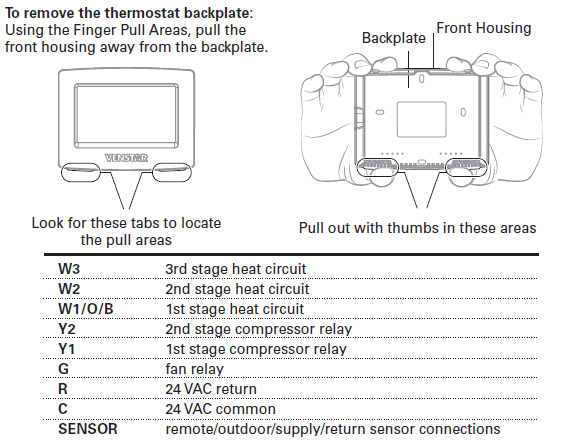
Dip switches are located on the back of the thermostat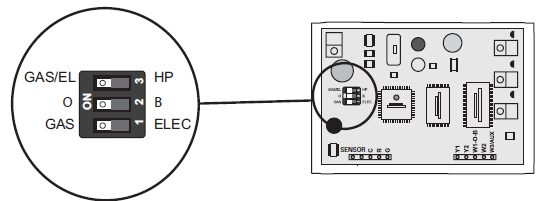
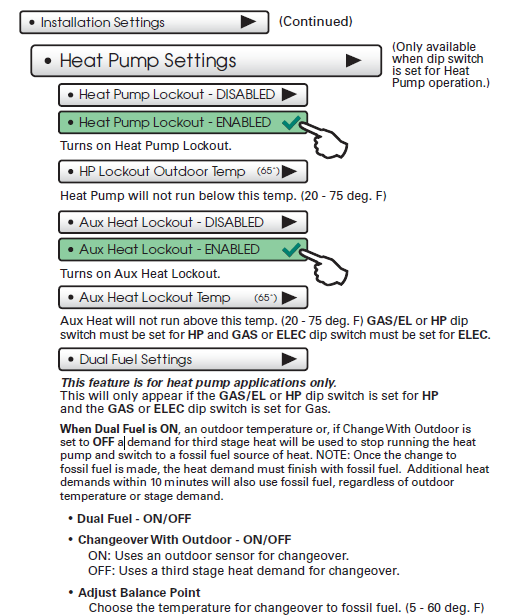
- This dip switch configures the thermostat to control a conventional gas/electric system or a heat pump. If your system is anything other than a heat pump, leave this switch set for GAS/EL.*
For some commercial heat pumps, this switch may need to be set for GAS/EL. Consult the commercial heat pump literature.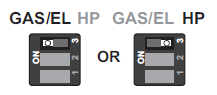
- When the GAS/EL or HP dip switch is configured for HP, this dip switch (O or B) must be set to control the appropriate reversing valve. If O is chosen, the W1/O/B terminal will energize in cooling. If B is chosen, the
W1/O/B terminal will energize in heating.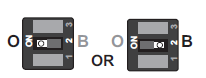
- When GAS/EL or HP is set for GAS/EL:
This switch (GAS or ELEC) controls how the thermostat will control the Fan (G) terminal in heating mode. When GAS is chosen, the thermostat will not energize the Fan (G) terminal in heating. When ELEC is chosen the thermostat will energize the fan in heating. - When GAS/EL or HP is set for HP:
This switch (GAS or ELEC) defines the Aux Heat type. When GAS is chosen, the auxiliary heat will not be allowed to run during heat pump operation. When using a Dual Fuel system, set this switch for GAS. When ELEC is chosen, up to two stages of auxiliary strip heat will be allowed to run.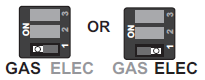
Sample Wiring Diagrams with Dip Switch Positions
Conventional Heating and Cooling Systems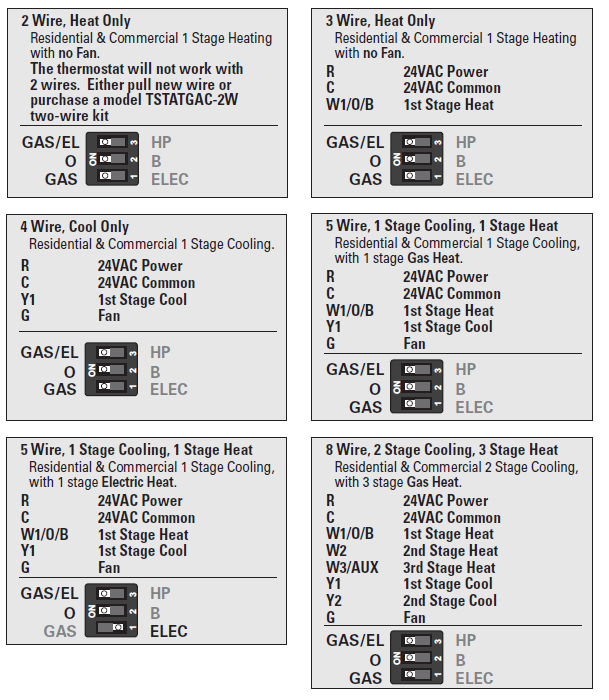
Heat Pump Systems
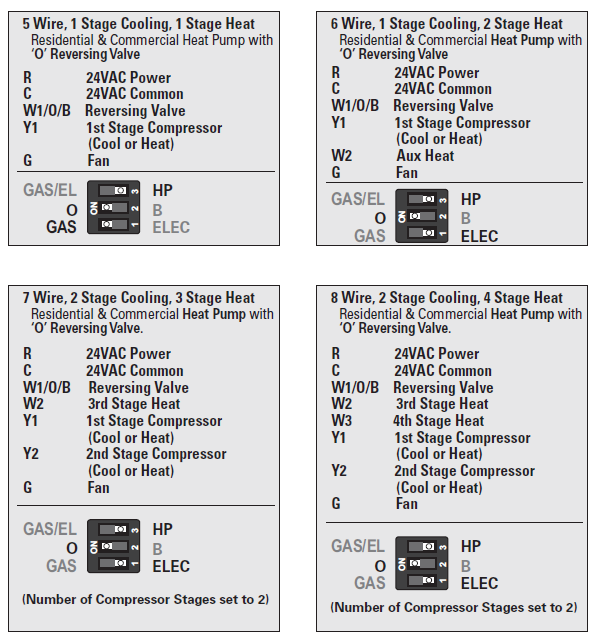
Heat Pump Systems with Dual Fuel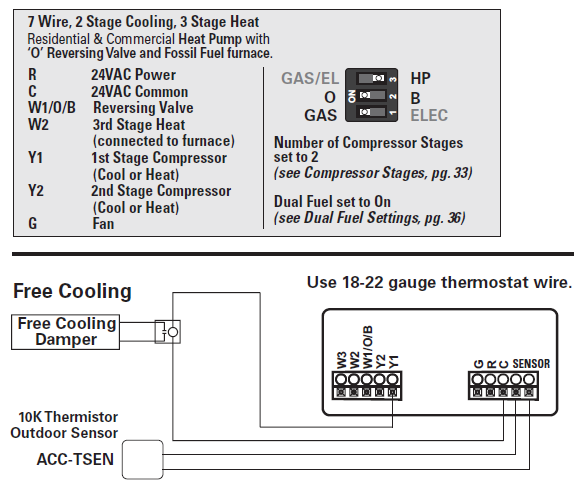
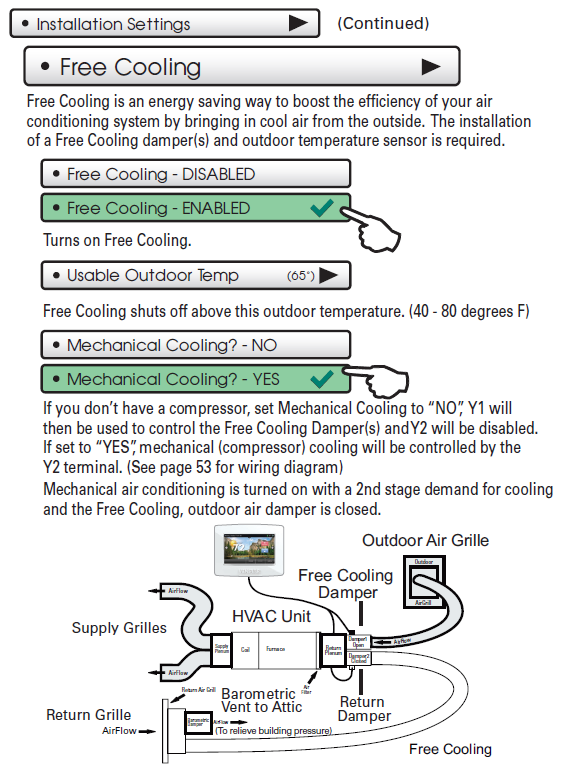
Free Cooling utilizes the Y1 terminal for the operation of 1st stage cooling. If mechanical (compressor) cooling is also present, the mechanical cooling is connected to the Y2 terminal in this instance.
Free Cooling may be used with a Gas/Electric or Heat Pump system. Temperature Sensor: ACC-TSEN Temperature Sensor 10K ohm sensor at 77F/25C. Negative Temperature Coefficient.
Sample Wiring Diagrams
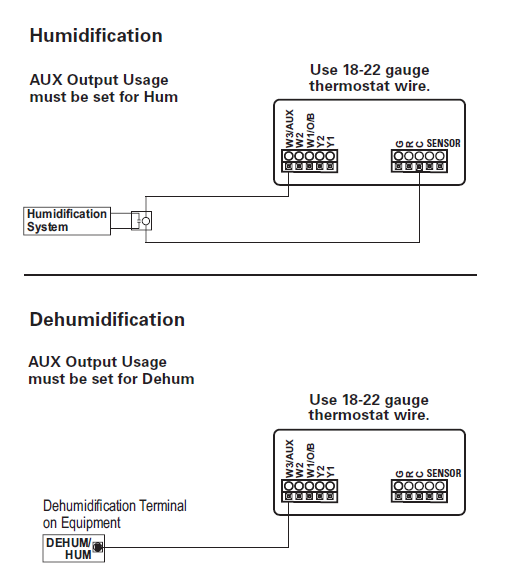
Troubleshooting
- SYMPTOM: The thermostat touchscreen buttons are not responsive.
CAUSE: The touchscreen is out of calibration.
REMEDY: Remove the thermostat from the backplate. Push the thermostat back onto the backplate, while keeping your finger pressed firmly against the center of the touchscreen until the Calibration screen appears. Re-calibrate the Touchscreen. - SYMPTOM: The display is blank.
CAUSE: Lack of proper power.
REMEDY: Make sure the power is on to the HVAC and that you have 24vac between R & C. - SYMPTOM: The air conditioning does not attempt to turn on.
CAUSE: The cooling setpoint is set too high.
REMEDY: Lower the cooling setpoint or lower the cooling set-point limit. See Setpoint Limits (page 28). - SYMPTOM: The heating does not attempt to turn on.
CAUSE: The heating setpoint is set too low.
REMEDY: Raise the heating setpoint or raise the heating set-point limit. See Setpoint Limits (page 28). - SYMPTOM: When controlling a residential heat pump, and asking for cooling, the heat comes on.
CAUSE: The thermostat reversing valve dip switch is set for “B”. REMEDY: Set the reversing valve jumper for “O”. - SYMPTOM: When calling for cooling, both the heat and cool come on.
CAUSE: The thermostat equipment dip switch is configured for “HP” and the HVAC unit is a Gas/Electric.
REMEDY: Set the equipment dip switch for “Gas”. - SYMPTOM: Air handler control board fuse blows when thermostat is attached to the backplate with power on, but does not blow until the thermostat is placed onto the backplate.
CAUSE: The Outdoor sensor and/or sensor wiring is shorted.
REMEDY: Check/replace Outdoor sensor and/or sensor wiring.
Warranty
One-Year Warranty – This Product is warranted to be free from defects in material and workmanship. If it appears within one year from the date of original installation, whether or not actual use begins on that date, that the product does not meet this warranty, a new or remanufactured part, at the manufacturer’s sole option to replace any defective part, will be provided without charge for the part itself provided the defective part is returned to the distributor through a qualified servicing dealer.
THIS WARRANTY DOES NOT INCLUDE LABOR OR OTHER COSTS incurred for diagnosing, repairing, removing, installing, shipping, servicing or handling of either defective parts or replacement parts. Such costs may be covered by a separate warranty provided by the installer.
THIS WARRANTY APPLIES ONLY TO PRODUCTS IN THEIR ORIGINAL INSTALLATION LOCATION AND BECOMES VOID UPON REINSTALLATION.
LIMITATIONS OF WARRANTIES – ALL IMPLIED WARRANTIES (INCLUDING IMPLIED WARRANTIES OF FITNESS FOR A PARTICULAR PURPOSE AND MERCHANTABILITY) ARE HEREBY LIMITED IN DURATION TO THE PERIOD FOR WHICH THE LIMITED WARRANTY IS GIVEN. SOME STATES DO NOT ALLOW LIMITATIONS ON HOW LONG AN IMPLIED WARRANTY LASTS, SO THE ABOVE MAY NOT APPLY TO YOU. THE EXPRESSED WARRANTIES MADE IN THIS WARRANTY ARE EXCLUSIVE AND MAY NOT BE ALTERED, ENLARGED, OR CHANGED BY ANY DISTRIBUTOR, DEALER, OR OTHER PERSON WHATSOEVER.
ALL WORK UNDER THE TERMS OF THIS WARRANTY SHALL BE PERFORMED DURING NORMAL WORKING HOURS. ALL REPLACEMENT PARTS, WHETHER NEW OR REMANUFACTURED, ASSUME AS THEIR WARRANTY PERIOD ONLY THE REMAINING TIME PERIOD OF THIS WARRANTY.
THE MANUFACTURER WILL NOT BE RESPONSIBLE FOR:
- Normal maintenance as outlined in the installation and servicing instructions or owner’s manual, including filter cleaning and/or replacement and lubrication.
- Damage or repairs required as a consequence of faulty installation, misapplication, abuse, improper servicing, unauthorized alteration or improper operation.
- Failure to start due to voltage conditions, blown fuses, open circuit breakers or other damages due to the inadequacy or interruption of electrical service.
- Damage as a result of floods, winds, fires, lightning, accidents, corrosive environments or other conditions beyond the control of the Manufacturer.
- Parts not supplied or designated by the Manufacturer, or damages resulting from their use.
- Manufacturer products installed outside the continental U.S.A., Alaska, Hawaii, and Canada.
- Electricity or fuel costs or increases in electricity or fuel costs for any reason whatsoever including additional or unusual use of supplemental electric heat.
- ANY SPECIAL INDIRECT OR CONSEQUENTIAL PROPERTY OR COMMERCIAL DAMAGE OF ANY NATURE WHATSOEVER. Some states do not allow the exclusion of incidental or consequential damages, so the above may not apply to you.
This warranty gives you specific legal rights and you may also have other rights which may vary from state to state.
Printed on recycled paper. P/N 88-860 Rev. 7 8/14
Reference
Download manual:
Venstar T5900 Touchscreen Digital Thermostat Owner Manual
Other manuals:
Venstar T5900 Touchscreen Digital Thermostat Quick Setup Guide
