Venstar T1700 Programmable Thermostat Thermostat
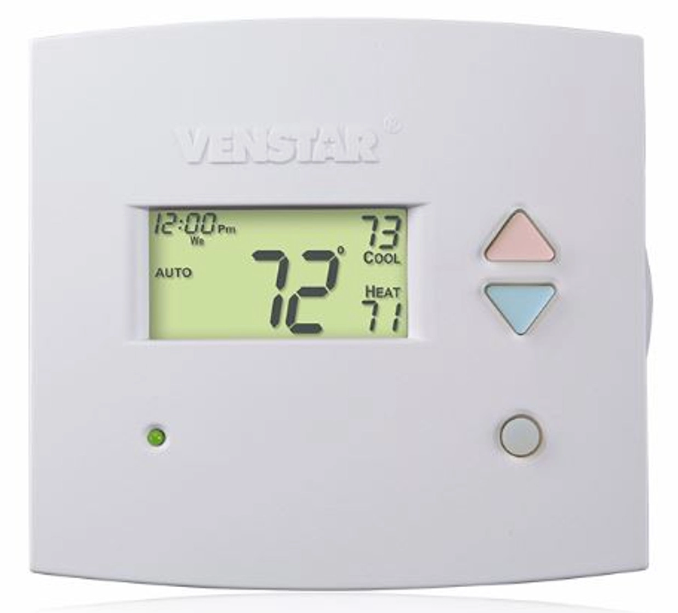
CONFIGURABLE IN SETUP:
- Auto or Manual changeover
- Programmable or Non-Programmable
- Control up to 2 Heat &
- 1 Cool Stages
- Backlit Display & Button
- Legends
- Aux Heat Indicator
- Outdoor Sensor Ready
- Accepts EZ Programmer
- Accepts Optional IR
- Remote Control
- Accepts Comfort Call
- Phone Control Accessory
Use with most Air Conditioning & Heating Systems including: 1 or 2 Stage Electric Cooling & 3 Stage Gas Heating, Heat Pump, Electric or Hydronic Heat.
Installation Instruction
CAUTION Follow the Installation Instructions before proceeding. Set the thermostat mode to “OFF” prior to changing settings in setup or restoring Factory Defaults.
This device complies with Part 15 of the FCC Rules. Operation is subject to the following two conditions: (1) this device may not cause harmful interference, and (2) this device must accept any interference received, including interference that may cause undesired operation.
SECTION 1 Preparation
Proper installation of the thermostat will be accomplished by following these step by step instructions. If you are unsure about any of these steps, call a qualified technician for assistance.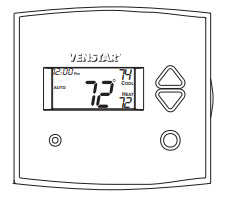
Assemble tools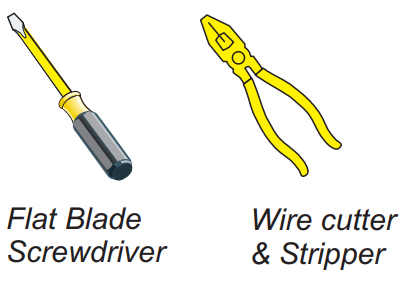
- Make sure your Heater/Air Conditioner is working properly before beginning installation of the thermostat.
- Carefully unpack the thermostat. Save the screws, bracket, and instructions.
- Turn off the power to the Heating/Air Conditioning system at the main fuse panel. Most residential systems have a separate breaker for disconnecting power to the furnace.
SECTION 2
Remove & Replace the Old Thermostat
- Remove the cover of the old thermostat.
- If it does not come off easily check for screws.
- Loosen the screws holding the thermostat base or subbase to the wall, and lift away.
- Disconnect the wires from the old thermostat. Tape the ends of the wires as you disconnect them, and mark them with the letter of the terminal for easy reconnection to the new thermostat.
- Keep the old thermostat for reference purposes, until your new thermostat is functioning properly.
SECTION 3
Wire Connections
If the terminal designations on your old thermostat do not match those on the new thermostat, refer to the chart below, or the wiring diagrams that follow.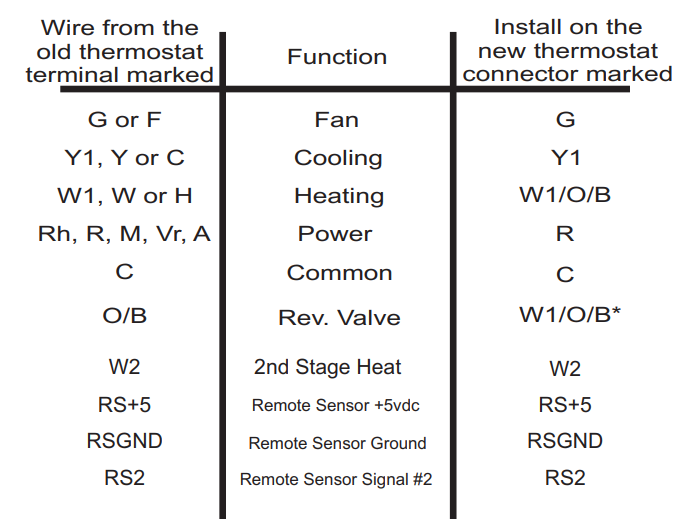
Note: O/B is used if your system is a Heat Pump.
SECTION 4
Sample Wiring Diagrams
6 Wire, 1 Stage Cooling, 1 Stage Heat.
- Residential & Commercial 1 Stage Cooling, with 1st stage Gas Heat
OR - Commercial Heat Pump 1 Stage Cooling with 2 Stage Heat
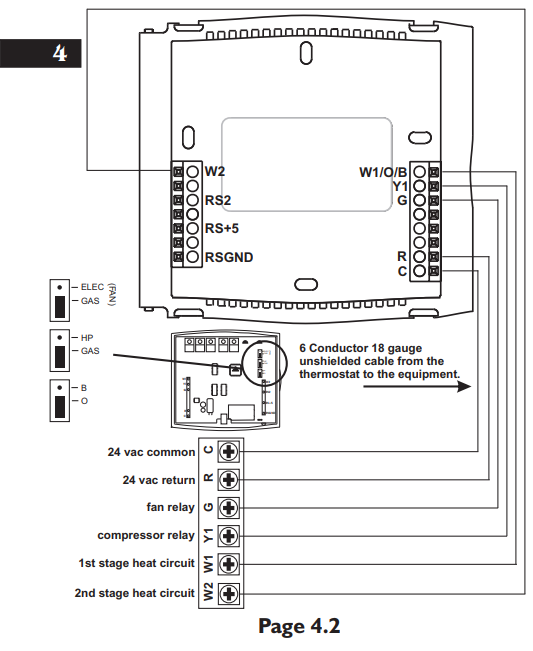
6 Wire, 1 Stage Cooling, 1 Stage Heat
Residential & Commercial 1 Stage Cooling, with 1st stage Electric Heat 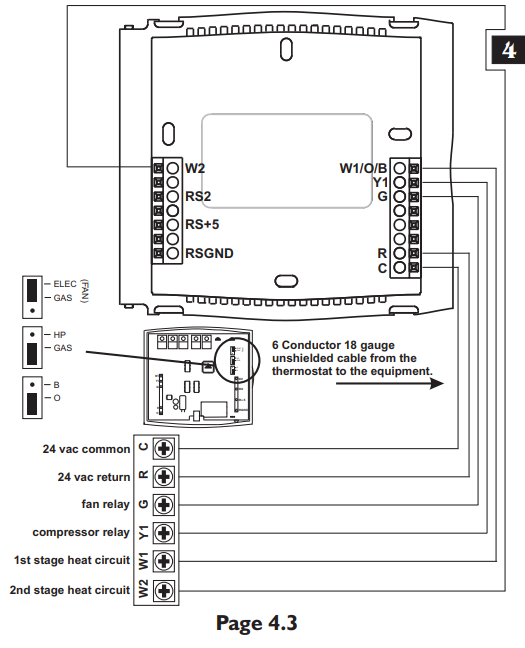
6 Wire, 1 Stage Cooling, 2 Stage Heat
Residential Heat Pump with O Reversing Valve 1 Stage Cooling, with 2 stage Heat 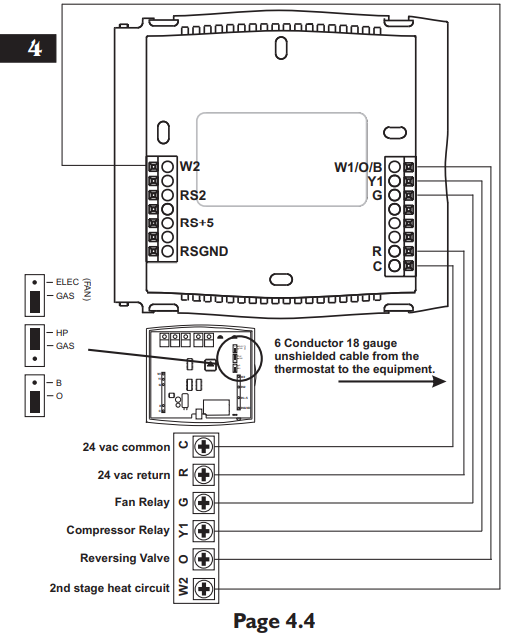
6 Wire, 1 Stage Cooling, 2 Stage Heat
Residential Heat Pump with b Reversing Valve 1 Stage Cooling, with 2 stage Heat 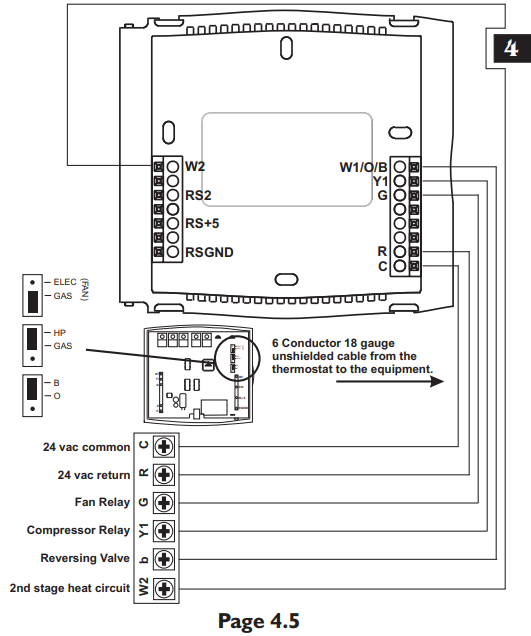
Installing the Outdoor Sensor
The Outdoor Sensor measures outdoor air temperature and sends this information to the thermostat; it measures temperature with a range of -40 to 127 F.
The Outdoor Sensor should be connected to the thermostat using solid conductor CAT 5, CAT 5e, or CAT 6 type network communication cable. This is an unshielded cable with four twisted pairs of 24 gauge solid wire; DO NOT use stranded cable. The cable length should not exceed 250 feet. If less than 75 feet of cable is required to connect the thermostat to the Remote Sensor, a three conductor thermostat cable (18-24 gauge) may be used; this cable is NOT suitable for any length greater than 75 feet.
IMPORTANT: Do no use shielded wire. Do not run sensor wiring in the same conduit as the 24VAC thermostat wiring. Electrical interference may cause the sensor to give incorrect temperature readings. See the Outdoor Sensor accessory for further details.
SECTION 5 Test Operation
- Turn the power on to the Heating/Air Conditioning system.
- Press the MODE button repeatedly until the HEAT icon appears on the display. Press the Up or Down buttons until the set temperature is 10 degrees above room temperature. The furnace should turn on.
- Press the MODE button repeatedly until the COOL icon appears on the display. Press the Up or Down buttons until the set temperature is 10 degrees below room temperature. The air conditioner should turn on. NOTE: Most equipment has a time delay of 5 minutes between cool cycles. This feature is defeatable on the thermostat. Consult the Owner’s Manual under Setup, cycles per hour.
- Press the UP button until the setpoint is equal to the room temperature. Press the FAN button to Fan On. The fan should turn on and run continuously.
SECTION 6
Calibrating the Thermostat Sensors
Under normal circumstances it will not be necessary to adjust the calibration of the temperature and humidity sensors. If calibration is required, please contact a trained HVAC technician to correctly perform the following procedure. 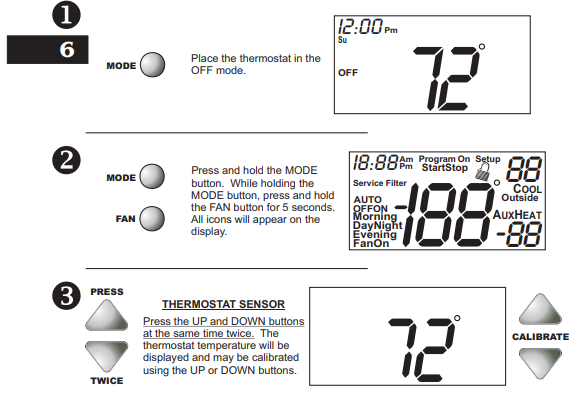
SECTION 7 TroubleShooting
- SYMPTOM: The air conditioning does not attempt to turn on.
CAUSE: The compressor timer lockout may prevent the air conditioner from turning on, for a period of time.
REMEDY: Consult the Owner’s Manual in the Setup section to defeat the cycles per hour and compressor time guard. - SYMPTOM: The display is blank.
CAUSE: Lack of proper power.
REMEDY: Make sure power is turned on to the furnace and that you have 24vac between R & W. If C is used, 24vac between R & C. - SYMPTOM: The air conditioning does not attempt to turn on.
CAUSE: The cooling setpoint is set too high. REMEDY: Consult the Owner’s Manual in the Setup section to lower the cooling setpoint limit.
SYMPTOM: The heating does not attempt to turn on. CAUSE: The heating setpoint is set too low. REMEDY: Consult the Owner’s Manual in the Setup section to raise the heating setpoint limit. - SYMPTOM: When controlling a residential heat pump, and asking for cooling, the heat comes on.
CAUSE: The thermostat reversing valve jumper is set for “b”.
REMEDY: Set the reversing valve jumper for “O”. See pages 5.4 and 5.5. - SYMPTOM: When calling for cooling, both the heat and cool come on.
CAUSE: The thermostat equipment jumper is configured for “HP” and the HVAC unit is Gas/Electric.
REMEDY: Set the equipment jumper for “Gas”. See pages 5.2 and 5.3.
References:
Download Manual
Venstar T1700 Programmable Thermostat Installation Instructuion
OTHER MANUAL
Venstar T1700 Programmable Thermostat Owner Manual

Venstar T1700 Programmable Thermostat Installation Instructuion