Trane TZEMT400BB32MAA Thermostat

INTRODUCTION
To use the remote features of this thermostat, a Schlage LiNKTM account is required. Schlage LiNK™ online setup requires broadband internet service and a router with an available port.
For professional installation service, instructions, operation guide, and installation video modules, please visit link.schlage.com
Customer Service: (877) 288-7707
Customer Service hours of operation:
- Monday-Friday 9.00 am-7:00 pm EST
- Saturday 11:00am-6:00pm EST
- Sunday 11:00am-4:00pm EST
The Trane Thermostat is compatible with single and multistage forced air systems, including
- Gas furnace systems
- Oil furnace systems
- Electric furnace systems
- Heat pump systems
- Air conditioning systems
The Trane Thermostat may be compatible with some other system types, including
- Boiler systems
- Geothermal systems
- Multi-zoned systems
Call (877) 288-7707 to verify compatibility.
The Trane Thermostat is not compatible with the following system types:
- Radiant floor systems
- Wall heating systems
Also, the Trane Thermostat is not compatible with dual fuel systems (gas furnace & heat pump combined) without adding a special kit. See Note below.
Note about dual fuel systems: This thermostat is not compatible with dual fuel systems (heating system with both heat pump and gas furnace), unless the system is controlled with a dual fuel accessory relay kit. If you are unsure whether your dual fuel system is controlled with this accessory or if you need a dual fuel kit, please contact a qualified heating and cooling contractor.

Physical Installation and Wiring
WARNING
Voltage hazard. Can cause electrical shock or equipment damage. Disconnect power to heating and cooling equipment before beginning installation.
Remove the existing thermostat cover from the wall plate. Leave wires attached.
Consult instructions that came with the existing thermostat as needed.

Determine if your system has a 24 VAC common wire which is required to power the thermostat.
If your system is a heat pump, skip to step 4.
- If your existing thermostat has a terminal named C, COM, X, or B with a wire connected to it, skip to step 4.
- If your thermostat does not have that terminal or does not have a wire connected to it, go to step 3a.
Connect a 24 VAC common wire to power the thermostat.
- Locate all unused (disconnected) wires from the thermostat wire bundle and write down the colors.
i24V Common wire is typically (not always) colored blue
- Go to your HVAC unit and remove the cover(s) to access the 24 VAC furnace wire terminals.

- Find the 24 VAC common terminal identified with the letter C, X, B, or COM.
This terminal may already have a wire connected to it but it may not be a wire that goes to the thermostat
- Locate the thermostat wire bundle inside the furnace panel.
- This wire bundle is routed from the thermostat, through the walls, and into the furnace panel.
- This bundle can be identified at the furnace by checking the wire colors connected and not connected and comparing to the wire bundle at the thermostat.

- Find a wire from the thermostat bundle that is unused at the thermostat and at the furnace.
It is possible that one of the unused wires at the thermostat will already be connected to the 24 VAC common terminal at the furnace. If so, go to step 4.
- Connect the unused wire to the 24 VAC terminal, then replace the furnace cover.
The 24 VAC common wire is typically (but not always) blue in color. If the blue wire has been unused, it is recommended that you use the blue wire.
If you are unsure about connecting this wire or you do not have any unused wires at the thermostat, contact Customer Service at (877)288-7707.
Label the wires on your existing thermostat to match terminal names.
- Do not use wire colors to chose labels. The terminal name is what is important.
- Locate the wiring labels located in the box with the new thermostat.
- Look at where each wire is connected to the existing thermostat and find the letter shown next to that wire terminal.
- Peel off the matching label and wrap it around each corresponding wire.

Important Notes
- If you have a short jumper wire between two terminals, remove the jumper and do not label it. This jumper wire is not required on the new thermostat.
- If you had to connect a new 24 VAC common wire in step 3a, you will use the “C” label on that wire.
- If you have a W terminal, use the W1/W label on that wire.
- If your thermostat has any terminals with names that do not match any on the label, write down the terminal names and wire colors for later reference.

Remove the existing wall plate
- Note: During this process, make sure that the wires do not pull back into the wall opening.
- Detach all wires from wall plate.
- Remove all screws attaching the wall plate to the wall and remove the wall plate.
- See “MERCURY NOTICE” below.

MERCURY NOTICE
When this control is replacing an old control that contains mercury in a sealed tube, do not dispose of your old control in the trash. Dispose of it properly. Contact your local waste management authority for instructions regarding recycling and proper disposal of the old control.
A listing of heating, ventilating and air conditioning wholesalers that participate in the Thermostat Recycling Corporation’s recycling program is available at www.thermostat-recyle.org.
Identify your System Type from the list below
You will need to check your wire labels to help identify the system type.

CAUTION: EQUIPMENT DAMAGE HAZARD
Improper system type selection can lead to equipment damage or high utility costs. Follow the System Type table carefully to properly select and set up the control to ensure proper heating and cooling system operation.
Separate the face of the new thermostat from the wall plate
Apply pressure at two tabs on top of wall plate to release it.
NOTE: It is not recommended that this Z-wave thermostat be mounted onto metal structures. Metal may affect the radio frequency (RF) communication between the thermostat and the Z-wave signal to the Schlage Bridge.

Mark two mounting holes using a new wall plate
- Pull wires through the hole in the center of the wall plate.
- Locate the new wall plate over the existing opening.
- Mark two holes with a pencil.
- Use a level to verify that the two hole locations are level.
- Correct holes locations as needed.

Prepare two mounting holes
- Drill 1/16” pilot holes in the two locations that were marked in step 9. If mounting to drywall with no studs behind it, enlarge pilot holes to 1/8” for anchors.
- If using anchors, screw them into the holes.

Install new wall plate.
- Pull wires through the hole in the center of the wall plate.
- Locate the new wall plate over the existing opening.
- Attach the wall plate to the wall using the two screws provided. Do not over-tighten.

Review the wiring table information
- Refer to:
- Table 1 – If you do NOT have a heat pump
- Table 2 – If you have a heat pump
- Select the correct row based upon the thermostat being replaced, and then circle the wire labels you have.
- Connect your wires as shown in the New Thermostat Terminals row.

- * Connect two wires to the W1 terminal
- ** If your existing thermostat has a “V” or “VR” wire label, connect that wire to “24RC” on the new thermostat, then connect the wire labeled “R” to “W2/O/B” on the new thermostat
Attach all wires securely to the new thermostat
- Note: A wire must be connected to “24C” to power the thermostat.
- Use the information from step 11 to match the wires to the correct terminals.
- Use 1/8” blade screwdriver to secure wires in terminals.
CAUTION: EQUIPMENT DAMAGE HAZARD
Improper wiring can lead to equipment damage. Follow the Terminal Connection information from step 11 carefully to ensure the control is wired properly. After wires are secure, bare wires MUST NOT touch each other.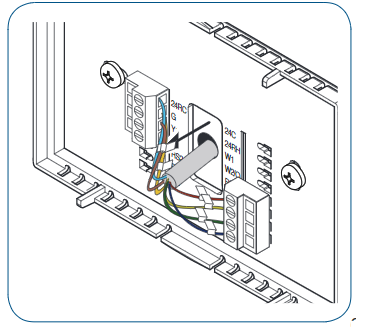
If necessary, cut the internal jumper wire (JP1)

Attach the thermostat face to the wall plate
- Tuck wiring flat inside the wall plate.
- It is critical that wires are not bunched together and that they are pressed flat.
- Carefully align the face plate to the wall plate while aligning pins into wire terminals.
- Once the thermostat face is properly aligned, apply pressure at top and bottom of the thermostat face until it is secure.

Turn power to the heating and cooling system back on
The thermostat display should turn on and begin displaying information. If the thermostat display does not come on, go back through the installation steps and look for problems. Pay special attention to steps 3, 3a, and 11.
System Settings at Thermostat
Set Time and Date

If your System Type is
- Gas Furnace – Single Stage, go to step 19
- Gas Furnace – Multistage, perform step 18A
- Electric Furnace, perform step 18B
- Heat Pump, perform step 18C
Note: It may be necessary to go back and review step 6 in the installation section to verify the differences between the system types.
Gas Furnace – Multistage Mechanical Settings
- Press the MENU button twice.
- Press and hold the two inner buttons for 3 seconds to view Installer Settings.
- Scroll down to System Settings and press the Select button.
- Scroll to Mechanical Settings (it is the first option), then press the Select button.
- Scroll down to 2nd Stage Heat.
- Press the + button to change the setting to Y for Yes.
- If your system also has 2nd stage cooling, scroll down to 2nd Stage Cool and press the + button to change the setting to Y for Yes.
- Press the Done button 4 times and go to step 19.

Electric Furnace Mechanical Settings
- Press the MENU button twice.
- Press and hold the two inner buttons for 3 seconds to view Installer Settings.
- Scroll down to System Settings and press the Select button.
- Scroll to Mechanical Settings (it is the first option), then press the Select button.
- Scroll down to Fan Type.
- Press the + button to change the setting to Electric.
- If Single Stage System, press Done 4 times and go to step 19.
- If Multistage System, continue with steps “g” through “j”.
- Scroll down to 2nd Stage Heat.
- Press the + button to change the setting to Y for Yes.
- If your system also has 2nd stage cooling, scroll down to 2nd Stage Cool and press the + button to change the setting to Y for Yes.
- Press the Done button 4 times and go to step 19.

Heat Pump Mechanical Settings
- Press the MENU button twice.
- Press and hold the two inner buttons for 3 seconds to view Installer Settings.
- Scroll down to System Settings and press the Select button.
- Scroll to Mechanical Settings (it is the first option), then press the Select button.
- Scroll to system Type.
- Press the + button to change the setting to Heat Pump.
- Scroll down to Fan Type.
- Press the + button to change the setting Electric.
- If Coleman, Rheem, or Rudd brand heat pump, scroll to C/O Type and change to With Heat.
- If Single Stage System, press Done 4 times and go to step 19.
- If Multistage System, continue with steps “j” through “n”.
- Scroll down to 2nd Stage Heat.
- Press the + button to change the setting to Y for Yes.
- Scroll down to 2nd Stage Cool.
- Press the + button to change the setting to Y for Yes.
- Press the Done button 4 times and go to step 19.
Perform System Checkout
- Test Fan Operation
- Press the FAN button.
- Scroll to ON.
- Verify that the system fan starts and moves air.
- Press the FAN button.
- Scroll to AUTO.
- Press the Done button to return to the home screen.
- Test Cooling Operation (if your system has cooling)
- Press the MODE button.
- Scroll to COOLING.
- Press the Done button to return to the home screen.
- Turn the temperature down using the scroll down button until the new setpoint is below the room temperature.
- Verify that the outdoor unit and the system fan come on and run.

- Test Heating Operation (if your system has heating)
- Press the MODE button.
- Scroll to HEATING.
- Press the Done button to return to the home screen.
- Turn the temperature up using the scroll up button until the new setpoint is above the room temperature.
- Verify that the heating system turns on and runs.
Note: It may take approximately 5 minutes for the system to start up after switching from COOLING to HEATING mode. There is a built in time delay which will not allow the equipment to turn on until it is ready. The screen will display the word “Wait” until the time delay has finished.
This concludes the system checkout. If any part of your system fails to come on when performing this checkout procedure, verify that the correct wires were connected to the wall plate and that each wire is securely attached to the appropriate terminal. Also go back and verify that you have set up the Mechanical Settings to match your System Type.
Enroll Thermostat into existing Schlage LiNKTM System
Prepare the Schlage Bridge for enrollment.
If you are using a controller that is not a Schlage Bridge, consult the instructions that came with the controller to find out how to enroll a new device.
- Unplug Ethernet and power cables from Schlage Bridge.
- Install a quality 9 volt battery.
- Verify that blue light is blinking. If blue light is solid, battery is dead. Replace with new 9 volt battery, if needed.
- Take the Schlage Bridge to the location where the thermostat is mounted.

Enroll the thermostat into the Schlage Bridge
- Hold the Schlage Bridge within 6 feet (1.8 meters) of the thermostat throughout steps “b” through “f”.
- Important Note: After you begin the enrollment process, you have 30 seconds to complete the remainder of the steps. Study the steps below before beginning.
- Press and release the plus (+) button on the Schlage Bridge.
- Press the MENU button on the thermostat.
- Scroll down to Z Wave Install, and press the Select button.
- Press the Yes button to enroll the thermostat.
- Observe the lights on the Schlage Bridge. The orange light will blink while enrollment is taking place. Enrollment is complete when the orange light becomes solid.


Verify enrollment of the thermostat
- Scroll down to Thermostat Info, and press the Select button.
- Look at the number listed after ZNID.
- If the number listed there is anything other than “000”, the thermostat has been successfully enrolled.
- If the number listed there is “000”, the thermostat has NOT been successfully enrolled. In this case, repeat step 21 and verify again.
- Press Done button 2 times when finished.

Establish Online Control of the Thermostat
A Schlage LiNK account is required to complete the setup.
If you have an active Schlage LiNK account, continue with the steps below.
If you need to create a new account, go to www.schlagelink.com and click on “Just Purchased A Schlage LiNK System?” For more information about the Schlage LiNK system, visit www.link.schlage.com.
Completing the setup.
- Remove the battery from the Schlage Bridge.
- Plug the Ethernet and power cord back into the Schlage Bridge.
- Log into your account at www.schlagelink.com.
- Click the Climate tab and follow the on-screen instructions.
©2010 Schlage Lock Company
TZEMT400B Thermostat Installation Instructions Rev. 11/10 18-HD43D1-2
REFERENCE:
Download Manual:
Trane TZEMT400BB32MAA Thermostat Owner Manual
