ThermoSphere SHC-W-01 Smart Thermostat
Compatibility
This thermostat is compatible with ThermoSphere NTC 10K floor sensor probes.
NTC 10kΩ @ 25°C
If you have an existing floor probe from another thermostat that is not compatible, set your thermostat to ambient temperature sensing mode. (Not advisable for timber or other temperature sensitive floors).
Replacing an existing thermostat?
Contact the manufacturer’s technical department and ask for the rating of the floor sensor at 25°C.
What’s in the box
Check you’ve got everything:
- SmartHome Control
- Floor sensor probe (3m)
- Floor sensor conduit (2m)
- Fixing screws
- Installation guide and warranty information
You will also need:
- Electrical screwdriver
- Electrical back box
- Electrical test meter
Before you start
Your thermostat should be:
- Installed 1.2 – 1.5m from the floor
- On an internal wall
- Outside any wet zones (IP21)
- Installed on an RCD protected circuit
- Away from drafts or heat influences
- Installed so that the floor sensor probe can be laid in a heated area of the floor
- Installed by a professional, in line with current electrical regulations and relevant local standards
Installing your thermostat
Switch off mains power
You will be installing your thermostat as part of a high voltage mains electrical circuit. To ensure your safety and to protect the thermostat, switch off the mains power and remove fuse from the spur before you start the installation.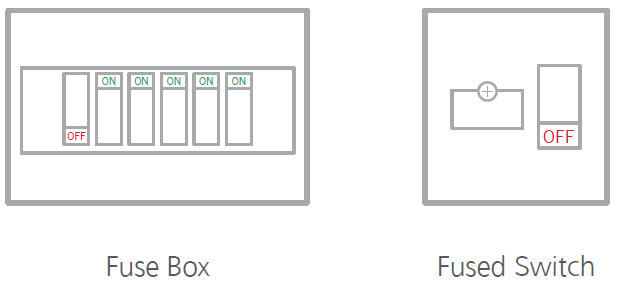
Maximum distances
Your thermostat can be installed up to 50m away from the underfloor heating system it is controlling, provided that the floor sensor is used to control the temperature. Underfloor heating cold tails and floor sensor probes can be extended up to 50m.
Connect multiple heaters in parallel.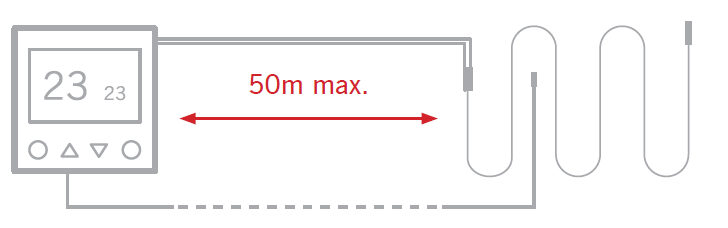
Release fascia plate
Use a small screwdriver to undo the captive screw on the underside of the fascia casing.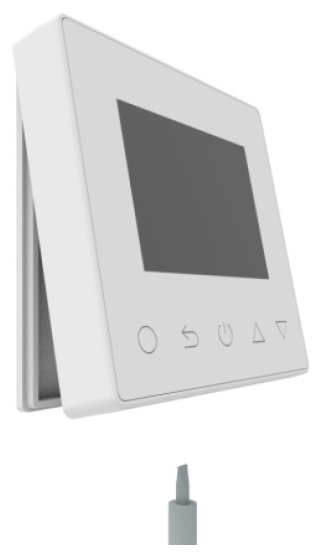
Wiring diagram
Connect the Thermostat to the underfloor heating (UFH) cold tail, power supply and floor temperature sensor. The floor temperature sensor is not polarity sensitive.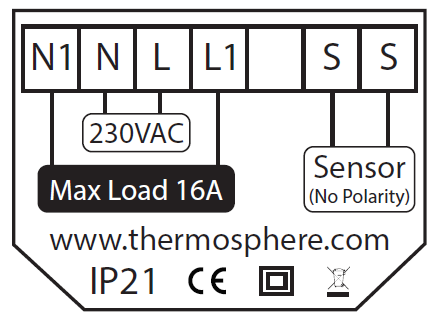
Fix mounting plate in position
Push the power block into the back box and use a screwdriver to securely fix the mounting plate in position.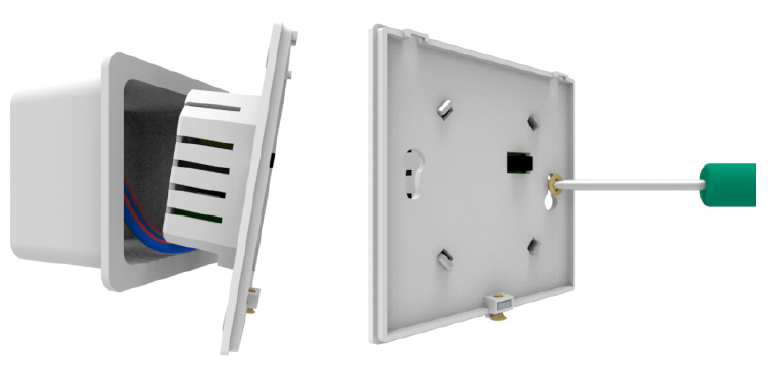
Fix thermostat fascia in place
Locate the thermostat onto the mounting plate and push down. Tighten the screw to secure in place.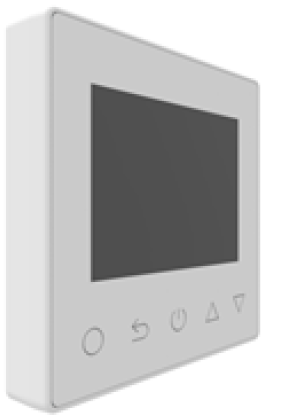
Switching on your system
- It is important that all adhesives and grouting is dry and fully cured before you switch on your underfloor heating.
- Most adhesives take between 7 to 10 days to cure. Follow manufacturer guidelines.
- The temperature of your underfloor heating should be increased gradually to avoid thermal shock in the floor. Start at 15°C and work up to your desired temperature 2-3°C per day.
- Observe any maximum temperature guidelines from your floor manufacturer.
Wait for 7 – 10 Days before you switch on
Advanced settings
| MENU | DESCRIPTION | RANGE | DEFAULT |
| 01 | Heating events | 2, 4 or 6 per day | 4 |
| 02 | Sensor mode | Room, Floor, Room & floor limit | Floor |
| 03 | Temperature calibration | Floor -5 to 5°C, Room -5 to 5°C | 0°C |
| 04 | Open window | On / Off | Off |
| Sensing time | 1 – 30 minutes | 1 minute | |
| Temp drop limit | 2 – 4°C | 3°C | |
| Off time | 10 – 60 minutes | 15 minutes | |
| 05 | Adaptive start | On / Off | Off |
| 06 | Floor temperature limit | 20 – 45°C | 35°C |
| 07 | Frost protection | On / Off | Off |
| Frost protection temperature | 5 – 15°C | 5°C | |
| 08 | Brightness | 1 – 99% | 80% |
| 10 | Temperature tolerance | 0.5, 1, 2 or 3°C | 1°C |
| 11 | Energy use | Power rating 0 – 4500W | 0W |
| Power consumption | – | ||
| 12 | Factory reset | – | – |
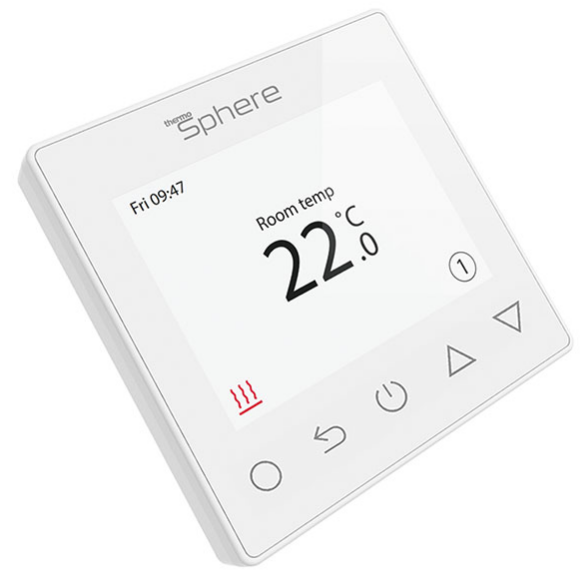
User interface
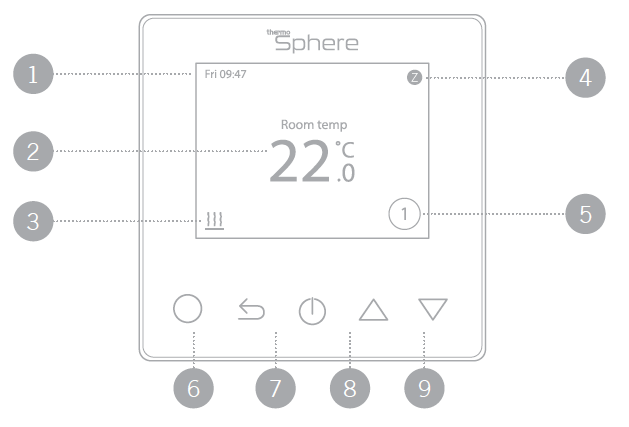
- Day and time
- Measured temperature
- Heating indicator
- Zigbee indicator
- Heating event
- Menu button
- Back button
- Power button
- Up & down arrows
Setup
Setting the day and time![]()
![]()
![]()
![]()
- Ensure the SmartHome Control is on.
- Press
 to enter the menu and press again to set the time.
 - Press

 to set the correct day.
 - Press to edit hours and use to set the correct hour.
- Press to enter minute setting and press to set the correct minute.
- Press to confirm and go back to the setting menu.
- If you connect your SmartHome Control to the internet the time will update automatically.
Boost mode
- In Boost mode, thermostat will work maintain the boost temperature until the next heating event change.
- Press to enter the menu and use to select boost.
- Press to enter Boost mode and press to turn on.
- Press to confirm and set temperature.
- Press to select boost temperature and press to confirm and go back to the main screen.
- To cancel boost mode, press power to turn the control of and on again.
Temperature override
When the heating schedule is running you can manually override the temperature without adjusting the schedule. Adjust the temperature with the and arrows. The override temperature will be maintained until the next scheduled temperature change. The thermostat will then revert back to the heating schedule automatically.
Set up your heating schedule
Set up a timed heating schedule to automatically manage your heating around your lifestyle pattern.
- Press to enter the menu and use to select Schedule.
- Press to enter Schedule settings.
- Press to select day (you can also select ‘All’ days)
- Press to enter event selection.
- Press to select a heating event to edit.
- Press to enter time (hours) setting.
- Press to select the correct hour.
- Press to enter minutes setting.
- Press to select the correct minute.
- Press to enter temperature setting
- Press to select the temperature you would like at this time. For a comfortable warm temperature we recommend 20-27°C*. (Always check the recommended maximum floor temperature with your floor finish manufacturer).
- Press to confirm and back to event setting. Repeat this process for every event that you wish to use.
Pre programmed heating schedules
| 2 per day | 4 per day | 6 per day | |
| Event 1 | 06:00 25°C | 06:00 25°C | 06:00 25°C |
| Event 2 | 18:00 16°C | 08:00 16°C | 08:00 16°C |
| Event 3 | 16:00 25°C | 11:30 25°C | |
| Event 4 | 22:00 16°C | 12:30 16°C | |
| Event 5 | 16:00 25°C | ||
| Event 6 | 22:00 16°C |
The SmartHome Control comes with 3 pre programmed heating schedules with 2, 4 or 6 heating events per day. You can select this in the advanced settings. Default program is 4 events per day.
Holiday mode
- Press to enter settings menu.
- Press to select Holiday mode and press to confirm.
- Press to set the amount of days you are away for and press to confirm.
- Press to set the temperature you would like to maintain while you are away for and press to confirm and return to the main screen.
- To end Holiday mode early simply turn the thermostat off and on again using the power button.
SmartHome Hub connection
You will need a ThermoSphere SmartHome Hub to set up and control your thermostat(s) via your wireless network.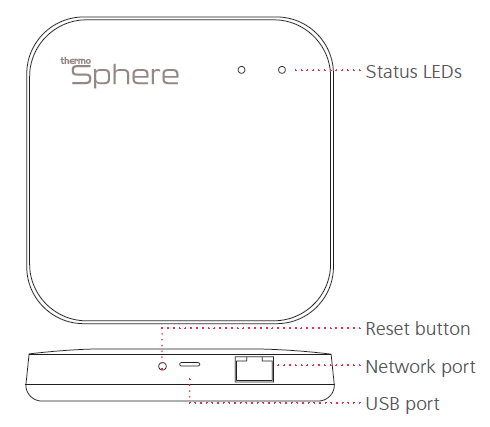
Network diagram
Wireless connection requires a Thermosphere Smarthome Hub, compatible Thermosphere Smarthome control, broadband internet and an available network port on your router. Approximate range limit 20m open field. Download the Thermosphere app on a compatible iOS or Android device.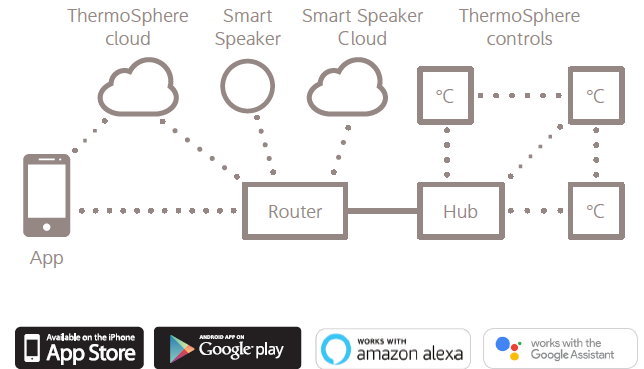
Reset button
Hold for 5 seconds, until the green light stays on, to connect the Hub with your router.
Hub installation
- Plug the network cable into an open port on your router.
- Plug the other end of the network cable into the network port on the hub.
- Plug the USB cable into the USB port on the hub.
- Plug the other end of the USB into the power adaptor and into a 230V mains socket.
- Press and hold the reset button for 5 seconds.
- The red LED on the hub will flash and both LEDs will stay on after a few seconds to indicate a successful connection between the hub, your router and the ThermoSphere server.
If the connection fails, unplug the hub and start again. You can also reset the hub by holding the reset button for 5 seconds.
Pairing the SmartHome Hub with your app
- Download and install the ThermoSphere app on your mobile device.
- Connect your mobile device to the same wireless network that your hub is plugged into.
- Register an account with your email or mobile phone number.
- Click ‘Add Home’ and select any rooms that you wish to add.
- Click ‘+’ in the top right corner and select ‘Zigbee Gateway’.
- Make sure the Hub LEDs are on and click ‘Confirm…’ button.
- When the app shows ‘Smart Gateway’ click ‘CONNECT’.
- Rename the Hub if you wish to and click ‘Done’.
- Click ‘Add new child device’ to add a SmartHome Control.
- With the SmartHome Control is on, press and hold the ‘Up’ and ‘Down’ arrows until the red Zigbee symbol flashes.
- After a successful connection you can rename your SmartHome Control and add it to a room. Click ‘Done’.
- Repeat steps 9 to 11 for additional SmartHome Controls.
Amazon Alexa
![]()
Pairing your SmartHome controls with Amazon Alexa
Voice control with Alexa requires a compatible Amazon Echo device, an Amazon Alexa account and a ThermoSphere account. If you do not have an Alexa account, visit www.alexa.amazon.com to create one before you start.
- We recommend using the alexa.amazon.com website to set up and link your ThermoSphere Controls with Alexa.
- Log in to alexa.amazon.com.
- Click on ‘Skills’ and search for ‘Smart Life’.
- Click ‘Enable’ and enter your ThermoSphere account details to link you ThermoSphere and Alexa accounts.
- After the accounts are linked successfully, click ‘Discover Devices’
- Alexa will discover any ThermoSphere SmartHome Controls that you have set up and connected your Hub.
- You can now control your electric underfloor heating with your voice!
If you rename your controls at any point within the ThermoSphere app you will have to discover devices again in your Alexa account. After initial setup you can simply ask Alexa to ‘Discover devices’ for you. You can also control you thermostats from the Alexa app.
Things to try with Amazon Alexa
Alexa uses the names that you give your devices in the ThermoSphere app to identify and control the right device. Make sure you call them something you can remember and say easily, like ‘Bathroom heating’ or ‘Kitchen heating’
Once you’re set up try asking Alexa to:
- “Alexa, set the <control name> to 27 degrees”.
- “Alexa, turn off <control name>”.
- “Alexa, turn on <control name>”.
- “Alexa, what is the temperature in <control name>?”.
- “Alexa, what is the <control name> temperature?”.
Google Assistant
![]()
Pairing your SmartHome controls with Google Assistant
Voice control with Google Assistant requires a compatible Google Home device, a Google account and a ThermoSphere account. If you do not have a Google account, visit www.google.com to create one before you start. Follow the Google instructions to set up your Google Home device.
- Download the Google Home app from your app store and login with your Google account
- Open the Google Home app and open Home Control in the side menu.
- Press the + button.
- Search for Smart Life and tap it.
- Link your accounts by entering your ThermoSphere account details.
- Google Home will discover any ThermoSphere SmartHome Controls that you have connected your SmartHome Hub.
- You can now control your electric underfloor heating with your voice!
If you rename your controls within the ThermoSphere app at any point, you will have to discover devices again in your Google Home app.
Things to try with the Google Assistant
The Google Assistant uses the names that you give your devices in the ThermoSphere app to identify and control the right device. Make sure you call them something you can remember and say easily, like ‘Bathroom heating’ or ‘Kitchen heating’
Once you’re set up try asking Google to:
- “Ok Google set the <control name> to 27 degrees”
- “Ok Google turn off <control name>”
- “Ok Google turn on <control name>”
- “Ok Google what is the temperature in <control name>?”
- “Ok Google what is the <control name> temperature?”
Technical data
| Supply voltage | 85 – 265V 50/60Hz |
| Maximum load | 16A |
| Accuracy | ±0.5°C |
| Sensor rating | NTC 10kÙ @ 25°C |
| Standby consumption | <2W |
| Warranty | 3 years |
| IP rating | IP21 |
| Width | 87mm |
| Height | 87mm |
| Depth | 14mm (23mm in wall) |
Error codes
- Room sensor error: Internal ambient sensor damaged/disconnected.
- Floor sensor error: External floor sensor damaged/disconnected.
Key lock
- To lock the keys press and hold
 for 3 seconds.
 - The
 icon will appear when the keys are locked and the keys will not function.
 - To unlock the keys press and hold for 3 seconds.
Factory reset
- Press to enter the menu and press to select ‘Advanced’.
- Press and then press to select page 2 and continue to ‘Factory reset’.
- Press to confirm and reset.
ThermoSphere is a trading name of Thermogroup Ltd.
‘Google Assistant‘ is a trademark of Google Inc.
‘Amazon Alexa‘ is a trademark of Amazon.com, Inc.
ThermoSphere
Pattenden Lane
Marden
TN12 9QJ
0800 019 5899
[email protected]
thermosphere.com
Reference
Download Manual:
ThermoSphere SHC-W-01 Smart Thermostat User Guide
Other Manual:
ThermoSphere SHC-W-01 Smart Thermostat Product Specification Guide