Terneo S SMART Thermostat
The terneo s thermostat is designed to maintain a constant temperature from 5 to 40 °C in underfloor heating systems based on:
- Electric heating cable or film
- Water floor using a normally closed electrothermal servo with an operating voltage of 230V.
According to the data from the temperature sensor, The thermostat located on the floor controls the heating: turns off the heating when the desired temperature is reached and turns it on when it drops by 1 °C.
SUPPLY PACKAGE
- Thermostat, frame 1 piece
- Temperature sensor with connected wire 1 piece
- Warranty certificate and card and technical passport, installation instructions 1 piece
- The packing box 1 piece
TECHNICAL DATA
| Adjustment range | 5…40 °С |
| Maximum load current (for category AC-1) | 16 А |
| Rated load capacity (for category AC-1) | 3 000 VА |
| Input voltage | 230 V ±10 % |
| Weight in the complete set | 0,18 kg ±10 % |
| Basic dimensions | 75 × 75 × 35 mm |
| Temperature sensor | NTC thermoresistor 10kW at 25 ° C |
| The length of the sensor-connected cable | 3 m |
| Number combinations under heat, at least | 50 000 cycles |
| Number of combinations without heating, no less than | 20 000 000 cycles |
| Temperature hysteresis | 1 °С |
| Measured analog sensor
temperature range digital sensor |
–27…+120 °С
–55…+125 °С |
| Degree of protection GOST14254 | IP20 |
READ BY THE END OF THIS DOCUMENT
before the installation and operation of the device. This will help to avoid possible dangers, mistakes, and misunderstandings.
RELIABILITY OF THE POWER RELAY
provides protection against frequent switching. If there was less than 1 minute between relay switching, relay activation will be delayed. Protection operation will be indicated by a flashing dot.
All settings are stored
in NON-VOLATILE MEMORY. DURABILITY AND RELIABILITY OF POWER RELAY CONTACTS are carried out by switching the load as close as possible to the moment when the voltage sinusoid passes through zero. Small deviations from the zero crossing are possible, associated with different trip times for different types of power relays.
CONNECTION SCHEME
Thermostat supports two types of sensors: analog sensor
- (factory setting) or digital sensor (D18).
- The temperature sensor is connected to terminals 1 and 2. To connect a digital sensor:
- connect the blue wire to terminal 1, and the white wire to terminal 2; џ in the functional menu of the thermostat, select the type of sensor: d18 (see table 1, menu item «Sensor type»).
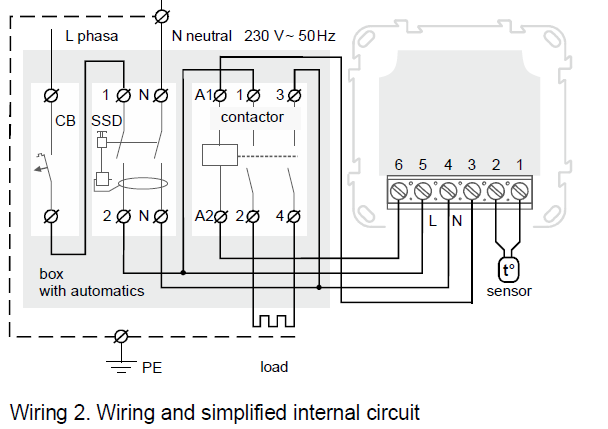
- Power voltage (230 V ± 10 %, 50 Hz) is supplied to terminals 4 (N, neutral) and 5 (L, phase).
- Load (connecting wires from the heating element) is connected to terminals 3 and 6.
THE THERMOSTAT IS MOUNTED AND CONNECTED after the installation and load testing
AFTER INSTALLATION MAKE SURE THAT THE EXTERNAL SENSOR AND MAINS VOLTAGE ARE CONNECTED CORRECTLY. In the case of incorrect wiring, is a possible failure of the thermoregulation.
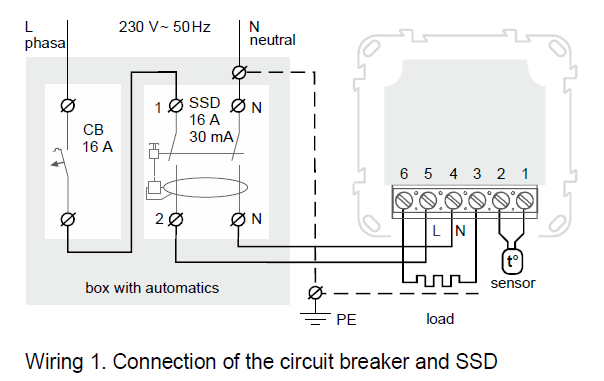
INSTALLATION
The thermostat is designed for indoor installation. When installed in a bathroom, toilet, kitchen, or swimming pool the thermostat should be installed at a place out of reach of casual spraying. The ambient temperature during installation must be between –5 … + 45 °C. The installation height of the thermostat should be in the range of 0.4…1.7 m above the floor level. To protect against short-circuit in the load circuit the circuit breaker (CB) has to be installed before installing the thermostat. The circuit breaker is installed in the gap of the phase conductor, as shown in Wiring 1. It should be designed for not more than 16 A. To protect people against electric shock leakage is installed the SSD (safety shutdown device). This event is obligatory when installing floor heating in wet areas. For working SSD, the heating cable screen must be grounded (connected to the protective conductor PE) or, if there is a two-wire network, it is necessary to make protective neutral earthing. That is to connect the screen to a zero before SSD. The thermostat is mounted in the standard mounting box 60 mm in diameter, with mounting screws. For installation, you must:
- make a hole in the wall for box mounting and wall chase for power wires and the sensor;
- take the power wires of the heating system and the sensor to the mounting box;
- perform the compounds according to the passport data; џ fix the thermostat in the mounting box.
The thermostat terminals are designed for a wire with a section not more than 2,5 mm2. To reduce the mechanical loads on the terminals it is desirable to use a soft wire. The wires are tightened in the terminals using a screwdriver with a blade width no more than 3 mm. A screwdriver with a blade width of more than 3 mm can cause mechanical damage to the terminals. This may result in the loss of the right to warranty. The terminals should be tightened with torque 0,5 N·m. If necessary is an acceptable reduction and increase (up to 20 m) of sensor connecting wires. To increase the length is unacceptable to use two conductors of a multiwire cable that is used to power the heater. Mounting of the sensor must be performed SO THAT IT WAS POSSIBLE TO EASILY REPLACE IT.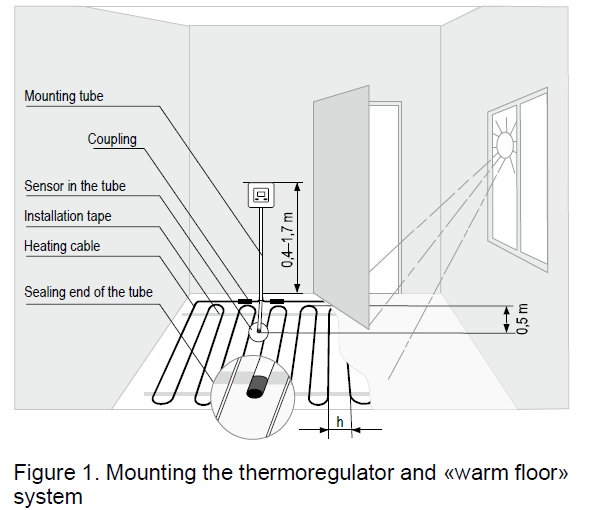
WARRANTY TERMS
The warranty for terneo devices is valid for 36 months from the date of sale, provided that the instructions are followed. The warranty period for products without a warranty certificate is counted from the date of production. If your device is not working properly, we recommend that you first read the section «Possible problems». If you cannot find an answer, contact Service Center. In most cases, these actions resolve all issues. If you continue to have issues with the device, please send it to a Service Center or to the store where you purchased the device. If your device is defective due to our fault, we will repair or replace it under warranty within 14 business days. Please see the full text of the warranty and the data you need to send to your Service Center. The website address can be found in the instructions in the Contacts section.
EXPLOITATION
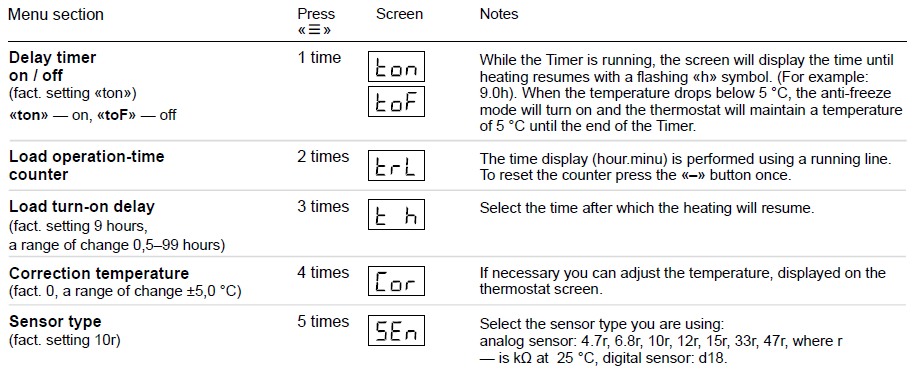
Use the button to navigate through the menu (table Use the buttons to change the parameters. After pressing the button for the first time the parameter will flash, after pressing it for the second time the parameter will change. In 5 sec after the button was pressed, the indicator will return to displaying the «≡». «+» «–» temperature. When the buttons aren`t currently being used the brightness of the indicator and the screen will be reduced to 30%.
Temperature selection
(factory setting 25 °С) Use and select the temperature. The supply of load to the warm floor is signaled by the glow of the red indicator. In the event of a sensor failure, the thermostat will continue to operate in percentage control mode (see page 6).
Hibernation
 Hold the button for 4 sec (3 dashes will appear on the display one by one) before appearing on the screen. To switch off thermo completely you should switch off the circuit breaker.
- To exit, also hold for 4 seconds until appears on the screen.
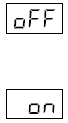
Button blocking
(child and public protection)
 Press the and buttons at the same time for 6 sec till the ( ) sign appears on the screen
Resetting to the factory settings
![]() Hold any 3 buttons till the «dEF» sign appears on the screen. After releasing the buttons the thermostat will restart and reset the settings to the factory settings
Hold any 3 buttons till the «dEF» sign appears on the screen. After releasing the buttons the thermostat will restart and reset the settings to the factory settings
Firmware version
Hold the button for 6 seconds. The manufacturer reserves the right to make changes to the firmware in order to improve the characteristics of the thermostat POSSIBLE PROBLEMS, CAUSES, AND WAYS TO OVERCOME THEM The load does not operate according to the settings, every 5 seconds the screen displays «OC» or «SC»
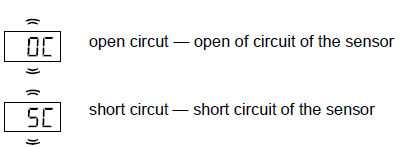
The temperature controller has switched to the Emergency Timer Mode. The temperature controller has switched to the Emergency Timer Mode. Possible reasons: failed connection, damage to the sensor circuit, or temperature exceeding the limits of the measured temperatures (Technical data table). Required: check the junction of the temperature sensor with the thermostat and its circuit, check for mechanical damages along the entire length of the connecting wire, and no power wiring that passes close. Operation in the Emergency Timer Mode: the mode will ensure the operation of the underfloor heating in case of damage to the sensor: the user selects the time of the work of the applied force, the rest time in the 30–minute cyclic interval of the applied force will be switched off. The time percentage can be changed with the «+» and «–» buttons in the range of 10 … 90%. At the first switching on, this value is 50% «50P», while the load in the 30-minute time interval will be turned off for 15 minutes. Heating temperature control is not available in this mode.
The load is disabled, «oht» flashes on the screen
![]() Тemperature inside the frame exceeds 85 °С, triggering protection against internal overheating Possible reason: inner overheating of the device which can lead: to bad contact in the terminals of the device, high ambient temperature, overwhelming power output or incorrectly selected cross-section of wires for connecting. Required: check the tension of power wires in the device terminals, make sure that the switching load does not exceed the permissible, and that the cross-section of the wires is selected correctly. Feature of protection against internal overheating: the device will be unlocked in case the temperature inside will decrease to 80 °C. If the protection trips more than 5 times, the device is blocked until the temperature inside the case drops to 80 °C and one of the buttons is pressed.
Тemperature inside the frame exceeds 85 °С, triggering protection against internal overheating Possible reason: inner overheating of the device which can lead: to bad contact in the terminals of the device, high ambient temperature, overwhelming power output or incorrectly selected cross-section of wires for connecting. Required: check the tension of power wires in the device terminals, make sure that the switching load does not exceed the permissible, and that the cross-section of the wires is selected correctly. Feature of protection against internal overheating: the device will be unlocked in case the temperature inside will decrease to 80 °C. If the protection trips more than 5 times, the device is blocked until the temperature inside the case drops to 80 °C and one of the buttons is pressed.
Every 5 sec the screen displays «Ert»
![]() Reason: open or short circuit of the internal overheating sensor. Control over inner overheating will not be done. Required: Send the device to the Service Center. Otherwise, control over inner overheating will not be done. The load is disabled, the indicator nor the screen light up Possible reason: no power supply voltage. Required: check the availability of power supply voltage. If the power supply voltage is available then contact the Service. When the screen turns on it displays 5 seconds «Er0»
Reason: open or short circuit of the internal overheating sensor. Control over inner overheating will not be done. Required: Send the device to the Service Center. Otherwise, control over inner overheating will not be done. The load is disabled, the indicator nor the screen light up Possible reason: no power supply voltage. Required: check the availability of power supply voltage. If the power supply voltage is available then contact the Service. When the screen turns on it displays 5 seconds «Er0»
![]() Reason: malfunction of the control system for the transition of the sinusoid through zero. Required: Send the device to the Service Center. Otherwise, the control of the transition of the sinusoid through zero will not be carried out.
Reason: malfunction of the control system for the transition of the sinusoid through zero. Required: Send the device to the Service Center. Otherwise, the control of the transition of the sinusoid through zero will not be carried out.
ADDITIONAL INFORMATION
- Do not fire and do not throw away the device with the household waste.
- After the end of its service life, the product must be disposed of in accordance with applicable law.
- Transportation of goods carried in the package, ensuring the safety of the product.
- The delivery is transported by any kind of transport (rail, sea, motor, air transportation).
- The date of manufacture is on the back side of the device. Application time is unlimited.
- The device does not contain harmful substances.
- If you have any questions or if something will not clear, call the Service Center at the telephone number listed below.
THE RESISTANCE OF THE SENSOR at different temperatures
- 5 °С — 25339 Ω 10 °С — 19872 Ω 20 °С — 12488 Ω
- 30 °С — 8059 Ω 40 °С — 5330 Ω
SAFETY INSTRUCTIONS
- Carefully read and become aware of yourself these instructions.
- Connection of the device must be done by a qualified electrician.
- Do not connect 230 V mains voltage instead of the sensor (it leads to the failure of the thermostat).
- Before the installation (dismantling) and connection (disconnection) of the device, turn off the voltage supply, and also act according to the «Rules of an arrangement of electric installations».
- Do not immerse the sensor with a connecting wire in the liquid medium.
- Do not connect the device to the network disassembled.
- Turning on and off or and configuring the device should be done with dry hands.
- Avoid hitting water or moisture on the device.
- Do not expose the device to extreme temperatures (higher than 40 ºСor below -5°C) and high humidity.
- Never clean the device with the use of chemicals such as benzene, or solvents.
- Do not store the device and do not use it in areas with dust.
- Do not attempt to disassemble and repair the device.
- Do not exceed the limit values for current and power.
- To protect against overvoltage caused by lightning discharges, use a lightning protector.
- Protect the children from games with the working device, it is dangerous.
- Low Voltage Directive 2014/35/EU
- EMC Directive 2014/30/EU
Manufacturer and vendor: DS ELECTRONICS, LTD
04136, Ukraine, Kyiv region, Kyiv, 1–3 Pivnichno-Syretska str.+38 (091) 481-91-81, Service Center: +38 (091) 481-91-81 [email protected] www.ds-electronics.company
SERVICE CENTER CONTACT
+38 (091) 481-91-81
Viber WhatsApp Telegram
[email protected]
Reference
Download Manual:
Terneo S SMART Thermostat Operation Manual
![]()