
STELPRO SIBTE12C Built-In Electronic Thermostat
WHAT’S IN THE BOX
- One (1) thermostat
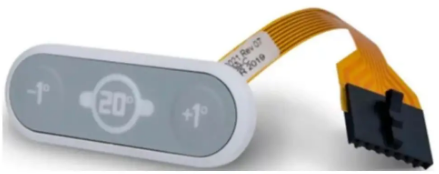
- one (1) control interface
- two (2) screws
- three (3) twist-on wire connector
MATERIAL REQUIRED
Hammer, #2 Phillips or #2 Robertson screwdriver
STELPRO DESIGN INC
Saint-Bruno-de-Montarville, Quebec, Canada, J3V 6L7
IMPORTANT INSTRUCTIONS
Before installing or using this product, you must read and understand these instructions. The manufacturer cannot be held responsible for anything, and the warranty will not be valid if the installer and user do not follow these instructions. Failure to comply with these instructions could result in bodily harm, property damage, serious injury and potentially fatal electric shock. The thermostat must be installed by a certified electrician.
WARNING: HIGH VOLTAGE. Turn off the power supply before installation and maintenance.
INSTALLATION
PREPARE THE BASEBOARD
WARNING: Turn off the power supply. Do not install the thermostat in a position other than that indicated in this guide.
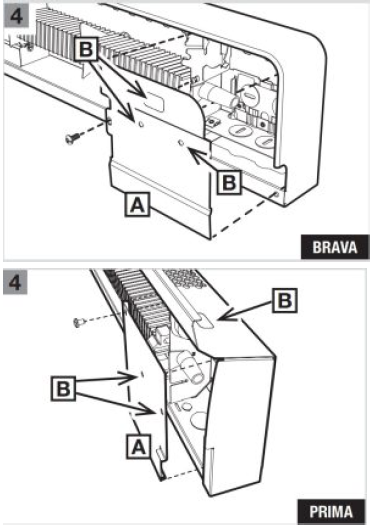
- INSTALLATION INSTRUCTIONSChoose which side of the baseboard to install the thermostat. The connection must be made in the same junction box as the power supply.
- Remove the front panel. Refer to the baseboard instructions for more details.
- Unscrew the front cover of the junction box [A] and remove it.
- Remove the knockouts [B] with a hammer and a screwdriver
ASSEMBLE THE THERMOSTAT
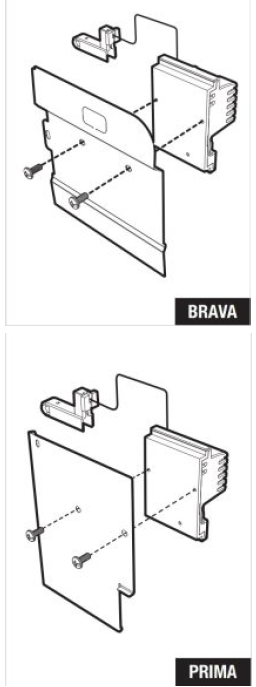
- Attach the thermostat using the screws provided.
- To ensure proper grounding and heat transfer, make sure the thermostat is screwed in securely and is in contact with the junction box cover
CONNECT THE POWER SUPPLY WIRES
Complete the thermostat’s electrical connection according to one of the diagrams below. Tighten the wires securely in the supplied connection caps.
WARNING: Be sure to connect the wire colours as shown in the diagrams when making electrical connections
INSTALL THE TEMPERATURE SENSOR
Install the temperature sensor [A] as shown, making sure it is firmly seated at the bottom of the groove.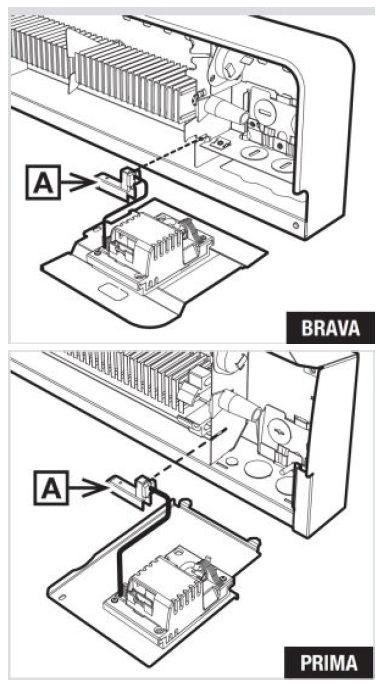
INSTALL THE INTERFACE
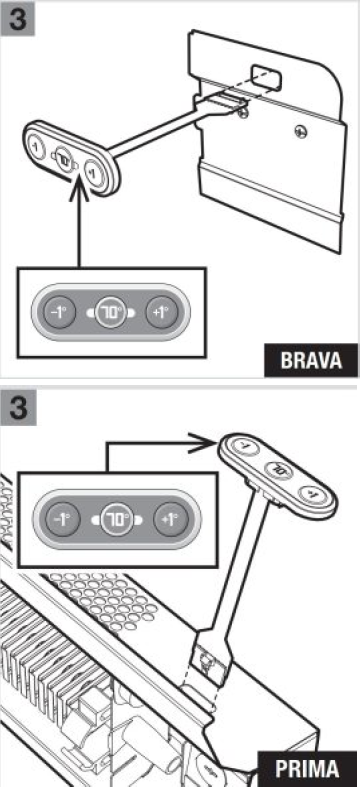
- Make sure surfaces are clean and dry. Position the interface so that the numbers face in the correct direction, as shown.
- Remove the adhesive protection on the back of the interface.
- Insert the connector into the opening. Clip the interface into place and press firmly so that the adhesive sticks to the surface.
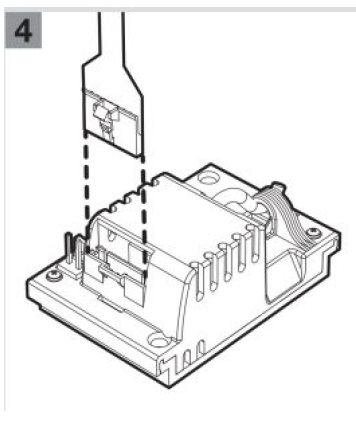
- Clip the interface connector into the thermostat connector.
- Push all the wires into the junction box while closing it. Make sure the wires and tape are not tangled
- Screw the junction box cover back on, then replace the front panel.
- Restore the power supply
OPERATING INSTRUCTIONS
3 BUTTONS TO CONTROL THE TEMPERATURE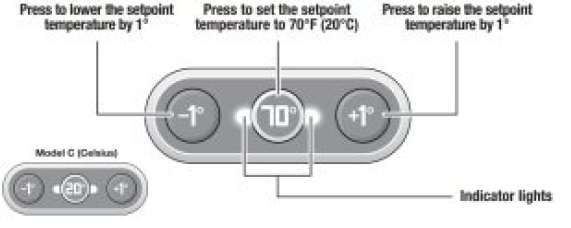
INITIAL SETTING
Once installation is complete, you must configure your thermostat according to your baseboard model.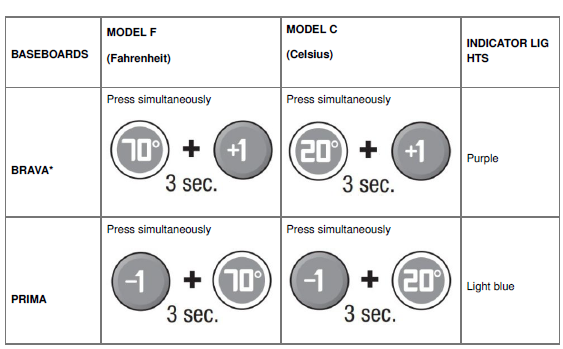
INDICATOR LIGHTS
The indicator lights provide feedback on your comfort choices and other advanced features.
|
COLOUR |
DESCRIPTION |
TEMPERATURE
MODEL F (Fahrenheit) MODEL C (Celsius) |
|
|
BLUE |
Freeze protection |
41°F |
5°C |
|
GREEN |
Energy saving |
42°F to 66°F |
6°C to 19°C |
|
GREEN TO ORANGE |
Eco-comfort balance |
67°F to 74°F |
20°C to 23°C |
|
RED |
Optimal comfort |
75°F to 86°F |
24°C to 30°C |
|
FLASHING RED |
The baseboard has overheated, and heating has been switched off. After four minute s, the indicator lights will turn off. Heating will be restored. If the indicator lights flash r epeatedly, make sure nothing is obstructing the baseboard. Otherwise, contact °STEL PRO. |
||
|
FLASHING YELLOW |
The baseboard isn’t operating due to a problem with the temperature sensor. Please contact °STELPRO. |
||
|
FLASHING WHITE |
Lock/unlock feature. See the section below. |
||
ADJUSTING THE TEMPERATURE
Here are some examples of how to use the three buttons on the thermostat to adjust the setpoint temperature.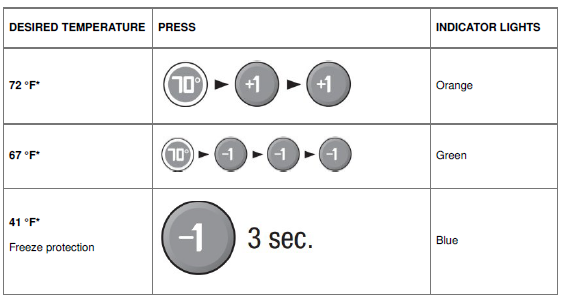
LOCK/UNLOCK FEATURE
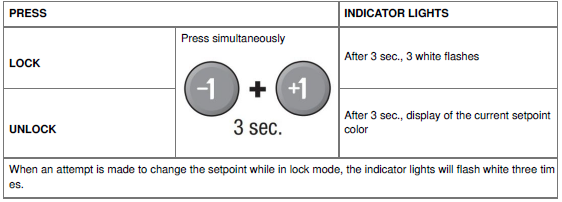
TECHNICAL SPECIFICATIONS
|
VERSION |
VOLTAGE AND LOAD |
VOLTAGE RATING |
||
|
PRODUCT CODE |
CELSIUS (°C) OR F AHRENHEIT (°F) |
SUPPLY VOLTAGE (VAC) |
LOAD (W) |
OVERVOLTAGE CA TEGORY |
|
SIBTE12C |
°C |
120-240 |
300-2500 |
II (1500V) |
|
SIBTE12F |
°F |
|||
|
SIBTE13C |
°C |
277-347 |
III (2500V) |
|
|
SIBTE13F |
°F |
|||
WARRANTY
LIMITED °STELPRO WARRANTY
Limited three-year warranty. See details on www.stelpro.com
REFERENCE
DOWNLOAD MANUAL
STELPRO SIBTE12C Built-In Electronic Thermostat Owner’s Manual
STELPRO SIBTE12C Built-In Electronic Thermostat Owner’s Manual