SIEMENS REV24 Room Thermostat

7-day room temperature controller
Heating or cooling applications
- Mains-independent, battery-operated room temperature controller featuring user-friendly operation, easy-to-read display and large numbers
- Self-learning two-position controller with PID response (patented)
- Operating mode selection:
- 7-day automatic mode with max. 3 heating or cooling phases
- Continuous comfort mode
- Continuous energy saving mode
- Protection against frost or overheating
- Exception day (24 hour operation) with max. 3 heating or cooling phases
- A separate temperature setpoint can be entered in automatic mode and for the exception day for each heating or cooling phase
- Control of a heating zone
- Possibility to control cooling equipment
Use
Room temperature control in:
- Single-family and vacation homes
- Apartments and offices
- Individual rooms and professional office facilities
- Commercially used spaces
Control for the following equipment:
- Magnetic valves of an instantaneous water heater
- Magnetic valves of an atmospheric gas burner
- Forced draught gas and oil burners
- Electrothermal actuators
- Circulating pumps in heating systems
- Electric direct heating
- Fans of electric storage heaters
- Zone valves (normally open and normally closed)
- Air conditioning and cooling equipment
Functions
- PID control with self-learning or selectable switching cycle time
- 2-point control
- 7-day time switch
- Remote control.
- Preselected 24-hour operating modes
- Override mode
- Holiday mode
- Party mode
- Protection function (protection against frost or overheating)
- Information level to check settings
- Reset function
- Sensor calibration
- Heating or cooling
- Minimum limitation of setpoint
- Periodic pump run
- Protection against valve seizure
- Optimum start control in the morning (P.1)
- Synchronization to radio time signal from Frankfurt, Germany (REV24DC)
Type summary
- Room temperature controller with 7-day time switch REV24
- Room temperature controller with 7-day time switch and receiver for time signal from Frankfurt, Germany (DCF77) REV24DC
Ordering
- Please indicate the type number as per the “Type summary” when ordering.
Delivery
- The controller is supplied with batteries.
Mechanical design
Plastic casing with an easy-to-read display and large numbers, easily accessible operating elements, and removable base. The housing contains the controller’s electronics, DIP switches, and the relay with potential-free changeover contact. The easily accessible battery compartment allows for easy exchange of two 1.5 V alkaline batteries, type AA. The base with terminal block provides lots of space to connect the wires.
Display and operating elements

| 1 |
Display |
|||
 |
Change battery |  |
Date (day – month – year) | |
 |
Alarm |  |
Time of day | |
 |
Heating mode |
|
Room temperature (measured) | |
 |
Cooling mode |  |
Clear text display line (max. 18 spaces) | |
 |
Weekday (max. 3 spaces) |
|
24-hour timeframe Switching pattern with flashing time cursor | |
 |
Info | |||
| Without language selection | 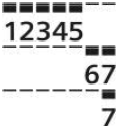 |
Weekday block Weekend block Weekday |
||
 |
Setpoint for remote control | |||
 |
Setpoint for comfort mode |
|||
 |
Setpoint for absence | h | Time unit | |
 |
Room temperature | |
Absence/holiday mode set | |
 |
Setpoint for protection mode |  |
Absence/holiday mode active | |
 |
Setpoint for energy saving mode |  |
Party mode active | |
| °C / °F | Temperature unit °C or °F | |||
 |
Time signal from Frankfurt |
 |
Heating/cooling/pump on | |
 |
Remote control active | |||


| 2 |
Operating mode selector |
 |
Automatic weekly mode with max. three heating or cooling phases per day. |
 |
Exception day with max. three heating or cooling phases. |
 |
Continuous comfort mode (= continuous comfort temperature). |
 |
Continuous energy saving mode (= continuous energy saving temperature). |
 |
Protection mode (protection against frost or overheating). |
| 3 |
INFO |

|
Pressing the Info button once illuminates the display. Illumination automatically turns off after a short period of time.
Pressing the Info button again activates the information display: is lit. The unit first displays queued error messages followed by important information (e.g. time switch programs, etc.). |
| 4 |
Plus button |
| + | Increase values, set time, or make a selection. |
| 5 |
Override button / party mode |
|
|
In the time switch program, this button allows you to quickly change from the active temperature level to the next and back.
Thus, you can quickly change to energy saving temperature when you leave the apartment for a short period of time, thus saving energy. The display indicates the change. It is valid only until the next switching time. Activate party mode: Press the button for 3 seconds. Party mode is available only in operating modes In party mode, symbol |

| 6 |
Minus button |
| – | Decrease values, set time, or make a selection. |
| 7 |
Program selection slider |
||||||
 |
|||||||
 |
Time | ||||||
 |
Day – Month – Year (2 spaces for day, month, and year) | ||||||
 |
Block of weekdays, block of weekend or individual days |
||||||
 |
1, 2, or 3 comfort phases. |
||||||
 |
Start
Comfort phase 1 |
 |
Start
Comfort phase 2 |
 |
Start
Comfort phase 3 |
||
 |
Setpoint Comfort phase 1 |  |
Setpoint Comfort phase 2 |  |
Setpoint Comfort phase 3 | ||
 |
End
Comfort phase 1 |
 |
End
Comfort phase 2 |
 |
End
Comfort phase 3 |
||
 |
Energy saving temperature in the automatic mode and exception day time switch programs. | ||||||
 |
Start of absence / holiday | ||||||
 |
Temperature setpoint during absence / holiday | ||||||
 |
End of absence / holiday | ||||||
|
Temperature setpoint at active remote control | ||||||
| RUN | Slider position RUN allows for closing the cover | ||||||
Operating modes
Operation with time switch program
The controller offers the two time switch programs and. Enter a start time and end time for each comfort phase. Also comfort temperature setpoint can be freely entered for each comfort phase. Between the comfort phases the controller always switches to the same, freely selectable energy-saving temperature setpoint.
Example with 3 heating phases

Continuous operating modes
- The controller also offers the three 3 continuous modes comfort mode, energy saving mode and frost protection mode.
Setpoints
- You can freely adjust the setpoints for the weekly and 24-hour operating modes.
- Setting range for all setpoints without setpoint limitation 3…35 °C.
- Setting range for all setpoints with setpoint limitation 16…35 °C.
Factory setting
| Factory setting for heating |
Factory setting for cooling |
|
 |
20 °C | 24 °C |
 |
16 °C | 28 °C |
|
8 °C | 35 °C |
 |
12 °C | 30 °C |
| Factory settings: Switching times | ||||||
| Comfort phases | P1 | P2 | P3 | P4 | P5 | P6 |
1. |
07:00 | 23:00 | PASS | PASS | PASS | PASS |
2. |
06:00 | 08:00 | 17:00 | 22:00 | PASS | PASS |
3. |
06:00 | 08:00 | 11:00 | 13:00 | 17:00 | 22:00 |
7-day time switch
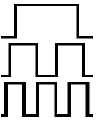
Three different switching patterns are available to simplify entry of switching times. These can be assigned as blocks to the corresponding weekdays 1…5 and weekend days 6…7. As a result, you need to adapt the switching times and room temperatures only once for each block.
| Switching pattern | Blocks |
 |
|
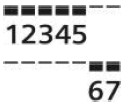
- You can also enter individual days

Enter holidays or absences
You can enter the beginning, temperature and end of your holidays. At the beginning of the holidays, the controller switches to the desired holiday temperature and returns to the previously set operating mode at the end of the holidays. In holiday mode, symbol is displayed along with the end of holiday mode.
Proceed as follows to enter your settings:
 |
Set slider to position 15 (start of absence): Press + or – to set the start date for your holidays. |
| |
Set slider to position 16 (temperature during absence): Press + or – to set the desired temperature while on holidays. |
| |
Set slider to position 17 (end of absence): Press + or – to set the end date for your holidays. |
|
RUN |
Return the slider to position RUN. Symbol is displayed to the left of the symbol.
Press |
Remote control
Use a suitable remote control unit to activate the “Remote control” temperature setpoint in the controller. Changeover takes place by making a potential-free contact connected to terminals T1 and T2. A flashing symbol indicates active remote control mode. After the contact opens, the previously set operating mode is reactivated.

Suitable remote control units are
- Telephone modem, manual switch, window contact, presence detector, central unit, etc.
Enter temperature for active remote control
You can freely select the temperature for active remote control. Activating remote control immediately enables control to the remote control temperature regardless of the currently active operating mode. When you deactivate remote control, the controller returns to the set operating mode. A flashing symbol indicates active remote control mode.
Proceed as follows to enter your settings:
| |
Set slider to position 18 (temperature for active remote control): Press or to set the desired temperature for active remote control. |
| RUN | Return the slider to position RUN. |
Technical features
DIP switches
DIP switch  ON / OFF ON / OFF |
1 | 2 | 3 | 4 | 5 | 6 | 7 | 8 | 9 | 10 | |||||||
|
A |
Sensor calibration On |
|
|
Periodic pump run and anti-lime function On |
E |
||||||||||||
|
Sensor calibration Off |
 |
|
Periodic pump run and anti-lime function Off | ||||||||||||||
|
B |
Setpoint limitation 16…35 °C | |
|
|
Start optimization: 1 h/°C |
F |
|||||||||||
| Setpoint limitation 3…35 °C | |
|
 |
Start optimization: ¼ h/°C | |||||||||||||
|
C |
Temperature display °F | |
|
|
Start optimization: ½ h/°C | ||||||||||||
| Temperature display °C | |
|
|
Start optimization: Off | |||||||||||||
|
D |
PID self-learning | |
|
|
(Op. mode: Cooling) |
G |
|||||||||||
| PID 6 | |
|
|
(Op. mode: Heating) | |||||||||||||
| PID12 | |
|
|
Quartz |
H |
||||||||||||
| 2-point | |
|
|
Radio clock |
|||||||||||||
|
J |
 |
J |
|||||||||||||||
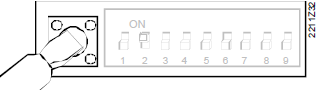
| DIP switch reset
After you change one or several DIP switch positions, you must press the DIP switch reset button to reset the DIP switch. Otherwise, the previous setting remains active! |
|||||||||||||||||
| Factory setting: All DIP switches to | OFF |
||||||||||||||||
- Sensor calibration: DIP switch 1
- If the displayed room temperature does not match the measured room temperature, the temperature sensor can be recalibrated.
- Set DIP switch to ON and press the DIP switch reset button:
- CAL symbol is displayed. The currently measured temperature flashes.
- Press + or – to recalibrate by max. ± 5 °C.
- Set DIP switch to OFF and press the DIP switch reset button to save the settings.
- Setpoint limitation: DIP switch 2
- The minimum setpoint limitation of 16 °C prevents undesired heat transfer to neighboring spaces in buildings featuring several heating zones.
- DIP switch ON: Setpoint limitation 16…35 °C.
- DIP switch OFF: Setpoint limitation 3…35 °C (factory setting).
- Press the DIP switch reset button to save the settings.
- Temperature display in °C or °F: DIP switch 3
- DIP switch ON: Temperature display in °F.
- DIP switch OFF: Temperature display in °C (factory setting).
- Press the DIP switch reset button to save the settings.
- Control behavior: DIP switches 4 and 5
- The REV24… is a two-position controller with PID control. The room temperature is controlled through cyclic switching of an actuating unit.
- DIP switches 4 ON and 5 ON: PID self-learning
- Adaptive control for all applications.
- DIP switches 4 ON and 5 OFF: PID 6
- Fast controlled system for applications in locations with large temperature deviations.
- DIP switches 4 OFF and 5 ON: PID 12
- Normal controlled system for applications in locations with normal temperature deviations.
- DIP switches 4 OFF and 5 OFF: 2-point
- For complex controlled systems, simple two-position controller with 0.5 °C switching difference (factory setting).
- Press the DIP switch reset button to save the settings.
- Periodic pump run and anti-lime function: DIP switch 6
- Only applicable with controlled circulating pump or valve!
- This function protects the pump or valve during extended OFF periods against possible seizure caused by liming. Periodic pump run is activated every 24 hours at 12 p.m. for three minutes (symbol ▲ is displayed during active pump run).
- DIP switch ON: Pump run ON.
- DIP switch OFF: Pump run OFF (factory setting).
- Press the DIP switch reset button to save the settings.
- Start optimization: DIP switches 7 and 8
- Optimization advances the switch-on point P.1 to ensure that the selected setpoint is reached at the desired time. The setting depends on the controlled system, i.e., on heat transmission (piping system, radiators), building dynamics (building mass, insulation), and heat output (boiler capacity, flow temperature).
- DIP switches 7 ON and 8 ON: 1 h/°C For slow controlled systems.
- DIP switches 7 ON and 8 OFF: ¼ h/°C For fast controlled systems.
- DIP switches 7 OFF and 8 ON: ½ h/°C For medium controlled systems.
- DIP switches 7 OFF and 8 OFF: OFF Off, no effect (factory setting).
- Press the DIP switch reset button to save the settings.

- Key for Figure
- T: Temperature (°C)
- t: Forward shift of switch-on point (h)
- TRx: Room temperature actual value
- Pon: Starting point for optimized heat-up time
- Optimization advances the switch-on point P.1 to ensure that the selected setpoint is reached at the desired time. The setting depends on the controlled system, i.e., on heat transmission (piping system, radiators), building dynamics (building mass, insulation), and heat output (boiler capacity, flow temperature).
- Operating mode heating or cooling: DIP switch 9
- The controller can be switched over for cooling applications on DIP switch 9.
- DIP switch 9 ON: Cooling
- DIP switch 9 OFF: Heating (factory setting)
- Press the DIP switch reset button to save the settings.
- Radio clock: DIP switch 10
- Only applicable to REV..DC (with integrated DCF77 receiver to receive time signal from Frankfurt, Germany)!
- DIP switch ON: Clock run by controller-internal quartz.
- DIP switch OFF: Time signal DCF77 from Frankfurt, Germany.
- Press the DIP switch reset button to save the settings.
- Note on synchronization: During startup, REV..DC synchronizes automatically to the time signal (DCF77) from Frankfurt, Germany. Synchronization takes max. 10 minutes. Synchronization restarts each time you press the button or move the program selection slider from the RUN position during these 10 minutes. Siemens recommends to set the desired settings upon startup, install the REV..DC in the desired location, and not carry out any actions on the REV..DC for the next 10 minutes. In normal operation, the REV..DC synchronizes to the radio clock every day at 3:10 a.m.
- Note on reception: The time signal from Frankfurt is modulated to a radio signal. The reception of this radio signal depends on the distance to Frankfurt, atmospheric conditions as well as the location where the REV..DC is installed. Siemens cannot guarantee that the REV..DC can receive the time signal from Frankfurt at any time and any place.
- No reception: The radio clock symbol is deactivated and an error message is displayed if the clock was not able to synchronize the time for 7 consecutive days. The controller then runs on the internal quartz.
- J DIP switch reset
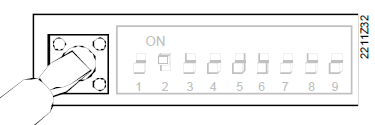 : After you change one or several DIP switch positions, you must press the DIP switch reset button to reset the DIP switch. Else, the previous setting remains active!
Access to the expert level
Set the program selection slider to RUN. Press + and – simultaneously for 3 seconds, release the buttons, and within 3 seconds press and hold down and
  simultaneously for 3 seconds, release , and press for another 3 seconds. This releases the settings at the expert level. Install is displayed. The display first shows language selection with Code 00. Press the buttons + or – to navigate the settings. Confirm settings by pressing. Press the operating mode selector to exit the engineering settings.
Code list
| Function block | Code | Name | Factory setting | Your setting |
|
Basic settings |
00 | Language | English | |
| 01 | Sensor calibration | off | ||
| 02 | Switching differential 2-point | 0.5 °C | ||
|
LCD optimization |
10 | Illumination time | 10 seconds | |
| 11 | Background brightness | 0 | ||
| 12 | Contrast | 0 | ||
|
Clock settings |
30 |
Time zone
Deviation from time signal in Frankfurt (Central European Time CET) (see Note 1) |
0 hours |
|
| 31 | Start of daylight saving time (see Note 2) | March 31 (03-31) | ||
| 32 | End of daylight saving time (see Note 3) | October 31 (10-31) |
Note 1
- This entry has no effect if the radio clock either is inactive or not available.
- The time signal received from Frankfurt is shifted by the value set in Code 30 (time zone) if the radio clock is active.
Note 2
The time is always changed over at 2 a.m. on the Sunday preceding the set date if there is no radio clock or if it is inactive. The time change is shifted by the value set in Code 30 (time zone) when the radio clock is active.
Note 3
The time is always changed over at 3 a.m. on the Sunday preceding the set date if there is no radio clock or if it is inactive.
Functional check
- Check the display. If there is no display, check insertion and function of the batteries.
- Operating mode “Continuous comfort mode“, read displayed temperature.
- REV.. in heating mode: Set the temperature setpoint higher than the displayed room temperature (see operating instructions). REV.. in cooling mode: Set the temperature setpoint lower than the displayed room temperature (see operating instructions)
- The relay and, as a result, the actuating device must switch at the latest after one minute. Symbol ▲ is displayed. If not displayed:
- Check actuating device and wiring
- It is possible that in heating mode the room temperature is higher than the set temperature setpoint (and lower for cooling mode)
- Set the temperature setpoint for operating mode “Continuous comfort mode“ to the desired value
- Select the desired operating mode.
Reset
User-defined settings
- Press, + and – simultaneously for 3 seconds:
- This resets all temperature and time settings of the program selection slider to default values (see also “Factory settings” in the operating instructions). The expert settings remain unchanged.
- The clock starts at 12 p.m., the date on 01-01-08 (01 January 2008).
- During the reset, all display fields are lit and can be checked accordingly.
All user-defined settings plus expert settings:
- Press the DIP switch reset button,
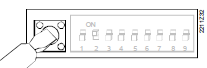 , + and – simultaneously for 5 seconds:
 - After the reset, all factor settings are reloaded. This applies to the program selection slider as well as to the expert settings.
Engineering

- Mount the room temperature controller in the main living room
- Select the mounting place so that the sensor can acquire the air temperature in the room as accurately as possible and without being influenced by solar radiation or other heat or refrigeration sources
- The mounting height is approx. 1.5 m above the floor
- You can mount the unit on most commercially available recessed conduit boxes or directly on the wall
Mounting and installation
- Begin installation by first attaching and wiring the base. You can mount the base on most commercially available recessed conduit boxes or directly on the wall. Then insert the controller from top to bottom into the base. For more information, see the installation instructions supplied with the unit.
- Comply with all local regulations on electrical installation
- Wire separately the remote control contact T1 / T2 using a separate, shielded cable.
 Warning
No internal line protection for supply lines to external consumers.
Risk of fire and injury due to short circuits!
- Adapt the line diameters as per local regulations to the rated value of the installed overcurrent protection device.
- The power supply line must have an external circuit breaker with a rated current of no more than 10 A.
Commissioning
- Remove from the batteries the battery transit tab designed to prevent premature activation of the unit: Select the desired language by + or –. Confirm by.
- You can change the control characteristics using the DIP switch on the rear of the unit
- Set any thermostatic radiator valves to their fully open position, if present in the reference room
- Recalibrate the temperature sensor (see “Sensor calibration”) if the displayed room temperature does not match the room temperature measured.
Notes: This is a software class A controller designed for use at a normal degree of pollution.
 Disposal
The device is considered electrical and electronic equipment for disposal in terms of the applicable European Directive and may not be disposed of as domestic garbage.
- Dispose of the device through channels provided for this purpose.
- Comply with all local and currently applicable laws and regulations.
- Dispose of empty batteries in designated collection points.
 |
 WARNING WARNING |
Risk of explosion due to fire or short-circuit, even if the batteries are empty Risk of injuries from by flying parts
|
 |
WARNING |
Electrolyte leakage Chemical burns
|
Observe the following:
- Only replace batteries with batteries of the same type and from the same manufacturer.
- Observe the polarities (+/-).
- The batteries must be new and free from damage.
- Do not mixed new batteries with used batteries.
- Store, transport, and dispose of the batteries in accordance with local regulations, guidelines, and laws. Also observe information from the battery manufacturer.
Technical data

*) The documents can be downloaded from http://siemens.com/bt/download.
Connection diagrams
REV24 / REV24DC

- L: Phase, AC 24 … 250 V
- L1: N.O. contact, AC 24 …250 V / 6 (2.5) A
- L2: N.C. contact, AC 24 … 250 V / 6 (2.5) A
- M1: Circulating pump
- N1: REV24… controller
- S1: Remote control unit (potential-free)
- T1: Remote control signal
- T2: Remote control signal
- Y1: Actuating device
Application examples

- Instantaneous water heater
- Atmospheric gas burner

- Zone valve
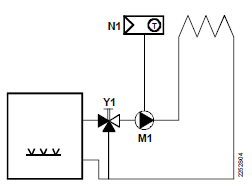
- Cooling unit
Circulating pump with pre-control by manual mixing valve
- E1: Cooling unit
- F1: Thermal reset limit thermostat
- F2: Manual reset safety limit thermostat
- M1: Circulating pump
- N1: REV24.. room temperature controller
- Y1: 3-port valve with manual adjustment
- Y2: Magnetic valve
- Y3: Three-port valve with actuator
- Y4: Two-port valve with actuator
Dimensions

Issued by
- Siemens Switzerland Ltd.
- Smart Infrastructure
- Global Headquarters
- Theilerstrasse 1a CH-6300 Zug
- Tel: +41 58 724 2424
- www.siemens.com/buildingtechnologies
© Siemens Switzerland Ltd, 2008 – 2019
Technical specifications and availability subject to change without notice.
REFERENCE:
DOWNLOAD MANUAL:
SIEMENS REV24 Room thermostat Product Specifications Guide
OTHER MANUAL:
SIEMENS REV24 Room thermostat Operating Instruction
