Siemens RDG20KN Room Thermostats

RDG2..KN
- Room thermostat with KNX communications allowing users to set ideal temperature, relative humidity and CO2 level (RDG204KN&RDG264KN). The thermostat offers the operating modes Comfort, Economy, and Protection.
- In addition, it can operate in Auto mode as per a schedule via KNX bus or local.
- The fan operates either in Auto mode or at the selected speed in Manual mode.
- Users can either use the factory settings or adjust settings as desired.
Overview
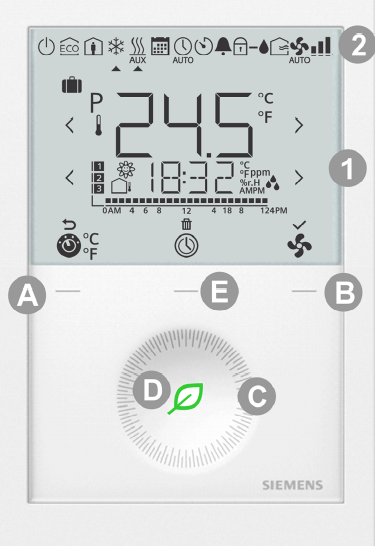
1: Main display
![]()
Operating mode selection *
Scheduler
Fan speed selection
Escape
Delete schedule
Confirm parameters
Number of schedules or slave alarms
Outside temperature
Parameter
Digits for setpoint display
Time bar for schedule
![]()
- Additional user information, such as outside temperature, time of day from KNX bus, relative humidity, or indoor air quality
- Morning: 12-hour format; Afternoon: 12-hour format
- Relative humidity
- Indoor air quality
- Value with a thermometer: Digits for room temperature display
![]()
- Degrees Celsius or Fahrenheit
- CO2 values
2: Operating mode
![]()
- Holiday mode
- Protection mode
- Economy mode
- Comfort mode
- Cooling mode
- Electric heater active
- Heating mode
- Scheduler mode
- Manual changeover
- Auto mode
- Temporary timer
- Fault
- Fresh air indication
- Condensation in the room (dewpoint sensor active) or humidity control active
- Button lock
- Automatic fan
- Fan speed I
- Fan Speed II
- Fan Speed III
- A. Operating mode button
- B. Fan mode button
- C. Rotary knob
- D. Green leaf
- E. Protection hospitality mode or scheduler button
When P002 = 3, the icon is displayed as ![]() and the button can be used to switch unit between °C and °F. (scan the above QR code for the latest version info).
and the button can be used to switch unit between °C and °F. (scan the above QR code for the latest version info).
Operating Instructions
Changing the room temperature

- Turn the rotary knob clockwise to increase, or counterclockwise to decrease the current room temperature setpoint.
Note: The setting range is 5…40 °C; it can be limited by parameters P013 and P016. (for parameter settings, see Control parameters).
Adjusting the fan speed

- Press the right button repeatedly until the desired fan mode is reached.
- In Auto mode
 , the fan speed is automatically selected by the thermostat depending on the setpoint and current room temperature.
 - In Manual mode, the fan operates independently and runs at the speed set by the user: speed I / speed II / speed III.
Changing the operating mode

- Comfort mode
- In Comfort mode, the thermostat maintains the room temperature at the setpoint which can be adjusted with the rotary knob.
- Economy mode
- In Economy mode, the thermostat maintains the room temperature at a lower or higher setpoint, thus saving energy and money.
- The thermostat can be set to Economy mode either by pressing the operating mode button if enabled (P002 = 2), or via an external signal (switch or KNX bus command) such as keycard or presence detector.
- The Economy setpoints are factory-set to 15 °C for heating and 30 °C for cooling. They can be adjusted via parameters P019 and P020 (for parameter settings, see Control parameters on page 2).
- Protection mode
- In Protection mode, the thermostat stops operating. However, if the room temperature drops below 8 °C, heating is switched on to protect the room against frost.
- The thermostat switches to Protection mode when the window contact (local or on KNX) is activated. The setpoints for Protection mode can be changed by your HVAC installer if desired:
- Changes made by installer:
 Frost protection: _________ ˚C Heating protection: __________˚C
- Auto mode
- In Auto mode, the thermostat automatically switches over between Comfort and Economy mode as per the KNX bus or local schedule (enabled via P005).
- If no schedule is available, Comfort replaces Auto.
- Important: If setpoints are set to Off, there is no protective heating or cooling function. Risk of frost!
Green leaf indication
The green leaf indication is an energy-efficient setting and indicates the end user settings.

- Green leaf: Settings are within the preset energy-efficient range.

- Red leaf: Settings exceed the preset energy efficiency range.
- End users can press the red leaf and return to the energy-efficient range.
Reminder to clean filter, display of external faults
 FIL: This message reminds you to clean the filter on your HVAC equipment.
- AL1: It appears after _______ “fan operating hours” and disappears when the thermostat is manually set to Protection. These fault messages tell you an external fault has occurred **:
- AL2: AL1 : _______________________ AL2 : __________________________
- AL3: AL3 : _______________________
Needs to be configured by the HVAC installer.
Scheduler
Set schedule

- Press button
 once and then turn the rotary knob or press button continuously to select programming mode PROG.
 - Press button
 once to enter scheduler mode
 .
. - Turn the rotary knob to select the weekday to be set, then press button once.
- Turn the rotary knob to view existing schedules, then press button once to select the schedule that need to be edited.
- Comfort mode setting of selected schedule and icons
 and are displayed, then press button once. The start time for Comfort flashes and can be changed by turning the rotary knob.
 - Press button once to confirm the adjusted value and enter the Economy mode setting for the schedule. Icons
 and are displayed, then press button once. The start time for Economy flashes and can be changed by turning the rotary knob.
 - Press button once to confirm the adjusted value. Then users can view other schedules by turning the rotary knob and enter other schedule settings (same as edited schedule).
Note: User can press button ![]() to delete any schedule or
to delete any schedule or ![]() (Esc) to cancel the change. The maximum number of set schedule is three per day.
(Esc) to cancel the change. The maximum number of set schedule is three per day.
Set TIME

- Press button once and then turn the rotary knob or press button continuously to select programming mode TIME.
- Press button once and then turn the rotary knob to select time format (12H).
- Press button once and then turn the rotary knob to select AM or PM.
- Press button once and enter the hour setting.
- The hour value flashes and can be changed by turning the rotary knob.
- Press button once to confirm the adjusted value and enter the minutes setting.
Repeat the steps as for the hour.
Note: When time format is 24 h, AMPM is not displayed.
Set DATE

- Press button once and then turn the rotary knob or press button continuously to select programming mode DATE.
- Press button once to enter date setting.
- Turn the rotary knob to select month/weekday / year, then press button once.
- For example, enter the year setting. The Year value flashes and can be changed by turning the rotary knob.
- Press button to confirm the adjusted value, or
 (Esc) to cancel the change.
Repeat steps for month and weekday settings.
Set AWAY (Holiday mode)

- Press button once and then turn the rotary knob or press button continuously to select programming mode AWAY. Holiday mode
 is displayed.
 - Press button once to enter scheduler mode.
- Turn the rotary knob to adjust the holidays, then press button once.
- Set the start time (AWAY): Set the month (MON) and then press button
 Set the day (DAY)
 - Press button once to confirm the adjusted value; the idle page for Holiday mode is displayed once the start time reaches.
 If the button lock function is enabled (parameter P028 = 2), pressing the right button for 3 seconds locks or unlocks the buttons respectively. Locked buttons are indicated by the key symbol
 .
.- If “Auto lock” is configured (P028 = 1), the thermostat automatically locks the buttons 10 seconds after the last adjustment.
Commissioning (by qualified HVAC installer)
To adapt the thermostat to your system and optimize control performance, a number of control parameters can be adjusted. This can be done during operation, either via the buttons on the thermostat or via a commissioning tool.
Control parameters

To change control parameters, proceed as follows:
- Press left and right buttons simultaneously for 3 seconds or until device beeps if the buzzer function is enabled (P030).
- Service level: Release and within 0.5…4 seconds, press the right button again until “P001” is displayed.
- Expert level: Release and within 0.5…4 seconds, press the left button again until the temperature disappears.
- Turn the rotary knob counterclockwise minimum ½ rotation. P050 displays.
- Select the required parameter by turning the rotary knob.
- Press button (OK). The current value of the selected parameter flashes and can be changed by turning the rotary knob.
- Press button (OK) to confirm the adjusted value, or (Esc) to cancel the change.
- To adjust additional parameters, repeat steps 3 through 5, or press (Esc) to quit parameter setting mode.
- To adjust additional parameters, repeat steps 3 through 5, or press
Note: If password protection (needs to be done by HVAC installer) is enabled, users must enter the password to open parameter setting mode. If the password is mistyped 5 times, the thermostat is locked and the password cannot be entered for 5 minutes.
Symbols ![]() and
and ![]() are displayed.
are displayed.
Parameter list
| No. | Description | Factory setting | Setting range | Adj.
! |
|
P001 |
Control sequence |
2-pipe: 1 = Cooling only 4-pipe: 4 = Heating and cooling |
0 = Heating only 1 = Cooling only 2 = H/C changeover auto 3 = H/C changeover manual 4 = Heating and cooling |
|
|
P002 |
Operation via room operating mode selector | 1 | 1 = Auto *** – Protection / Auto – Comfort – Protection (when there is local scheduler) 2 = Auto *** – Comfort – Economy – Protection 3 = Auto *** (Comfort) – Protection Hospitality |
|
|
P003 |
Operation via fan operating selector |
0 |
0 = Auto – Manual 1 = Manual 2 = Auto – Manual – Protection 3 = Auto – Protection |
|
| P004 | Unit | 0 | 0 = °C (parameter in °C) 1 = °F (parameter in °F) |
|
| P005 | Scheduler | OFF | ON = Enabled; OFF = Disabled | |
| P006 | Measured value correction | 0 K | -5…5 K | |
| P007 | Humidity value correction | 0 | -10…0…10 % | |
| P008 | Standard display | 0 | 0 = Room temperature; 1 = Setpoint | |
|
P009 |
Additional display information |
0 |
0 = — (No display) 1 = °C and °F 2 = Outside temperature 3 = Time of day (12 h) 4 = Time of day (24 h) 5 = Humidity 6 = Indoor air quality (numeric) ***** 7 = Indoor air quality (text) ***** 8 = Humidity and IAQ (numeric) ***** 9 = Humidity and IAQ (text) ***** |
|
| P010 | Setpoint concept | 1 | 1 = Comfort concept; 2 = Energy saving concept | |
| P011 | Comfort basic setpoint | 21 °C (70 °F) | 5…40 °C (41…104 °F) | |
| P013 | Comfort setpoint minimum | 5 °C (41 °F) | (P010 = 1): 5 °C (41 °F)…P016-1 K (P010 = 2): 5 °C (41 °F)…P014-1 K |
|
| P014 | Comfort setpoint maximum heating | 21 °C (70 °F) | P013+1 K…P015-1 K | |
| P015 | Comfort setpoint minimum cooling | 25 °C (77 °F) | P014+1 K…P016-1 K | |
| P016 | Comfort setpoint maximum | 35 °C (95 °F) | (P010 = 1): P013+1 K…40 °C (104 °F) (P010 = 2): P015+1 K…40 °C (104 °F) | |
| P017 | Summer time | 1 | OFF; 1 = Europe; 2 = Australia; 3 = New Zealand | |
| P019 | Economy heating setpoint | 15 °C (59 °F) | — (0), 5 °C…P020 (41 °F…P020)
P020 = 40 °C max. (P020 = 104 °F max.) |
|
| P020 | Economy cooling setpoint | 30 °C (86 °F) | — (0), P019…40 °C (P019…104 °F) P019 = 5 °C min. (P019 = 41 °F min.) |
|
| P023 | Indoor air quality setpoint ***** | 1000 ppm | 10…2000 ppm | |
| P024 | Humidity setpoint high | 50 | — (0), P026 or 20…90 % | |
| P026 | Humidity setpoint low | OFF | — (0), 20…90 % or P024 | |
| P027
**** |
Electric heater when cooling | ON | ON = Enabled; OFF = Disabled |

|
P029 |
Fan: Dead zone Comfort mode |
0 |
0 = Fan disable
1 = Low speed (Heat and Cool) 2 = Low speed (Cooling only) 3 = Fan disable Auto & Manual 4 = Low speed Auto & Manual 5 = Low speed Auto & Manual Cooling |
|
| P030 | Buzzer function | ON | ON = Enabled; OFF = Disabled | |
|
P031 |
Language |
1 |
1 = English; 2 = Francais (French)
3 = Deutsch (German); 4 = Italiano (Italian) 5 = Espanol (Spanish); 6 = Nederlands (Dutch) 7 = Turkce (Turkish); 8 = Cesky (Czech) 9 = Suomi (Finnish); 10 = Polski (Polish) 11 = Magyar (Hungarian); 12 = Slovenski (Slovak) 13 = (Limba) Romana (Romanian); 14 = Dansk (Danish) 15 = Norsk (Norwegian) |
|
| P032 | Room operating mode holidays | 0 | 0 = Economy; 1 = Protection |
- When no time schedule via KNX exists, Auto equals Comfort.
- Parameter P027 is displayed only for application 2-pipe with an electric heater.
- These parameter values are valid for RDG204KN and RDG264KN.
All temperature settings are in increments of 0.5 °C (except P006 of RDG204KN & RDG264KN is in 0.1 °C).
![]() Remember to record all changes!
Remember to record all changes!
Issued by
- Siemens Switzerland Ltd
- Smart Infrastructure
- Global Headquarters
- Theilerstrasse 1a CH-6300 Zug
- Tel: +41 58 724 2424
- www.siemens.com/buildingtechnologies

© Siemens Switzerland Ltd, 2020
Technical specifications and availability are subject to change without notice.
REFERENCE:
DOWNLOAD MANUALS:
Siemens RDG20KN Room Thermostats Operating Instruction