SALUS RT310SR Internet Wireless Thermostat

Introduction
The RT310SR module will switch your appliance on or off in accordance with the temperature set by you. The completed RT310SR series consists of a transmitter – RT310TX thermostat and a Smart Relay SR868.
Product Compliance
This product complies with EMC 2014/30/EU, LVD 2014/35/EU, RED 2014/53/EU and RoHS 2011/65/EU. Full text of the EU Declaration of Conformity on www.saluslegal.com.
868.0-868.6MHz; <13dBm
Safety Information
Use in accordance with the regulations. Indoor use only. Keep your equipment completely dry. Disconnect your equipment before cleaning it with a dry towel.

- Turn on the LCD backlight
- Turn On/Off the Frost Mode
- Increase button
- Decrease button
- Test Mode/ Pairing Mode
LCD icons

- The thermostat is calling for heat
- The thermostat is in frost mode
- RF signal
- The low battery indicator icon
- Temperature display
DIP switch settings
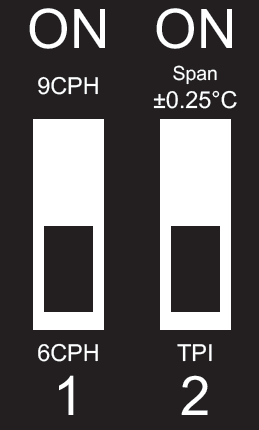
The DIP Switches can be found on the rear of your thermostat.
| Control feature | TPI | Span |
|
Operation |
When TPI is selected on DIP switch № 2, the DIP switch № 1 is functional. You can choose the Cycles Per Hour between a lower comfort level (6CPH) and a higher comfort level (9CPH). | When Span is selected on DIP switch № 2, the DIP switch № 1 is not functional. The temperature accuracy of your thermostat is set to ± 0.25 °C. |
LED indication Smart Relay
| LED State | Description | |
|
Red |
On | The relay is off. |
| Flash | The relay is in pairing mode. | |
|
Green |
On | The relay is on. |
| 2 x Flash | The relay is writing pairing code. | |
|
Red and Green |
Flash alternately | The relay is paired but lost link. |
| Flash in different sequence | It indicates the software version after reboot. | |
Installation – Step 1
- Electric heater

- Boiler

The thermostat and the smart relay are pre-paired from the factory if purchased as a pack. If not, follow the thermostat pairing process.
Installation – Step 2

Pairing process

In case you want to add more than one relay, set all relays into pairing mode, including the ones already paired, and start the pairing process. The LED will flash red when the relay is in pairing mode.
Put the thermostat into pairing mode, by pressing the pair button for 3 seconds. After the smart relay is paired with the thermostat, the LED is steadily red.

Test the pairing process

If the thermostat loses connection with the Smart Relay, the Smart Relay goes into fail-safe mode after 30 minutes.
Change temperature
- Actual room temperature

- Setpoint temperature
- By changing the Setpoint (desired) temperature, you are permanently altering your temperature.
- Two seconds timeout

- Actual room temperature
Frost Mode
Frostpoint review


Press the three buttons together for 3 seconds. Use ![]() to select dxx parameter,
to select dxx parameter, ![]() to change a parameter value, and to confirm.
to change a parameter value, and to confirm.
Parameter
| dxx | Function | Parameter | Description | Default value |
| d01 | Temperature display increments | 0.1 or 0.5°C | Select temperature display increments | 0.5°C |
| d02 | Temperature offset | ±3.0°C | Calibrate your thermostat temperature | 0.0°C |
| d03 | Frost setpoint | 5.0-17.0°C | Set the Frost Point Temperature | 5.0°C |
REFERENCE
Download Manual:
SALUS RT310SR Internet wireless Thermostat Quick Guide
OTHER MANUALS:
SALUS RT310SR Internet wireless Thermostat User Manual
SALUS RT310SR Internet wireless Thermostat Wiring Daigram