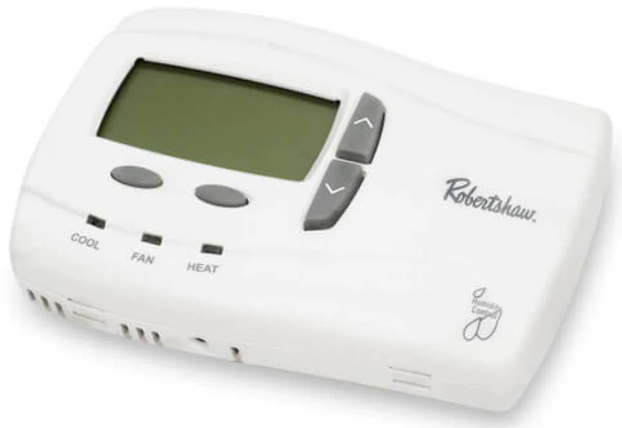
Robertshaw 9801i2 Programmable Thermostat
IMPORTANT INFORMATION
WARNING:
- Always turn off power at the main power source by unscrewing fuse or switching circuit breaker to the off position before installing, removing, or cleaning this thermostat.
- Read all of the information in this manual before programming this thermostat.
- This is a 24V AC low-voltage thermostat. Do not install on voltages higher than 30V AC.
- All wiring must conform to local and national building and electrical codes and ordinances.
- Do not short (jumper) across terminals on the gas valve or at the system control to test installation. This will damage the thermostat and void the warranty.
- Do not connect ground to any terminal in this unit.
- This thermostat is equipped with configurable automatic compressor protection to prevent potential damage due to short cycling or extended power outages. The short cycle protection provides up to a 5-minute delay between heating (heat pump only) or cooling cycles to prevent the compressor from being damaged.
- Do not switch system to cool if the temperature is below 50°F (10°C). This can damage the cooling system and may cause personal injury.
- Use this thermostat only as described in this manual
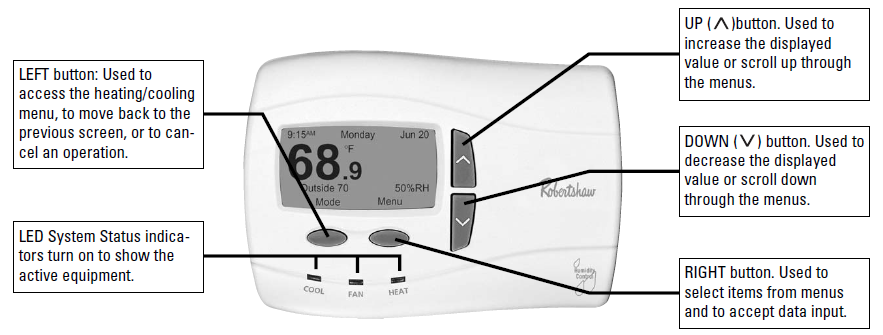
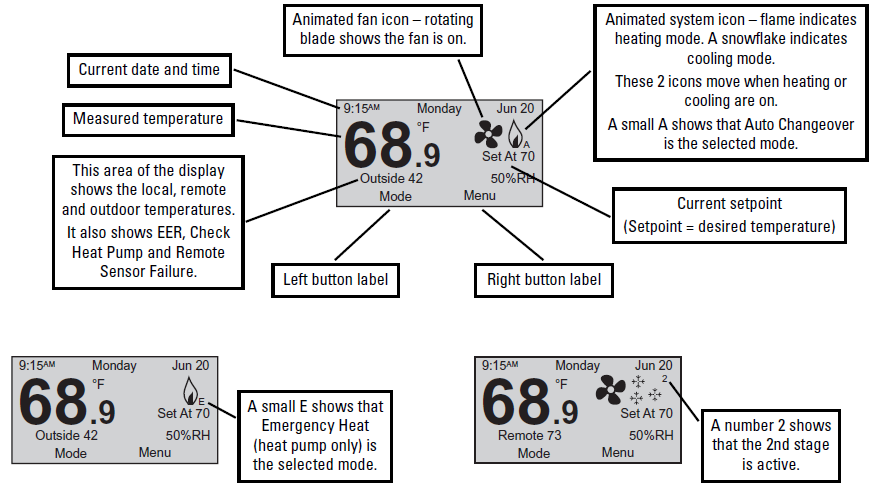
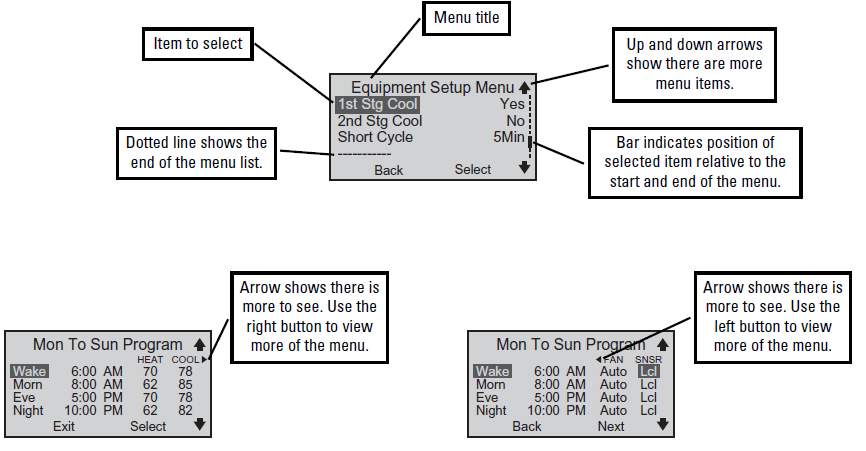
KNOW YOUR THERMOSTAT’S CONTROLS AND DISPLAYS
NOTE: In many cases the installer made the initial setup of your thermostat. That was based on your preferences and the characteristics of your heating/cooling system. Our User’s Guide gives information allowing you to make basic modifications for your home environment at any time. Become familiar with your thermostat’s controls and displays by reviewing the information on the next three pages.
CHOOSE HEATING/COOLING
- To choose a mode (of operation), select Mode.
- There are five possible operating modes:
- Off – The heating/cooling systems are turned off, and will not operate.
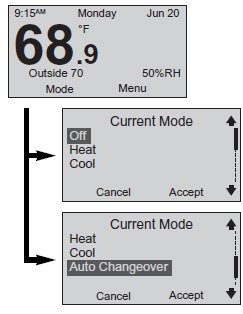
- Heat – The heating system is activated. The main screen displays the heat icon (
 ).
). - Cool – The cooling system is activated. The main screen displays the cool icon (
 ).
). - Auto Changeover – Either heating or cooling will be activated to maintain the temperature setpoint. The main screen displays the letter A next to the or
- NOTE: Auto Changeover will be displayed only if activated in System Settings.
- Emer – Emergency heat is activated. (This choice is available only when 1st stage Heat is set as Heat Pump.)
- The main screen displays a small letter E next to the .
- Note: Emer will not automatically energize on the 9801i2. You will need to manually select it from the Current Mode menu.
- Note: Balance points are not an option when an outdoor sensor is installed with the 9801i2.
When should I select Emergency Heat?
If your heat pump is not adequately providing heat, you can bypass it by selecting Emergency (heat) until the heat pump can be serviced. In some installations, your thermostat may indicate a problem with the heat pump by displaying a message (on the main screen) underneath the temperature. You may also want to select Emergency (heat) when the outdoor temperature drops below freezing since the heat pump is very inefficient at low temperatures. - See Balance Points (page 22) for other options.
OVERRIDE CURRENT SETTINGS
- Hold does not appear in the Main Menu if Off is the selected mode.
- To access the Override Settings, select Menu on the main screen.
- Hold – With this menu item you may override the current temperature setpoint and choose a new setpointto be held during the override period. This can be a few hours, or it can be a longer period.
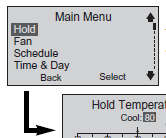
- To start a Hold: On the Main Menu, scroll to Hold, and press Select. OR. . . While at the main screen, press either the or button. In either case, the Hold Temperature screen appears.
- Set the Hold Temperature by pressing the or button until the desired temperature is displayed. Select Next. The Select Override Type screen appears.
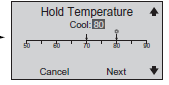
- NOTE: The unlabeled arrow is the current room temperature. The arrow with a or is the programmed setpoint for that mode.
- A Temporary override lasts up to 24 hours.
- A Vacation override lasts up to one year
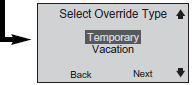
- Temporary Hold – Select the time when the hold will end.
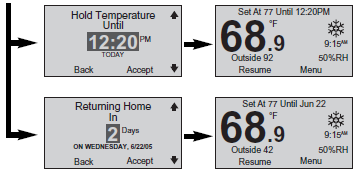
- Select Accept. The Main Menu will appear. Select Back.
- The main screen will show the hold temperature and time.
- When the hold expires, normal operation continues.
- Vacation Hold – Select the number of days for the hold to last. Select Accept. The Main Menu will appear. Select
- Back. The main screen will show the hold temperature and time. Vacation hold ends at midnight on the last day.
- NOTE: To cancel the hold at any time, select Resume
OVERRIDE CURRENT SETTINGS
- Setting a hold when the operating mode is Auto Changeover.
- When the selected mode is Auto Changeover, setting a hold means that two setpoints (one for heat and one for cool) have to be chosen. The distance between the heating and cooling setpoints cannot be smaller than the deadband. (For more information about deadband, see COMFORT SETTINGS on page 18.)
- NOTE: There is a letter A next to the on the main screen. This shows that Auto Changeover is active.
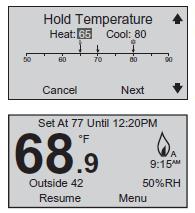
- The settings are the same for Auto Changeover as they are for just Heat or Cool (see previous page), except both a heat and cool hold temperature must be selected.
- NOTE: The or above the arrows are the heat and cool setpoints respectively. The unlabeled arrow is the current room temperature.
- Press the
 button until the desired Heat temperature is displayed. Select Next. Press the button until the desired Cool temperature is displayed. Select Next.
 - The Select Override Type screen appears. Follow the Select Override Type steps from the previous page to complete the hold setting.
OVERRIDE FAN OPERATION
- Select Menu from the main screen.
- Select Fan from the Main Menu.
- The first item on the Fan Menu is Fan Mode.
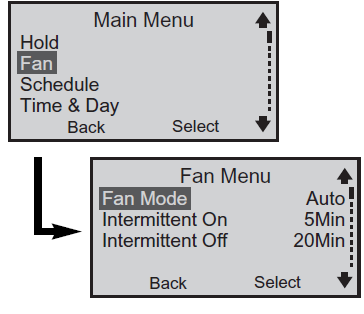
Possible fan modes are:
- On – In this mode the fan is constantly on until a different fan mode is chosen.
- Auto – The fan operates when either the heating system or cooling system require it.
- Intermittent – Use this fan mode to circulate the air in your home between heating or cooling cycles.
- The fan operates similarly to Auto mode. When heating or cooling equipment is not active, the fan circulates the air for Intermittent On (how long the fan will be on) and Intermittent Off (how long the fan will be off) times you set.
- These times are set from the Fan Menu by selecting the Intermittent On or Intermittent Off option and then using the or button to select the desired amount of time.
- Program – In this fan mode, fan operation is determined by the programming done through the
- Program Menu. (For more information, see PROGRAMMING THE THERMOSTAT on page 12 and 13.)
- Select this mode if the fan operation was overriden and you would like it to resume the settings made in the original program.
PROGRAMMING THE THERMOSTAT
About EnergyStar®
- Your thermostat has been preprogrammed with a schedule of setpoints recommended by EnergyStar (www.energystar.gov). This schedule is designed to lower your energy costs year-round.
- If you changed the schedule and want to return to the EnergyStar schedule, you can do that at any time by selecting Menu, Schedule, Reset to EnergyStar.
- From the main screen, select Menu.
- From the Main Menu, select Schedule.
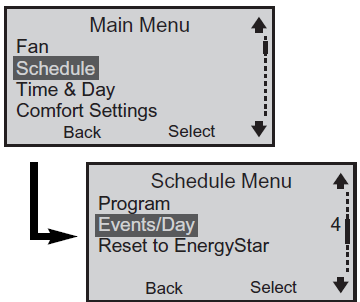
- Your schedule is based on the number of events you want each day. Each event includes a time of day, heating and cooling setpoint, fan setting, and sensor setting.
- (Sensor setting only appears when a remote sensor is installed.) There can be two, four, or six events per day.
- You can change how many events per day by selecting Events/Day.
- In the following programming example, the Schedule Menu shows the default of four events per day.
- From the main screen, select Menu, then Schedule, then Program. This will take you to the Select
Program Days menu. The choices are: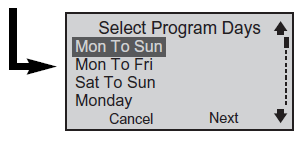
- Mon to Sun – All days of the week will be set the same.
- Mon to Fri – Five weekdays can be set the same.
- Sat to Sun – Weekend days can be set differently from the weekdays.
- Individual Days (you may select the actual individual days) – Each day can be set separately.
Once you select the day or set of days:
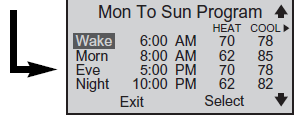
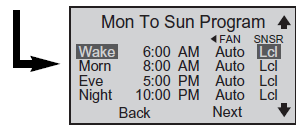
- NOTE: In this example there are four events (Wake, Morn, Eve and Night) in a Monday to Sunday program. The previous page explained how to change the number of events.
- Selecting Next will change the highlighted selection.
- Choose one event (Wake, for instance), and make changes to the four items in that row
- Time – Select a time. The thermostat allows for changes in 10-minute increments.
- Heat and Cool – Select temperature. Adjustments are in one-degree increments.
- Fan – Choose On, Auto, or Int (Intermittent). (See OVERRIDE FAN OPERATION on page 11.)
- If a remote sensor is installed, SNSR will be the fifth item to program. SNSR – In this column you select the temperature sensor(s) used to control the thermostat. Lcl selects the local sensor built-in to the thermostat, and is the default setting for this menu item. Rmt selects
- the remote indoor sensor. This choice also disables the local sensor. Avg selects the average temperature of the local and remote sensors.
TIME & DAY
- Select Time & Day from the Main Menu.
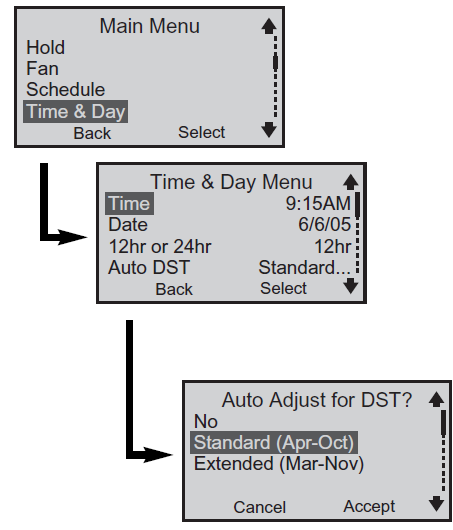
- With the Time & Day Menu you can make these four settings:
- Time – Set the Time by setting the hour and then the minutes.
- Date – Set the month, then the day, then the year.
- 12hr or 24hr – Select a clock type; either a 12-hour or 24-hour format.
- Auto DST – Choose whether you want the thermostat’s clock to adjust automatically for
- Daylight Saving Time.
- No – Makes the Auto DST feature inactive.
- Standard (Apr – Oct) – The clock will be automatically set one hour ahead at 2:00 am on the first Sunday in April, and set one hour back at 2:00 am on the last Sunday in October.
- Extended (Mar – Nov) – The clock will be automatically set one hour ahead at 2:00 am on the second Sunday in March, and set one hour back at 2:00 am on the first Sunday in November. (The Extended option meets conditions of U.S. Federal Daylight Saving
- Time legislation that goes into effect in 2007.)
HUMIDIFY
- Choose Humidify from the Main Menu.
- The three items available in this menu are explained below.
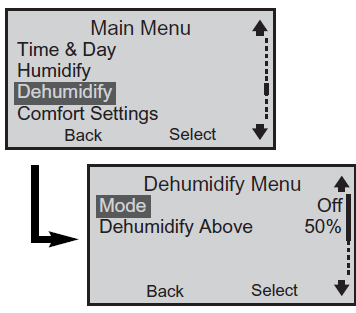
Mode choices are:
- Off – Humidity level will not be controlled through the thermostat.
- With Heating – Humidification will occur only during a heat cycle and when the indoor humidity level falls 2% below the humidity setpoint.
- Independent Of Heating – Humidification will occur when the measured humidity level falls 2% below the humidity setpoint regardless of a call for heat.
- NOTE: Setpoint is only an option when an outdoor sensor is installed. Setpoint choices are:
- User Adjust – Humidification will occur based on the user setting.
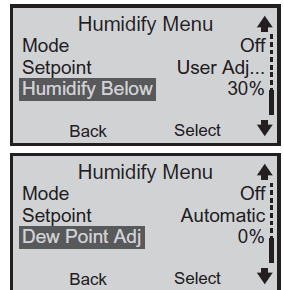
- Automatic – This selection can be made only when an outdoor sensor is connected. Humidity setpoint is based on the outdoor temperature and the dew point adjustment (see below).
- Notes: If Setpoint is set to User Adjust, Humidify Below will be the option on the Humidify Menu. If Setpoint is set to Automatic, Dew Point Adj will be the option on the Humidify Menu.
- Humidify Below – This is where you set your preference of the humidity level. The range is 15% to 45%.
- Dew Point Adj – Range -15% to +15%. This feature is typically used to help prevent condensation from forming. In general, the lower the outdoor temperature, the lower the humidity level must be to avoid condensation. Because each house has different tightness characteristics, the Dew Point Adj setpoint may need to be adjusted to optimize humidity control.
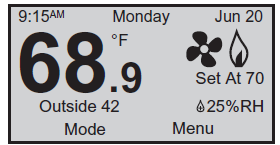
NOTE: When humidification is active, the main screen will include the icon next to the measured humidity.
DEHUMIDIFY
- Choose Dehumidify from the Main Menu.
- The three items available in this menu are explained below. Mode choices are:
- Off – Humidity level will not be controlled through the thermostat.
- With Cooling – Dehumidification will occur only during a cooling cycle and when the indoor humidity level rises 2% above the humidity setpoint.
- Independent Of Cooling – Dehumidification will occur when the measured humidity level rises 2% above the humidity setpoint regardless of a call for cooling.
- NOTE: If Mode is set to Independent of Cooling, Over Cooling will be an option on the Dehumidify Menu.
- Over Cooling – To achieve more dehumidification, the thermostat will allow cooling beyond the temperature setpoint by the entered amount. Range 0.5°F to 2.0°F.
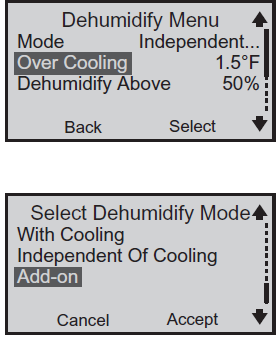
- Dehumidify Above – This is where you set your preference of the humidity level. The range is 45% to 60%.
- Add-on – Cycles the dehumidifier regardless of a call for cooling. In order to get full use of this mode, it should only be selected when a duct mounted dehumidifier is installed.
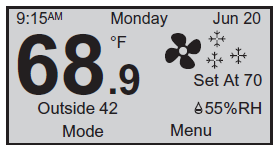
NOTE: When dehumidification is active, the main screen will include the icon next to the measured humidity.
COMFORT SETTINGS
- Comfort Settings control equipment cycling (on/off periods), staging and sensors that may be connected to your thermostat.
- Choose Comfort Settings, from the Main Menu.
- The four items available in this menu are explained below.
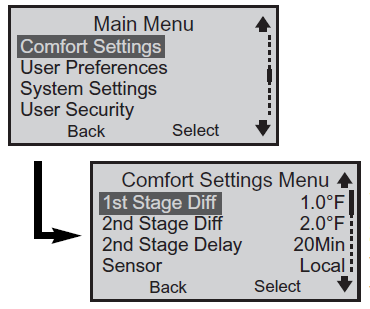
- 1st Stage Differential is the number of degrees away from the setpoint that the thermostat allows before it calls for the 1st stage equipment to be activated. As this setting is lowered, your system will cycle more frequently.
- 2nd Stage Differential is the number of degrees away from 1st stage activation that the thermostat allows before 2nd stage equipment is activated. (Temperature demand overrides the 2nd Stage Delay.)
- This feature is available only on the 9825i2 models.
- 2nd Stage Delay is a timed delay between 5 and 40 minutes. It is the maximum time 1st stage equipment tries to satisfy demand before the second stage equipment is activated.
- This feature is available only on the 9825i2 models.
- Sensor appears only if a remote sensor is connected to the thermostat.
- If a remote sensor is connected, you can choose to have the temperature controlled by the thermostat’s built-in sensor (Local), by the remote sensor (Remote), or by an average between the two sensors (Average). You also can select Program, which means the sensor selection is controlled by the programmed schedule.
- See the SNSR section in PROGRAMMING THE THERMOSTAT on page 13. Also, see Do I need an accessory sensor? in FREQUENTLY ASKED QUESTIONS for sensor choice and faulty sensor information.
- Deadband is used only when the thermostat is set in the Auto Changeover mode. The deadband refers to a band or range between the heating and cooling setpoints that controls how often the thermostat switches from heating to cooling and vice versa.
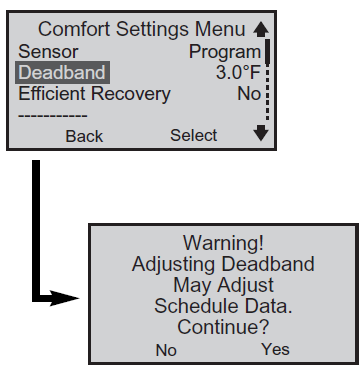
- The lower the deadband, the more often the thermostat will switch between heating and cooling, usually in the fall and spring.
- (For more information, see What is deadband? in FREQUENTLY ASKED QUESTIONS on page 29.)
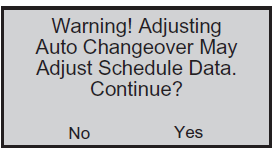
- The Warning shown to the left appears alerting you that Deadband adjustments may affect Schedule data.
- This means setpoints already entered into the program may be changed when the headband is put into effect.
- When (Energy) Efficient Recovery is turned on (Yes), the thermostat attempts to reach the next setpoint at the exact time of the next event. If you have two stages, the thermostat will use only the first stage during this period. This is more efficient than waiting until the next event and then turning on both first and second stages.
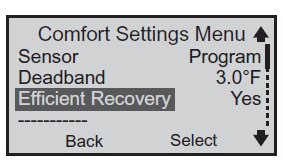
- (For more information, see What is Energy Efficient Recovery™ (EER™)? in FREQUENTLY ASKED QUESTIONS on page 29.)
CUSTOMIZE THE DISPLAY
- User Preferences provides you with more ways to customize the displayed information and maintain optimal comfort.
- From the Main Menu, choose User Preferences.
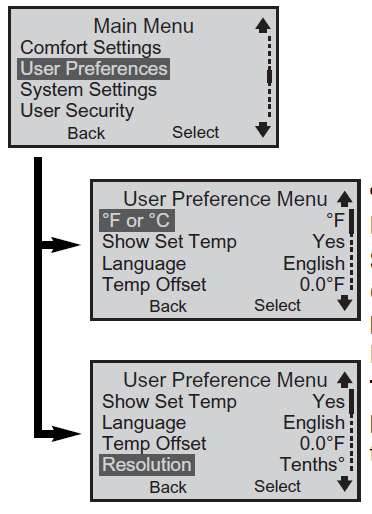
- ºF or ºC – Allows temperature to be displayed in either the Fahrenheit or Celsius scale.
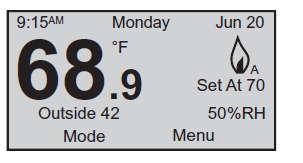
- Show Set Temp – Allows for the temperature setpoint to be displayed. (See the example at right.)
- Language – You can choose to display thermostat information in English, French or Spanish.
- Temp Offset – Allows for offsetting the factory calibration by ±3ºF or ±1.5ºC.
- Resolution – Personalize the way the main temperature is displayed. The main screen temperature display can be in whole degrees, in half degrees, or in tenths of a degree.
- Air Quality – Sets service reminders for parts of the heating/cooling system that need periodic attention.
- Based on the intervals you set, these service reminders are displayed on the main screen when a part needs to be serviced:
- Replace or Clean Filter
- UV Filter: Replace Bulb
- Replace or Clean Humidifier Pad
- All service intervals can be set to OFF or for a period of 1-12 months.
- When the main screen reminder appears, you can select either of these choices:
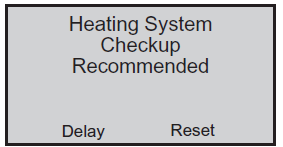
- Delay – This is a 24-hour delay. The reminder appears again in one day.
- Reset – This resets the service reminder. It will appear again at the end of the interval that’s been set.
- Display Settings – Changes screen brightness and contrast control.
- Idle Brightness – Refers to backlight brightness. When turned ON, this feature can be used as a night light.
- Active Brightness – Refers to backlight brightness when any of the keys are being used.
- Contrast – Refers to screen clarity.
SYSTEM SETTINGS
- Choose System Settings from the Main Menu.
- The System Settings Menu gives nine more ways to get the most from the thermostat.
- The information below describes how these features enhance thermostat performance.
- Equipment Setup – Make selections about the types of equipment used in your heating/cooling system.
- First, choose what type of equipment is used for the 1st Stage Heat.
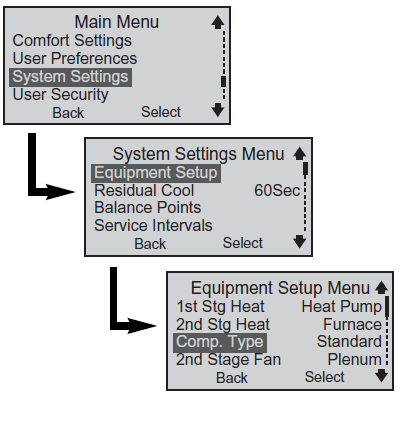
- Choices are: None, Furnace (e.g., gas forced air furnace), Strip (e.g., electric baseboard heating), or Heat Pump.
- On 9825i2 models, choose 2nd Stage Heat.
- Choices are: None, Furnace, Strip, or Heat Pump.
- If Heat Pump is chosen for the 1st Stage Heat and Furnace is chosen for the 2nd Stage Heat, two new menu items will appear on the Equipment Setup Menu; Comp. Type and 2nd Stage Fan.
- The Comp. Type allows you to determine how 1st and 2nd stage heat work together.
- Add-On – 1st stage heating compressor on the heat pump will be turned off when 2nd stage heating is activated.
- Standard – 1st stage heating compressor will continue to operate with the 2nd stage furnace for added heating.
- The 2nd Stage Fan determines how the fan will operate.
- Plenum – Allows the furnace to control the fan.
- ON – Allows the thermostat to control the fan.
- 1st Stage Cool equipment – Select Yes or No.
- 2nd Stage Cool equipment can be selected for 9825i2 models only – Select Yes or No.
- Short Cycle – The minimum time between heating or cooling cycles intended to protect your equipment. (See the WARNING below.) Turn it Off or set it from 1 to 5 minutes.
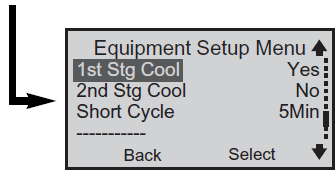
- WARNING: Adjusting the Short Cycle protection may damage the cooling equipment. Check with the equipment manufacturer’s recommended settings.
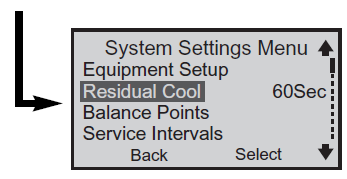
- Residual Cool – For cooling system efficiency, this tells the fan to keep running for up to two minutes after the cooling system has shut down.
- Balance Points – This choice only appears when the 1st stage is a heat pump. Low and High balance points are selected. The low balance point prevents the heat pump from being used when it is least efficient. The high balance point prevents the second stage heat (furnace or strip) from activating when the heat pump is most efficient.
- Outdoor setpoint temperature ranges are:
- Low Setpoint : -20ºF to 75ºF (-29ºC to 24ºC)
- High Setpoint : 0ºF to 75ºF (-18ºC to 24ºC)
- (For more information, see What are balance points? in FREQUENTLY ASKED QUESTIONS on page 28.)
- Select Service Intervals to set service reminders for primary system components of the heating/cooling system that need periodic attention. Based on the intervals you set, these reminders are displayed on the main screen when a part needs to be serviced:
- Heating System Checkup Recommended
- Cooling System Checkup Recommended
- Heat Pump System Checkup Recommended
- All service intervals can be set to OFF or for a period of 1-12 months.
- When the main screen reminder appears, you can select either of these choices:
- Delay – This is a 24-hour delay. The reminder appears again in one day.
- Reset – This resets the service reminder. It will appear again at the end of the interval that’s been set.
- Cooling Limit and Heating Limit.
- To prevent extremes in thermostat settings, use this menu item to limit maximum cooling and heating mode temperatures.
- Choose either (or both) a cooling or a heating limit to set.
- Set a temperature from 45ºF to 90ºF (7ºC to 32ºC).
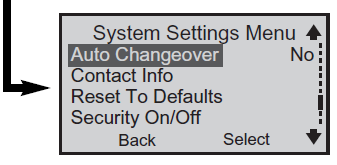
- Auto Changeover – When this feature is selected, it allows the thermostat to switch automatically between heating and cooling to maintain the optimal temperature. A warning appears with an alert that Schedule Data (your programmed settings for the week) may change if
- Auto Changeover is turned on. (For more information, see Deadband in COMFORT SETTINGS on page 18.)
- Contact Info – This is a place to store the installing dealer’s contact information. It provides a two-line display where typically, a name is on line one, and a phone number on line two.
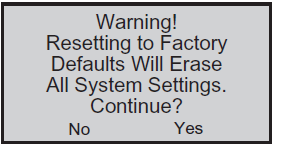
- Reset to Defaults – A warning appears. ALL settings (time, date, System Settings, etc.) will be erased and original factory default settings will replace them. Use this feature when the heating/cooling equipment changes, or when the way the equipment is used changes.
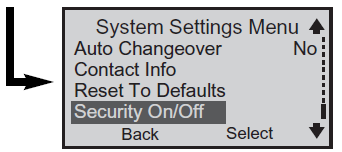
- Security On/Off – This item provides security for the System Settings Menu only.
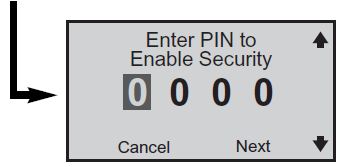
- To enable Security:
- Enter a four-digit PIN. When this number is accepted, a closed lock icon ( ) appears next to System Settings on the Main Menu.
- With System Settings enabled, you need to enter the PIN to review or change the system settings. After the PIN is entered, an open lock icon ( ) appears.
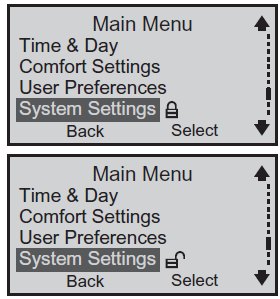
NOTE: When System Settings is unlocked, it will be relocked after 5 minutes of inactivity (i.e., no buttons being pressed).
To disable Security:
With Security unlocked, select System Settings, then Security On/Off. The Enter PIN to Disable Security screen appears. Enter the PIN again. Security is disabled. (The lock icon does not appear in the Main Menu.)
PREVENT THERMOSTAT ACCESS
- Choose User Security from the from the Main Menu when you want to prevent others from modifying thermostat operation. In effect, you can make the thermostat tamperproof.
- Select User Security from the Main Menu. Two choices are available:
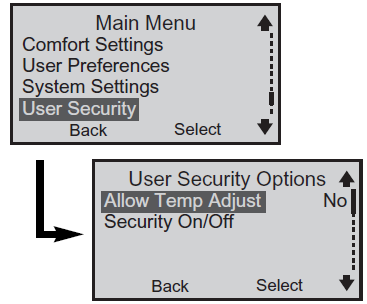
- Allow Temp Adjust – Do you want to allow a user to modify the Hold settings while locking out all other use of the thermostat? Choose Yes or No. If Yes is chosen, use the and buttons to modify Hold settings (see OVERRIDE CURRENT SETTINGS [Hold]).
- Security On/Off – Enable Security by entering a four-digit PIN. With Security enabled, ANY use of the thermostat (except for Hold modifications if Yes was chosen for Allow Temp Adjust) is prevented.
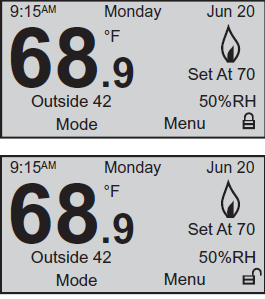
- The will be displayed on the main screen when Security is on. To modify any settings, touch any of the buttons and the Enter Pin to Unlock Security screen will appear. Enter the four-digit PIN to proceed.
- NOTE: When User Security is unlocked, it will be relocked after 5 minutes of inactivity (i.e. no buttons being pressed).
To disable Security:
- After Security is unlocked, select User Security, then Security On/Off, enter the PIN. Security is now disabled. (The lock icon no longer appears on the main screen
TECHNICAL SUPPORT
Do you have a question about your thermostat?
Select Tech Support from the Main Menu to find technical support contact information.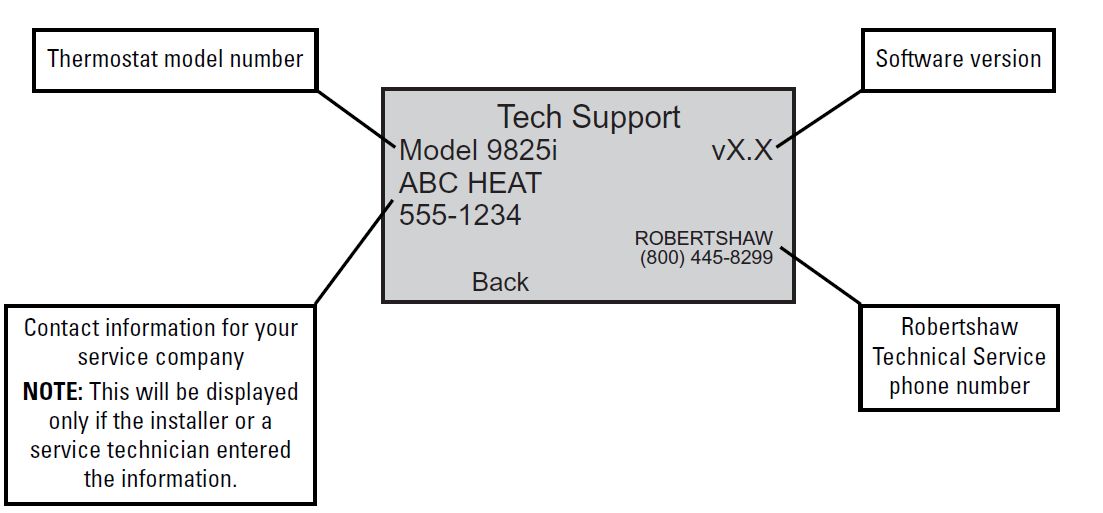
FREQUENTLY ASKED QUESTIONS
Who should I call for help?
Visit our web site at www.about-i-series.com. To talk with a Tech Support representative, give us a call at 800-445-8299.
What if I forget my PIN?
Talk with a Tech Support representative at 800-445-8299 to get a temporary PIN.
What should I do if my power goes out?
Make sure your family is safe and don’t worry about the thermostat. Your thermostat automatically retains the time of day for approximately two hours in the event of a power outage. All other programmed parameters are stored permanently in memory. If your power is out for more than two hours, simply reset the clock when power returns.
What are balance points?
For a heating/cooling system where the 1st stage heating is a heat pump, balance points prevent the heat pump from operating when the outside temperature is too cold. As the outside temperature drops, heat pump output increases along with the increasing heat requirement for the home. The balance point temperature is reached when heat pump output and the home heating requirement match. Supplemental heating is needed below the balance point temperature. Balance points differ according to climate, however they typically range from 27ºF to 35ºF.
Why is the time/temperature/backlight flashing?
The time and date need to be set. From the Main Menu, go to Time & Day and enter the settings.
What is a deadband?
The deadband refers to a range between the heating and cooling setpoints that controls how often the thermostat switches from heating to cooling and vice versa. The smaller the deadband, the more often the thermostat will switch between heating and cooling, which typically happens in the fall and spring of the year. As an example, let’s say the deadband is set to 3°F and your heating setpoint for a particular event is 68°F. The cooling setpoint for that event can’t be lower than 72°F. This prevents your thermostat from constantly cycling between heating and cooling.
What is Energy Efficient Recovery™ (EER™)?
Energy Efficient Recovery™ is an energy-saving feature. During a setback period (or set up in cooling), it allows the thermostat to look ahead two hours to determine when to turn on the heating (or cooling) system. During this period, the second stage is locked out to allow the first (and most efficient stage) to bring your home to the desired temperature.
Should I change installer settings?
Don’t change the settings made by your installer. The installer determines these settings based on the type of equipment you have in your home. Only a certified HVAC technician should enter these settings. Changing them could result in higher energy costs and may even damage your equipment. Please use the security lock for System Settings to prevent tampering.
What is an event?
An event is a programming period. This could be the period in the morning when you are preparing for work or school. It could be the period when no one is at home. It could be the period when the household is asleep at night. The time for an event is selected based on when you want the event to occur. For example, if you wake up at 6:30 AM, set the first event for 6:30 AM. With EER™ activated, the thermostat will automatically make sure your home is at the desired temperature selected for that event by the time you wake. If EER™ is not activated, you should set the event times 1/2 hour earlier than the actual time you want your home to be at the desired temperature.
How many events can be programmed?
This thermostat can be set for two, four, or six events per day.
Select two events if someone is home all day. Typically, this requires a constant temperature during the day and a different temperature at night. Four events are common for working households. Event 1 (WAKE) is the morning period. Event 2 (DAY) is when everybody has left for school or work. Event 3 (EVE) is the return period, coming home from school or work. Event 4 (NIGHT) is when everybody is asleep. Six events can be used especially when there is activity during the day. Event 1 (WAKE) is the morning period. Event 2 (MORN) is when everybody has left for school or work. Event 3 (NOON) is the lunch period, when the kids may be home for a break. Event 4 (DAY) is the afternoon period when the house is empty. Event 5 (EVE) is the return period, coming home from school or work. Event 6 (NIGHT) is when everybody is asleep.
What program is right for me?
The thermostat is factory set with the US EPA EnergyStar® recommended times and temperatures for optimal energy savings. You can change those settings to suit your lifestyle. Examine your schedule, and set the times and temperatures that fit best. This thermostat is extremely versatile and helps you make changes with ease.
Do I need an accessory sensor?
Remote indoor sensor
The remote indoor sensor (Part No. 9020i) can be used to improve the comfort of your home. When used in conjunction with the local sensor on the thermostat, the two sensors average the sensed temperature and control to that average temperature. You also can use the remote sensor in a stand-alone situation when you want to control the temperature in a remote room but have the thermostat in a secure location.
Remote outdoor sensor
The remote outdoor sensor (Part No. 9025i) can be used to aid in the comfort of your home or simply as a sensing device to inquire about outdoor temperature. With your heat pump system, the remote outdoor sensor helps determine when to turn on the second stage heating for optimal comfort.
Installing a remote outdoor sensor
The remote outdoor sensor should be installed on the northern wall of your home, away from direct sunlight or other heat sources that may affect its sensitivity.
Time of Day Zoning
You may want your thermostat to use the temperature in your living room during the day and the temperature in your bedroom at night. Assuming the thermostat is installed in your living room, you would install the remote sensor in your bedroom. You would then use the Schedule Menu to establish a two-event day (Wake and Night). Then make a setpoint of 70° for your living room from 6am to 10pm. Another setpoint of 65° could be made for your bedroom during the hours of 10pm to 6am.
Faulty Sensor
If a remote sensor fails or is disconnected, the thermostat defaults to the built-in local sensor (when you have selected Remote as the sensor choice). NOTE: Remote Failed also appears on the main screen to indicate a remote sensor failure.
How do I reset the thermostat?
To reset the thermostat, press the button and the LEFT button at the same time. Hold for five seconds. The information screen, including version, is displayed indicating a reset has occurred. NOTE: This will NOT reset any of the programmed settings, and it will not disable any of the security provisions.
How do I know if the heating or cooling is on?
The thermostat display will indicate the operating mode, HEAT – with a flame icon, or COOL – with a snowflake icon. When the temperature in your home decreases or increases, the HEATING or COOLING cycle will come on and the thermostat will display the appropriate icon for that mode. When the HVAC system is ON, the LED’s along the bottom of the thermostat will turn on, and the main screen icons become animated.
What can I do about high energy bills?
While we can’t do anything about the high cost of energy, we can try to use less energy and thereby lower our heating and cooling costs. Generally, the best way to do this is to use the EPA EnergyStar® recommended setpoints for heating and cooling. (See page 12 for the preset EnergyStar setpoints.) Another way to contain costs is to cycle the heat pump or air conditioner with moderation. The thermostat controls the cycle rate based on temperature differentials. By maintaining a reasonable differential setpoint, 1°F for 1st stage and 2°F for 2nd stage, your equipment will cycle with moderation.
WARRANTY
FIVE-YEAR LIMITED WARRANTY
The manufacturer warrants to the original contractor installer or to the original consumer user, each new Robertshaw thermostat to be free from defects in materials and workmanship under normal use and service for a period of five (5) years from the date of purchase. This warranty does not cover batteries (if so equipped), damage caused by batteries, or damage resulting from improper installation, alteration, misuse or abuse of the thermostat occurring after the date of purchase. The manufacturer agrees to repair or replace at its option any thermostat under warranty provided it is returned within the warranty period, postage prepaid, with proof of the date of purchase. Cost of thermostat removal or reinstallation is not the responsibility of the manufacturer. Repair or replacement as provided under this warranty is the exclusive remedy of the consumer. This warranty and our liability does not apply to the merchandise that has been damaged caused by misuse, neglect, mishandling, alterations, improper installation, or use in a way other than in accordance with the recommendations and instructions of the manufacturer. Except to the extent prohibited by applicable law, any implied warranty of merchantability or fitness for a particular purpose on this product is limited to the duration of this warranty. Some states do not allow the exclusion or limitation of incidental or consequential damages, or allow limitations on how long an implied warranty lasts, so the above limitations or exclusions may not apply to you. This warranty gives you specific legal rights, and you may also have other rights which vary from state to state. Instructions for return: Pack the thermostat carefully in a well-padded carton. Be sure to include a note describing, in detail, what is wrong with the product. Return, postage prepaid, to:
In the U.S
- Invensys Controls Americas
- 515 South Promenade Avenue
- Corona, CA 92879-1736
- Attn: Warranty Department
Reference
Download Manual:
Robertshaw 9801i2 Programmable Thermostat User Manual