
Rayotec V2 Standard Touchscreen Thermostat
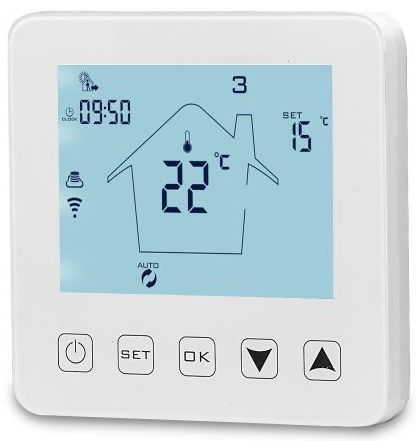
Product Specifications
- Power: 90-240Vac 50/60HZ
- Display accuracy::0.5°C
- Contact capacity: 16A/250V(WE)
Before wiring and installing
- Read these instructions carefully. Failure to follow them could damage the product or cause a hazardous condition.
- Check the ratings given in the instructions and on the product to make sure it is suitable for your application.
- Installer must be a trained and qualified Electrician
- After installation is complete check operation as per these instructions
Displays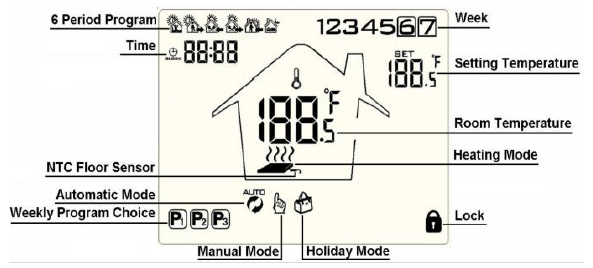
Description of icon
 Auto mode; run preset program
 Temporary manual mode
 Heating, icon disappears to stop heating
 To lock and unlock the thermostat hold
 Manual mode
 Clock
Clock Holiday mode
 External NTC sensor
Wiring Diagram
Connect the heating mat to 1 & 2, connect the power supply to 3 & 4 and connect the floor probe to 5 & 6. If you connect it wrongly, there will be a short circuit and the thermostat may become damaged and the warranty will be invalid. You must always install the floor probe sensor. If you are installing the thermostat in a bathroom or wet room, then the thermostat needs to be placed outside the room and the floor probe needs to be inside. A lways check that the temperature limit for the floor probe is set to a suitable temperature for your flooring (typically 27℃). This can be done in the advanced setting menu A9 (see next page)
Always test the floor probe with a megger tester or fluke tester set to 2000 ohms, the reading should be between 8-15 ohms. The live and neutral are interchangeable.
Operation key
Step 1: Setting up time and date
When you turn on the thermostat for the first time you will need to set the time and also the number that corresponds to the day of the week (1-7 starting from Monday). This can be done by following the steps below:
- Press the button and the time in the top left corner will start flashing.
- Press or to get to the desired minute and then press
- Press or to get to the desired hour and then press
- Press or to change the day number. 1=Monday 2= Tuesday 3=Wednesday 4=Thursday 5=Friday 6=Saturday 7=Sunday – Once you have selected the day press to confirm
Step 2: Programming heating schedule
Days are divided into 6 periods. Wake up, sleep and 4 periods in between. When you are at home, set the period at a “comfort” temperature (typically 18C-21C). When you are out of the property or asleep, set the temperature of the period much lower (typically 15C-16C). This will help to reduce your energy costs.
To program the timings do the following:
- When power is on , long press
 for 5 10 seconds to enter programming mode
 - The time in the top right will now flash. Press
 to adjust hour.
 - Press the and the minutes will now flash. Press to adjust the minutes.
- Press the and the temperature will now flash. Press to adjust the temperature.
- Once you have set the time and temperature press to go to the next set of times and repeat steps 2 4 for each of the 6 time periods
- When you have set all the time periods press to return to the main screen
Important:
Please note after about 10 seconds it will automatically save and exit.
Advanced options
When the thermostat is off hold for 3 to 5 seconds to access the advanced setting. From A1 to A D , short press to choose the option, and adjust data byshort press to switch next option.
| NO | Setting Options | Data Setting Function | Factory Default |
| A1 | Show current temperature | Displays current temperature | N/A |
|
A2 |
Temperature control return difference setting | 0.5-2.5℃ |
1℃ |
|
A3 |
High-temperature protection temperature difference setting | 1-9°C |
2°C |
|
A4 |
Sensor settings |
N1: Air sensor only(do not use) N2:Floor probe only
N3: Air sensor and Floor probe |
N3 |
| A5 | Child lock setting | 0:half lock 1:full lock | 0 |
|
A6 |
High-temperature protection for external sensor | 20°C-70°C
When setting temp = 20°C, , if press will display 【—】, cancel high temperature protection |
27°C |
|
A7 |
Low-temperature protection | 1-10°C
1. When setting temp = 10℃, if press will display 【—】, cancel low temperature protection |
5°C |
| A8 | Temperature minimum limit | 1-10°C | 5°C |
| A9 | Temperature maximum limit | 20-70°C | 35°C |
| AA | Descaling function | N/A for EUFH | N/A |
|
AB |
Power with memory function | 0: Power with memory function
1: Shutdown power after power off 2: Shutdown power after power on |
0 |
|
AC |
Weekly programming selection | 0: 5+2
1: 6+1 1. 2: 7 |
0 |
| AD | Restore Factory Defaults | Hold OK button until all icons appear on screen | — |
Sensor fault display: Please choose the correct setting of the built-in and external sensor (option B1), if chosen incorrectly or if there is a sensor fault ( breakdown then errors E1 E2 or ER will be displayed on the screen. If this occurs ask the electrician to redo the test on the probe to ensure the cable was not damaged during the installation.
Warranty
We offer a warranty of 1 2 months, from the day of purchase. Beyond the warranty period, we will charge for the after-sale service.
Reference
Download manual:
Rayotec V2 Standard Touchscreen Thermostat User Manual