![]()
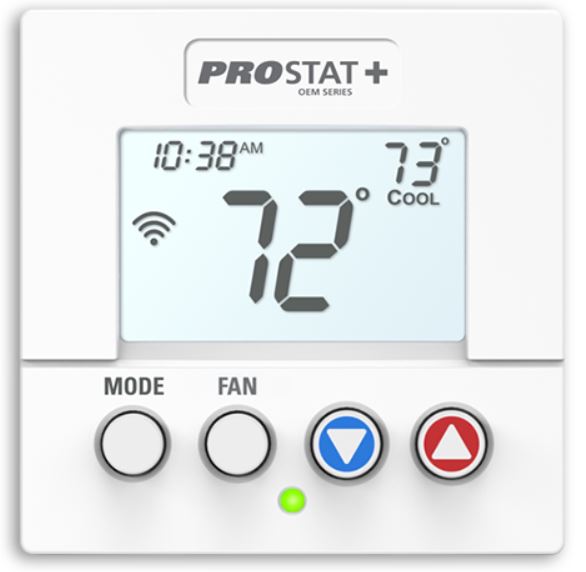
Prostat PSP2270 Programmable Thermostat
CAUTION Follow the Installation Instructions before proceeding. Set the thermostat mode to “OFF” prior to changing settings in setup or restoring Factory Defaults.
FCC Compliance Statement
This equipment has been tested and found to comply with the limits for an intentional radiator, pursuant to Part 15, subpart C of the FCC rules. These limits are designed to provide reasonable protection against harmful interference in a residential installation. This equipment generates, uses and can radiate radio frequency energy and, if not installed and used in accordance with the instructions, may cause harmful interference in radio communications. However, there is no guarantee that the interference will not occur in a particular installation. If this equipment does cause harmful interference to radio or television reception, which can be determined by turning the equipment off and on, the user is encouraged to try to correct the interference by one or more of the following measures:
- Reorient or relocate the receiving antenna.
- Increase the separation between the equipment and receiver.
- Connect the equipment into an outlet on a circuit different from that of the receiver.
- Consult the dealer or an experienced radio or TV technician for help.
Notice: Only peripherals complying with FCC limits may be attached to this equipment. Operation with noncompliant peripherals or peripherals not recommended by ProStat+™, is likely to result in interference to radio and TV reception. Changes or modifications to the product, not expressly approved by ProStat+ could void the user’s authority to operate the equipment.
FCC – INDOOR Mobile Radio Information:
To comply with FCC/IC RF exposure limits for general population / uncontrolled exposure, the antenna(s) used for this transmitter must be installed to provide a separation distance of at least 20 cm from all persons and must not be co-located or operating in conjunction with any other antenna or transmitter.
This Device complies with Industry Canada License-exempt RSS standard(s). Operation is subject to the following two conditions: 1) this device may not cause interference, and 2) this device must accept any interference, including interference that may cause undesired operation of the device.
Under Industry Canada regulations, this radio transmitter may only operate using an antenna of a type and maximum (or lesser) gain approved for the transmitter by Industry Canada. To reduce potential radio interference to other users, the antenna type and its gain should be so chosen that the equivalent isotropically radiated power (e.i.r.p.) is not more than that necessary for successful communication.
We, ProStat+, declare under our sole responsibility that the device to which this declaration relates: Complies with Part 15 of the FCC Rules. Operation is subject to the following two conditions: (1) this device may not cause harmful interference, and (2) this device must accept any interference received, including interference that may cause undesired operation.
This Mini thermostat has the ability to receive updates to its firmware. Periodically firmware updates are released by the manufacturer to add features and/or performance enhancements. This manual was produced reflecting the most current firmware/feature set at the time of publication, firmware rev. 1.0. Firmware releases after rev. 1.0 may not be adequately depicted in this manual. Please refer to the appropriate website or contact your place of purchase to learn about changes to the thermostat after firmware release 1.0.
About Your Thermostat
Front Panel
- Backlit Display
- Up/Warmer, Down/Cooler Buttons
- MODE Button
- FAN Button
- Heat or Cool Indicator
Heat = Red, Cool = Green
Table for button presses that are required for entering various menus
TO ENTER MENUS BUTTON PRESS
- Setup Steps MODE & FAN for 5 seconds
- Time Schedule MODE & Up for 2 seconds
- Emergency Heat Up & FAN for 2 seconds
- Lockout Buttons MODE, Up & Down for 2 seconds
- Calibration MODE & Down for 2 seconds, then MODE
- Wireless Setup FAN for 5 Seconds
Display
- Mode Indicators
Selects the operational mode of the equipment.- HEAT – Indicates the heating mode.
- COOL – Indicates the cooling mode.
- AUTO – Indicates the system will automatically changeover between heat and cool modes as the temperature varies.
- OFF – Indicates heating and cooling are turned off.
- Clock with Day of the Week
Indicates the current time and day. This clock is also used to program the time period schedules. - Room Temperature Display
Indicates current room temperature. - Desired Set Temperature
Indicates desired room temperature(s).
- Morning, Day, Evening & Night icons
Indicates the day part of the time period program. - Setup icon
Indicates the thermostat is in the setup mode. - Fan icon
When only the Fan icon is displayed, the fan is always on. If the FAN is not on the display, then the FAN is in Auto mode and will run only when necessary to heat or cool. - Locked icon
Indicates the thermostat’s control buttons have been locked.
Basic Operation
Selecting Your Desired Temperature (adjusting the setpoints)
Auto-Changeover Mode
Pressing the WARMER or COOLER buttons in Auto mode will adjust both the heat and cool setpoints simultaneously. To adjust the heat and cool setpoints individually, choose HEAT mode to adjust the heat setpoint, and COOL mode to adjust the cool setpoint, then return to AUTO mode. Adjust the desired set temperature with these buttons

Heat or Cool Mode
Pressing the UP or DOWN buttons in Heat or Cool mode will adjust only the heat or cool set temperature.
Turning on the Time Period Program
Pressing the MODE button should cycle through OFF, then the available modes (setup step #28) then Program ON. Note that this sequence may be restricted due to settings on the ProStat+ Web Portal. The thermostat can be configured to be non-programmable which will keep Program ON from appearing in the MODE sequence. The thermostat can also be configured to force the program to always be running so the MODE button will have no effect.
Using the Fan Button
Fan indicates constant fan operation. You may turn the fan on even if the thermostat is in the OFF mode. Pressing the FAN button toggles this feature on or off.
Connect to Wi-Fi Overview
At minimumm the first 3 tasks below must be completed to access your thermostat remotely from a browser.
The 4th step is optional (highly recommended) and only is needed to access your thermostat(s) from a mobile device.
These steps are:
- Successful connection to a local Wi-Fi Access Point with internet access.
- Confirm receipt of a ProStat+ generated verification email (this only occurs once during the ProStat+ Web Portal account setup).
- A 6-digit code obtained from the thermostat is successfully entered into a ProStat+ Web Portal account.
- Successfully download and install the ProStat+ app on your mobile device(s). Your thermostat operates on the 2.4 Ghz, Wi-Fi b/g/n band.
Wi-Fi Symbol Legend
 When the only the ‘dot’ of the Wi-Fi symbol appears = not connected to an access point.
 When the full Wi-Fi symbol appears = connected to an access point.
 When the full Wi-Fi symbol appears and the ‘dot’ of the symbol is flashing = connected to ProStat+ Web Portal.
Wi-Fi Setup
The ProStat+ Configurator App is needed to configure the Wi-Fi Settings of this thermostat
- Download the ProStat+ Configurator App from your mobile device’s App Store.
- Open the ProStat+ Configurator App
- Choose the ProStat+ Mini thermostat picture.
- Press and hold the FAN button of the thermostat for approximately 5 seconds to enter Wi-Fi setup screens.
- Press the cooler button to setup Wi-Fi.
- Follow the instructions that appear on the ProStat+ Configurator App.
Connect to ProStat+ Web Portal
Although there is more than one way to create an account, the steps below illustrate account creation from a browser.
To create an account a thermostat must be joined to the account.
If the thermostat is connected to the local Wi-Fi Access Point, but you do not have an account, you may create an account and join the thermostat to the account by doing the following:
- Open your browser to: http://prostat.skyportcloud.com
- Select “Create account now”

- Follow on screen instructions to create an account and add a thermostat to the ProStat+ account.
Join a Thermostat to the ProStat+ web portal
If the thermostat is connected to the local Wi-Fi access point but not yet joined to an existing account, you may join the thermostat to the account by doing the following:
- Log in to your ProStat+ web portal account.
- Select the “Location” you want to add a thermostat into or select the “Add a Location” link in the upper left-hand corner.
- Select the “Add a New Thermostat” box. A screen will ‘pop-up’ asking for a six digit code.
- Press the FAN button on the thermostat for 5 seconds.
- Press the Warmer button on the thermostat.
- A six digit code will appear on the thermostat’s display.
- Enter the six digit code into your ProStat+ account
Wi-Fi Status Screens
Press and hold the FAN button on the thermostat for 5 seconds. When “Wi-Fi Setup” appears on the display, press the MODE button. Pressing the up or down button will display the following information:
- AP Name
- AP Signal Strength
- IP Address
- ProStat+ account Status
- API Status
Setup Step Table
| Step# | Description | Pg# | Range | FD |
| 1 | Set Clock | 15 | 12A – 12A | |
| 2 | Set Day of Week | 15 | Monday – Sunday | |
| 3 | Backlight | 15 | On, Off, 6pm-6am | Off |
| 4 | Night Dimmer | 15 | On/Off | Off |
| 5 | Night Dimmer Start Time | 15 | 12A – 12A | 8:00PM |
| 6 | Night Dimmer Stop Time | 15 | 12A – 12A | 6:00AM |
| 7 | Current Service Filter Runtime Hours | 0-1999 Hours | 0 | |
| 8 | Current Service Filter Calendar Days | 0-720 Hours | 0 | |
| 9 | Set Service Filter Runtime Hours | 0-1999 Hours | 0 | |
| 10 | Set Service Filter Calendar Days | 0-720 Days | 0 | |
| 11 | Setpoint Limits | On, Off | Off | |
| 12 | Maximum Heat Setpoint Limit | 35 – 99 Degrees | 74 | |
| 13 | Minimum Cool Setpoint Limit | 35 – 99 Degrees | 70 | |
| 14 | Cycles Per Hour | No Limit, 2, 3, 4, 5, 6 | 6 | |
| 15 | Compressor Minimum Off Minutes | 0, 3, 5 Minutes | 5 | |
| 16 | Min. Heat/Cool Setpoint Difference | 0 – 6 Degrees | 2 | |
| 17 | 1st Stage Deadband | 1 – 6 Degrees | 2 | |
| 18 | 2nd Stage Deadband | 0 – 10 Degrees | 2 | |
| 19 | Minutes Between 1st and 2nd Stage | 0 – 60 Minutes | 2 | |
| 20 | 2nd StageTurnoff Point | Deadband, Setpoint | Deadband | |
| 21 | Fan Off Delay | 0, 120 Seconds | 0 | |
| 22 | F/C | Fahrenheit (F), Celsius (C) | F | |
| 23 | Comfort Recovery | On, Off | Off | |
| 24 | Dry Contact Polarity | Open, Closed | Open | |
| 25 | Dry Contact Use | Condensate Pan, Vacation, FDD | Vacation | |
| 26 | ProStat+ Web Portal | On, Off | On | |
| 27 | Local API | On, Off | Off | |
| 28 | Available Modes | Heat, Cool, Heat or Cool, Auto | Auto | |
| 29 | Show Clock | On, Off | On |
How to Change Settings in the Setup Screens
To enter the setup screens, press the MODE button, and simultaneously press FAN button for 5 seconds. Release the buttons when you see “Setup” on the display. Use the WARMER or COOLER buttons to adjust the value of your selection. Press MODE to advance to the next setup step. Press MODE and FAN together again to leave the setup screens.
Setting the Clock and Day (Setup Steps 1 & 2)
When your thermostat is connected to the ProStat+ web portal, the time and day of the week are controlled by the app. There is no local adjustment, the ProStat+ web portal also adjusts the time for Daylight Savings Time as well.
Adjusts the clock (Setup Step 1)
Use the Warmer/Up or Cooler/Down buttons to adjust the time.
Press the MODE button to advance to Step 2.
Select the day of the week (Setup Step 2)
Use the Warmer/Up or Cooler/Down buttons to adjust the day.
Backlight (Setup Steps 3-6)
- Off – Backlight turns on only with a button press and turns off after 8 seconds.
- On – Backlight is on continuously.
Night Dimmer (Setup Step 4)
Selecting On allows for turning off the backlight of the display during specific times of the day, usually at night.
- Night Dimmer Start Time (Setup Step 5)
- Night Dimmer Stop Time (Setup Step 6)
Locking/Unlocking the Keypad
To prevent unauthorized use of the thermostat, the front panel buttons may be disabled. To disable, or ‘lock’ the keypad, press and hold the MODE button. While holding the MODE button, press the WARMER and COOLER buttons together, the ![]() icon will appear on the display, then release the buttons.
icon will appear on the display, then release the buttons.
To unlock the keypad, press and hold the MODE button. While holding the MODE button, press the WARMER and COOLER buttons together, the![]() icon will disappear from the display, then release the buttons.
icon will disappear from the display, then release the buttons.
Programming a Daily Schedule
Programming a Daily Schedule
To enter Time Period Programming screens, press and hold MODE and UP until the scrolling prompt appears.
Select Day of Week to program
Press the WARMER or COOLER buttons to choose the day of the week. Press MODE to advance to the next step.
This thermostat features four programmable time periods per 24 hour day: Morning, Day, Evening, and Night. The start time for each time period is adjustable. The stop time for each time period is the start time for the next period. Each time period may be individually disabled.
Select the Day to Program
Press the WARMER or COOLER buttons to select the desired Day of the Week.
Enable/Disable Morning Period
Press the WARMER or COOLER buttons to select ON or OFF. If ON is selected, then the Morning period will run with the Mode and Setpoints selected. If OFF is selected then the Morning time period will be skipped and the thermostat will use the next time period that is enabled.
Select Morning Mode
Press the WARMER or COOLER buttons to adjust the moring time period start time.
Select Morning Start Time
Press the WARMER or COOLER buttons to adjust the time of day desired. Press MODE to advance to the next step.
Select Morning Cool Setpoint
Press the WARMER or COOLER buttons to adjust the cool setpoint desired. This step will appear if Cool or Auto Mode was selected in the step where the Morning mode is specified. Press MODE to advance to the next step.
Select Morning Heat Setpoint
Press the WARMER or COOLER buttons to adjust the heat setpoint desired. This step will appear if Heat or Auto Mode was selected in the step where the Morning mode is specified. Press MODE to advance to the next step.
Repeat previous steps for Day, Evening, and Night programming.
Copy Program
Press the UP button to Copy the current day’s program to the next day. Press Mode again to continue copying the following day.
Press and hold the MODE and WARMER buttons to exit Time Period Programming at any time.
Press the MODE button to cycle through OFF, then the available modes (Setup Step 28) until Program ON is displayed. Note that this sequence may be restricted due to settings on the ProStat+ website. The thermostat can be configured to be non-programmable which will prevent Program ON from appearing in the MODE sequence. The thermostat can also be configured to force the program to always be running so the MODE button will have no effect.
Advanced Features & Operation
Emergency Heat
Only available if you have a Heat Pump installed. To initiate the Emergency Heat feature, press the FAN button. While holding the FAN button press the UP button for two seconds. The display will read ‘EM HEAT’ (Emergency Heat).
During Emergency Heat operation the thermostat will turn on the fan and the Aux strip heat when there is a demand for heat. Also during Emergency Heat, heatpump operation will be unavailable.
Exit Emergency Heat
Follow the same steps as entering Emergency Heat by pressing the FAN and UP buttons, for two seconds. During Emergency Heat, only OFF and HEAT modes are available by pressing the MODE button.
Factory Defaults
If, for any reason, you desire to return all the stored settings back to the factory default settings, follow the instructions below.
WARNING: This will reset all Time Period and Advanced Programming to the default settings. Any information entered prior to this reset will be permanently lost.
- Place the thermostat in the OFF mode.
- Press and hold the MODE button. While holding the MODE button, press and hold the DOWN button for 5 seconds. All icons will appear on the display.
- After all of the icons appear, release the MODE and DOWN buttons.
- Press and hold the FAN button for 2 seconds.

- Select one of the below options using the UP or DOWN buttons. Restore the factory settings to just Wi-Fi (Wi-Fi), or just the thermostat (STAT), or both the thermostat and Wi-Fi (ALL).

- Press FAN for 2 seconds to restore the factory settings.

- After factory settings are restored, the thermostat display will return to the “all icon” screen.

- To return to normal operation; Press the MODE button twice.

Limited Warranty
PSP Series – Thermostat Models: PSP1100, PSP1152, PSP2100, PSP2152, PSP2270, PSP2270C, PSP2111, PSP4272, PSP4273, PSP4271C, PSP4272C, PSP4272RT, PSP4273RT, PSP4272CT, PSP4273CT
Who Is Providing The Warranty?
This warranty is provided to you by Goodman Manufacturing Company, L.P. (“Goodman”), which warrants all parts of this thermostat (“control”), as described below.
To What Type Of Installations Does This Warranty Apply?
This warranty applies to controls installed in owner-occupied residences. What Units Does This Warranty Not Cover?
This warranty does not apply to:
- Controls that are ordered over the Internet, by telephone, or by other electronic means unless the unit is installed by a dealer adhering to all applicable federal, state, and local codes, policies, and licensing requirements.
- Controls that are installed outside the United States, its territories, or Canada.
- Controls that are installed in buildings other than owner-occupied residences, such as non-residential buildings or residences not occupied by the owner.
What Problems Does This Warranty Cover?
This warranty covers defects in materials and workmanship that appear under normal use and maintenance.
Other Warranties
This warranty is in lieu of all other express warranties. ANY IMPLIED WARRANTIES BY GOODMAN, INCLUDING BUT NOT LIMITED TO WARRANTIES OF MERCHANTABILITY AND FITNESS FOR PARTICULAR PURPOSE, ARE LIMITED TO THE DURATION OF THIS WARRANTY. NO AFFILIATE OF GOODMAN GIVES ANY EXPRESS OR IMPLIED WARRANTY, INCLUDING BUT NOT LIMITED TO WARRANTIES OF MERCHANTABILITY AND FITNESS FOR PARTICULAR PURPOSE, ON THIS UNIT. Some states and provinces do not allow the exclusion of express warranties and/or limitations on how long an implied warranty lasts, so the above exclusion and/or limitation may not apply to you.
For further information about this warranty contact Consumer Affairs at (877) 254-4729 or by mail to 19001 Kermier Rd, Waller, Texas 77484
What Problems Does This Warranty Not Cover?
Goodman is not responsible for:
- Damage or repairs required as a consequence of faulty installation or application. · Damage as a result of floods, fires, winds, lightning, accidents, corrosive atmosphere, or other conditions beyond Goodman’s control.
- Damage or the need for repairs arising from the use of components or accessories not compatible with this control.
- Normal maintenance as described in the installation and operating manual.
- Parts or accessories not supplied or designated by the manufacturer.
- Damage or the need for repairs resulting from any improper use, maintenance, operation, or servicing.
- Damage or failure of the control due to interruption in electrical service or inadequate electrical service.
- Any damage caused by frozen or broken water pipes in the event of equipment failure.
- Changes in the appearance of the control that do not affect its performance.
- Replacement of fuses and replacement or resetting of circuit breakers.
When Does Warranty Coverage Begin?
Warranty coverage begins on the “installation date.” The installation date is one of two dates depending on the circumstances of purchase:
- For controls installed in a newly constructed residence, the installation date is the date the owner purchases the residence from the builder.
- For controls installed in existing residences, the installation date is the date that the control is originally installed.
- For products on which a manufacture date is indicated, if the date the owner purchases the residence from the builder or the date the product is originally installed cannot be verified, the installation date is three months after the manufacture date.
- For products on which a manufacture date is not indicated, if the date the owner purchases the residence from the builder or the date the product is originally installed cannot be verified, the installation date is the date the condensing unit to which the product is paired was originally installed.
How Long Does Warranty Coverage Last?
The warranty lasts for a period up to 1 YEAR.
The warranty period does not continue after the control is removed from the location where it was originally installed. The replacement of a part under this warranty does not extend the warranty period. In other words, Goodman warrants a replacement control only for the period remaining in the applicable warranty that commenced on the installation date.
What Will Goodman Do To Correct Problems?
Goodman will furnish a replacement control, without charge for the control only, to replace any control that is found to be defective due to workmanship or materials under normal use and maintenance. Furnishing of the replacement control is Goodman’s only responsibility under this warranty and the furnishing of the replacement control is the owner’s only remedy.
THE OWNER AGREES THAT THESE REMEDIES ARE THE OWNER’S EXCLUSIVE REMEDIES FOR BREACH OF ALL WARRANTIES, EXPRESS OR IMPLIED.
What Won’t Goodman Do To Correct Problems?
Goodman will not pay for:
- Labor, freight, or any other cost associated with the service, repair, or operation of the control.
- Electricity or fuel costs, or increases in electricity or fuel costs, for any reason, including additional or unusual use of supplemental electric heat.
- Lodging or transportation charges.
WHETHER ANY CLAIM IS BASED ON NEGLIGENCE OR OTHER TORT, BREACH OF WARRANTY OR OTHER BREACH OF CONTRACT, OR ANY OTHER THEORY, NEITHER GOODMAN NOR ANY OF ITS AFFILIATES SHALL IN ANY EVENT BE LIABLE FOR INCIDENTAL OR CONSEQUENTIAL DAMAGES, INCLUDING BUT NOT LIMITED TO LOST PROFITS, LOSS OF USE OF A CONTROL, EXTRA UTILITY EXPENSES, OR DAMAGES TO PROPERTY.
Some states and provinces do not allow the exclusion or limitation of incidental or consequential damages, so the above exclusion may not apply to you.
How Can The Owner Receive Warranty Service?
If there is a problem with the control, contact a licensed contractor.
To receive a replacement control, a licensed contractor must bring the defective control to a Goodman heating and air conditioning products distributor.
For more information about the warranty, contact Consumer Affairs at 877-254-4729 or write to Consumer Affairs, 19001 Kermier Rd, Waller, TX 77484.
This warranty gives you specific legal rights, and you may also have other rights that vary from state to state or province to province.
Quebec Residents
The arbitration provisions of this warranty shall not apply to residents of Quebec.
Non-Owner Occupied Warranty
Products installed in non-residential buildings or in residences not occupied by the owner are warranted for a period of 1 YEAR. THIS WARRANTY IS PROVIDED IN LIEU OF ANY OTHER WARRANTIES, WHETHER BY GOODMAN OR ANY OF ITS AFFILIATES, EXPRESS OR IMPLIED, INCLUDING ANY IMPLIED WARRANTY OF MERCHANTABILITY OR FITNESS FOR A PARTICULAR PURPOSE. Subject to the additional limitations set forth in this paragraph, all other provisions of the Limited Warranty apply to products installed in non-residential buildings or in residences not occupied by the owner.
Where Can Any Legal Remedies Be Pursued?
ARBITRATION CLAUSE. IMPORTANT. PLEASE REVIEW THIS ARBITRATION CLAUSE. IT AFFECTS YOUR LEGAL RIGHTS.
- Parties: This arbitration clause affects your rights against Goodman and any of its affiliates or employees or agents, successors, or assigns, all of whom together are referred to below as “we” or “us” for ease of reference.
- ARBITRATION REQUIREMENT: EXCEPT AS STATED BELOW, ANY DISPUTE BETWEEN YOU AND ANY OF US SHALL BE DECIDED BY NEUTRAL, BINDING ARBITRATION RATHER THAN IN COURT OR BY JURY TRIAL. “Dispute” will be given the broadest possible meaning allowable by law. It includes any dispute, claim, or controversy arising from or relating to your purchase of this control, any warranty upon the unit, or the unit’s condition. It also includes determination of the scope or applicability of this Arbitration Clause. The arbitration requirement applies to claims in contract and tort, pursuant to statute, or otherwise.
- CLASS-ARBITRATION WAIVER: ARBITRATION IS HANDLED ON
AN INDIVIDUAL BASIS. IF A DISPUTE IS ARBITRATED, YOU AND
WE EXPRESSLY WAIVE ANY RIGHT TO PARTICIPATE AS A CLASS REPRESENTATIVE OR CLASS MEMBER ON ANY CLASS CLAIM YOU MAY HAVE AGAINST US OR WE AGAINST YOU, OR AS A PRIVATE ATTORNEY GENERAL OR IN ANY OTHER REPRESENTATIVE CAPACITY. YOU AND WE ALSO WAIVE ANY RIGHT TO CLASS ARBITRATION OR ANY CONSOLIDATION OF INDIVIDUAL ARBITRATIONS. - Discovery and Other Rights: Discovery and rights to appeal in arbitration are generally more limited than in a lawsuit. This applies to both you and us. Other rights that you or we would have in court may not be available in arbitration. Please read this Arbitration Clause and consult the rules of the arbitration organizations listed below for more information.
- SMALL CLAIMS COURT OPTION: YOU MAY CHOOSE TO LITIGATE
ANY DISPUTE BETWEEN YOU AND ANY OF US IN SMALL CLAIMS COURT, RATHER THAN IN ARBITRATION, IF THE DISPUTE MEETS ALL REQUIREMENTS TO BE HEARD IN SMALL CLAIMS COURT. - Governing Law: For residents of the United States, the procedures and effect of the arbitration will be governed by the Federal Arbitration Act (9 U.S.C. § 1 et seq.) rather than by state law concerning arbitration. For residents of Canada, the procedures and effect of the arbitration will be governed by the applicable arbitration law of the province in which you purchased your control. The law governing your substantive warranty rights and other claims will be the law of the state or province in which you purchased your control. Any court having jurisdiction may enter judgment on the arbitration award.
- Rules of the Arbitration: If the amount in controversy is less than $250,000, the arbitration will be decided by a single arbitrator. If the amount in controversy is greater than or equal to $250,000, the arbitration will be decided by a panel of three arbitrators. The arbitrator(s) will be chosen pursuant to the rules of the administering arbitration organization. United States residents may choose the American Arbitration Association (1633 Broadway, 10th Floor, New York, NY 10019, www.adr.org), JAMS (1920 Main Street, Ste. 300, Irvine, CA 92614, www.jamsadr.com), or, subject to our approval, any other arbitration organization. In addition, Canadian residents may choose the ADR Institute of Canada (234 Eglinton Ave. East, Suite 405, Toronto.
- Location of the Arbitration Hearing: Unless applicable law provides otherwise, the arbitration hearing for United States residents will be conducted in the federal judicial district in which you reside or, for Canadian residents, in the province in which you reside.
- Costs of the Arbitration: Each party is responsible for its own attorney, expert, and other fees unless applicable law requires otherwise. Goodman will pay your share of the fees charged by the arbitration organization and arbitrator(s) beyond the first $200. Where permissible by law, you may be required to reimburse Goodman for the fees of the arbitration organization and arbitrator(s) in whole or in part by decision of the arbitrator(s) at the discretion of the arbitrator(s).
- Survival and Enforceability of this Arbitration Clause: This Arbitration Clause shall survive the expiration or termination, or any transfer, of the warranty on your control. If any part of this Arbitration Clause, except waivers of class-action rights, is found to be unenforceable for any reason, the remainder of this clause and the warranty shall remain enforceable. If, in a case in which class-action allegations have been made, the waiver of class-action rights under this warranty is found to be unenforceable with respect to any part of the dispute, the parts of the dispute as to which the waiver of class-action rights have been found unenforceable will be severed and will proceed in court without reference or application of this Arbitration Clause. Any remaining parts will proceed in arbitration.

Innovation, Science and Economic Development Canada ICES-003 Compliance Label: CAN ICES-3 (B)/NM8-3(B)
Reference
Download manual:
Prostat PSP2270 Programmable Thermostat User Manual
![]()