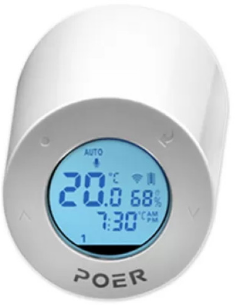
POER PTV30 Smart Radiator Thermostat
Overview
Application system
Smart radiator controller (PTV30) with built-in high precision temperature and humidity sensor, can real-timely sense indoor temperature; And with a micro motor, it controls Angle valve’s opening, by regulating heat medium’s flow to achieve a constant indoor temperature.
PTV30 have RF communication function with additional smart gateway PTG10 (sold separately) and installed with our APP. you can control home temperature anytime and anywhere via smart phone.

Features
- Touch buttons: Use four touch keys and operate friendly.
- LCD display: LCD display screen to display time, temperature and humidity, and other information.
- Programmable: Equipment factory with 3 section of the program, and you can modify or personalize programming.
- Remote operation: Connect to smart gateway (PTG10), temperature can be controlled anytime and anywhere through the phone APP.
Attention
- This product can fit on a standard Angle valve with connector M30X1.5mm, and it might request adaptor for some specific model Angle valves (may consult the installer or supplier).
- This product does not have the heating function, if room temperature can not reach set temperature, please raise the heat medium temperature, or check the heating system.
- Before using this product, please read this manual carefully.
- The product passed the CE certification.
Control button and screen display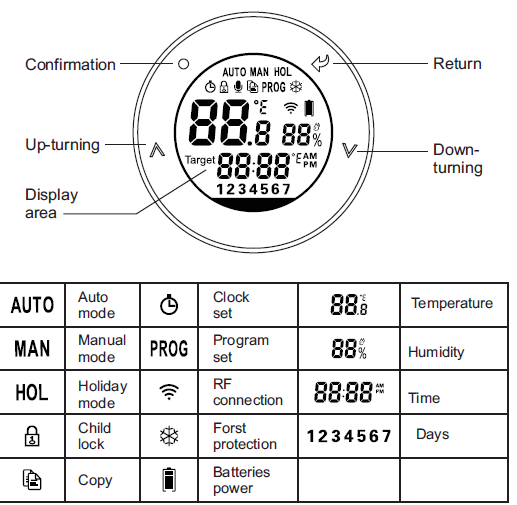
System installation
Installation of smart radiator controller
- Hold PTV30 valve body in hands, joint connector with angle valve threads, rotates in clockwise, and realize connection with angle valve.
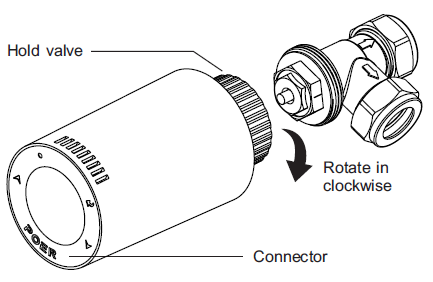
- Rotate PTV30 valve body until screen display to the right angle that you are satisfied, then fasten the connector.
Boot of device
Press simultaneously ![]() until 0N display on the screen, the boot is finished.
until 0N display on the screen, the boot is finished.
Disassembly of smart Radiator Controller
Shutdown of device: Before disassembly, please turn off the device!
Press simultaneously  until 0F display on the screen, after 0F flashing for 3 seconds, the The radiator controller starts shutdown. When radiator controller’s valve opens to 100%, shutdown is completed
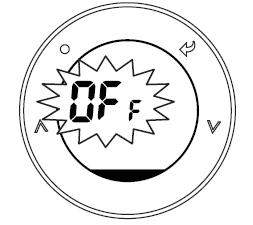
Disassembly of smart radiator controller
Hold radiator controller PTV30, rotate connector in anticlockwise until divide PTV30 from angle valve.
RF signal pairing between smart radiator controller and gateway
Smart radiator controller PTV30 can be connected with smart gateway through mobile phone’s APP; APP makes its setting and controlling more simple and convenient.
Automatic pairing by mobile phone APP
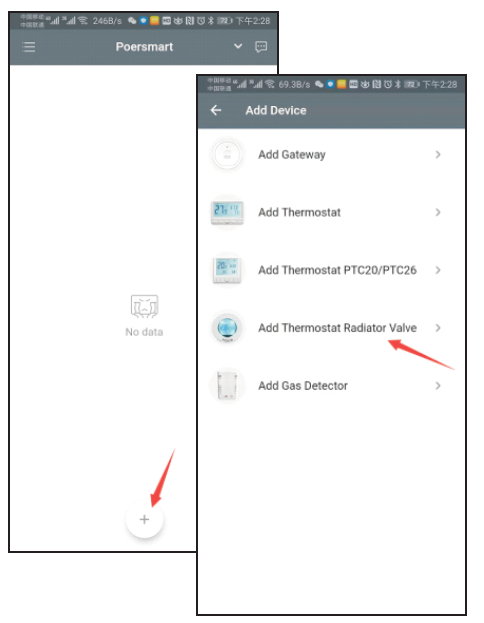
- Open the App. which already connected with gateway PTG10 (how to add a gateway on App. please refer to gateway’s manual for details), choose Add Radiator Controller from the interface.
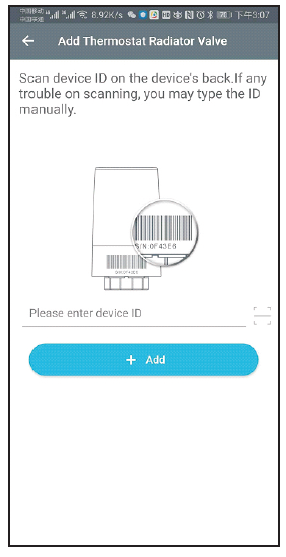
- Scan bar code on the PTV30 valve body for getting MAC idof device. If scanning failed, may type the MAC id manually.
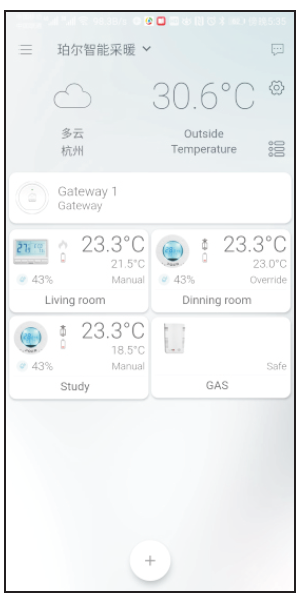
- After successfully get MAC id, choose Add to start paring radiator controller PTV30 with gateway, after adding successfully, radiator controller’s screen displays icon, and the “HOME”page of APP displays newly added device
Manually pairing smart radiator controller with gateway
- Preparation: Make sure gateway PTG10 was plug in the socket correctly and has been added on APP (how to add a gateway on App. please refer to gateway’s manual for details).
- Start gateway’s pairing mode by hold pressing until its LED is blinking slowly.
- Smart radiator controller PTV30 send pairing command with gateway
- Long press button
 to enter menu page, press
  button to make choice. When
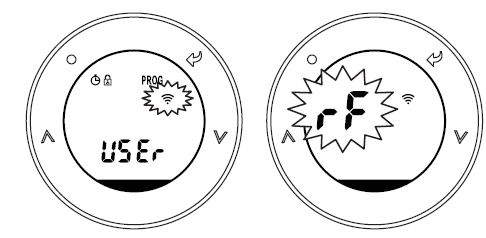
 flashes, press button to enter code page. Display flashing RF in temperature area and press button to send pairing command with gateway.
- After paring successfully, the time area displays flashing 000 ; otherwise, the time area displays a flashing E0 means paring failed.

- If pairing failed, please check:If the gateway PTG10 is under pairing mode;If the distance between radiator controller PTV30 and gateway PTG10 is less than 5 meters;
- Then keep pressing button to continue sending paring command to gateway PTG10 until pairing succeed.
- Gateway is still under paring mode even one radiator controller’s paring succeed, if you had more devices need to be paired, you may continue to pair them with gateway manually. (1 gateway could RF communicate with 10 devices at one time).
- Exit pairing mode by long pressing
 icon until gateway LED recovers the state before paring.
 - After paring successfully, radiator controller’s screen displays icon, and the “HOME” page of APP displays newly added device.

Smart radiator controller’s function and operation
Setting and controlling PTV30 with APP
With mobile phone APP, it can be easily set and control PTV30. Please explore the specific operation on the mobile phone APP.
Setting and controlling PTV30 with button
- Enter time setting page: Long press button, enter menu page, press button until
 flashes. And press to enter time setting page

- Year setting: when displays a flashing yr , press or
 button to choose the right year, press button to confirm the setting and enter month-setting page.
 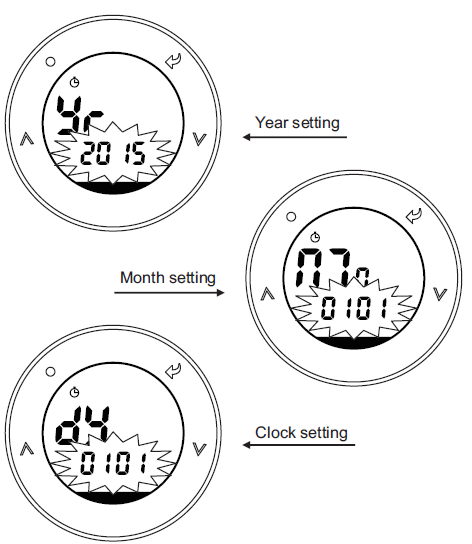 Following same operation to complete date and time setting accordingly. You can return last setting page by pressing button. Return main menu page after completing setting.
Program setting (Auto Mode setting)
When radiator controller PTV30 leaves factory, it has been preset program. Preset program as following
Program1:
| Monday to Friday | |||||||
| Event | 1 | 2 | 3 | 4 | 5 | 6 | 7 |
|
Time |
00:00
~ 6:30 |
6:30
~ 8:30 |
8:30
~ 12:00 |
12:00
~ 14:00 |
14:00
~ 16:30 |
16:30
~ 22:30 |
22:30
~ 24:00 |
| Temperature | 7°C | 20°C | 16°C | 16°C | 16°C | 21°C | 7°C |
| Saturday and Sunday | |||||||
| Event | 1 | 2 | 3 | 4 | 5 | 6 | 7 |
|
Time |
00:00
~ 7:00 |
7:00
~ 9:00 |
9:00
~ 12:00 |
12:00
~ 14:00 |
14:00
~ 16:30 |
16:30
~ 23:00 |
23:00
~ 24:00 |
| Temperature | 7°C | 20°C | 18°C | 21°C | 18°C | 21°C | 7°C |
Program2
| Monday to Friday | |||||||
| Event | 1 | 2 | 3 | 4 | 5 | 6 | 7 |
|
Time |
00:00
~ 6:30 |
6:30
~ 8:30 |
8:30
~ 12:00 |
12:00
~ 14:00 |
14:00
~ 16:30 |
16:30
~ 22:30 |
22:30
~ 24:00 |
| Temperature | 10°C | 21°C | 16°C | 21°C | 16°C | 21°C | 10°C |
| Saturday and Sunday | |||||||
| Event | 1 | 2 | 3 | 4 | 5 | 6 | |
|
Time |
00:00
~ 7:00 |
7:00
~ 9:00 |
9:00
~ 12:00 |
12:00
~ 14:00 |
14:00
~ 23:00 |
23:00~24:00 |
|
| Temperature | 10°C | 21°C | 18°C | 21°C | 18°C | 10°C | |
Program3:
| Monday to Friday | |||||||
| Event | 1 | 2 | 3 | 4 | 5 | 6 | 7 |
|
Time |
00:00
~ 6:00 |
6:00
~ 8:30 |
8:30
~ 12:00 |
12:00
~ 14:00 |
14:00
~ 17:30 |
17:30
~ 22:30 |
22:30
~ 24:00 |
| Temperature | 16°C | 21°C | 19°C | 21°C | 19°C | 21°C | 16°C |
| Saturday and Sunday | |||||||
| Event | 1 | 2 | 3 | 4 | 5 | 6 | 7 |
|
Time |
00:00
~ 7:00 |
7:00
~ 9:00 |
9:00
~ 12:00 |
12:00
~ 14:00 |
14:00
~ 16:30 |
16:30
~ 23:00 |
23:00
~ 24:00 |
| Temperature | 16°C | 21°C | 18°C | 21°C | 18°C | 21°C | 16°C |
Personalize preset program:
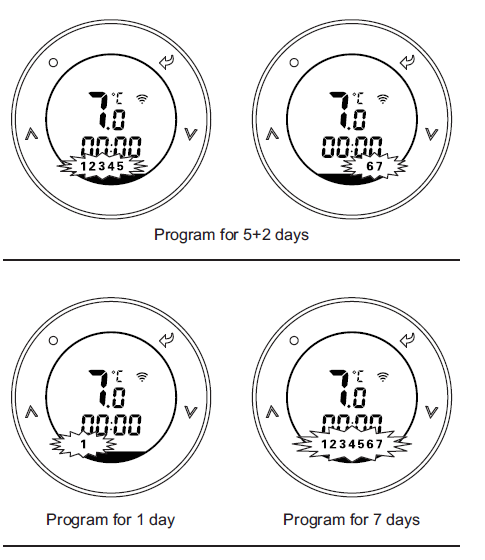
- Enter program setting page: Long press button to enter menu page, press button until flashes. Press button to enter program page, program page is shown below:
- Choose programming date: in the programming page, press to choose programming date, the program supports 5+2 days /1 day/7 days’ programming setting; press button to conform programming date when it is flashing, meanwhile enter programming temperature ‘s setting page.
- Set programming temperature: when temperature is flashing as following fig., select by pressing to choose programming temperature, confirm the temperature by press button, meanwhile enter programming period setting page;

- Set programming period: when time is flashing as following fig., select by pressing , and press button to set a period’s time separately by hour and minute; next periods in a day is setting accordingly in the same way.

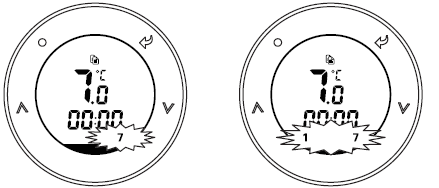
Copy a day’s program to other day:
- Copy function can be used to simplify the programming, For example: If you want to copy programming data from Sunday to Monday, you can operate following the steps below:
- Under program setting page, press until 7 (=Sunday) is flashing, then long press until icon
 occurs, it means copy is successful processed; next, select by pressing until 1(=Monday) is flashing, then press button to complete paste to Monday
 - If necessary, can continue to choose other programming day, press button to paste.
Override mode setting
Under Auto mode, it operates temperature control according to your program, but if press , you also can temporarily adjust temperature. In this case, icon appears on the screen , which means Override Mode started, Override control only functions in current programming time and automatically return to the Auto Mode once next programming period coming. Press to exit
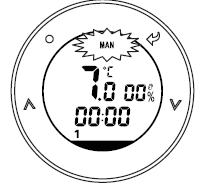
Manual control mode setting
Press button to swift between each control mode, when shows on screen, means Manual control mode started; in manual mode, you can select casually to adjust temperature and each temperature adjustment is permanent
Holiday mode setting
Press until HOL icon shows on screen, means the Holiday mode started. Pressing can set a holiday’s starting time and ending. After setting a holiday plan, it automatically change to Auto mode. When holiday staring time is coming, smart radiator controller PTV30 enters holiday mode automatically. During holiday, the radiator controller PTV30 starts frost protection function, saving energy and protecting the device. By the end of the holiday time, it will give you a well warmed room as you wished in advance After setting a holiday plan, it automatically change to Auto mode. When holiday staring time is coming, smart radiator controller PTV30 enters holiday mode automatically. During holiday, the radiator controller PTV30 starts frost protection function, saving energy and protecting the device. By the end of the holiday time, it will give you a well warmed room as you wished in advance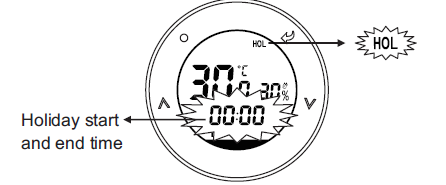
ECO mode setting
- Pressing button can enter ECO mode. In this mode, icon ECO display on screen.
- ECO mode is energy saving mode, in this mode, the radiator controller keeps the room temperature within energy-saving temperature (energy saving temperature is default 9℃ , and can be reset in the user options
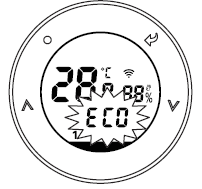
- Pressing button can enter / exit ECO mode.
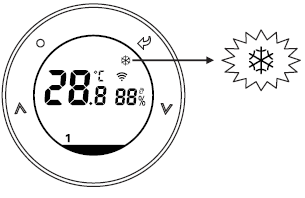
OFF mode setting
Long press button to enter OFF mode. In OFF mode, display icon on the screen, the radiator controller start frost protection function (frost protection temperature is default 7℃, and can be reset in the user options). Long press button to exit OFF mode.
Child lock setting
- In order to guard against children’s wrong operation, smart radiator controller PTV30 has child lock function. In child
- lock state, device will not respond to any button operation.
- Long press button and enter menu page. Choose icon
 , press to set child lock

Mac id display
Long pressing the![]() button when the TRV on MAN mode. The MAC id will show on the display. Pressing to exist.
button when the TRV on MAN mode. The MAC id will show on the display. Pressing to exist.
Users’ option
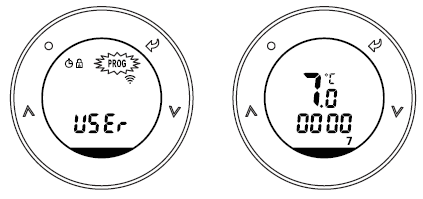
- Users’ option page: Long press button and enter menu page. Press button until USER icon flashes, and press button to enter users’ option page.
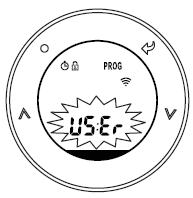
- In users’ option page, temperature display area shows ID option of users, and time display area shows users’ option value
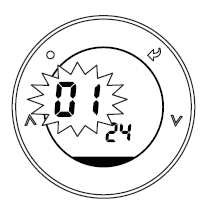
- Modification of users’ options: when enter users’ option page, option ID flashes. Select the target option ID by, enter the target option ID by pressing modify, at this time, item value flashes. Press button to adjust item value, and press button to save value. After successful modification, it can continue to modify other users’ option, or press button to exit setting
Users’ option table
| ID | Olption Content | Minimum | Maximum | Default value |
|
1 |
Change 12h or 24h clock |
12 |
24 |
24 |
|
2 |
Switch into other preset program |
1 |
3 |
1 |
|
3 |
Switch on / off summer / winter time temperature |
OFF |
ON |
ON |
|
4 |
Change temperature offset ℃ |
-5 |
5 |
0 |
|
5 |
Restore factory setting |
OFF |
ON |
OFF |
|
6 |
To disable Off function (after the setting, long pressing OFF key will not enter the OFF mode) |
OFF |
ON |
OFF |
|
7 |
Frost Protection function(turn it on, in OFF mode will be in a state of frost prevention) |
OFF |
ON |
ON |
| ID | Option Content | Minimum | Maximum | Default value |
|
8 |
Pre-set the lowest temperature |
5 |
28 |
5 |
|
9 |
re-set the highest temperature |
28 |
32 |
32 |
|
10 |
Pre-set the ECO temperature |
The lowest temperature setting | The highest temperature setting |
9 |
|
11 |
Valve protection time (unit: minute, 0 means no protection, after opening valve protection, if valve is not opened for 24 hours, it will automatically open output at 10 o ‘clock every morning) |
0 |
5 |
0 |
|
12 |
Activate Smart Remote Control (App remote control) |
OFF |
ON |
ON |
|
13 |
Temperature unit: Celsius / Fahrenheit switch |
C |
F |
C |
Products Specification
| Operating Temperature | 0 to 50°C |
| Control object | Heating system |
| Display | LCD with backlight |
| Actuator | Electric |
|
Frequency |
868 MHz,
433Mhz for option, two-way |
| Communication Range (open space) |
100 meters |
|
Temperature setting range |
5 °C to 32°C
(0.5°C step) |
|
Temperature control precision |
+/- 0.3°C |
| Frost protection temperature | 5 °C |
| Humidity range | 10 to 90%RH |
| Humidity precision | +/- 5%RH |
| Time | 12 hour/24 hour |
| Noise level | <30 dBA |
| Dimensions (HxWxD) | H91 × 51.5mm |
| IP class | IP30 |
| Standard | CE |
REFERENCE
DOWNLOAD MANUALS:
POER PTV30 Smart Radiator Thermostat User Manual
![]()