Peco TB180 Programmable Thermostat
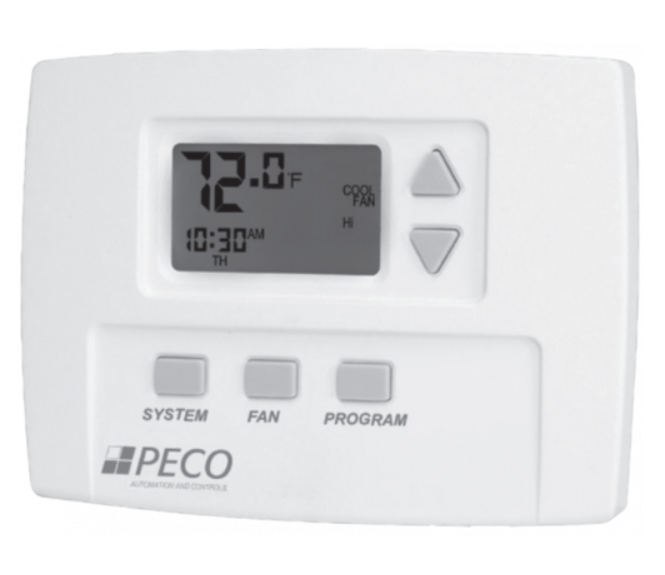
CAUTION!
- FOLLOW TA/TB180 INSTALLATION INSTRUCTIONS BEFORE PROCEEDING.
- READ THESE INSTRUCTIONS CAREFULLY BEFORE ATTEMPTING TO OPERATE THIS THERMOSTAT.
- Retain these instructions for future reference. This product, when installed, will be part of an engineered system whose specifications and performance characteristics are not designed or controlled by PECO.
- If at any time your system does not operate properly, contact a qualified service person.
- Care should be used to avoid static discharge to the thermostat.
IMPORTANT NOTE
This thermostat was shipped with factory-default settings. Your thermostat’s installer may have configured the thermostat differently from the factory-default settings, and may have modified or disabled certain features. Contact the installer or a service technician if you have questions about the thermostat’s configuration.
GENERAL
The T180 Thermostat is a wall-mounted digital control for 2 or 4 pipe fan coil applications. The thermostat can be set for 7-day, 5/2-day, 5/1/1-day, or 1-day programmable operation. Different heating and cooling setpoints and times are programmable for 4 time periods per day. The thermostat can also be set to nonprogrammable (manual) operation. The T180 Thermostat has connections for occupancy sensors and door switches, to automatically activate the thermostat’s setback mode.
The T180 Thermostat does not need batteries to store user-configured settings in memory. During power loss its internal memory saves the settings and clock for unlimited time.
FRONT PANEL REFERENCE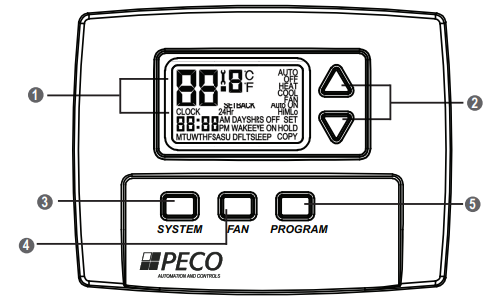
- Liquid Crystal Display with a blue backlight
- UP ▲and DOWN ▼Buttons
- SYSTEM Button
- FAN Button
- PROGRAM Button
DISPLAY REFERENCE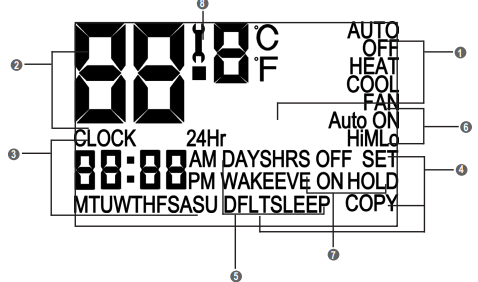
System Mode Display
- HEAT – indicates the system is in heating mode.
- COOL – indicates the system is in cooling mode.
- AUTO – indicates the system will automatically changeover between heating and cooling modes as the room temperature varies.
- OFF – turns off the entire system.
- SETBACK – indicates the heating or cooling system is operating in setback mode. Setback mode is an energy saving feature that can be either manually activated by the thermostat’s user, or automatically activated by an occupancy sensor or door switch.
Temperature Display
- Default display: Digits display the current room temperature.
- During programming: Digits are used to set the desired temperatures.
Time and Day Display
Default display: Digits indicate the current time, and day abbreviations indicate the current day. During programming: Digits and days are used to program time periods.
- CLOCK – lights up during programming when the clock is being set.
- 24Hr – lights up during programming to indicate time will be displayed in 24-hour clock format.
- AM / PM – indicates 12-hour clock format.
Programming Commands
- SET – enters thermostat into custom program mode which allows you to specify a unique times and temperatures for a particular day or group of days.
- COPY – simplifies programming by allowing you to copy all of an individual day’s settings to another day or group of day.
- DFLT – restores the thermostat to the factory program.
Time Period Indicators
WAKE, DAY, EVE, and SLEEP are the names given to the four time periods per day. Each time period has its own unique setpoint temperatures.
Fan Operation Indicators
- FAN – “FAN” will be always be lit in conjunction with “ON” or “AUTO”.
- ON – indicates constant, continuous fan operation.
- Auto – indicates fan is only on with heating or cooling demand.
- Hi – indicates high speed fan; always lit in conjunction with “ON” or “AUTO”.
- M – indicates medium speed fan; always lit in conjunction with “ON” or “AUTO”.
- Lo – indicates low speed fan; always lit in conjunction with “ON” or “AUTO”.
Program Override Commands
- HOLD – indicates thermostat is in manual operation. (Programmed settings are off, but not lost.)
- HOLD HRS – during programming, lights up in conjunction with clock digits; allows program to be put on hold for up to 24 hours.
- HOLD DAYS – during programming, lights up in conjunction with the clock digits; allows program to be put on hold for up to 99 days.
- HOLD ON – indicates thermostat is in permanent manual operation.
- OFF – turns off the hold and resumes programmed settings.
Service Indicator
The wrench symbol is displayed when there is a temperature sensor error or condensate overflow error. It indicates there is an open or a short connection to the sensor switch. When this occurs, the thermostat will disable all outputs and illuminate the wrench symbol. A service technician should be called to determine the cause of the error.
SAVING CHANGES
As you navigate your thermostat, be aware of the thermostat’s save and exit protocol:
- The thermostat automatically saves all the changes you make, as you make them.
- When you are in the SYSTEM or FAN menus:
- If you push a button that is not applicable to the current menu, all changes are saved and the thermostat goes to the menu associated with the button that was pushed.
- If the thermostat is idle for five seconds, the thermostat times out, saves all changes, and returns to the thermostat’s default display.
- When you are in the PROGRAM menu:
- If you push a button that is not applicable to the current menu, nothing happens (your programming is not interrupted).
- If the thermostat is idle for fifteen seconds, the thermostat times out, saves all changes, and returns to the thermostat’s default display.
- When you have finished the last step of programming a setting, pressing PROGRAM saves your setting and returns the thermostat to the default display.
▲AND ▼BUTTON OPERATION
The ▲and ▼buttons function in two ways:
- When you are in the default display, you can press ▲to increase, or ▼to decrease, the current temperature setpoint. This will override programmed temperature settings until the next programmed time period (Wake, Day, Evening, or Sleep).
- When you are in the PROGRAM menu, you can press ▲to scroll up, or ▼to scroll down, through the menu, time, and temperature options.
SYSTEM BUTTON OPERATION
Pressing SYSTEM will light up the five system mode options described below. Press SYSTEM to scroll through the options. As you scroll, the current option will be blinking. To select the blinking option, wait for the five-second timeout, which saves your option and returns you to the thermostat’s default display.
MENU DESCRIPTION
- HEAT The thermostat operates as a Heating Only thermostat.
- COOL The thermostat operates as a Cooling Only thermostat.
- AUTO The thermostat automatically selects the appropriate Heat or Cool mode depending upon the setpoint (desired temperature) and zone temperature (actual temperature).
- OFF Turns the system off by disabling all thermostat outputs
- SETBACK Setback mode is an energy saving feature that minimizes the heating and cooling when the room is not occupied. Setback mode overrides the programmed time and temperature settings by telling the thermostat to instead use the setback setpoint for heating and cooling. The setback setpoint temperatures are factory default or installer-selected during installation. During setback mode, when a demand for heating or cooling exists, the fan will run at the lowest speed.
- Automatic setback mode: If your thermostat is connected to an occupancy sensor or door switch, setback mode is automatically turned on and off by the sensor or door switch.
- Manual setback mode: Select SETBACK in the SYSTEM menu. Setback temperature settings will remain in effect until you manually turn off setback mode. Selecting HEAT, COOL, or AUTO in the SYSTEM menu will turn off setback and resume your programmed time and temperature settings.
Note: SETBACK appears on your menu only if this feature was enabled by your thermostat’s installer.
FAN BUTTON OPERATION
Pressing FAN will light up the six fan mode options described below. Press FAN to scroll through the options. As you scroll, the current option will be blinking. To select the blinking option, wait for the five-second timeout, which saves your option and returns you to the thermostat’s default display.
MENU DESCRIPTION
- ON Hi High speed fan is on continuously, even if no demand for heating or cooling exists.
- ON M Medium speed fan is on continuously, even if no demand for heating or cooling exists.
- ON Lo Low speed fan is on continuously, even if no demand for heating or cooling exists.
- AUTO Hi High speed fan cycles with active demand for heating and cooling.
- AUTO M Medium speed fan cycles with active demand for heating and cooling.
- AUTO Lo Low speed fan cycles with active demand for heating and cooling.
Function Overview
Pressing PROGRAM lights up five program mode options, described below. Press ▲or ▼buttons to scroll through the options. As you scroll, the current option will be blinking. To select the blinking option, press PROGRAM again and you will be taken to the menu associated with that option.
MENU DESCRIPTION
- CLOCK Sets the current time and day. (See “Setting the Clock & Day” page 15)
- °F / °C Use this option to change the temperature display to Fahrenheit or Celsius. Your thermostat’s default temperature display setting is Fahrenheit. (See “Setting the Temperature Display” page 15)
- SET Use to specify the time and temperature programming for a particular day or group of days. Also allows you to reset the thermostat to the factory default ENERGY STAR program. (See “Programming Time & Temperature Settings” page 16)
- COPY Simplifies programming by allowing you to copy a particular day’s program to another day or group of days. (See “Programming Time & Temperature Settings” page 16)
- HOLD Puts the thermostat in manual operation for a permanent or temporary time period. Overrides your programmed settings, but does not lose them. (See “Overriding the Program” page 20)
Setting the Clock & Day
- Press PROGRAM once.
- Press ▲or ▼to scroll until “CLOCK” is blinking. To select, press PROGRAM once.
- Press ▲or ▼to scroll through “24Hr”, “AM”, “PM” options. “24Hr” sets your thermostat to a 24-hour clock. “AM” and “PM” sets your thermostat to a 12-hour clock. To select your preference, press PROGRAM once.
- Press ▲or ▼to scroll to the current hour. To select, press PROGRAM once.
- Press ▲or ▼to scroll to the current minute. To select, press PROGRAM once.
- Press ▲or ▼to scroll to the current day. To select, press PROGRAM once.
Your selections have been saved and you have exited program mode. Your thermostat is ready to function with the factory preprogrammed ENERGY STAR program. If you want to change the program for your particular needs, follow the instructions in the “Programming Your Thermostat” section.
Setting the Temperature Display
- Press PROGRAM once.
- Press ▲or ▼to scroll until “°F °C” is blinking. To select, press PROGRAM once.
- Both “°F” and “°C” will be lit, but only one will be blinking. Press ▲or ▼to scroll so that the preferred option is blinking. To select, press PROGRAM once.
Your selection has been saved and you have exited program mode.
Programming Time & Temperature Settings
Your thermostat’s programming feature allows you to divide up a 24-hour day into four time periods (referred to as “Wake”, “Day”, “Evening”, and “Sleep”), and give each time period its own setpoint temperatures. Your “Heat Setpoint temperature” tells your heating system the room temperature to maintain during cold weather. The “Cool Setpoint Temperature” tells your cooling system the room temperature to maintain during hot weather.
Factory Program
Your thermostat comes from the factory preprogrammed with all seven days of the week set to the times and temperatures shown below.
| Time Period | start Time | heat setpoint Temperature | Cool setpoint Temperature |
| Wake | 6:00 am | 70° F (21.0° C) | 78° F (25.5° C) |
| Day | 8:00 am | 62° F (16.5° C) | 85° F (29.5° C) |
| Evening | 6:00 pm | 70° F (21.0° C) | 78° F (25.5° C) |
| Sleep | 10:00 pm | 62° F (16.5° C) | 72° F (22.0° C) |
If the factory program meets your needs, simply follow the “Setting the Clock & Day” instructions, and you’re done. If you want to change the preprogrammed times and/or temperatures, follow the instructions under “Custom Program”.
Custom Program
Begin by planning your program. Use the “Custom Program Worksheet” to plan your program time periods and temperatures you want during each period. You must program four periods for each day. Fill in the complete table, as it will serve as a record of your programs, then follow this procedure:
- Press PROGRAM once.
- Press ▲or ▼to scroll until “SET” is blinking. To select, press PROGRAM once.
- Press ▲or ▼to scroll to the day or group of days you want to program. To select your preference, press PROGRAM once.
Day / Group of Days options are:- To program each day individually, the abbreviations are: “M” is Monday, “TU” is Tuesday, “W” is Wednesday, “TH” is Thursday, “F” is Friday, “SA” is Saturday, and “SU” is Sunday.
- “MTUWTHFSASU” allows you to give all 7 days of the week the identical heating & cooling program.
- “MTUWTHF” allows you to give all 5 weekdays the identical heating & cooling program.
- “SASU” allows you to give both weekend days the identical heating & cooling program.
- “DFLT” restores all seven days of the week to the original factory preprogrammed ENERGY STAR program.
- Press ▲or ▼to scroll through the four time periods. To select your preference, press PROGRAM once.
- Press ▲or ▼to scroll to the desired starting hour. To select, press PROGRAM once.
- Press ▲or ▼to scroll to the desired starting minute. To select, press PROGRAM once.
- Press ▲or ▼to scroll to the desired HEAT setpoint temperature. To select, press PROGRAM once.
- Press ▲or ▼to scroll to the desired COOL setpoint temperature. To select, press PROGRAM once.
You’re now done with one time period. Your selections have been saved and you have exited program mode. Repeat steps 1 through 8 for remaining day(s) and time periods. You may also use the thermostat’s “COPY” command to copy all of an individual day’s settings to another day or group of days.
Copy Feature
- Press PROGRAM once.
- Press ▲or ▼to scroll until “COPY” is blinking. To select, press PROGRAM once.
- Press ▲or ▼to scroll to the individual day you want to copy from. “DFLT” (the default Factory Program) is also a copy option. To select your preference, press PROGRAM once.
- Press ▲or ▼to scroll to the day or group of days you want to copy to. To select, press PROGRAM once.
Your selection has been saved and you have exited program mode.
Time & Temperature Programming Example
In this example, the thermostat user wants to program the weekend with a different schedule from the Factory Program. The user wants the Saturday and Sunday program to be identical.
- Press PROGRAM once.
- Press ▲or ▼to scroll until “SET” is blinking. To select, press PROGRAM once.
- Press ▲or ▼to scroll until “SASU” is blinking. To select, press PROGRAM once.
- Press ▲or ▼to scroll until “WAKE” is blinking. To select, press PROGRAM once.
- Press ▲or ▼to scroll hours to “8: ”. To select, press PROGRAM once.
- Press ▲or ▼to scroll minutes to “ :30”. To select, press PROGRAM once.
- User wants to keep same HEAT setpoint temperature. To keep unchanged, press PROGRAM once.
- User wants to keep same COOL setpoint temperature. To keep unchanged, press PROGRAM once.
Now you’re done setting up the Wake period, and ready to set up the other three time periods for Saturday and Sunday:
- Program the Day period for SASU by repeating steps 1 through 8, but in Step 4, select “DAY”.
- Program the Evening period for SASU by repeating steps 1 through 8, but in Step 4, select “EVE”.
- Program the Sleep period for SASU by repeating steps 1 through 8, but in Step 4, select “SLEEP”.
Now you’re done setting up all four time periods for SASU.
Overriding the Program
Your thermostat’s HOLD feature allows you to put the thermostat in manual operation for either a specified or indefinite length of time. HOLD will override your programmed settings, but does not lose them.
Setting up a Temporary Hold You may set up a temporary hold by hours and/or days.
- Press PROGRAM once.
- Press ▲or ▼to scroll until “HOLD” is blinking. To select, press PROGRAM once.
- Press ▲or ▼to scroll through options. “DAYS” allows you to specify 0-99 days hold; “HRS” allows you to specify 0-24 hours hold. To select your preference, press PROGRAM once.
- Press ▲or ▼to scroll to the desired length of time. To select, press PROGRAM once.
The thermostat is now on hold for the time period you selected, unless you decide to turn it off earlier. (See “Turning off a Hold”.)
Setting up a Permanent Hold
- Press PROGRAM once.
- Press ▲or ▼to scroll until “HOLD” is blinking. To select, press PROGRAM once.
- Press ▲or ▼to scroll to “ON”. To select, press PROGRAM once.
The thermostat is now on hold until you manually turn off the hold. (See “Turning off a Hold”.)
Turning off a Hold
- Press PROGRAM once.
- Press ▲or ▼to scroll until “HOLD” is blinking. To select, press PROGRAM once.
- Press ▲or ▼to scroll to “OFF”. To select, press PROGRAM once.
The thermostat will now resume your programmed time and temperature settings.
Custom Program Worksheet
| Day | Time Period | start Time | heat setpoint Temperature | Cool setpoint Temperature |
|
Monday |
Wake | |||
| Day | ||||
| Evening | ||||
| Sleep | ||||
|
Tuesday |
Wake | |||
| Day | ||||
| Evening | ||||
| Sleep | ||||
|
Wednesday |
Wake | |||
| Day | ||||
| Evening | ||||
| Sleep |
|
Thursday |
Wake | |||
| Day | ||||
| Evening | ||||
| Sleep | ||||
|
Friday |
Wake | |||
| Day | ||||
| Evening | ||||
| Sleep | ||||
|
Saturday |
Wake | |||
| Day | ||||
| Evening | ||||
| Sleep | ||||
|
Sunday |
Wake | |||
| Day | ||||
| Evening | ||||
| Sleep |
Automation and Controls
Division of PECO, Inc.
PO Box 82189, Portland, OR 97282
Phone: 503-233-6401
Email: [email protected]
www.pecomanufacturing.com
© Copyright 2008. PECO, Inc. All Rights Reserved. P/N LCT180OMO9O8 PAGE 72
PECO is a registered trademark of PECO, Inc. The PECO logo is a trademark and/or service mark of PECO, Inc.
REFERENCE
Download Manual
Peco TB180 Programmable Thermostat Owner Manual
other manuals
Peco TB180 Programmable Thermostat INSTALLATION INSTRUCTIONS
