
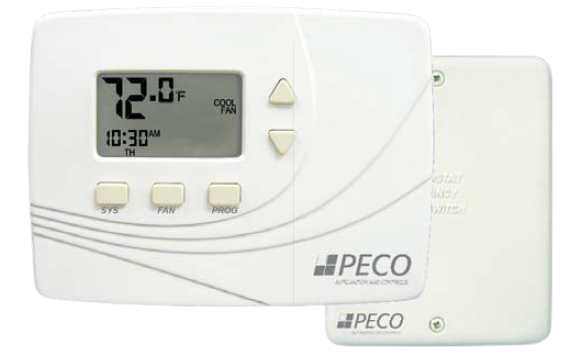
Peco T2500 Wireless Programmable Thermostat
THE PECO WAVEPRO WIRELESS SYSTEM
Thank you for choosing the PECO WavePROTM Wireless System (Model K2500-001). The PECO WavePRO Wireless System is a wireless thermostat transmitter and receiver. It is designed for use with conventional (gas, oil, electric) or heat-pump systems. It can support up to 2-HEAT/ 2-COOL configurations in conventional systems and 3-HEAT/ 2-COOL configurations in heat pump applications. The PECO WavePRO Wireless System is comprised of the T2500 wireless thermostat paired with the R2500 wireless receiver. This operating manual contains important information on operating the T2500 thermostat and R2500 receiver. The T2500 thermostat may be powered by batteries, 24 VAC, or by both. The thermostat may be programmed for operation on a 7-day, 5/2-day, 5/1/1-day, or 1-day operational basis, with four time periods per day. The R2500 wireless receiver is powered by 24 VAC only and is wired directly to the HVAC equipment it controls.
Product Specifications (Model K2500-001)
- Temperature Range: 50° to 90° F (10° to 32° C)
- Differential: 1° F (0.5°C)
- Input Power
- T2500 Thermostat: Two AA alkaline batteries or 24 VAC, 50/60 Hz
- R2500 Receiver: 24 VAC, 50/60 Hz
- Wireless Type 902 to 928 MHz Band, Frequency Hopping Spread Spectrum (FHSS)
- Wireless Range 100 feet (30.48 meters) typical reliable range in the open air
- Operation Temperature 0° to 120° F (-17° to 48°C)
- Shipping Temperature -20° to 130°F (-28°to 54°C)
- Operating Humidity 5% to 95% RH, non-condensing
- Physical dimensions
- T2500: 4.5”H x 5.75” W x 1.1”D
- R2500: 4.8”H x 3.8”W x 1.3”D
- Read and save this operating manual
CAUTION!
- READ INSTRUCTIONS CAREFULLY BEFORE ATTEMPTING TO OPERATE THIS THERMOSTAT AND RECEIVER.
- FOLLOW THE WAVEPRO WIRELESS INSTALLATION INSTRUCTIONS BEFORE PROCEEDING.
- Contact a qualified service person if at any time your system does not operate properly.
- Use care to avoid static discharge to the thermostat and receiver.
- Failure to observe safety information and comply with instructions could result in PERSONAL INJURY, DEATH, AND/OR PROPERTY DAMAGE.
- To avoid electrical shock or damage to equipment, disconnect power before installing or servicing and use only wiring with insulation rated for full thermostat operating voltage.
- To avoid potential fire and/or explosion do not use in potentially flammable or explosive atmospheres.
- This product, when installed, will be part of an engineered system whose specifications and performance characteristics are not designed or controlled by PECO. You must review your application and national
and local codes to assure that your installation will be functional and safe. - Retain these instructions for future reference.
IMPORTANT NOTE: This thermostat was shipped with factory default settings. Your thermostat’s installer may have configured the thermostat differently from the factory-default settings and may have modified or disabled certain features. Contact the installer or a service technician if you have questions about the thermostat’s confi guration
FRONT PANEL DISPLAY REFERENCE: T2500 THERMOSTAT
Following are the T2500 thermostat Display and buttons:

System Button
The SYS (system) button is used to control the operating mode of the T2500. Press the SYS button once to light up the menu options, as described below. Continue pressing the SYS button to scroll through menu options. As you scroll, the menu option being accessed (operating mode) will flash. To select that option, allow the display to automatically time out. The T2500 saves the “flashing” option and switches the thermostat to the selected operating mode. The SYS modes are:
HEAT – Indicates the system is in heating mode.
COOL – Indicates the system is in cooling mode.
AUTO – Indicates the system will automatically changeover between heating and cooling modes as the room temperature varies.
OFF – Disables thermostat outputs.
SETBACK –Indicates the heating or cooling system is operating in manual setback mode. (To appear, SETBACK must be selected in “Advanced configuration.” See the “PECO WavePRO Wireless System Installation Guide”).
NOTE: The SYS button is also used to scroll through the Service Menu in advanced configuration.(see “Advanced configuration” in the “PECO WavePRO Wireless System Installation Guide”).
Fan Button
The FAN button is used to control the fan mode. Pressing FAN will light up the two fan mode options described below. Press FAN to scroll through the options. As you scroll, the “flashing” option is automatically selected. The T2500 thermostat times out and automatically saves the “flashing” option. The modes are:
ON – Turns on the continuous fan, even if no demand exists for heating or cooling.
AUTO – Sets fan cycles with demand for heating and cooling.
Program Button
The PROG (program) button is used to program the T2500. Press the PROG button once to light up fi ve program mode options, described below. Press ▲or ▼buttons to scroll through the options. As you scroll, the option being accessed will flash. To select the flashing option (e.g.,” CLOCK”), press PROG again, and an associated submenu appears. Press ▲or ▼scroll through the submenu options. Press the PROG button to select the desired option. The five program mode options are: CLOCK –Sets the current time and day (see “Setting the time and day”). °F / °C –Sets temperature display to Fahrenheit or Celsius. The default setting is Fahrenheit (see “Selecting the Fahrenheit or Celsius temperature”).
SET – Initiates the time and temperature schedule for a particular day or group of days. Allows you to reset the thermostat to the factory default ENERGY STAR® program. (see “Programming the T2500”).
COPY – Copies one day’s schedule to another day or to another group of days (see “Programming the T2500”). HOLD – Puts the thermostat in Temporary or Permanent Hold mode. Overrides your programmed settings but does not lose them (see “Overriding the program”). Up ▲and ▼Down Button Operation The up ▲and ▼down buttons are used to create a temporary override, thereby increasing or decreasing the current setpoint, or to access the Service Menu. The buttons are also used with the PROG button to select various programming options
THE T2500 DISPLAY
Figure 1 below illustrates the various display menus in the T2500 display. The menus are:
- System Mode Display
- Programming Commands
- Program Override Commands
- Temperature Display
- Time Period Indicators
- Service Indicator
- Time & Day Display
- Fan Operation Indicators

System Mode Display
HEAT – Indicates the system is in heating mode.
COOL – Indicates the system is in cooling mode.
AUTO – Indicates the system will automatically changeover between heating and cooling modes as the room temperature varies.
OFF – Turns off the entire system.
SETBACK – Indicates the heating or cooling system is operating in manual setback mode. (To appear, SETBACK must be selected in “Advanced configuration.”See the “PECO WavePRO Wireless System Installation Guide”).
Temperature Display
Default display: Digits display the current room temperature. During programming: Digits are used to set the desired temperature format.
Time & Day Display
Default display: Digits indicate the current time. Day abbreviations indicate the current day. During programming: Digits and days are used to program time periods.
CLOCK – Lights up during programming when the clock is being set.
THE T2500 DISPLAY MENUS (CONT.)
24Hr – Lights up during programming to indicate time will be displayed in 24-hour clock format. AM / PM – Indicates 12-hour clock format.
Programming Commands
SET – Enters thermostat into custom program mode which allows you to specify unique times and temperatures for a particular day or group of days.
COPY – Simplifies programming by allowing you to copy all of an individual day’s settings to another day or group of days.
DFLT – Restores the thermostat to the factory program.
Time Period Indicators
WAKE, DAY, EVE, and SLEEP are the names given to the four time periods per day. Each time period has its own unique setpoint times and temperatures.
Fan Operation Indicators
FAN – “FAN” will always be lit in conjunction with “ON” or “AUTO”.
ON – Indicates constant, continuous fan operation.
Auto – Indicates fan is only on with heating or cooling demand
Program Override Commands
HOLD – Indicates thermostat is in a Temporary or Permanent Hold. (Programmed settings are off, but they are not lost.)
HOLD HRS – During programming, lights up in conjunction with clock digits; allows the program to be put on Temporary Hold for up to 24 hours.
HOLD DAYS – During programming, lights up in conjunction with the clock digits; allows the program to be put on Temporary Hold for up to 99 days.
HOLD ON – Turns the Permanent Hold on. The current setpoint is maintained indefinitely or until the Permanent Hold is turned off.
HOLD OFF – Turns the Permanent Hold off and resumes programmed settings.
Service Indicator
The wrench symbol will flash during wireless pairing. For further information, see “Establish a wireless connection” in the “WavePRO Wireless System Installation Guide.” The wrench symbol is displayed when there is a temperature sensor error. The wrench symbol also indicates there is an open or a short connection to the sensor. When this occurs, the T2500 thermostat will disable all outputs and illuminate the wrench symbol. A service technician should be called to determine the cause of the error
SET THE TIME AND DAY
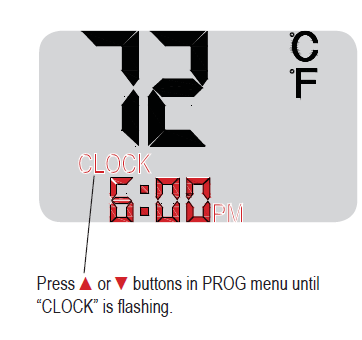
Note: The flashing option is saved automatically after each entry in the program mode.
- Press PROG to show program options.
- Press ▲or ▼to scroll until “CLOCK” is fl ashing. To select, press PROG once.
- Press ▲or ▼to scroll through the “24Hr”, “AM”, and “PM” options. “24Hr” sets your thermostat to a 24-hour clock. “AM” and “PM” sets your thermostat to a 12-hour clock. To select, press PROG once.
- Press ▲or ▼to scroll to the current hour. To select, press PROG once.
- Press ▲or ▼to scroll to the current minute. To select, press PROG once. Press ▲or ▼to scroll to the current day. To select, press PROG once.
SELECTING THE FAHRENHEIT OR CELSIUS TEMPERATURE

Set the temperature display using the following simple steps. Settings are saved automatically after you exit the PROG mode.
- Press PROG once.
- Press ▲or ▼to scroll until BOTH “°F/°C” are fl ashing.
- Press PROG once to enter the temperature menu for “°F/°C” .
Note: Either “°F” or “°C” will fl ash as an option. - Press ▲or ▼to ito scroll to select the fl ashing option as desired (°F / °C).
- To select the desired option, press PROG once.
PROGRAMMING THE T2500
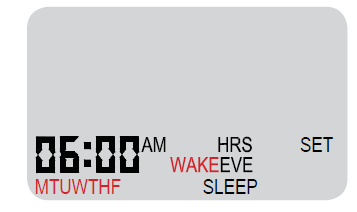
Each day has four scheduled periods (WAKE, DAY, EVE, and SLEEP ). Each one of the periods has a start time and heat and cool setpoints. Heat Setpoint controls system heating during cold weather. Cool Setpoint controls the cooling system during hot weather. (Your thermostat is preprogrammed to function with the ENERGY STAR settings.)
Factory Program: The T2500 is preprogrammed seven days of a week:
| Time Period | Start Time | Heat Setpoint Temperature | Cool Setpoint Temperature |
| Wake | 6:00 am | 70° F (21.0° C) | 78° F (25.0° C) |
| Day | 8:00 am | 62° F (17.0° C) | 85° F (28.5° C) |
| Evening | 6:00 pm | 70° F (21.0° C) | 78° F (25.0° C) |
| Sleep | 10:00 pm | 62° F (17.0° C) | 82° F (27.0° C) |
Note: If you want to change the preprogrammed times and/or temperatures, follow the instructions under “Custom program”.
CUSTOM PROGRAM
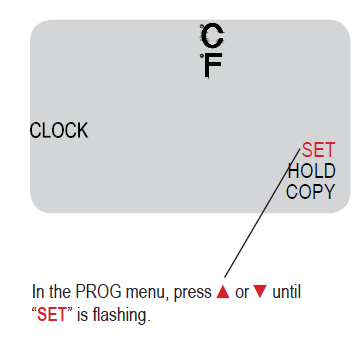
The T2500 can be programmed with settings for each day individually, for Monday through Friday, for Saturday and Sunday, or for all seven days as identical. Follow this step-by-step procedure.
- Press PROG once.
- Press ▲or ▼to scroll until “SET” is fl ashing.
- Press PROG once to select a menu option.
- Press ▲or ▼to scroll to the day or group of days you want to program.
- Select one of the following options.
Default (DFLT) Programming: Select “DFLT” to restore seven days of the week to the original factory-preprogrammed ENERGY STAR program.
The Day/Group of Days are:
7-Day Individual Programming: Each day flashes individually. Select: “M,” Monday; “TU,” Tuesday; “W,” Wednesday; “TH,” Thursday; “F,” Friday,“SA,” Saturday, and “SU,” Sunday. You must program four periods for each day.
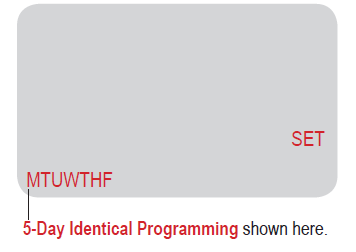
7-Day Identical Programming:
“MTUWTHFSASU” flashes as a block. Select “MTUWTHFSASU” to program every day of the week identically.
5-Day Identical Programming: “MTUWTHF”
fl ashes as a block. Select “MTUWTHF” to the program Monday through Friday identically SASU Programming: “SASU” flashes as a block. Select “SASU” to program identically
After the Day/Group of Days are selected, each time period must be programmed for the start time as well as the Heat and Cool Setpoints.
Note: Repeat steps 6 through 10 for the remaining day(s) and time periods.
- To select your preference, press PROG once.
- Press ▲or ▼to scroll through the four-time periods (WAKE, DAY, EVE, and SLEEP). Select the time period to be programmed and press PROG once.
- Press ▲or ▼to scroll to the desired starting hour. Press PROG once.
- Press ▲or ▼to scroll to the desired starting minute. Press PROG once.
- Press ▲or ▼to scroll to the desired Heat Setpoint Temperature. Press PROG once.
- Press ▲or ▼to scroll to the desired Cool Setpoint Temperature. Press PROG once. After you complete this process, the T2500 will return to the default Display.
CUSTOM PROGRAM: COPY FEATURE
You may also copy and paste all of an individual day’s settings to another day or to another group of days.
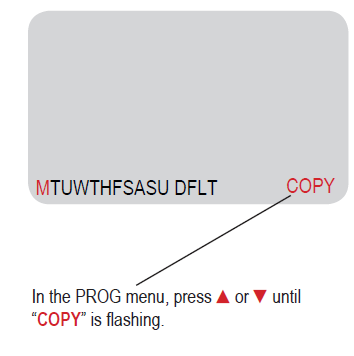
- Press PROG once.
- Press ▲or ▼to scroll until “COPY” is flashing.
- Press PROG once to select “COPY”.
- Press ▲or ▼to scroll to the individual day from which you want to copy.
- Press PROG once.“COPY” will begin flashing. Settings for flashing day(s) are now copied.
- Press ▲or ▼to find the day(s) to which you want to copy the captured settings.
- Press PROG once to select the desired day(s). Settings are now copied.
Time & Temperature Programming Example
In this example, the thermostat user wants to program the weekend with a schedule different from the Factory Program. The user wants the Saturday and Sunday programs to be identical.
- Press PROG once.
- Press ▲or ▼to scroll until “SET” is flashing. To select, press PROG once.
- Press ▲or ▼to scroll until “SASU” is flashing. To select, press PROG once.
- Press ▲or ▼to scroll until “WAKE” is flashing. To select, press PROG once.
- Press ▲or ▼to scroll hours to “8: ”. To select, press PROG once.
- Press ▲or ▼to scroll minutes to “ :30”. To select, press PROG once.
- The user wants to keep the same Heat Setpoint Temperature. Press PROG once.
- The user wants to keep the same Cool Setpoint Temperature. Press PROG once.
The user may want to set up additional time periods for Saturday and Sunday:
- Program the Day period for SASU by repeating steps 1 through 8, but in Step 4, select “DAY”.
- Program the Evening period for SASU by repeating steps 1 through 8, but in Step 4, select “EVE”.
- Program the Sleep period for SASU by repeating steps 1 through 8, but in Step 4, select “SLEEP”.
OVERRIDING THE PROGRAM
The thermostat is now on hold for the time period you selected, unless you turn it off earlier
The T2500 thermostat’s HOLD feature allows you to put the thermostat in Temporary Hold or Permanent Hold. HOLD will override programmed settings but does not lose them.
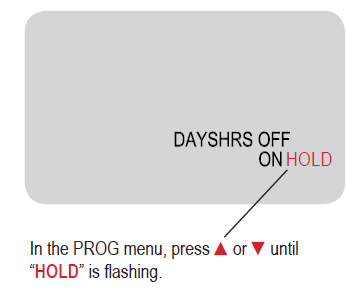
- Press PROG once.
- Press ▲or ▼to scroll until “HOLD” is flashing. To select, press PROG once.
- Press ▲or ▼to scroll through the options. “DAYS” allows you to specify 0-99 days hold; “HRS” allows you to specify 0-24 hours hold. To select a preference, press PROG once.
- Press ▲or ▼to scroll to the desired length of time. To select, press PROG once.
OVERRIDING THE PROGRAM (CONT.)
Setting up a Permanent Hold:
- Press PROG once.
- Press ▲or ▼to scroll until “HOLD” is fl ashing. To select, press PROG once.
- Press ▲or ▼to scroll to “ON”. To select, press PROG once.
Note: The thermostat is now on hold until you manually turn off the hold.
Turning off a Hold:
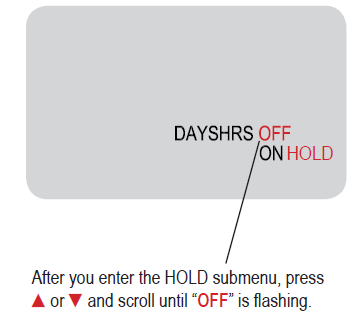
- Press PROG once.
Press ▲or ▼to scroll until “HOLD” is fl ashing. To select, press PROG once. - Press ▲or ▼to scroll to “OFF”. To select, press PROG once.
Note: The thermostat will now resume your programmed time and temperature settings
FCC COMPLIANCE
This device complies with part 15 of the FCC rules. Operation is subject to the following two conditions: this device may not cause harmful interference, and this device must accept any interference received, including interference that may cause undesired operation. Warning: Modifications not expressly approved by the manufacturer could void the user’s authority to operate the equipment under FCC rules. NOTE: This equipment has been tested and found to comply with the limits for a Class B digital device, pursuant to part 15 of the FCC Rules. These limits are designed to provide reasonable protection against harmful interference in a residential installation. This equipment generates, uses, and can radiate radio frequency energy, and if not installed and used in accordance with the instructions, may cause harmful interference to radio communications. However, there is no guarantee that interference will not occur in a particular installation. If this equipment does cause harmful interference to radio or television reception, which can be determined by turning the equipment off and on, the user is encouraged to try to correct the interference by one or more of the following measures:
- Reorient or relocate the receiving antenna.
- Increase the separation between the equipment and the receiver.
- Connect the equipment into an outlet on a circuit different from that to which the receiver is connected.
- Consult the dealer or an experienced radio/TV technician for help.
Reference:
Download Manual:
Peco T2500 Wireless Programable Thermostat Operational Manual
OTHER MANUALS:
Peco T2500 Wireless Programable Thermostat Installation Guide
![]()
Peco T2500 Wireless Programable Thermostat Operational Manual
Leave a Reply