OEM ET-72G Programmable Thermostat
SPECIFICATION
- Warranty: 2 years
- After-sale Service: Online technical support, Return and Replacement
- Project Solution Capability: graphic design, 3D model design, total solution for projects,
- Place of Origin: Anhui, China
- Model Number: ET-72G
- Floor Heating Part Type: Floor Heating Thermostats
- Certifications: ETL
- Function: thermostat controller
- Usage: Underfloor Heating Controls System
- Floor Heating Valve: all
- Material: VA/Polycarbonate
- Design Style: Modern
- Brand Name: OEM
- Type: Floor Heating Parts
- Product name: digital heat mat thermostat controller for underfloor
- Brand name: OEM
- Name: thermostat
- Sensor temperature: 0-45℃
- Feature: Flexible
INTRODUCTION
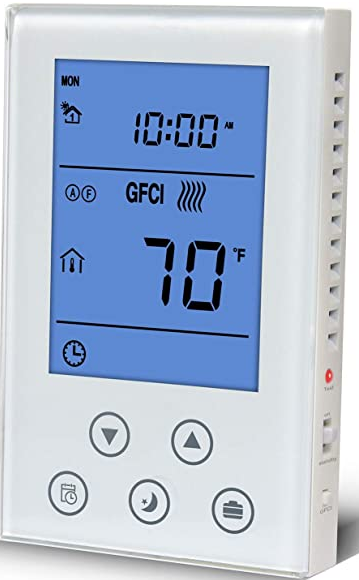
The OEM ET-72G Programmable Underfloor Heating Thermostat is a device that is designed to control the temperature of an underfloor heating system. The thermostat is programmable, which means that it can be set to turn on and off at specific times of the day or week, allowing you to have control over when your heating system operates. The thermostat has a large, easy-to-read LCD display that shows the current temperature, as well as the temperature that has been set. It also has a built-in sensor that measures the temperature of the room, ensuring that the system operates at the desired temperature.
The OEM ET-72G Programmable Underfloor Heating Thermostat is compatible with most underfloor heating systems, including electric and water-based systems. It is easy to install and use, making it a great choice for both homeowners and professionals alike. Overall, the OEM ET-72G Programmable Underfloor Heating Thermostat is a reliable and convenient option for those looking to control the temperature of their underfloor heating system with ease and precision.
WHAT IS IN THE BOX
- THERMOSTAT
- USER MANUAL
- SCREWS
- External Sensors
Product characteristics

HOW TO WORK
- Turn off the power supply to the heating system.
- Mount the thermostat on the wall according to the manufacturer’s instructions.
- Connect the thermostat to the underfloor heating system. Make sure the wiring is correct and secure.
- Turn on the power supply to the heating system.
- Press the power button on the thermostat to turn it on.
- Set the date and time by following the instructions in the user manual.
- Set the desired temperature and program schedule. You can set different temperatures for different times of the day.
- Save the settings and exit the programming mode.
- The thermostat will now control the temperature of your underfloor heating system according to the program schedule you set.
HOW TO INSTALL
- Turn off the power supply to the heating system at the circuit breaker or fuse box.
- Remove the existing thermostat cover and disconnect the wires from the old thermostat. Take note of the wire connections and their corresponding labels.
- Install the mounting plate for the ET-72G thermostat onto the wall using the provided screws.
- Connect the wires from the heating system to the corresponding terminals on the thermostat according to the manufacturer’s instructions. The ET-72G usually has terminals for line (power), load (heating), and neutral wires.
- Connect the thermostat to the mounting plate and secure it in place.
- Turn on the power supply to the heating system at the circuit breaker or fuse box.
- Follow the manufacturer’s instructions to program the thermostat and set the desired temperature and schedule for your underfloor heating system.
- Test the thermostat to ensure it is working properly and accurately controlling the temperature of the heating system.
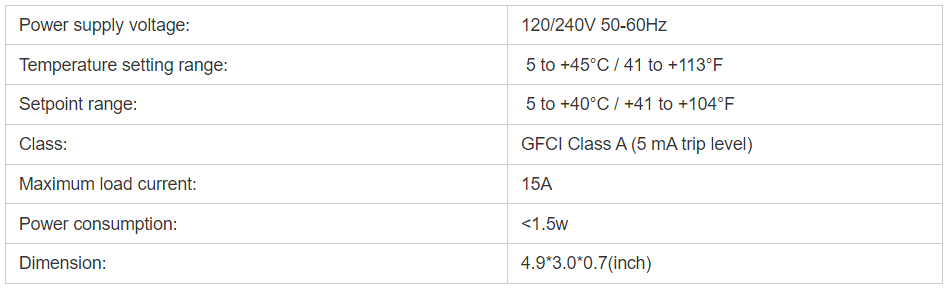
TECHNICAL DATA
HOW TO OPERATE
Setting the Time and Date:
To set the current time and date on the thermostat, press the “SET” button and use the arrow keys to adjust the values.
Setting the Schedule:
The ET-72G thermostat has a 7-day programmable schedule, which allows you to set different temperatures for different times of the day. To set the schedule, press the “PROG” button and use the arrow keys to select the day of the week and the time period that you want to program. Then, use the arrow keys to set the desired temperature for that time period. Repeat this process for all the time periods that you want to program.
Manual Override:
If you want to temporarily override the programmed schedule, you can manually adjust the temperature by pressing the “TEMP” button and using the arrow keys to set the desired temperature. The thermostat will maintain this temperature until the next scheduled program period.
Other Functions:
The ET-72G thermostat has several other functions, including a vacation mode, a temperature display in Celsius or Fahrenheit, and a floor sensor option. You can access these functions by pressing the “SET” button and using the arrow keys to navigate to the desired function.
Period parameter table

Suitable for all floor heating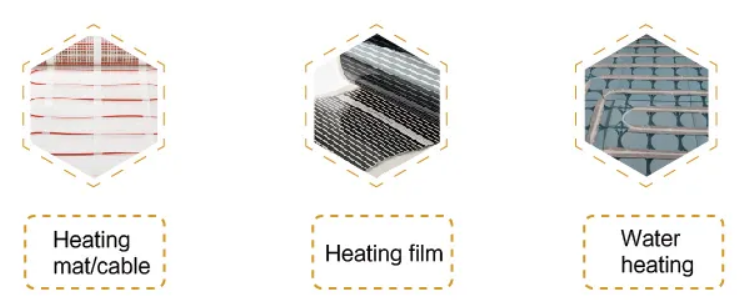
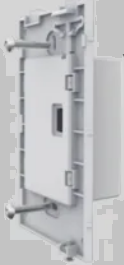
Installtion
Installtion scheme
Loosen the bottom screw by a Phillips screwdriver. Then open the thermostat from the upper right side as shown.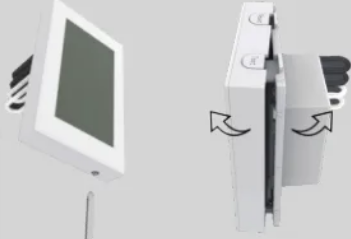
Wire as shown:
- L/N lead: Connect the power cord using the terminal block
- L1/N1 lead: Use a terminal block to connect the load line.
- IN/SNR terminal: Connect the floor sensor.
- OUT terminal: Connect to IN/SNR of Power Module.
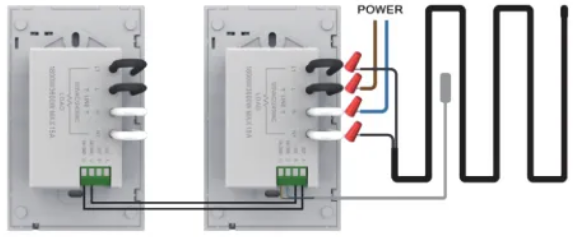
Note: Screw the nut out of the groove and do not need to unscrew it.
- Install the back cover into the terminal box and secure it with the set screw.
- Fit the left side of the front and rear covers as shown.Rotate to the right again and press the upper half of the right border until you hear a click. Use a screwdriver to secure the bottom screw. Turn on the power and test the GFCI tunction.
![]()
OEM ET-72G Programmable Underfloor Heating Thermostat User Manual