NEOMITIS RTE1A PROGRAMMABLE ROOM THERMOSTAT

OVERVIEW
Thank you for purchasing our RT7PLUS, 7-day programmable digital room thermostat. It is by listening to your requirements we have created and designed our products to be easy to operate and install. It is this ease of operation that is intended to make your life easier and help you save energy and money.
CONTROLS AND DISPLAY
Thermostat
Programming sliders sequences:
Time/date Day to be programed Comfort period setting Comfort temperature Eco temperature Run.
LCD Display
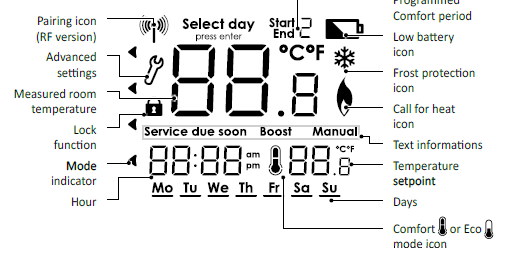
SETTINGS
INITIAL POWER UP
- To start: insert the two AA batteries provided into the battery compartment. Once batteries are fitted all symbols will be displayed on the LCD screen as shown for two seconds. 2- After 2 seconds, the LCD will show: – The ambient temperature (°C) solid. To start: insert the two AA batteries provided into the battery compartment. Once batteries are fitted all symbols will be displayed on the LCD screen as shown for two seconds.

- After 2 seconds, the LCD will show: – The ambient temperature (°C) solid.

Note: When the batteries must be changed, a low battery level indicator appears in the display. Remember to take used batteries to battery collection points so they can be recycled.
PROGRAMMING
SET CLOCK
- To set the current time, move the O. Programming slider to position, the time setting is flashing.
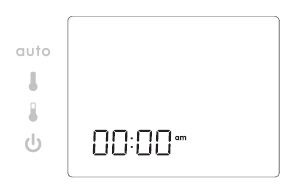
- Turn the dial clockwise, to increment the time, and turn the dial counter-clo- ckwise, to decrement the time.
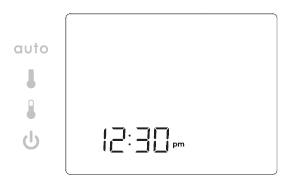
Move the Programming slider to the next position to confirm/finish this setting.
SET THE PROGRAM COMFORT PERIOD
- To set the first Comfort start time, move the Programming slider to the position
 . The default time is 6:30 am.
- Turn the dial to set the time. Move the Program slider to the next position to confirm/finish this setting.

- To set the first Comfort end time, move the Programming slider to the position. The default time is 8:30 am.

- Turn the dial to set the time. Move the Program slider to the next position to confirm/finish this setting.

- Repeat for the second comfort period
 , and for the third comfort period
 .
.
| Comfort period | Default times | |
| Comfort period 2 | Start at 12:00 pm | End at 02:00 pm |
| Comfort period 3 | Start at 05:00 pm | End at 10:00 pm |
Note: if you wish not to use a period then this can be done by Coinciding the End time with Start time.
TEMPERATURES SETTING
Two temperatures can be set: Comfort temperature and Economy temperature.
- To set the Comfort temperature, move the Programming slider to the position
 . The default temperature is 20°C (68°F).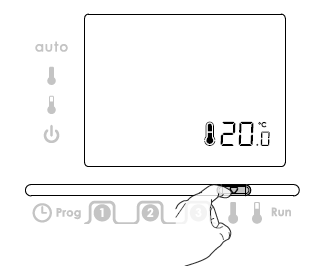
- Turn the dial to set the temperature between 5°C and 30°C, in increments of 0.5°C. Move the Program slider to the next position to confirm/finish this setting.

- To set the Economy temperature, move the Programming slider to the position. The default temperature is 16°C (61°F).

- Turn the dial to set the temperature between 5°C and 30°C, in increments of 0.5°C. Move the Program slider to the next position to confirm/finish this setting. NOTE: This is the temperature that the unit will work to outside of your comfort periods

- Move the program mode slider to the position to confirm and finish all previous settings.
OPERATING
Mode sliders sequences:
Auto mode Comfort mode Economy mode Standby
- AUTO: Automatic mode. The unit is controlled by the time and temperature program that have been selected (refer to the “programming” section on page 2).
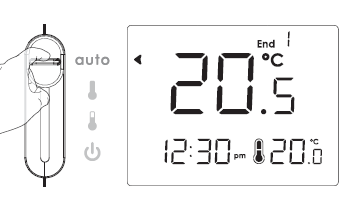
- COMFORT: Permanent comfort mode. The unit is controlled continuously to the comfort temperature setpoint. The default temperature setting is 20°C (68°F). Refer to the section temperatures setting to change the value on page 3.
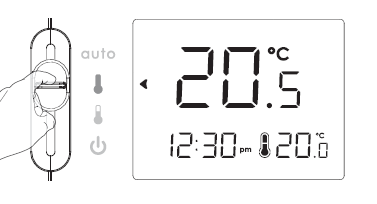
- ECO: Permanent eco mode. The unit is controlling continuously the eco temperature setpoint. The default temperature setting is 16°C (61°F). Refer to the section temperatures setting to change the value on page 3.
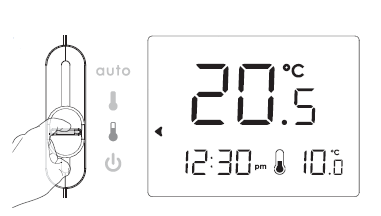
- STANDBY: Permanent standby mode with frost protection. The unit is controlled continuously at the frost protection temperature factory set. i.e 8°C. The ambient temperature will be displayed. Use it when you will be away from your home for a long time to protect your installation against frost.
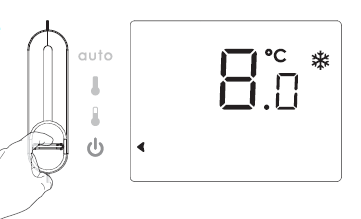
MANUAL: A TEMPORARY CHANGE
MANUAL: Indicates when the temperature has been moved from the setpoint. This temperature will operate until the next switching time. This is only active when the controller is in AUTO or COMFORT mode.
BOOST
- Boost mode is a temporary mode that allows you to operate at a comfortable temperature for 1 hour. At the end of 1 hour, the device will revert to its prior setting.

- BOOST will work from any running mode. BOOST is entered by pressing / the button.

FACTORY SETTINGS
BOOST is canceled by any press of a button, or movement of a dial or slider. When BOOST is running the time and day disappear. The minute array will count down from 60 – 0 to indicate the time left in BOOST mode
Note: To restore factory settings, press and hold down this part for more than 3 seconds using the tip of a pen.
| Settings | Factory settings | |
| Comfort temperature | 20°C | |
| Eco temperature | 10°C | |
| Comfort period 1 | Start at 06:30 am | End at 08:30 am |
| Comfort period 2 | Start at 12:00 pm | End at 02:00 pm |
| Comfort period 3 | Start at 05:00 pm | End at 10:00 pm |
Note: To restore factory settings, press and hold down this part for more than 3 seconds using the tip of a pen.
 All LCD display will be turned ON for 2 seconds and the factory settings will be res-Torea.
TROUBLESHOOTING
- The boiler is not heating: –
- Check that the Thermostat is calling for heat if yes then the thermostat would appear to be working check that the boiler has not switched itself off. If no increase set the temperature.
- Check the position of the batteries. Remove them for 30 seconds and reinsert them. If the problem persists, replace the 2 batteries.
- Nothing in the display: –
- Check the position of the batteries. Remove them for 30 seconds and reinsert them. If the problem persists, replace the 2 batteries.
- The room temperature is not high enough, and the boiler is not providing enough heat: –
- Check the active operating mode (see page 4) – the room thermostat may be in an Eco, Standby, or Auto Mode entailing a temperature drop. –
- Check the active desired temperature and increase it if needed (see page 3).
- The temperature in the room is lower than the setpoint temperature
- Check the programming. The thermostat could be in a scheduled Eco period.
- Ensure that the time displayed is the same as the current time.
- You made a mistake while setting:
- You just need to restore factory settings, as explained in the “Factory settings” section (see page 4). This will reverse any changes you might have made.
- The system is not heating but
 is on: –
- If an indicator light is on but the system remains cold, then you should contact your installer.
- If
- The thermostat is programmed and you observe a delay between the active mode Comfort or Eco and your requirement: –
- The optimization function can generate slight offsets to guarantee the level of comfort at the right time or to save energy by slightly anticipating an Eco passage.
- Heating comes on before the programmed start time and comes off after the programmed end time: –
- The thermostat may be set to OPTI Comfort mode. The thermostat will start the boiler at the optimum time to achieve the set point temperature at the start of the occupancy period.
- (On cold days your heating may come on earlier than expected in order for the programmed occupied temperature to be achieved).
- To change the optimization type, refer to the installation instructions.
- The heating does not come on at the programmed start time and comes off before the programmed end time: –
- The thermostat may be set to OPTI ECO mode. The thermostat will stop the boiler at the optimum time to slightly reduce the set point temperature before the end of the occupancy period. (This helps you to save money on your heating bills).
- To change the optimization type, refer to the installation instructions
TECHNICAL SPECIFICATIONS
Please refer to the installation instructions for any information about batteries life, standards, and product environment
NOTE
In some instances, the unit may have been set with the service interval function enabled. By Law in rented accommodation, your gas boiler should be inspected/serviced annually to ensure it is working correctly. This option is designed to remind the end user to contact the relevant person to have the annual service carried out on the boiler. This function will be enabled and programmed by your Installer, maintenance Engineer, or Landlord. If it has been set to do so, the unit will display a message on the screen to remind you that a boiler service is due. The Service Due Soon countdown will be indicated up to 50 days before the Service is due to allow time to arrange for an engineer to attend, normal functions will continue during this stage. At the end of this service due soon period, the unit will go to Service Due OFF at which point only the 1hour boost will operate on TMR7 and PRG7, if the unit is a thermostat RT1/RT7PLUS, it will operate at 20°C during this hour. If PRG7 RF, Thermostat has no function.
WHAT IS A ROOM THERMOSTAT

an explanation for householders A room thermostat simply switches the heating system on and off as necessary. It works by sensing the air temperature, switching on the heating when the air temperature falls below the thermostat setting and switching it off once this set temperature has been reached. Turning a room thermostat to a higher setting will not make the room heat up any faster. How quickly the room heats up depends on the design of the heating system, for example, the size of the boiler and radiators. Neither does the setting affect how quickly the room cools down. Turning a room thermostat to a lower setting will result in the room being controlled at a lower temperature, and saves energy. The heating system will not work if a time switch or programmer has switched it off. The way to set and use your room thermostat is to find the lowest temperature setting that you are comfortable with, and then leave it alone to do its job. The best way to do this is to set the room thermostat to a low temperature – say 18ºC – and then turn it up by one degree each day until you are comfortable with the temperature. You won’t have to adjust the thermostat further. Any adjustment above this setting will waste energy and cost you more money. If your heating system is a boiler with radiators, there will usually be only one room thermostat to control the whole house. But you can have different temperatures in individual rooms by installing thermostatic radiator valves (TRVs) on individual radiators. If you don’t have TRVs, you should choose a temperature that is reasonable for the whole house. If you do have TRVs, you can choose a slightly higher setting to make sure that even the coldest room is comfortable, then prevent any overheating in other rooms by adjusting the TRVs. Room thermostats need a free flow of air to sense the temperature, so they must not be covered by curtains or blocked by furniture. Nearby electric fires, televisions, and wall or table lamps may prevent the thermostat from working properly.
NEOMITIS
- NEOMITIS® LIMITED – 16 Great Queen Street, Covent Garden, London, WC2B 5AH UNITED KINGDOM
- Registered in England and Wales No: 9543404
- Tel: +44 (0) 2071 250 236
- Fax: +44 (0) 2071 250 267
- E-mail: [email protected]
REFERENCE
DOWNLOAD MANUAL
NEOMITIS RTE1A PROGRAMMABLE ROOM THERMOSTAT OPERATING Instruction
Other manuals:
NEOMITIS RTE1A PROGRAMMABLE ROOM THERMOSTAT INSTALLATION INSTRUCTION

NEOMITIS RTE1A PROGRAMMABLE ROOM THERMOSTAT OPERATING Instruction