
MI-HEAT SAS918RF Digital Room Thermostat
Operating range
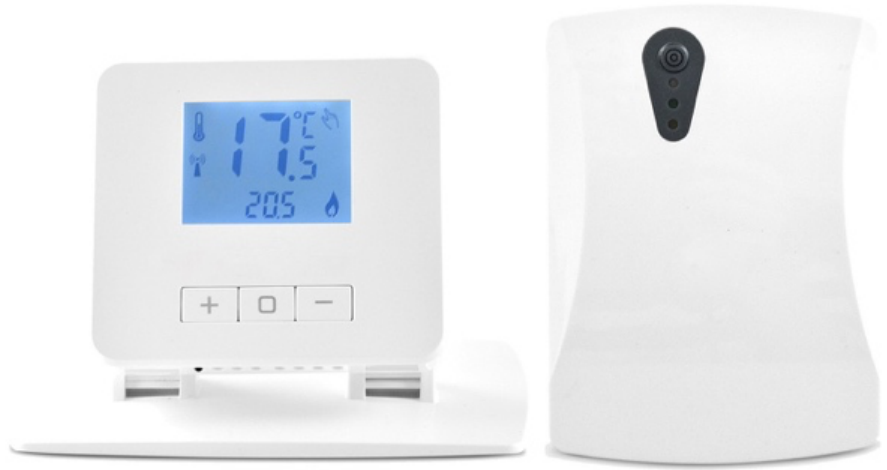
The SAS918RF is an 868 MHz remote room thermostat and consists of a battery-powered transmitter (2x AA batteries) and a mains-powered receiver (230V / 50Hz). The device is designed for comfortable and economical heating operation and can control both centrally the boiler, electric heaters or other consumers with a maximum switching capacity of 16A (amps). Almost all consumers can be switched via the potential-free switching contact. The temperature is monitored via the integrated sensor on the remote transmitter. The remote range is up to 60 meters.
Safety instructions and measures
- Please read these operating instructions carefully before using the product for the first time.
- Use the product strictly as intended, as described in the operating instructions.
- To avoid electric shock, never immerse the product in water or other liquids and make sure that no water drips on it.
- Make sure that the mains voltage in your home corresponds to the operating voltage indicated on the rating plate.
- The electrical connection may only be carried out by qualified personnel in accordance with the applicable electrical safety regulations. This appliance is not intended for use by persons (including children) with reduced physical, sensory or mental capabilities, or lack of experience and / or knowledge, unless they have been given supervision or instruction concerning use of the appliance by a person responsible for their safety.
- Children should be supervised to ensure that they do not play with the device.
Display and operating options
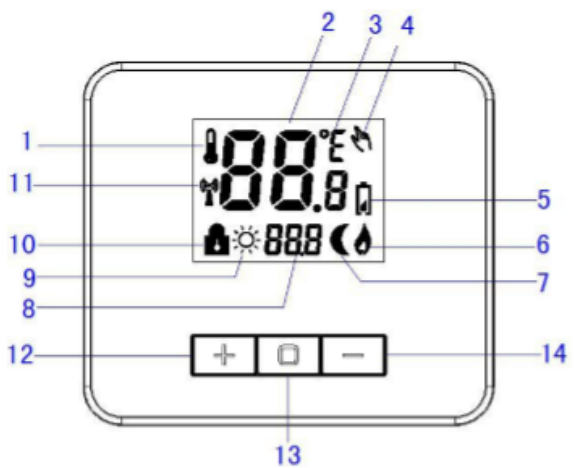
- Symbol for temperature display
- ACTUAL temperature
- Temperature unit (Celsius / Fahrenheit)
- Manual operation mode
- Empty battery
- Heating mode
- ECO mode
- Set temperature
- Comfort mode
- Key lock (child lock)
- Radio symbol
- Temperature High button
- Menu button
- Temperature Down key
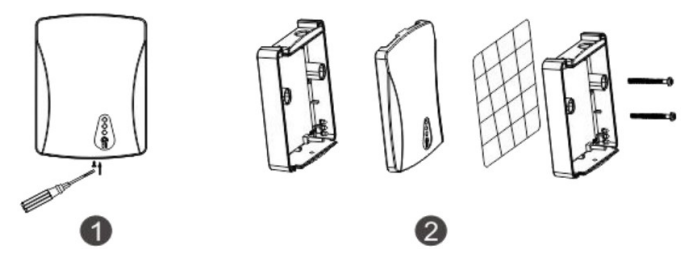
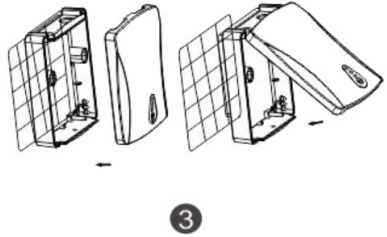
Assembly and installation diagram
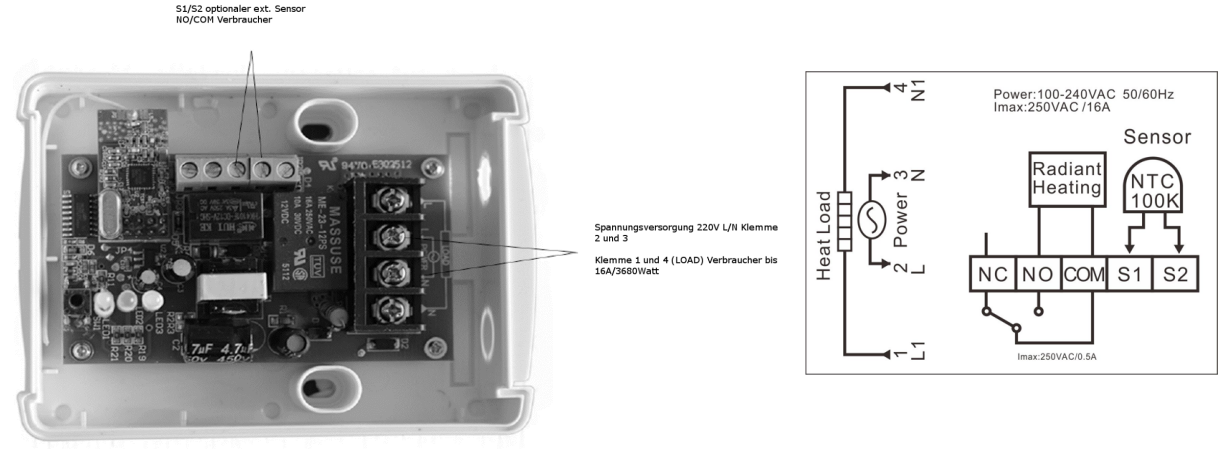
Initial operation
Place the batteries in the transmitter and then connect the receiver to the power supply cable. Connect the consumer to the receiver in accordance with the applicable regulations. The unit is now ready for operation and the power supply can be switched on.
If for some reason the units are not tuned in to each other, carry out the following steps:
- Make sure the receiver is in the off state, with the red LED off.
- Press the button on the receiver and keep it pressed for 3 seconds, the yellow LED will light up constantly. The receiver is in teach-in mode.
- Press the “
 ” and ” – ” buttons simultaneously on the transmitter. Successful programming is confirmed by the yellow LED on the receiver flashing several times and the thermostat switching on.
Note: Only the original receiver can be paired with the intended transmitter.
Configuration
Switch off the thermostat and then press and hold the “ ” button for 5 seconds to enter the configuration menu. Press “ ” to move to the next menu item. The selection with is made with the buttons ” + ” or ” – “. To exit the menu, press and hold the ” ” button for a few seconds. If no key is pressed, the menu is exited automatically after about 20 seconds. To restore the factory setting, keep the ” + ” and ” – ” buttons pressed simultaneously for at least 3 seconds. The successful reset is signalled by the display “DEF”.
| Nr. | Button | Display
(factory setting) |
Press +、- to select | Description |
| 1 | |
30℃/86℉ | 20℃—35℃ | Maximum set point |
| 2 | |
5℃/41℉ | 5℃(41℉)—20℃(68℉) | Minimum setpoint |
| 3 | |
16 ℃ | 10 ℃~20 ℃ | ECO mode temperature |
| 4 | |
21 ℃ | 20 ℃~25 ℃ | Comfort mode temperature |
| 5 | |
ON | ON/OFF | Display lighting |
| 6 | |
0℃ | -5℃ — +5℃ | Temperatur-Offset |
| 7 | |
PI | PI/HP | Control mode PI exciter / fixed hysteresis |
| 8 | |
0. 5 ℃ | 0. 1 ℃ ~5 ℃ | Control accuracy (applies only to HP control mode) |
| 9 | |
OFF | ON/OFF | Valve protection function |
- This function provides a maximum set temperature. The default settings 35 ℃, can be changed between 20 ℃ and 35 ℃.
- This function provides a minimum setpoint temperature. The default setting is 5 ℃, it can be changed between 5 ℃ to 20 ℃.
- ECO temperature for energy-saving periods, e.g. during the night.
- Comfort temperature for heating periods, e.g. during the day.
- Here you can switch the display illumination on/off.
- Temperature offset for adjusting the ACTUAL temperature, e.g. when the thermostat is installed on a cold outside wall.
- You can set the room temperature display up to 5 higher or lower. Your thermostat has been accurately calibrated at the factory, but you have the option to change the display temperature according to your previous thermostat. The current or set room temperature is shown on the right side of the display.
- Select the desired control mode. In PI setting, adaptive control is used. In HP mode, an adjustable switching hysteresis is used.
- Select the control accuracy of the switching hysteresis (only available in HP control mode). The factory default setting is 0.5 ℃.
- The valve protection function prevents heating valves from calcifying. If no switch-on command is received for more than 24 hours, the switching output of the receiver is switched through for 30 seconds so that the heating valve is moved.
LED displays during operation
- Red LED On = Receiver is ready to receive
- Red LED Off = Receiver is off (consumer is also off)
- Green LED ON = Load is switched on
- Green LED OFF = Load is switched off
- Yellow LED = Signal reception status
Error messages
- E1 = Check sensor
- E2 = Replace the battery
Technical data
Transmitter
- Operating voltage: 2xAA (2×1.5V) batteries
- Temperature range int. sensor: 50C-350C (410F-950F)
- Tolerance range: +/-1°C, +/-1°F
- Mounting type: surface mounting
- Dimensions: 85x75x23mm
Receiver
- Power supply: 230V / 50Hz
- Switching voltage: max. 250V
- Output: potential-free, max. 16A
- Dimensions: 109x84x29mm
Disposal note
 Do not dispose of this appliance in household waste! Electronic devices must be disposed of in accordance with the Waste Electrical and Electronic Equipment Directive via the local collection points for waste electronic equipment.
Note on conformity
 The CE mark is an over-the-counter mark that is addressed exclusively to the authorities and does not imply any assurance of properties.
Documentation © 2021 Mi-Heat Heizsysteme GmbH
All rights reserved. No part of this manual may be reproduced or duplicated in any form without the written consent of the publisher. It is possible that this manual contains typographical defects or printing errors. We accept no liability whatsoever for errors of a technical or printing nature and their consequences.
Reference
Download Manual:
MI-HEAT SAS918RF Digital Room Thermostat INSTALLATION INSTRUCTIONS
MI-HEAT SAS918RF Digital Room Thermostat INSTALLATION INSTRUCTIONS