MI-HEAT MCS 350 Programmable Thermostat
INTRODUCTION
The MCS 350 Tuya is designed to control domestic electrical heating systems (heating mats, film heaters or heating cable sections). The thermostat maintains a comfort temperature of the heated surface and ensures rational power consumption. The thermostat provides the control using two temperature sensors: floor sensor and air sensor (included in the sc ope of delivery), both simultaneously and individually. The thermostat enables to control the water warm floors under certain conditions, and when using a thermal he ad of the normally closed (NC) type with 230 VAC control voltage. The thermostat is mounted onto a wall in close proximity to installation wires of the heating system used.
SPECIAL FEATURES
The thermostat enables to control your warm floor both directly from the device touch screen and by using the Tuya Smart application installed on a smartphone. The thermostat shall be connected to a smartphone via Wi-Fi.
- The WiFi network standards supported by the device are: IEEE 802.11. b/g/n 2.4 GHz.
- The smartphone operating system required is Android 4.4 or higher, iOS 10.0 or higher.
- Download the free Tuya Smart App for your smartphone or tablet from the respective store.

WiFi CONNECTION GUIDELINES
- The WiFi network standards supported by the device: IEEE 802.11. b/g/n 2.4 GHz.
- The minimum WiFi signal level at the place of the thermostat installation: -70 dBm.
- Position the antennas of the WiFi router according to the manufacturer‘s recommendations in order to achieve the maximum WiFi signal level at the place where the thermostat is installed.
- The number of thermostats simultaneously connected to the home network depends on the type of your router.
- If the WiFi signal level of your home network at the place of installation is interfered by other WiFi networks or sources of interference in the 2.4 GHz range, we recommend changing the WiFi channel to a less busy one, eliminating the source of interference, changing the position of the router, or using equipment to expand the radio coverage area (access points and repeaters).
- When installing thermostats in rooms of a large area, complex configuration, or in case of problems with setting up a WiFi connection, it is recommended to contact a specialist in setting up WiFi equipment.
IMPORTANT!
- The Wi-Fi signal strength, as well as the occupied Wi-Fi channels, can be checked e.g. using a suitable smartphone App (available for iOS and Android devices) by holding the smartphone next to the place where the thermostat is installed. Also most routers offer the ability to analyse the signal strength of connected WiFi devices. If the signal level is less than desired, reposition the router, or use equipment to increase the coverage of the WiFi network (access point, repeater, etc.). WiFi signal propagation is affected by concrete floors, metal objects (cabinets, boxes, mirrors, etc.), as well as sources of interference (e.g. microwave ovens). WiFi access points installed in adjacent rooms can also be a source of radio interference.
- Since the thermostat is deepened into the wall, the perceived WiFi signal level may be lower than that shown by a smartphone.
SAFETY WARNINGS
Only qualified electricians are allowed to work on electrical connections and the electric supply of the device according to national laws and regulations. Otherwise the warranty invalidates. Switch off power from all wiring before installing, testing or replacing the thermostat. Only use electrical plastic wall mounting boxes for the thermostat installation. Ensure that the sensor can be placed into and removed from the corrugated tube (Ø16mm); once during installation of the tubing and again before installation of the floor finish!
INSTALLATION
Sensor installation
The floor temperature sensor cable has to be placed into a seperate corrugated tube according to EN 61386-1. The sensor should be placed centrally between the heating conductor. Route the heating mat cold lead through the second corrugated tube. Do not cross the cold lead over or place it closer than about 2 cm to the mat heating wires! A standard plastic round recessed electrical box with 230 VAC power supply is preferred for installation at the chosen thermostat location. A ground fault circuit breaker (30 mA) should be used for the 230 VAC heating mat circuit. Ensure that the sensor can be placed into and removed from the corrugated tube (Ø16mm); once during installation of the tubing and again before installation of the floor finish!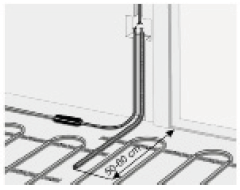
CONNECT THE THERMOSTAT
IMPORTANT! We recommend to use the services of qualified specialists when installing the thermostat and heating system. The electrical connection and connection to the power supply must be performed by a professional electrician in compliance with the applicable national laws, rules and regulations. The installation instructions and wiring diagram do not replace the professional skill of the device installer. Disconnect your local wiring from the mains before connecting the thermostat or disconnecting it to check or replace it. Electrical connections of the device and its connection to the mains must be performed by a qualified electrician.
- Install the mounting box or the intermediate junction box if necessary (e.g. if two or more heating mats are to be connected and controlled with one thermostat).
- Lead power supply cable, installation wires of the warm floor heating elements, temperature sensor installation wire to the box.
- Energize the supply cable and find the phase wire and the neutral wire using the mains phase indicator; mark these wires. De-energize the supply cable.
- Connect all required wires to the thermostat using its terminals with screw fastening.
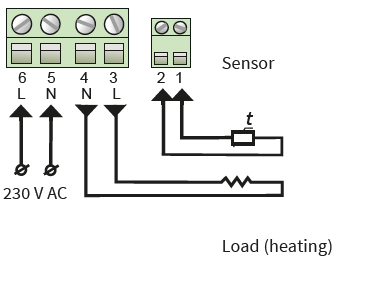
- The temperature sensor is connected to terminals 1 and 2 (polarity does not matter). The supply voltage (230 VAC) is applied to terminal 5 and 6, at that the phase wire (detected by the indicator) – to terminal 6, and the neutral wire – to terminal 5.
- The heating element installation wires are to be connected to terminals 3 and 4; the screening braid output (yellow-green wire) – to the protective earthing (PE) line via the external terminal contact (not included in the scope of delivery)
MOUNTING THE THERMOSTAT
We recommend the following procedure of the device installation:
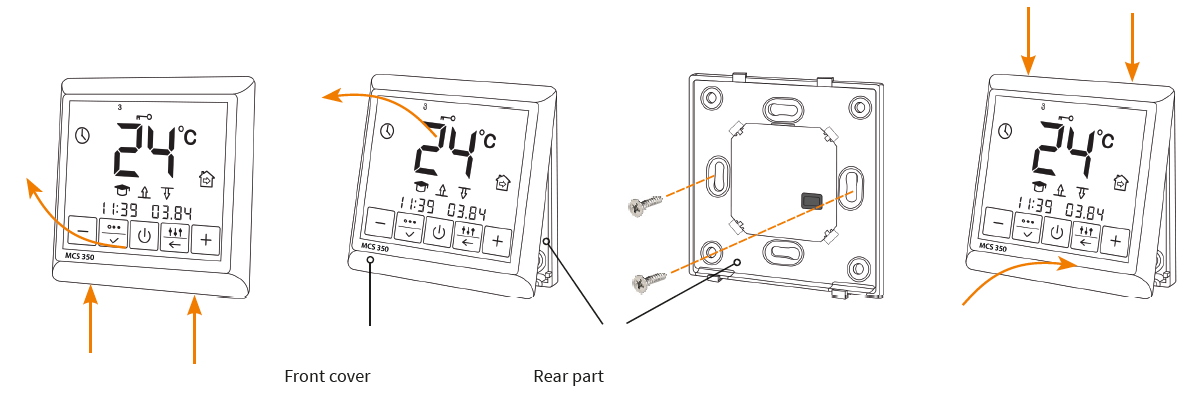
- Remove the front cover. For that, carefully press in turn, by thin slot screwdriver, the latches located on the lower side of the front cover, pulling it slightly out.
- Remove the cover.
- Make electrical connection as described in the previous item.
- Insert the rear cover of the device into the fl ush-mounted box and fasten it with two screws, left and right at the same height .
- Attach the front cover on the upper fi xtures, and then press gently until both latches click into place. Make sure that the front cover tightly adjoins the rear part of the thermostat installed in the fl ush-mounted box.
IMPORTANT! Avoid damage and bending of the connector’s contacts in the course of the mounting..
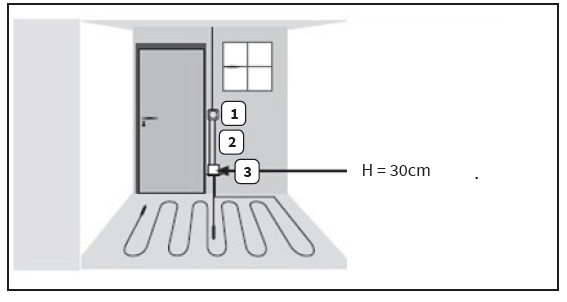
THERMOSTAT INSTALLATION FOR TWO OR MORE HEATING MATS.
- Electrical thermostat;
- Power supply distribution cable
- NYM 3 x 1,5 mm²
- Corrugated tube for the temperature sensor or the cold lead (both are not to be installed inside the same tube)
- Recessed electrical box (only necessary for more than one heating mat
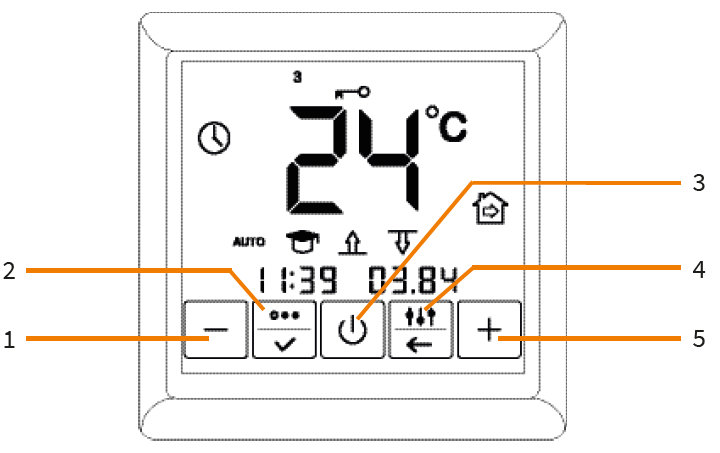
CONTROLS AND INDICATION
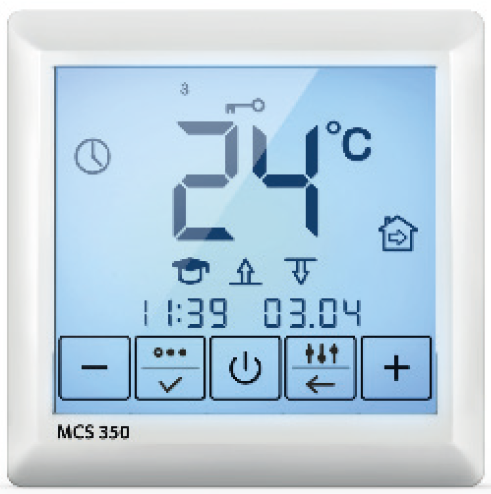
To display information and control operating modes, the thermostat uses a liquid crystal touch panel display with functional control buttons depicted on it. The control buttons are as follows:
- “ – ” — to decrease the temperature value;
 to select the operating mode;
 to switch the thermostat ON/OFF, to unlock the device;
 to enter the adjustment menu;
- “ + ” — to increase the temperature value.
MAIN INDICATION SCREEN
There are two display modes of the main indication screen:
- indicating the current time and date
- indicating the current floor surface and air temperature
- Switching between the display modes takes place automatically every 3 seconds.
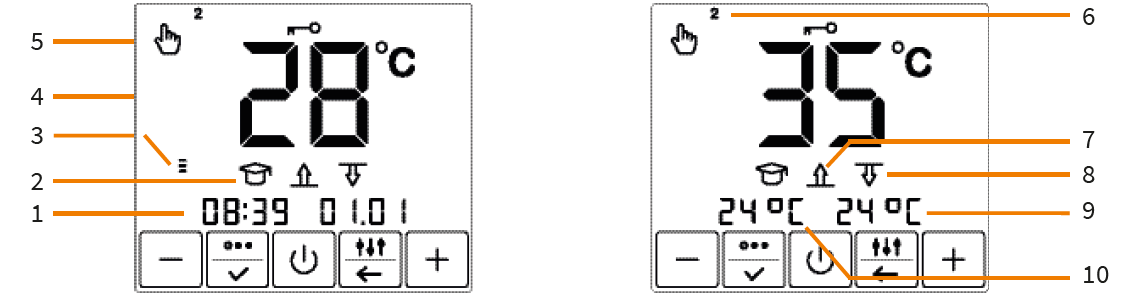
The large figures show the set floor temperature.
- Current time/date
- Self-learning mode enabled
- WiFi signal level
- Comfort temperature setting
- Operating mode
- Weekday (1 = Monday … 7 = Sunday)
- Floor temperature sensor enabled
- Air temperature sensor enabled
- Current air temperature
- Current floor surface temperature
CONNECTION TO A SMARTPHONE
- Use your smartphone and scan the QR code (Figure 5a) or search for the “Tuya Smart” app in the App St ore or Google Play Store to download.
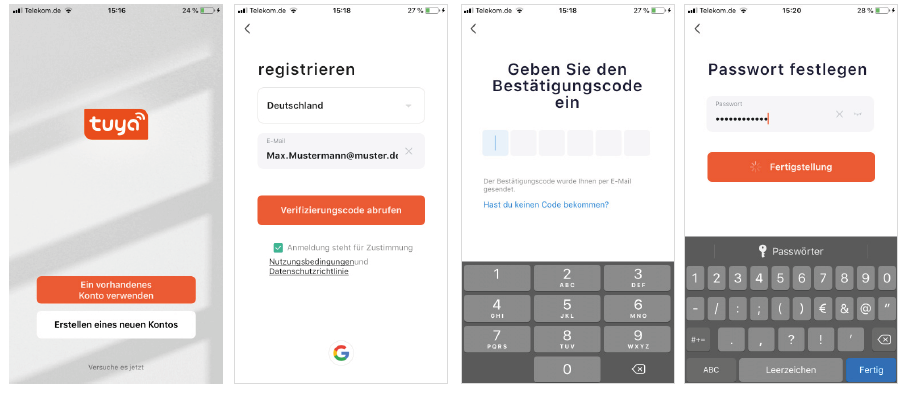
- Run the “Tuya Smart” app on your smartphone and tap “Register” if you don’t have an account yet.
- Then perform the necessary steps in the app to create the user account by following the instructions on the smartphone. The main steps are as follows.
- Use the country or region that the system automatically identifies and displays or manually select a c ountry or a region.
- Important: After registration, the country or region cannot be changed.
- Enter an email address and tap “Get Verification Code”.
- Enter the confirmation code that you will receive by email.
- Now, the password settings appear. Set a password. The password requires 6-20 characters, and must contain both letters and digits.
- After you have assigned a password to protect your account and tap “Done”.
- If you already have an user account, log in with your access data.
ADDING A DEVICE
In order to be able to conveniently operate the thermostat via the “Tuya Smart” app, the device first needs to be added to the app and connected with your smartphone using WiFi. This requires the following steps:
- Make sure that your WiFi is switched on, is in workable condition, and is active on the 2.4 GHz frequency band.
- Log in to your “Tuya Smart” user account with your login details.
- Tap on “Add device”.
- Tap the scanner icon

- Scan the QR code (Figure 5b) with your smartphone. This code is also attached to the rear part of the device (body housing).
- Follow the instructions on the smartphone to successfully complete the registration of the thermostat.
Please note:
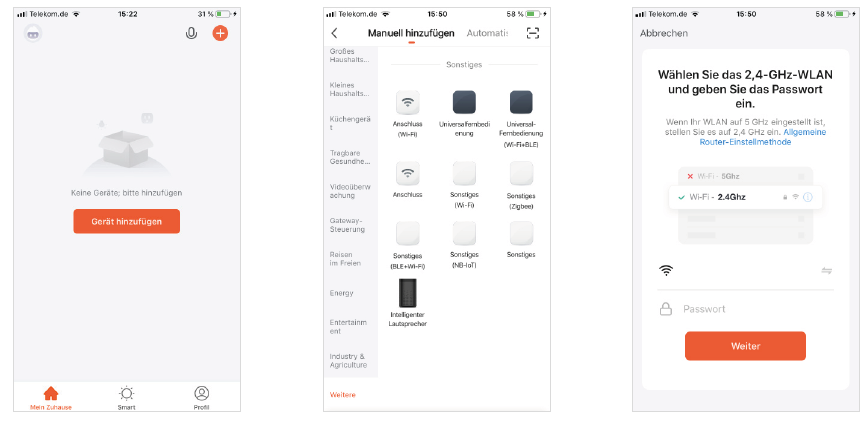
- If you do not have the QR code to hand, you can manually add and connect the thermostat as follows.
- Start the “Tuya Smart” app and tap either on the button
 on “ Add device” in the main screen.
 - In the following screen, tap “Other”, and then “Other (Wi-Fi)”.
- Enter the network name and password or select a WiFi network that has already been added. Then tap “Next”.
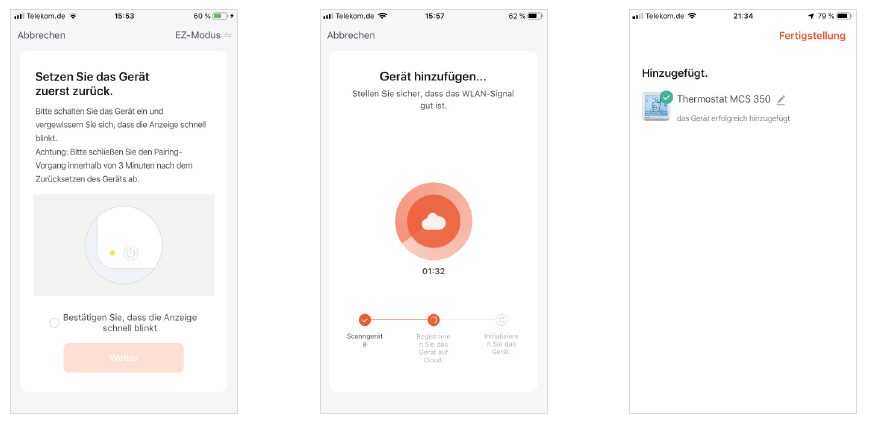
- In the following screen on your smartphone, first select “EZ mode” and then activate the “SC” Config mode (configuration mode) on the thermostat by simultaneously pressing the “+” and butt on in the unlocked condition.
- The “SC” symbol and a countdown appear on the display of the thermostat.
- Make necessary confirmation in the app and tap “Next”. The connection is now established.
- After the device has been successfully added, tap “Done”. Now follow the further instructions on the smartphone.

CONTROL AND OPERATION
SWITCHING THE THERMOSTAT ON
The device is switched on by pressing and holding the button.
LOCKING/UNLOCKING
To ensure the childproofing and protect from accidental button presses, the device is equipped with a lock. It turns on automatically, 40 seconds after the last touch of any button on the device. You can force the lock by holding the power button for more than 1 second but less than 3 seconds. To remove the lock, press the button and hold for at least 3 seconds. After that, the lock mode is removed.
OPEN AND LEAVE THE MENU
To open the menu for the thermostat settings press the button and hold for 3 seconds. You can leave the menu with the button.
SWITCHING THE THERMOSTAT OFF
To turn OFF the device, you must hold the button for more than 3 seconds. After a displayed countdown has elapsed while pressing the butt on, the device switches OFF.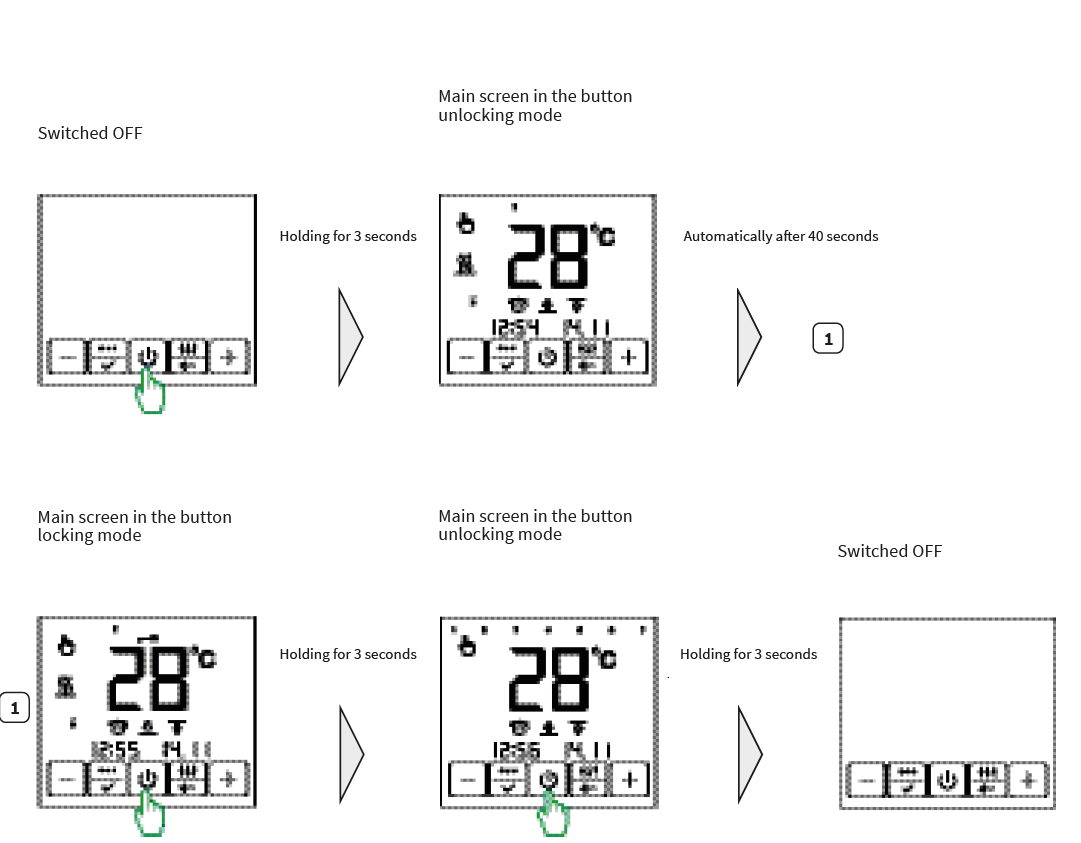
Please note:
With the exception of date and time, all other settings described below can be performed via the Tuya Smart App. However, if required, you can also perform the settings directly at the thermostat
Attention:
After an interruption of the voltage supply (e.g. due to a power failure), the time and date settings are retained for 4 hours. All other settings like temperatures, operation mode etc. will be retained for 12 months
The thermostat provides three basic operating modes:
 Permanent temperature maintenance;
 Program mode;
 Anti-freezing.
The thermostat enables to control heating systems by using two temperature sensors
- floor sensor and air sensor.
There are three basic control modes:
 by floor temperature only;
 by air temperature only;
 by floor temperature with limitation by air temperature (both sensors activated).
SETTING THE OPERATING MODE
To set the operating mode required, press the button. At that, the main indication screen will appear (in the permanent temperature maintenance mode – Figure 7a, in the anti-freezing mode – Figure 7b, in the program mode – Figure 7c). The current mode icon will be flashing. Use the “+” and “-” buttons to select the desired operating mode and press to confirm the selection. The main indication screen of the device will be displayed

PERMANENT TEMPERATURE MAINTENANCE MODE
This mode (Figure 7a) is used when there is a need to constantly maintain the set temperature. Set the temperature by pressing “+” and “-” buttons. The temperature display starts flashing. Temperature setting is possible in the range of +12 … +45 °C. Set the desired temperature and press the button to confirm.
ANTI-FREEZING MODE
The thermostat in the “Anti-freezing” mode (Figure 7b) can reduce the temperature in heated rooms for a long time to a level that prevents freezing, thereby saving electric energy. This mode can be used when there is no need for permanent comfortable heating of the room, for example, during the absence of the owners of the house. In this mode, the maintenance temperature is reduced to the “anti-freezing” temperature. The “Anti-freezing” mode is similar to the “Permanent temperature maintenance” mode, only the temperature can be set in the range of +5 … +12 °C.
PROGRAM MODE
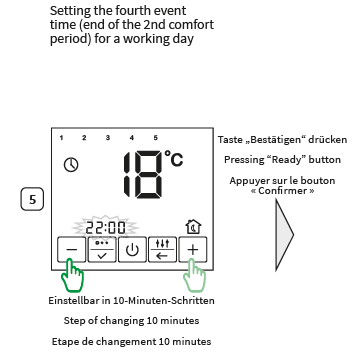
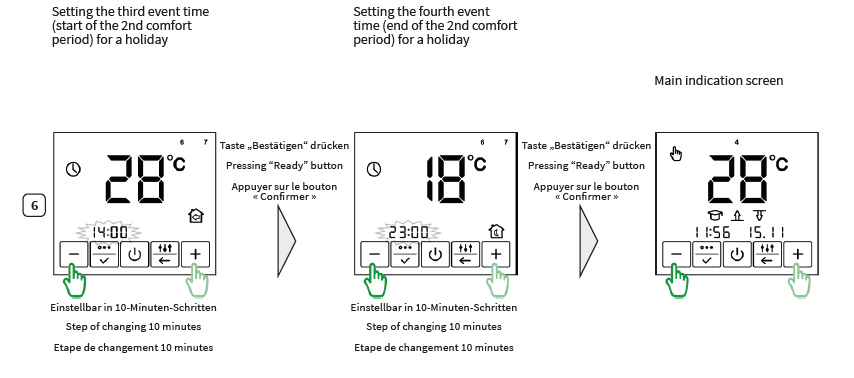
This mode (Figure 7c) is an effective means of saving electric energy in the case when there is no need for permanent heating, and heating is switched ON only during certain periods of the day. The program mode is event-driven, i.e. the thermostat operates with four events per each day of the week, the time of which you can set with an accuracy of 10 minutes. Depending on the event and day of the week the thermostat automatically controls the heating according to the set COMFORT and ECONOMY temperature. The temperature can be set in the range from +5 … +45 °C.
 Waking up (comfort heating start);
 Leaving home (economy heating start);
 Coming home (comfort heating start);
 Going to sleep (economy heating start).
The events “Waking up” and “Coming home” are related to the COMFORT temperature, the events “Leaving home” and “Going to sleep” are related to the ECONOMY temperature.
To program the thermostat, press and hold the button for 3 seconds. The ECONOMY temperature display starts flashing. Set the ECONOMY temperature using the “+” and “-” buttons (symbolized by the “moon” on the right of the display) and confirm your selection with the button. After that, the COMFORT temperature display starts flashing. Use the “+” and “-” buttons to set the COMFORT temperature (symbolized by the “sun”
 on the right of the display) and confirm your selection with the button. Then press the key until you get to the first “Waking up” event and set the time for each event for each weekday using the “+” and “-” button. Confirm your selection with the button. To leave the menu, press the key. The thermostat uses a self-learning mode. By analyzing the temperature of the floor, the air, or both temperatures at the same time, the MCS 350 calculates the system‘s switching ON time to reach the desired comfort temperature at the time you set. The self-learning mode can be disabled
OPEN WINDOW DETECTION MODE
The thermostat provides the “Open window detection” mode. In the factory settings of the device, this mode is disabled. You can enable this feature only via the Tuya Smart App. The thermostat permanently monitors the air temperature in the room. This happens even if the control is based on the floor sensor only. If the room temperature has dropped by more than 3 degrees within 5 minutes, the thermostat forcibly turns OFF the heating for 30 minutes (Figure 8). After this time, heating control continues in the preset mode.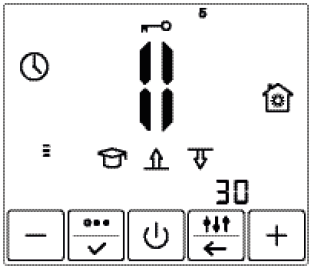
TIME AND DATE SETTING
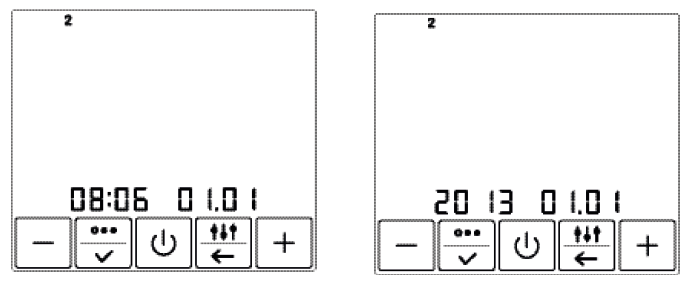
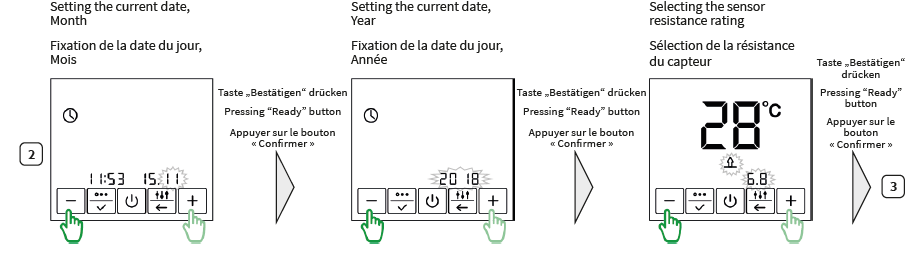
Press the button and hold it for 3 seconds. The thermostat will then go to the main menu. Press the button 2 times to go to the section for the time and date setting. The time value will start flashing. Set the required time and press . The date value will start flashing (Figure 9b). Select the current day, month, and year using the “+” and “-” buttons. The day of the week will be set automatically.
SELF-LEARNING MODE
When operating in program mode, the thermostat has the ability to study the temperature characteristics of the room, turn ON the heating in advance and reach the temperature set by you exactly at the specified time. The self-learning mode can be disabled (see section “Control mode setting”). In this case, the thermostat will turn ON the comfort heating exactly at the time you set.
CONTROL MODE SETTING
Use the “+” button to set the desired control mode. At the same time, the active icon will flash. Inactive will not light up. The “-” button enables/disables self-learning mode . The “+” button changes the control mode.
- by floor temperature only;
- by air temperature only;
- by floor temperature with limitation by air temperature (both sensors activated).
After selecting the required control mode, fix it by pressing the button. If you set the control mode using both sensors, you will be taken to the air temperature limit window (Figure 11). It is necessary to set the maximum air temperature using the “+” and “-” buttons and press If you have previously left the menu, you can return to the setting by first pressing the button and holding for 3 seconds. Then press the button times. The temperature display starts flashing. The thermostat controls the air temperature and turns OFF the heating if the set maximum value (limiting temperature) is exceeded.
AIR TEMPERATURE READINGS CORRECTION
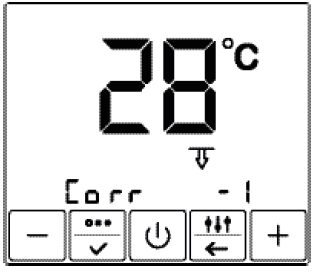
The temperature measured by the room sensor may deviate from the actual room temperature due to the fact that the sensor is installed inside the device housing. Therefore, the slight self-heating of the thermostat during its normal operation can affect the temperature measurement, just like its location such as near to other heat sources, windows, doors, etc. In order to compensate such a possible deviation, the room sensor can be calibrated as follows. Press the button and hold it for 3 seconds. Then press the button 10 times. In this case, the thermostat will go into the mode of adjusting the air temperature readings Set the correction value for the air temperature sensor readings using the “+” and “-” buttons and fix the selection by pressing them. Air temperature correction setting is possible in the range of -9 … +9 °C.
SELECTING FLOOR SENSORS FROM OTHER MANUFACTURERS
Press and hold the button for 3 seconds. You will be taken to the control mode setting window. Press the button times until you get to the menu for setting the floor temperature sensor resistance rating Using the “+” and “-” buttons, set the required floor temperature sensor rating. Sensors from other manufacturers that can be used with the thermostat can be found in the “Technical Data” section. Press for confirmation.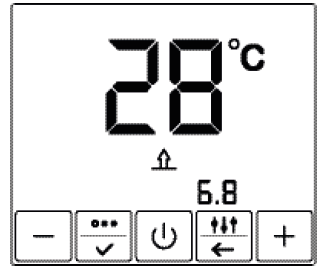
SELF-DIAGNOSTICS
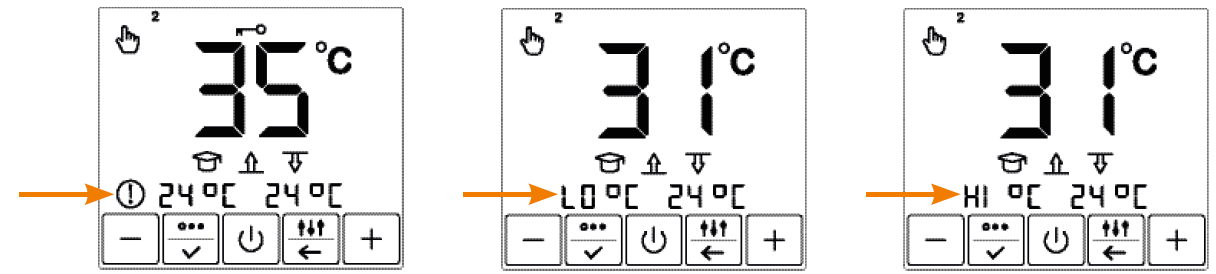
- The thermostat continuously monitors the operation of the heating system. If the heating system cannot warm up the surface to the set temperature within 4 hours, the corresponding information appears on the display (Figure 14).
- If the floor temperature drops below +5 °C, or rises above +45 °C, information about this appears on the display by symbols “LO °C” oder “HI °C”
FLOOR TEMPERATURE SENSOR OPERABILITY CHECK
The thermostat continuously monitors the operation of the temperature sensor. In the event of its failure (breakage or short circuit of the installation wires), the display will show information about the malfunction (Figure 16, 17). In this case you need to contact your dealer/installer to repair or replace the temperature sensor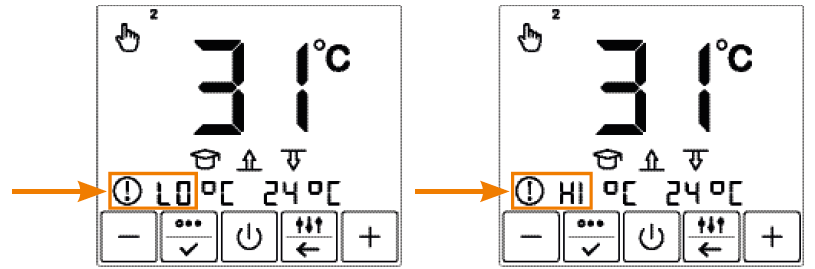
FACTORY SETTINGS RESET
The thermostat provides the ability to return to factory settings. To do this, in operating mode, press and hold the “+” and “-” butt ons until the device is turned OFF. After that, just turn ON the thermostat. By default, the following event times and corresponding maintenance temperatures by weekdays are preset: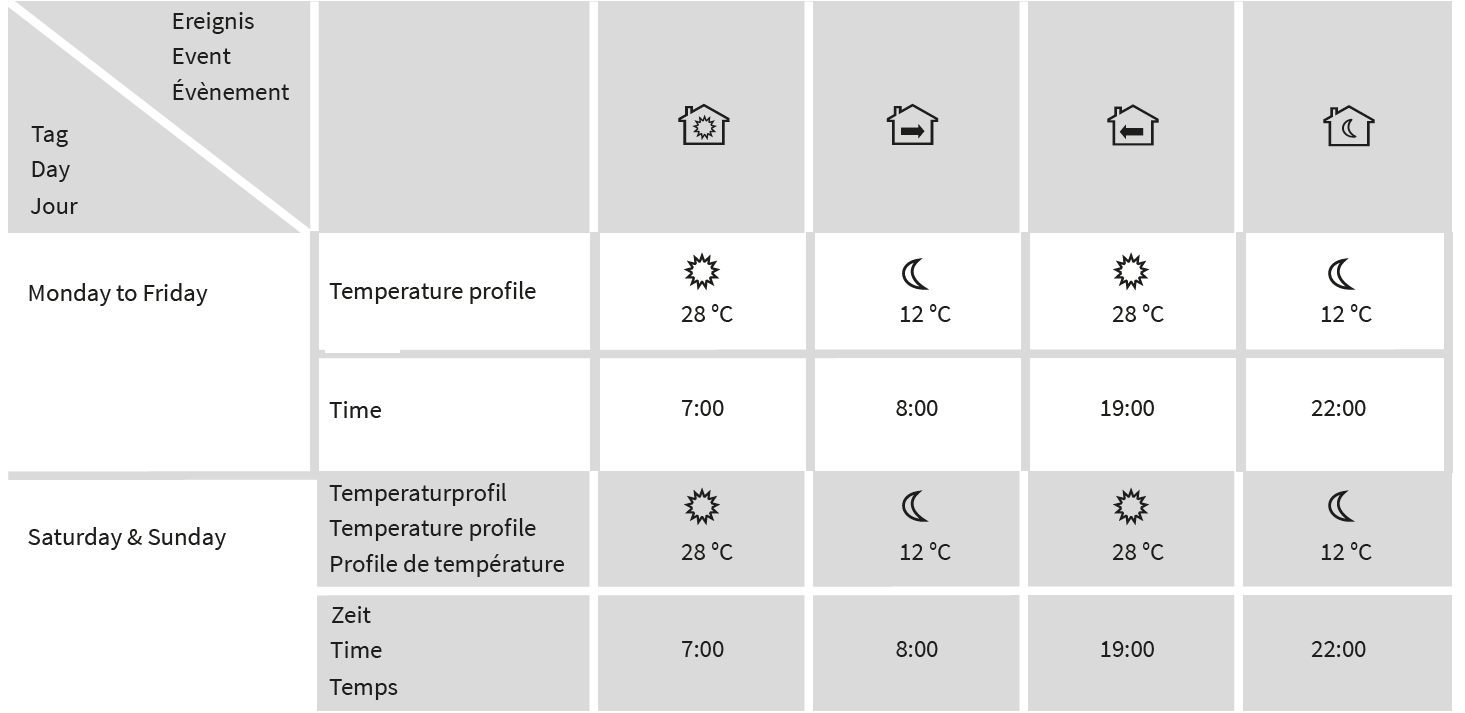
TECHNICAL DATA
| Versorgungspannung | Supply voltage | Tension d‘alimentation | 230 VAC, 50 Hz |
| Maximaler Schaltstrom | Maximum load current | Courant de charge maximum | 16 A |
| Stromverbrauch | Power consumption | Consommation électrique | 0.45 W |
| Gewicht | Weight | Poids | 150 g |
| Abmessungen | Dimensions | Dimensions | 90x90x41 mm |
| IP Schutzklasse | IP rate | Indice de protection IP | IP21 |
| Geräteschutzklasse | Protection class | Classe de protection | II |
| Bodentemperatursensor, TST02 (im Lieferumfang enthalten) | Floor temperature sensor, TST02 (included in the scope of delivery) | Capteur de temperature du sol, TST02 (inclus dans livraison) | NTC 6.8 k□ (Teploluxe) |
| Länge Anschlussleitung Sensor | Sensor installation wire length | Longueur du fil d‘installation du capteur | 2 m |
| Zul. Umgebungstemperaturbereich | Perm. ambient air temp. range | Température de l‘air ambiant admiss. | +5…+40 °C |
| Max. zul. relative Luftfeuchtigkeit | Permissible relative air humidity | Humidité relative de l‘air admissible | 80% |
| Temperatureinstellbereich | Temperature setting range | Plage de réglage de la température | +5…+45 °C |
| Unterstützte WLAN-Netzwerk- standards | Wi-Fi network standards supported | Les normes du réseau WiFi supportées | IEEE 802.11. b/g/n 2.4 GHz |
| Unterstützte Bodentemperatur- fühler anderer Hersteller | Other manufacturers floor temperature sensors supported | Capteurs de température du sol d‘autres fabricants supportées | Teploluxe 6.8 kOhm
AuBe 10 kOhm Warmup 12 kOhm Devi 15 kOhm |
CLAIMS
In case of a claim during the warranty period please contact the seller. The sensor will need to be sent together with the thermostat for processing a claim.
WARRANTY
- The manufacturer guarantees the conformity of the thermostat with the design description, assuming compliance with the assembly and operating instructions.
- Warranty period – 2 years from date of purchase.
- In case of a failure during guarantee period caused by a manufacturing defect, the customer has the right to supplementary performance.
- The warranty does not cover any damages due to inadequate handling, damages through a third party, wrong installation (not following the manual) or its consequential damages. Please keep your receipt.
- For any warranty claims you have to show your sales receipt.
GUARANTEE CARD
Completed test protocol is necessary for warranty claims.
- First measurement: Before and after installation of the heating mat
- The thermostat MCS 350 Tuya has passed all the tests.
- The sensor can be removed through the corrugated tube (Ø 16mm) during installation of the heating mat.
- Second measurement: Before and after installation of the flooring.
- The sensor can be removed through the corrugated tube (Ø 16mm) before installation of the flooring .
| Temperatur [°C] Temperature [°C] Température [°C] | Widerstand [k□] Resistance [k□] Résistance [k□] | Temperatur [°C] Temperature [°C] Température [°C] | Widerstand [k□] Resistance [k□] Résistance [k□] |
| 10 | 13,11 – 13,92 | 21 | 7,92 – 8,40 |
| 11 | 12,56 -13,34 | 22 | 7,59 – 8,06 |
| 12 | 12,01 – 12,75 | 23 | 7,27 – 7,72 |
| 13 | 11,46 – 12,17 | 24 | 6,95 – 7,38 |
| 14 | 10,91 – 11,59 | 25 | 6,60 – 7,00 |
| 15 | 10,35 – 11,00 | 26 | 6,34 – 6,73 |
| 16 | 9,93 – 10,54 | 27 | 6,08 – 6,46 |
| 17 | 9,51 – 10,09 | 28 | 5,83 – 6,19 |
| 18 | 9,08 – 9,64 | 29 | 5,57 – 5,92 |
| 19 | 8,66 – 9,19 | 30 | 5,32 – 5,64 |
MCS 350 MENU NAVIGATION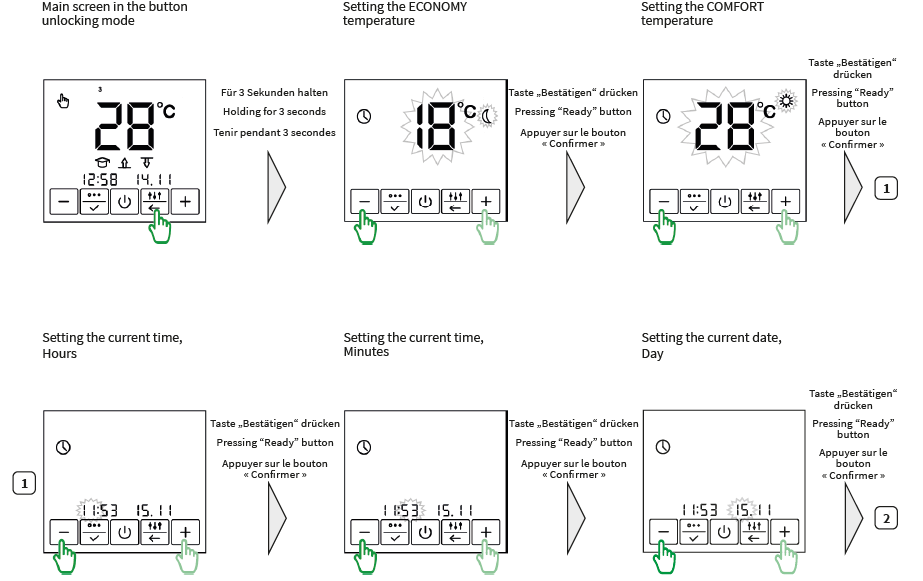


NAVIGATION TUYA SMART APP REGISTRATION
APP NAVIGATION FOR MANUALLY ADDING A MCS 350
APP NAVIGATION FOR ADDING A MCS 350 USING QR-CODE
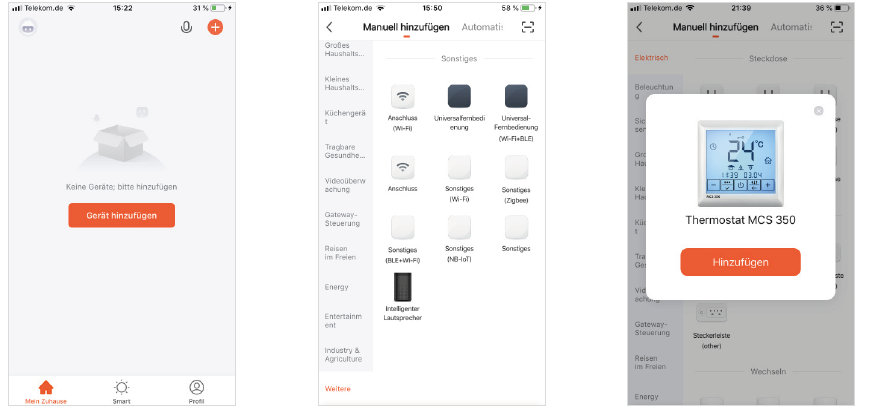
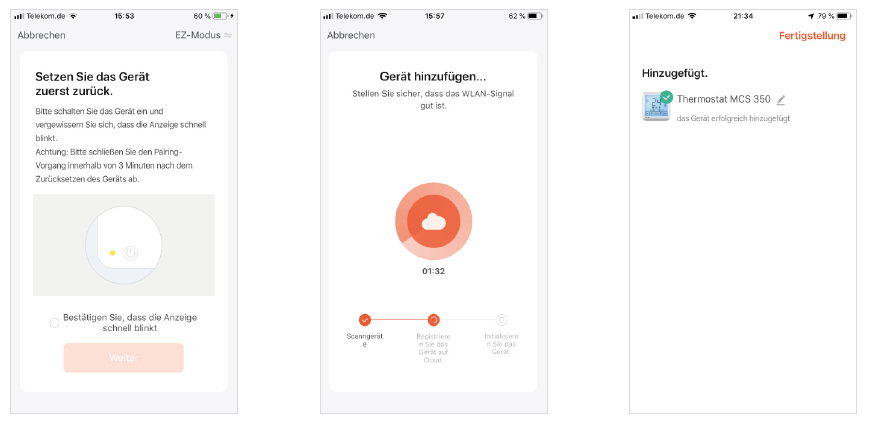
Reference
Download Manual:
MI-HEAT MCS 350 Programmable Thermostat INSTALLATION INSTRUCTIONS

MI-HEAT MCS 350 Programmable Thermostat INSTALLATION INSTRUCTIONS