Magnumheating RAL 9011 Smart WiFi Thermostat
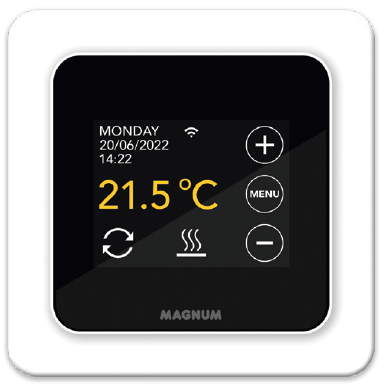
Introduction
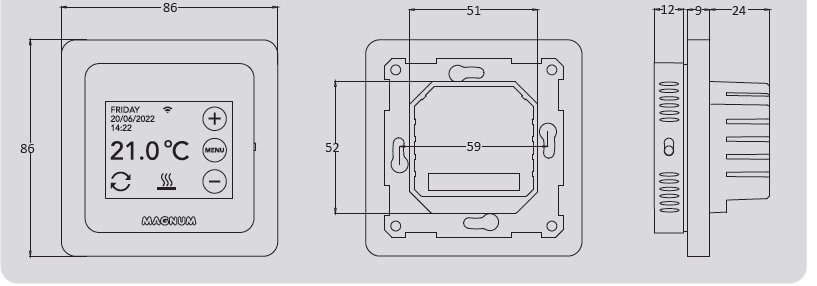
Read this manual carefully and keep it with other warranty documents. The connection must be carried out by a qualified installer in accordance with local regulations. Before installing or disassembling the thermostat, always switch off the electricity in the meter cupboard. The MRC thermostat can be installed in a single flush mounting box 50 mm deep, according to standard DIN formats.
Technical data
- Volts 230V – 50/60 Hz
- Max. Load max. 16 Amp. / 230V when connected to 16A load, the power cable of the load must be 2.5mm2
- Temp. range +5/+40ºC
- Frequency 4 Ghz
- Cover IP21
- Color Polar white (RAL 9010)
- Sensor incl. floor sensor and build air sensor
- Warranty 2 year manufacturer warranty
- Approvals FI / CE
- Manufacturer MAGNUM Heating Group B.V. Netherlands
Assembly/Dismounting
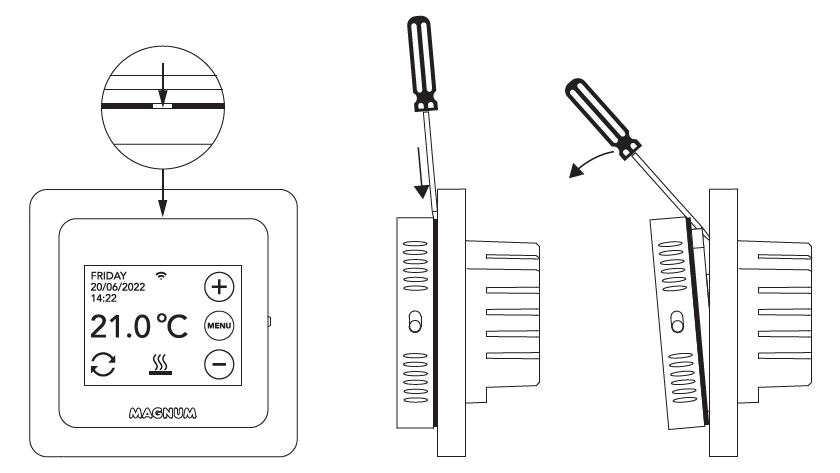
Make sure the power is off. Remove the display by carefully inserting a small flat-blade screwdriver into the top recess of the black foam (between the display housing and the cover frame). After this, the display case can be released with a lever movement. This requires some force.
Connection instructions
This product must be secured with a 16A means! the circuit breaker in the electrical cabinet!
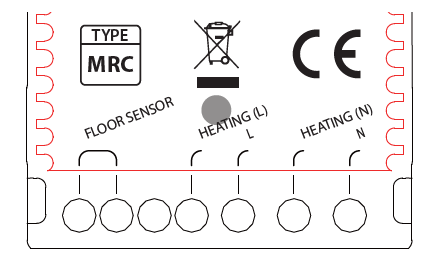
- FLOOR SENSOR Floor sensor connection
- HEATING L * Heating cable connecting wire
- L Power supply (Phase)
- HEATING N * Heating cable connecting wire
- N Power supply (Neutral)
- Order HEATING L or HEATING N does not apply.
EARTH: Connect the earth of the heating cable and the earth of the power supply outside the thermostat using the supplied terminal block. Bring the thermostat into position, mount and secure it in the flush-mounting box using 2 screws. Place the cover frame and carefully bring the display case back into position. Then press it firmly until there is no more space between the display housing and the cover frame.
Make sure that the on/off switch on the right side of the thermostat is in the correct position. After connection to the mains, the startup menu appears:
- Language > Year > Month > Day > Time
- Automatic Summer Winter Time
- Floor finish: Wood/other (tiled floor)
- Sensor type: 12K is supplied as standard
- Temp. registration: Room or Floor
- Desired comfort temperature
- Overview of pre-programmed times
- Slow start-up (Only for newly installed floors. See point 6.1)
- WiFi set up (See point 7)
Operation
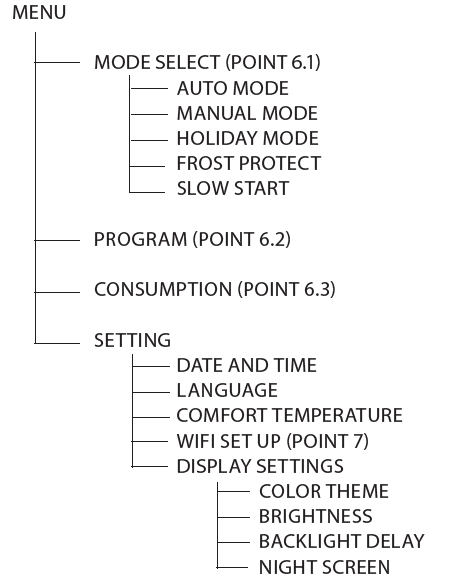
You can easily operate the thermostat via the touchscreen. The menu structure is structured as follows:
Explanation of functions and symbols
 Auto mode
The thermostat follows the set program.
Manual mode
The thermostat is operated manually.
Vacation mode
The thermostat is in lowering mode and follows the program again after the number of set days.
Frost protection mode
The thermostat keeps the temperature at a minimum of 7 degrees.
Slow Start mode (For newly installed floors)
The temperature gradually rises over 20 days to prevent cracking. If this feature is activated in the startup menu, the key lock will be active for 20 days. The display will show the number of days remaining. After 20 days, the key lock will be lifted and the thermostat can be connected to WiFi.
WARNING: Do not interrupt this mode.
 Temporary mode
Auto Mode is temporarily interrupted manually. Follows the Auto Mode program again at the next switching moment.
Heating
The system is heating up.
Open window detection
Detection of the rapid drop in temperature. Stops when the temperature is stable.
WiFi signal strength
Keylock active
Press ⊖ for 5 sec to activate.
Press ⊕ for 5 sec to deactivate.
Programming
MENU > PROGRAM
- Overview of the current schedule
- Overwrite Schedule (Yes/No)
- Number of periods (1,2 or 3 per day)
- Select (multiple) days

- Set periods & Comfort temperature
- Repeat for the remaining days.
- After confirmation, the thermostat will follow this program in AUTO MODE.
Consumption
The average consumption of the underfloor heating can be read as a percentage. The thermostat must be on for at least 1 month. To calculate the average consumption per day you can use the following calculation: % x installed power x 24
Example
- Installed power is 300 Watt and consumption is 20%:
- 20% x 300 Watt = 60 Watt consumption per hour.
- 60W x 24 hours = 1.440 Watt consumption per day.
Keylock
Press ⊖ for 5 sec to activate.
Press ⊕ for 5 sec to deactivate.
Advanced Settings
PLEASE NOTE: Settings in this menu may only be adjusted in consultation with the supplier in order to avoid undesired results. Press MENU for 10 seconds to activate it.
Connecting to WIFI
If you also want to operate the thermostat via your smartphone, you need to connect it to your home network. For this, you need to download the App. After this, the thermostat can also be accessed via your mobile network.
STEP 1
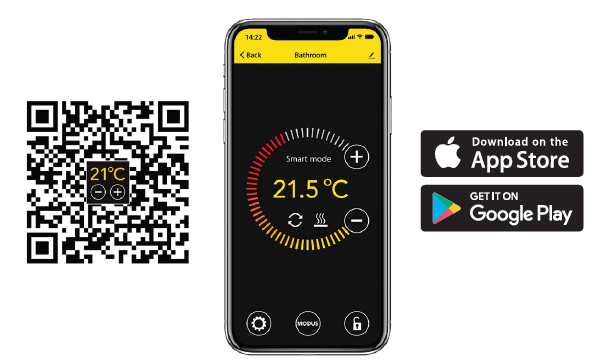
Scan the QR code with your smartphone or search the Apple App Store or Google Play Store for MAGNUM MRC. Download the App and launch it. Then create an account and complete the process.
STEP 2
On the thermostat:
MENU > SETTINGS > WIFI SET UP > DEFAULT MODE.
The WiFi symbol is flashing rapidly.
STEP 3
- Open the App on a Smartphone or tablet
- Choose “Add device”
- Select the MRC thermostat in the menu
- Press “connect”.
- Choose the right WiFi network (Doesn’t work on 5 Ghz WiFi networks!)
- Enter the password and confirm
The thermostat will now connect to the WiFi network. This will take a maximum of 1 minute.
An alternative method (Acces Point)
If the above method does not work, then Acces Point is an alternative way (Does not work on 5 Ghz WiFi networks):
STEP 1
Smartphone: Bluetooth on.
STEP 2
Thermostat: MENU > SETTINGS > WIFI SET UP > AP MODE. The thermostat will now create a hotspot.
STEP 3
Smartphone: Now connect to this hotspot via the WiFi settings of your smartphone or tablet. The thermostat will then make the connection to your home network itself.
Google Assistant or Amazon Alexa
 Via a Google or Amazon-supported speaker, you can set the temperature of your thermostat higher or lower or ask what the current temperature is. This can be done for every thermostat added to the App. Connecting to Google Assistant or Amazon Alexa is explained in the App. In the App, go to your “Profile”, choose “More Services” from the menu, and follow the steps. You will also be prompted to install a service skill:
- Google skill: MAGNUM thermostat
- Amazon skill: MAGNUM MRC
EU DECLARATION OF CONFORMITY
Hereby, MAGNUM Heating Group B.V. declares that the radio equipment type MRC is in compliance with Directive 2014/53/EU. The full text of the EU Declaration of Conformity is available at the following internet address: https://www.magnumheatinggroup.com/privacy-statement
Reference
Download Manual:
Magnumheating RAL 9011 Smart WiFi Thermostat INSTALLATION INSTRUCTION
Other Manual:
Magnumheating RAL 9011 Smart WiFi Thermostat Product Specification Guide

Magnumheating RAL 9011 Smart WiFi Thermostat INSTALLATION INSTRUCTION