Lux ELV4 Programmable Heating Thermostat

Thank you for your confidence in our product. To obtain the best results from your investment, please read these instructions and acquaint yourself with your purchase.
COMPATIBILITY
This programmable thermostat is compatible with Single or Double pole, 120/240 VAC, line voltage electric heating systems up to 15 Amps. The heating wattage rating is 1800 Watts (Resistive) for 120 VAC, and 3600 Watts (Resistive) for 240 VAC. This thermostat can also be used with 120/240 VAC line voltage Hydronic (hot water) heating systems with otors up to 1/4 HP.
WARNING: THIS THERMOSTAT IS NOT COMPATIBLE WITH HEATING APPLIANCES THAT CONTAIN BOTH AN ELECTRIC HEATING ELEMENT (RESISTIVE LOAD) AND A BLOWER FAN (INDUCTIVE LOAD) WITHIN THE SAME DEVICE.
This thermostat cannot be used with: cooling systems, typical 24-volt systems, or heat pump systems. Ask your dealer for other LUX thermostats to control those systems.
NOTE: Disconnection Type: “TYPE 1B”.
FEATURES

- Heating Only
- Armchair Programmable
- 3 Year Warranty
- On-Screen Low Battery Indicator
- Attractive Design
- Exclusive LUX Speed Dial®
- 5/2 Day Programming
- 4 Periods Per Day
- Battery Free Memory Storage
- Temporary Temperature Override
- Temperature Hold
- F/C Temperature Display
- 12/24 Hr Clock Display
- Adjustable Temperature Swing
INSTALLATION
Please read ALL of these instructions carefully before beginning installation. Save them for future reference.
WARNING:
- For applications such as baseboard electric heat (resistive), the maximum load is 15 Amps, from a 20 Amp circuit breaker. For heat applications such as a hot water circulator pump (inductive), the maximum load is 1/4 HP @ 120 Volts, and 1/2 HP @ 240 Volts.
- Do not use with circuit breakers that are rated higher than 20 Amps. Maximum load for this thermostat MUST NOT exceed 1800 Watts @ 120 Volts (15 Amps), or 3600 Watts @ 240 Volts (15 Amps), otherwise, a potential fire hazard exists.
- WARNING: This product should be installed by a licensed electrician.
Do not attempt to install it unless you are completely familiar with line-voltage wiring. If improperly handled, there is a risk of an electric shock hazard, which may cause serious injury or death.
MOUNTING LOCATION
Install a vertical, electrical switch box for mounting the thermostat approximately 5 Feet (1.5 Meters) above the floor on an inside wall where the thermostat will be exposed to average room temperature. The use of a “deep” style switch box will make the installation easier by providing more room for making the wiring connections. The thermostat must be placed away from concealed warm or cold water pipes, air ducts, or drafts from hallways, direct sunlight, fireplaces, or stairways in order to sense room temperature properly. Do not place the thermostat directly above any of the heating elements.
CAUTION
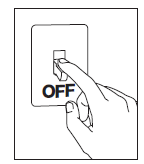
Turn off electricity to your heating system prior to installing this thermostat, or servicing any part of the system. Do not turn the electricity back on until installation is fully completed.
WIRING
- Disconnect power before removing your old thermostat (if applicable). Double-check that this thermostat is rated for the voltage and amperage to be switched.
- Remove the front portion of the thermostat by carefully pressing the button at the bottom of the thermostat and swinging the body up and away.
NOTE:
Wiring performed must comply with all applicable national electrical codes and local ordinances for your particular area. - When replacing an old line voltage wall thermostat, remove it carefully to avoid damage to the insulation on the wiring. Check the old insulation for cracks, nicks, or fraying and apply certified electrical tape where necessary to achieve adequate insulation, or replace the wires in an approved fashion.
- Use the diagrams shown in the “WIRE IDENTIFICATION AND WIRING SCHEMATICS” section of this manual to ensure that the thermostat connections are made to the proper wires for your installation.
- Attach the wires together using the solder-less wire connectors (provided), and be sure that all wire connectors are tight and secure.
- Bend the solid conductors, and then push them and the wire connectors into the electrical box carefully, providing enough clearance behind the mounting screw locations. Secure the thermostat base to the electrical box with the mounting screws.
- Place the thermostat’s front portion onto the back plate by first catching the plastic tabs at the top, and then firmly pressing the bottom of the thermostat towards the back plate to latch the halves together.
NOTE:
When you are finished performing your installation and setup options, please remove the thin plastic film that is protecting the LCD display screen on the front of the thermostat. This plastic may or may not be present, and is evident by the appearance of fake digits appearing on the display screen. - Install two new Energizer® or DURACELL® “AA” size alkaline batteries before continuing further. Ensure that the batteries are installed in the proper direction as per the markings shown in the battery tray. The battery tray is located in the front of the thermostat, behind the door.
- Now turn the supply power back on to the heating system. On the thermostat screen, ensure that the Power Unit Disconnected Indicator (shown at right) is not present on the display screen. If it is, remove the front half and try mating the front half to the back half again.

NOTE:
This thermostat is protected against normal static electric discharges, however, to minimize the risk of damaging the unit in extremely dry weather, touch a grounded metal object before touching your thermostat.
WIRE IDENTIFICATION AND WIRING SCHEMATICS

WIRING DIAGRAM NOTE:
This Double Pole thermostat model may be used in either Single Pole, or Double Pole wiring configurations. Only the LINE 1 (IN) and LOAD 1 (OUT) terminals are switched during normal temperature cycling. If this thermostat is used in a Single Pole configuration, the unused L2 LINE (IN) and L2 LOAD (OUT) wire ends must be securely insulated using the additional wire connectors provided.
FIRE HAZARD WARNING:
DO NOT use the supplied wire nuts if you are connecting this thermostat to aluminum wiring.
All connections made to aluminum conductors must be made using approved CO/ALR solder-less wire connectors.
SETUP OPTIONS
The settings, options, and components listed in this section below are located on the rear of the thermostat, and on the circuit board.

- OPTION SWITCHES:
There is a square box with 2 small switches, located to the right side of the circuit board. Each switch controls a different setting depending on the position of the switch. The individual switches are labeled as 1 and 2, and there is a corresponding table printed on the circuit board to show the possible options for each of the two switch positions. - TEMPERATURE SCALE (Option Switch #1):
This determines how the thermostat displays all temperatures on the screen. Switch position OFF is F°, and ON is C°. - TIME FORMAT (Option Switch #2):
This determines how the thermostat displays the clock and all other times on the screen. Switch position OFF is 12 HR, and ON is 24 HR. - HARDWARE RESET:
The hardware reset is a push button that is located near the center of the circuit board. This reset button is used by the thermostat to read the position of the option switches. When either of the two optional settings above are changed, the hardware reset button must be pushed for the change to be recognized. This can also be used if the thermostat is exhibiting any erratic behavior. User temperature programs are not erased when a hardware reset is performed, however, you will have to set the clock and day of the week.
FRONT PANEL ITEMS
- SOFTWARE RESET:
The Software Reset is a small recessed push button that is located to the right of the NEXT and holds buttons. This button can be pushed with a pencil or the end of a paper clip. The software reset clears all of the user temperature programs and all other software preferences to their default values. You should write down your heating program times and temperatures prior to using the Software Reset. - PUSH BUTTONS:
There are four primary push buttons on the front of the thermostat: The UP and DOWN arrow keys, the NEXT button, and the HOLD button. - ROTARY DIAL:
The LUX Speed Dial® provides an easy way to quickly navigate between the different programming areas. This rotary dial has four individual positions. - HEAT / OFF SWITCH:
This switch is located on the front of the power unit (back half of the thermostat). To access this switch, separate the front and back halves of the thermostat by pressing on the thumb tab under the bottom of the thermostat and pulling the front of the thermostat away from the back half. In the winter, set the power switch to “HEAT” to control your heating system. Through the summer months when heating is not required, set the switch to “OFF” to prevent your heating system components from turning on.
OPERATING INSTRUCTIONS
- SET DAY/TIME:
Rotate the dial to the SET DAY/TIME position. The day of the week will start flashing on the display. With the day flashing, press the UP button, once for each day, to advance to the desired day of the week. Press the NEXT button; this should cause the time to start flashing and the day to remain on steady. Using either the UP or DOWN buttons, adjust the clock to the desired time. The clock digits will increment rapidly if either the UP or DOWN buttons are held in the pressed position. - TEMPERATURE OVERRIDE:
A Temperature Override occurs in Run mode, anytime the user adjusts the set temperature to a value other than what the stored program set temperature is for that day and time. When the thermostat is in an Override, the word “OVERRIDE” will appear at the bottom of the display screen. The thermostat will maintain thermal control using this new set temperature until the start of the next program period time is reached. At that time, the set temperature will return to the value stored in memory for that new program period. To enter an Override, push either the UP or DOWN button once and the set temperature will begin to flash. Push either the UP or DOWN button to the desired set temperature value. An Override may be canceled by rotating the dial or by initiating a HOLD. - TEMPERATURE HOLD:
A Temperature Hold is similar to an override but is used for maintaining a constant set temperature under manual control, for a longer time duration. A Hold is the simplest means to set and maintain a fixed temperature. It allows you to set and maintain a fixed temperature indefinitely, without concern for programming.
A temperature Hold may be used for days, weeks, or even months at a time. To enter a Hold, push the HOLD button once, and the word“HOLD” will appear in the temperature portion of the screen, along with the flashing set temperature. While the set temperature is flashing, push either the UP or DOWN button to the new desired set temperature value. To cancel a Hold, press and release the HOLD button once again, or rotate the dial away from RUN.
ADVANCED FEATURES
SWING SETTING:
A thermostat works by turning your heating system on and off whenever the room temperature varies from the set-point temperature. The amount of this variation is called the “swing”. Your system should cycle on about 3 to 6 times per hour. A smaller swing number increases the number of cycles per hour, so the room temperature is more precise and constant. A larger swing number decreases the number of cycles per hour, but saves energy in most cases. To change the Swing setting, turn the dial to RUN mode. Hold down the NEXT button and push the HOLD button once, then let go of both. A single number will appear on the screen. Use the UP/DOWN buttons to change the number value between 1 and 9. Number 1 is the default setting. Press the NEXT button to accept the setting and return to normal Run mode.
MINIMUM RUN TIME DELAY:
This is determined by the thermostat and controls the minimum length of time that the thermostat must remain with the Heat either On or Off before it will automatically switch to the alternate On or Off state. This feature prevents rapid undesired cycling of the heating equipment. The time amount for this delay is fixed at 5 minutes between on or off-load changes.
PROGRAMMING
For the two program types that are described below, this thermostat provides four independent periods per day for Heat mode, they are MORN, DAY, EVE, and NITE. Each period ends at the start time of the following period. When you install batteries for the first time or perform a Software Reset, a default temperature program (shown below) is inserted into all four of the program periods. You can use this default program, or alter any portion of it to suit your own preferences. When setting the program items, the value that is flashing is the item that you can change at that time.
| PERIOD | TIME / TEMPERATURE |
| Morning | 6:00 AM 70 °F (21 °C) |
| DAY | 8:00 AM 62 °F (17 °C) |
| EVE | 6:00 PM 70 °F (21 °C) |
| NITE | 10:00 PM 62 °F (17 °C) |
- SET WEEKDAY PROGRAM:
Rotate the dial to WEEKDAY PROGRAM. You will be programming all five weekdays at the same time. The first period is MORN. Using the UP and DOWN buttons, set the start time for this period, and then push the NEXT button to proceed. Now set the desired set temperature for the MORN period using the UP and DOWN buttons, and push NEXT to proceed. Now set the start time and set temperature for the DAY period, pushing NEXT after each to advance. Continue with these same steps to set the start time and set temperature for the EVE, and NITE program periods. When you are finished setting all four periods, you may continue pushing the NEXT button through all four periods to review your entries or turn the dial to RUN if you are finished. - SET WEEKEND PROGRAM:
Turn the dial to the WEEKEND PROGRAM. You will be programming both Saturday and Sunday at the same time. You will begin with the start time of the MORN period, and use the same procedures that were performed while setting the Weekday Program periods, using the NEXT button to advance through the values. Return the dial to the RUN position when you are finished.
BATTERIES AND MAINTENANCE
The batteries should be replaced AT LEAST once per year, or sooner if the LOW BATT battery symbol appears in the lower left portion of the display screen as shown. To replace the batteries in the thermostat, open the front door of the unit. The battery compartment is located just below the rotary dial and pushes buttons. Pull the battery compartment out, starting with the top edge. Remove the used batteries from the battery tray and discard them appropriately.
Install two new Energizer® or DURACELL®, “AA” size alkaline batteries into the battery tray. Observe the polarity markings shown in the battery compartment to ensure proper installation. When finished, re-install the battery compartment by first seating the bottom into its alignment pins, and pivoting the top towards the thermostat to snap the latch back into place.
TECHNICAL ASSISTANCE
If you have any problems installing or using this thermostat, please carefully and thoroughly review the instruction manual. If you require assistance, please contact our Technical Assistance Department at 856-234-8803 during regular business hours between 8:00 AM and 4:30 PM Eastern Standard Time, Monday through Friday. You can also receive technical assistance online anytime day or night at http://www.luxproducts.com. Our website offers you answers to the most common technical questions, and also permits you to email your questions to our technical support staff at your convenience.
WARRANTY
Limited Warranty: If this unit fails because of defects in materials or workmanship within three years of the date of original purchase, LUX will, at its option, repair or replace it. This warranty does not cover damage by accident, misuse, or failure to follow installation instructions. Implied warranties are limited in duration to three years from the date of the original purchase. Some states do not allow limitations on how long an implied warranty lasts, so the above limitation may not apply to you. Please return malfunctioning or defective units to the location from which the purchase was made, along with proof of purchase. Please refer to “TECHNICAL ASSISTANCE” before returning the thermostat. Purchaser assumes all risks and liability for incidental and consequential damage resulting from the installation and use of this unit. Some states do not allow the exclusion of incidental or consequential damages, so the above exclusion may not apply to you. This warranty gives you specific legal rights and you may also have other rights which vary from state to state. Applicable in the U.S.A. and Canada only.
MERCURY WARNING AND RECYCLING NOTICE
Mercury is considered to be a hazardous material. If this product is replacing a thermostat that contains mercury in a sealed tube, contact your local waste management authority for instructions regarding recycling and proper disposal. It may be unlawful in your state to place it in the trash.
REFERENCE:
Download Manual:
Lux ELV4 Programmable Heating Thermostat Installation Instruction

Lux ELV4 Programmable Heating Thermostat Installation Instruction