Lux ELV1 Programmable Line Voltage Thermostat

WARNING: Use Energizer® or DURACELL® Alkaline Batteries Only. Energizer® is a registered trademark of Eveready Battery Company, Inc. DURACELL® is a registered trademark of The Gillette Company, Inc.

For Use On
- Heating Only 120/240 Vac Single
- Pole Applications
- Baseboard, Ceiling Cable, and other Radiant Heat
Not For Use On
- Double Pole Applications
- Heating/Cooling or Cooling Only
- Low Voltage (24Vac) Systems
Electrical Rating
- 16A at 120/240 Vac
- 1900W at 120Vac
- (Non-Inductive)
- 3800W at 240 Vac
- (Non-Inductive)
Temperature Differential
- ±1°F Factory Preset; Adjustable
Batteries
- Two Energizer® or DURACELL® “AA” alkaline batteries (not included)
Programming
- Preprogrammed – 4 Periods per day
- 5 / 2 Programming
- Weekdays/Weekends can be different
- °F / °C Changeable
- Temporary Temperature Override
- Vacation Hold
Dimensions
- 4.7” T x 2.7” W x 2.4” D
- 1.4” D from the wall surface Wall Plate
- 4.8” W x 5.0” H Wallplate Included
INSTALLATION
WARNING
- This Thermostat is a line voltage (120 / 240 Vac) control. Do not install it unless you are completely familiar with house wiring. If improperly handled, there can be a risk of electric shock hazard which may cause serious injury or death.
- The thermostat is rated for normal full-load current on a dual residential 20A circuit breaker or fuse block. Do not use on circuits protected by higher-rated over-current protection devices. Some sustained fault conditions can cause product failure.
- Do NOT connect to a voltage different from the device rating.
CAUTION
- Disconnect the power supply before making wire connections to prevent electrical shock or equipment damage.
- All wiring must comply with applicable codes and ordinances.
- Thermostats are designed to be used with appliances having limited control.
- The maximum load for this thermostat MUST NOT EXCEED 3800W, otherwise, a potential fire hazard exists.
Location
Install a vertical switch box for mounting the thermostat approximately 1.5 m (5 ft.) above the floor on an inside wall where the thermostat will be exposed to average room temperature. The thermostat must be placed away from concealed warm or cold water pipes, air ducts, or drafts from hallways, fireplaces, or stairways to sense temperature properly. Do not place the thermostat above the heater.
WIRING
- Disconnect power while installing. Double-check that the thermostat is rated for the voltage and amperage load to be controlled.
- Remove the cover by carefully pressing the button at the bottom of the thermostat and swinging the body up and away.
- When replacing an old line voltage wall thermostat, remove it carefully to avoid damage to the insulation on the wiring. Check the old insulation for cracks, nicks, or fraying and apply certified electrical tape where necessary to achieve adequate insulation, or replace the wires in an approved fashion.
- CAUTION: Do not short the 120 / 240 Vac wires with the thermostat. This will damage the thermostat and void the warranty.
WARNING: To avoid the risk of fire hazards, all connections to aluminum conductors must be made using approved CO/ALR solderless wire connectors. Do not use the supplied solderless wire connectors. Attach the wires with solderless wire connectors (provided). Be sure that all wire connectors are tight.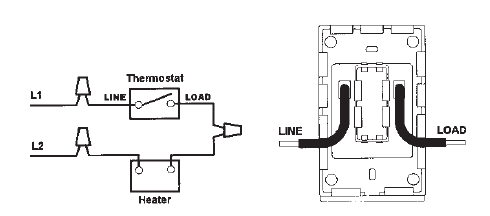
- Bend the solid conductors, then push them and the wire connectors into the electrical box. Secure the thermostat base to the electrical box with the mounting screws.
- Snap the cover in place.
- Turn the power on.
WARNING: Use Energizer® or DURACELL® Alkaline Batteries Only.
INSTALLING BATTERIES
The thermostat requires batteries to operate your furnace and retain its programming in memory. Replace the batteries when the LO BAT indicator appears in the display or at least once a year.
NOTE: When replacing batteries, you have approximately 1 minute before the programs are lost.
- Remove the fresh batteries from their package.
- Open the front door of the thermostat and tilt out the battery compartment.
- Remove the used batteries if necessary.
- Install two new Energizer® or DURACELL® “AA” size alkaline batteries in the battery compartment. Observe the polarity marking shown in the compartment.
- Place the battery compartment back in the thermostat.
- Close the door.
Note: If this is the first time you are installing batteries, the thermostat will display “SUN 12:00 AM”. Within 90 seconds, the thermostat will begin to display the room temperature alternately with the time. To correct the display, see SETTING THE TIME AND DAY.
OPERATION
This thermostat is “armchair programmable.” You can make any program or setting changes with the thermostat body off or on the wall thermostat base. The thermostat alternately displays the current time and the room temperature. It also displays the day of the week and the currently active control program that is controlling the temperature: MORN, DAY, EVE, or NIGHT. The set point temperature will appear in the right side of the display.
The Built-In Programs
| PERIOD | HEAT | |
| WEEKDAYS | MORNING | 6:00 AM 70° |
| preprograms | DAY | 8:00 AM 62° |
| EVE | 6:00 PM 70° | |
| NIGHT | 10:00 PM 62° | |
| MORNING | 6:00 AM 70° | |
| WEEKENDS | DAY | 8:00 AM 62° |
| preprograms | EVE | 6:00 PM 70° |
| NIGHT | 10:00 PM 62° |
Push in the RESET key. This sets the built-in heating programs. To review the built-in programs, rotate the dial to SET WEEKDAY PROGRAM or SET WEEKEND PROGRAM. You can use the built-in programs as shown, or change them as you wish. Each day is divided into four periods. Each period has its own starting time and temperature
Programming the thermostat
You can change any of the preset times and/or temperatures to suit your schedules for the weekday and weekend programs. Each day is divided into four periods: Morning, Day, Evening, and Night. A blank programming chart is provided for you to record your temperature settings in that chart.

Rotate the dial to SET WEEKDAY PROGRAM. To program the WEEKEND, rotate the dial to SET WEEKEND PROGRAM. With dial on set WEEKDAY Program, you will see this display.

Setting the TIME and DAY

The thermostat is protected against normal static electric discharges. However, in extremely dry weather you should touch another metal object before the thermostat to avoid potential loss of programs. Open the drop-down door on the front of the thermostat. Rotate the dial to the SET DAY/TIME position. You should see the display pictured above with a flag pointing to a day of the week flashing. When you are finished setting the day and time, rotate the dial to RUN to return to normal operation or to another position to continue programming.

TEMPERATURE OVERRIDE AND TEMPERATURE HOLD
These features let you change the current Set Temperature without changing the programs stored in your thermostat’s memory.
Temporary Temperature Override
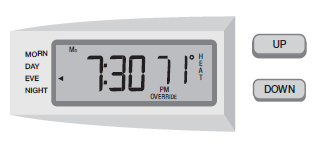
- Press UP/DOWN to change the current temperature setting. The OVERRIDE indicator appears on display.
- The Override feature will be automatically canceled at the start of the next program period.
- To cancel OVERRIDE prior to the next program period press UP/DOWN until the original set temperature appears. The OVERRIDE indicator will disappear from the display.
VACATION Temperature HOLD

- Press HOLD. Adjust the temperature as desired with UP/DOWN.
- The temperature setting will not change even after the next program period begins.
- To clear, press HOLD again.
ADVANCED FEATURES
TEMPERATURE SWING
A thermostat works by turning your heating on and off whenever the room temperature varies a certain number of degrees from the set-point temperature. This variation is the “swing.”
Your system should cycle on about 3 to 6 times per hour. A smaller swing number increases the number of cycles, so room temperature is more constant. A larger swing number decreases the number of cycles, to save energy in most cases.

CHANGING FROM °F to °C AND A 12HR CLOCK TO A 24HR CLOCK
- Warning: Making these changes will require you to reset the thermostat. Copy any of your customized programs onto the chart below. This will be your reference to reenter the programs afterward.
- Located at the center of the circuit board of your thermostat are two dip switches.
- To change to Celsius, move the top dip switch to the right.
To change to a 24HR clock, move the bottom dip switch to the right. - Press the reset key on the front of the thermostat for the changes to take effect.
- Reprogram as necessary.
PROGRAMMING CHART
| DAY | PERIOD | TIME | TEMP |
| MONDAY
through FRIDAY |
MORNINIG | ||
| DAY | |||
| EVE | |||
| NIGHT | |||
| SATURDAY
and SUNDAY |
MORNINIG | ||
| DAY | |||
| EVE | |||
| NIGHT |
TECHNICAL SERVICE
If you have problems installing this thermostat, please re-read the instructions carefully. Be sure the batteries are good and installed correctly. Press the RESET button if an erratic operation is encountered. If you still have problems, call Technical Service at 1-856-234-8803 between 8:00 a.m. and 4:30 p.m. Eastern Standard Time, Monday through Friday or visit our online technical support at www.luxproducts.com. Please refer to Model ELV1 or PSPLV510.
WARRANTY
Limited Warranty: If this unit fails because of defects in materials or workmanship within one year of the date of original purchase, LUX will, at its option, repair or replace it. This warranty does not cover damage by accident, misuse, or failure to follow installation instructions. Implied warranties are limited in duration to one year from the date of the original purchase. Some states do not allow limitations on how long an implied warranty lasts, so the above limitation may not apply to you. Please return malfunctioning or defective units to the participating
retailer from which the purchase was made, along with proof of purchase. Please refer to Technical Service Section before returning the thermostat. Purchaser assumes all risks and liability for incidental and consequential damage resulting from the installation and use of this unit. Some states do not allow the exclusion of incidental or consequential damages, so the above exclusion may not apply to you. This warranty gives you specific legal rights and you may also have other rights which vary from state to state. Applicable in the U.S.A. only.
REFERENCE:
Download Manual:
Lux ELV1 Programmable Line Voltage Thermostat INSTALLATION INSTRUCTIONS

Lux ELV1 Programmable Line Voltage Thermostat INSTALLATION INSTRUCTIONS