Ideal Halo 222145 Programmable Thermostat

INSTALLATION GUIDE
HALO HEAT & SYSTEM 2-ZONE EXTENSION
- Product Code: 222145
- 2-Zone Extension kit for Halo Heat & System Wi-Fi or
- Halo Heat & System RF.
- Compatible with the following boilers: Logic Heat H,
- Logic Heat H IE, Logic System S, Logic System S IE,
- Logic+ Heat H, Logic+ System S, Logic Max Heat H,
- Logic Max Heat H IE, Logic Max System S,
- Logic Max System S IE Keston System, Vogue
- System, Vogue GEN2 System, Vogue Max System,
- Vogue Max System IE
To install Halo with older boilers further details can be found at idealheating.com This installation guide is designed to work alongside the installation guide from either the Halo Heat & System RF (222141) or the Halo Heat & System Wi-Fi (222143). This guide will advise you on how to install and pair the Halo control unit for Zone 2. The Halo Heat & System 2-Zone Extension kit must be installed by a competent person with the appropriate safety qualifications. Please read the instructions carefully. Failure to follow these instructions can damage the product or cause a hazardous condition. These instructions are applicable to the Ideal Boiler models stated and must not be used with any other make or model of boiler. This product must be installed to all applicable standards. Halo Heat & System RF is a non-connected control (control is via the Halo Heat & System unit only). Halo Heat & System Wi-Fi is a wireless heating control that is connected to the internet. You can download the Halo app on Google Play or the Apple app store. You will not have to pay to use the app. For more information on the features in your Halo app visit the Help section of the app or idealheating.com. If you have purchased or are upgrading a Halo Heat & System RF (non-connected control) you can upgrade this to an internet heating control by downloading the Halo app and following the steps in the app to connect your Halo control. You will be required to pay a connection fee to upgrade to app-controlled heating.
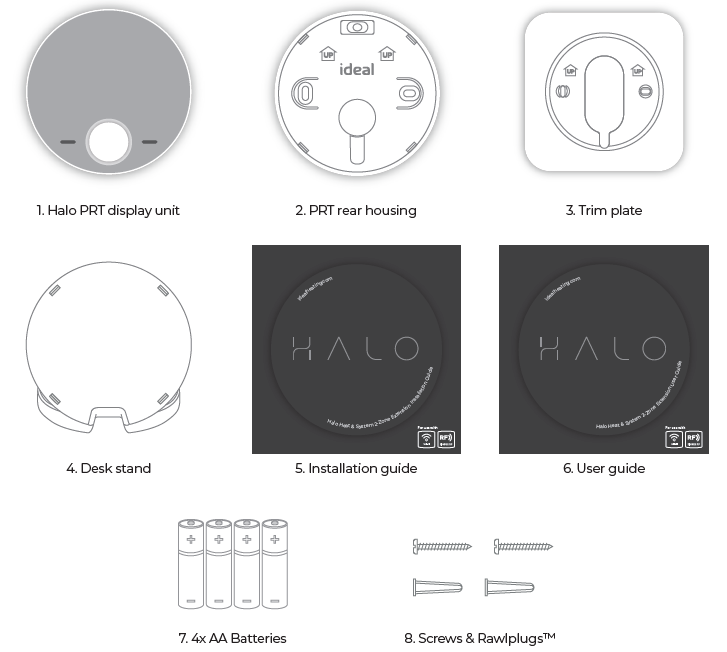
KIT CONTENTS
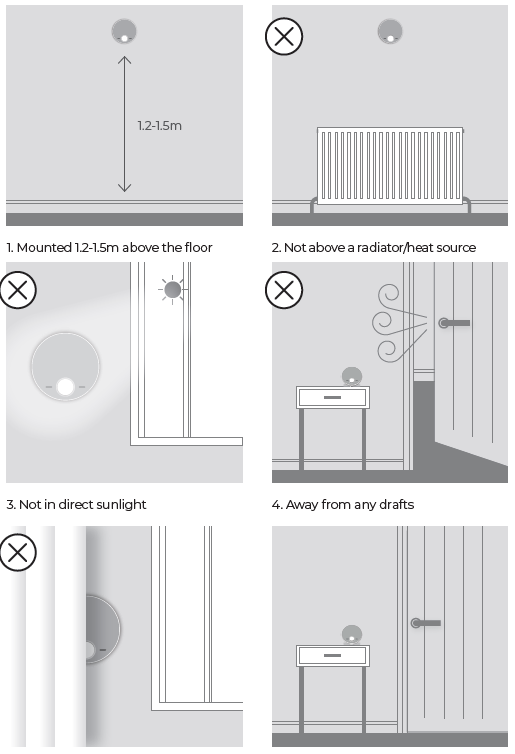
LOCATION GUIDELINES
The Halo Heat & System 2-Zone Extension uses wireless Zigbee communication from the Smart Interface to the Halo PRT up to a maximum distance of 30 meters. Occasionally house constructions and materials can reduce this communication range and it is advisable, where possible, to try and avoid directing communications through metal frames or solid concrete walls. If the distance between the Halo PRT and Smart Interface is greater than 30 meters or the install location is challenging, consider using the Zigbee Booster (UIN 221132), further details available at idealheating.com
SYSTEM OVERVIEW
This is a simplified diagram of how the Halo units, Smart Wiring Centre and Smart Interface communicate. Some wiring and pipework has been omitted for clarity.
TOP TIP: For a robust signal between units, where possible, ensure that the line of communication between the Smart Interface and other units is not through any stone or metallic object
solid and metallic objects will reduce maximum distance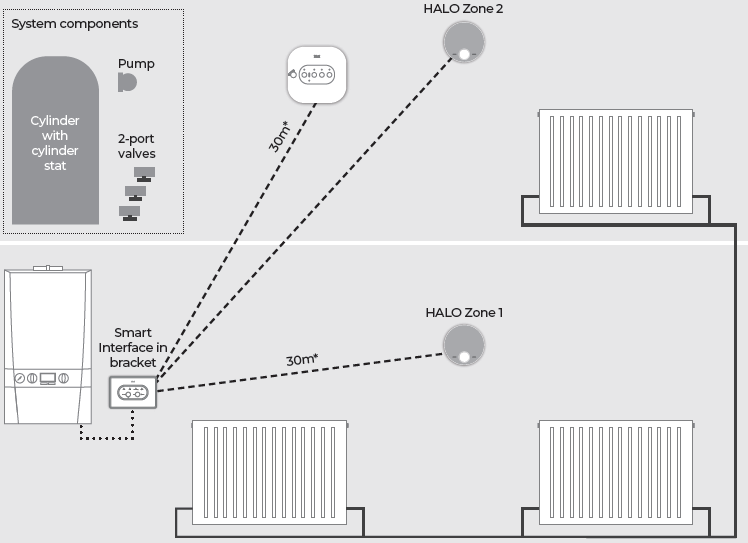
INSTALLING THE HALO PRT
The Halo can be either wall mounted or desk mounted
WALL MOUNTING THE HALO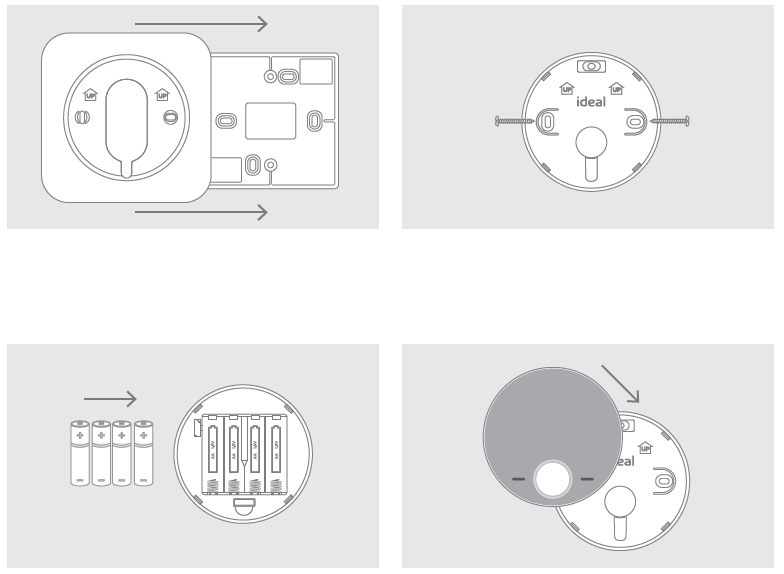
DESK MOUNTING THE HALO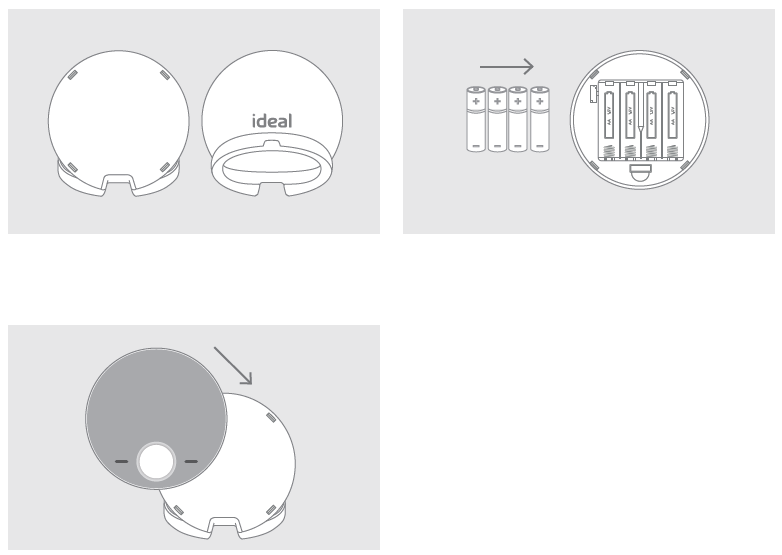
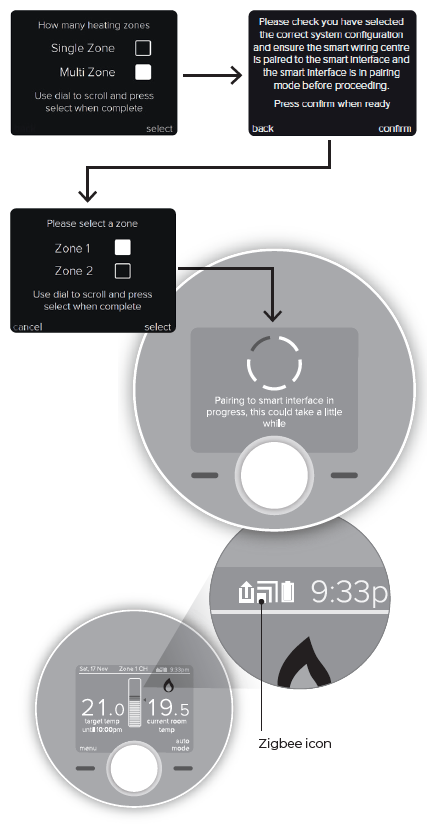
PAIRING OF THE HALO – ZONE 1
- When the batteries are inserted, the Halo PRT will power up automatically.
- The device will prompt pairing with the Smart Interface using an easy step-by-step process.
- Simply follow the on-screen guide to select the type of boiler, Heat & System, and the system type, Two zone heating and hot water and Zone 1.
- The Halo PRT screen will show “Pairing in Progress”, then “Synchronisation in Progress” and then “Pairing Complete” when the Halo PRT has successfully connected to the Smart Interface.
- The device will automatically prompt set up of the time and date. 6. There is the opportunity to add an installer contact phone number into the device at this stage, if not changed this will default to the Ideal Heating Customer Service number.
- The home screen will be displayed showing the current and target temperature and the temperature bar. The Zigbee communication icon will also be visible on the display.
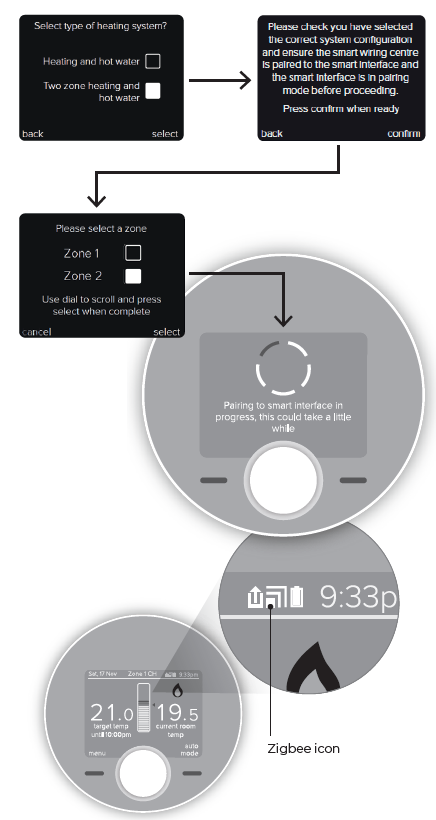
PAIRING OF THE HALO – ZONE 2
- When the batteries are inserted, the Halo PRT will power up automatically.
- The device will prompt pairing with the Smart Interface using an easy step-by-step process.
- Simply follow the on-screen guide to select the type of boiler, Heat & System, and the system type, Two zone heating and hot water and Zone 2.
- The Halo PRT screen will show “Pairing in Progress”, then “Synchronisation in Progress” and then “Pairing Complete” when the Halo PRT has successfully connected to the Smart Interface. The Date and Time are automatically uploaded from Zone 1.
- The home screen will be displayed showing the current and target temperature and the temperature bar. The Zigbee communication icon will also be visible on the display.
COMMISSIONING CHECKLIST
|
Use the “Identify” function to confirm successful pairing has taken place. Short press on the Pair button on the Smart Interface. Press Pair button again to exit “Identify” function. |
Zigbee LED on Smart Interface flashes green | |
| Halo home screen flashes to indicate successful pairing | ||
| Zigbee LED on Smart Wiring Centre flashes green | ||
| Halo is positioned in the homeowners chosen location if desk mounted. | ||
| Check RSSI (Received Signal Strength Indication) of the Zigbee wireless connection via support page on the PRT (access via the menu). | Target RSSI between 0 and -65 and text green | |
| Check RSSI (Received Signal Strength Indication) of the Zigbee wireless connection and the Wi-Fi connection via the support information in the Halo app. (Wi-Fi only) | Target RSSI between 0 and -65 and text green | |
|
On the Halo set the mode to AUTO then increase the temperature to 30°C (repeat using Halo app if applicable). Note: The boiler will only fire once the zone valve is in the fully open position. |
Flame icon ON | |
| Heating zone on Smart Wiring Centre OFF | ||
| Boiler ON | ||
| Boiler LED on Smart Interface ON (Green) | ||
|
On the Halo set the heating mode to AUTO then decrease the temperature to 5°C (repeat using Halo app). |
Flame OFF | |
| Heating zone on Smart Wiring Centre OFF | ||
| Boiler OFF | ||
| Boiler LED on Smart Interface OFF | ||
|
On the Halo set the hot water mode to ON (repeat using Halo app). Note: The boiler will only fire once the zone valve is in the fully open position. |
Hot water ON (icon turns orange) | |
| Hot water zone Smart Wiring Centre ON | ||
| Boiler ON | ||
| Boiler LED on Smart Interface ON (Green) | ||
|
On the Halo set the hot water mode to OFF (repeat using Halo app). |
Hot water OFF (icon turns white) | |
| Hot water zone Smart Wiring Centre OFF | ||
| Boiler OFF | ||
| Boiler LED on Smart Interface OFF | ||
|
Use the “Identify” function to confirm successful pairing has taken place. Short press on the Pair button on the Smart Interface. Press Pair button again to exit “Identify” function. |
Zigbee LED on Smart Interface flashes green | |
| Halo home screen flashes to indicate successful pairing | ||
| Zigbee LED on Smart Wiring Centre flashes green | ||
| Halo is positioned in the homeowners chosen location if desk mounted. | ||
| Check RSSI (Received Signal Strength Indication) of the Zigbee wireless connection via support page on the PRT (access via the menu). | Target RSSI between 0 and -65 and text green | |
| Check RSSI (Received Signal Strength Indication) of the Zigbee wireless connection and the Wi-Fi connection via the support information in the Halo app. (Wi-Fi only) | Target RSSI between 0 and -65 and text green | |
|
On the Halo set the mode to AUTO then increase the temperature to 30°C (repeat using Halo app if applicable). Note: The boiler will only fire once the zone valve is in the fully open position. |
Flame icon ON | |
| Heating zone on Smart Wiring Centre OFF | ||
| Boiler ON | ||
| Boiler LED on Smart Interface ON (Green) | ||
|
On the Halo set the heating mode to AUTO then decrease the temperature to 5°C (repeat using Halo app). |
Flame OFF | |
| Heating zone on Smart Wiring Centre OFF | ||
| Boiler OFF | ||
| Boiler LED on Smart Interface OFF | ||
|
On the Halo set the hot water mode to ON (repeat using Halo app). Note: The boiler will only fire once the zone valve is in the fully open position. |
Hot water ON (icon turns orange) | |
| Hot water zone Smart Wiring Centre ON | ||
| Boiler ON | ||
| Boiler LED on Smart Interface ON (Green) | ||
|
On the Halo set the hot water mode to OFF (repeat using Halo app). |
Hot water OFF (icon turns white) | |
| Hot water zone Smart Wiring Centre OFF | ||
| Boiler OFF | ||
| Boiler LED on Smart Interface OFF | ||
- Hereby, Ideal Boilers Ltd declares that this device (model 222145) is in compliance with: Directive 2014/53/EU.
- The full text of the EU declaration of conformity is available at the following internet address idealheating.com
- For more information and FAQs visit the Ideal Heating website idealheating.com
- Ideal Boilers Ltd
- National Avenue
- Hull, HU5 4JB
- T: 01482 498660
- E: [email protected]
REFERENCE
DOWNLOAD MANUAL
Ideal Halo 222145 Programmable Thermostat Installation Guide

Ideal Halo 222145 Programmable Thermostat Installation Guide