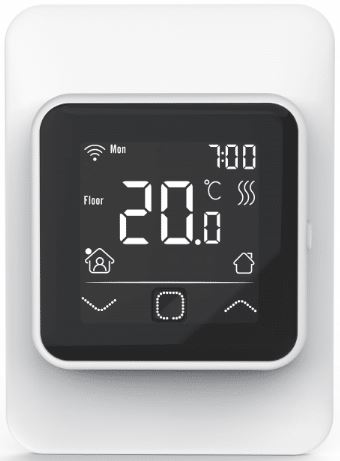
Hotwire HW-WiFi Smart Wif Thermostat
Introduction
Thank you for buying our touch thermostat. We hope you will enjoy the ease of use offered by the touchscreen and intuitively designed interface. You can program the thermostat any way you want with the options provided under Heating Schedule and User Settings. The thermostat will switch on your heating system at predetermined times each day of the week. You can set individual temperatures for up to six separate periods, called events, for each day of the week. Lowering the temperature when your home is unoccupied will reduce your energy costs without reducing comfort. The thermostat comes with a preset heating schedule suitable for most homes. Unless you change the settings, the thermostat will operate according to this preset heating schedule The thermostat features an adaptive function that automatically changes heating start times to ensure that the required temperature has been reached at the beginning of any specific event. After a few days, the adaptive function will have learned how much earlier the heating must be switched on. The resistive touchscreen only requires a soft tap with your fingertip to register the touch. In this manual, the touch areas on the screen will be referred to as buttons. The WiFi version of the this touch thermostat offers remotely control of your underfloor heating – through the SWATT® (Smart Wifi And Touch Thermostat) app, which can be downloaded from both Google Play and App Store.
Startup Wizard
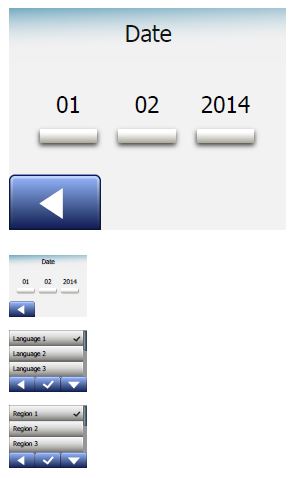
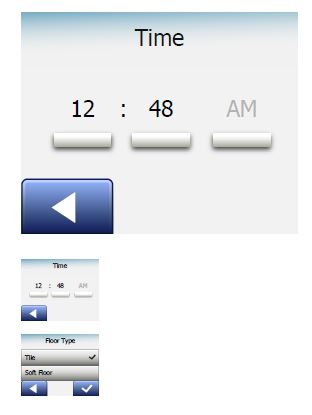
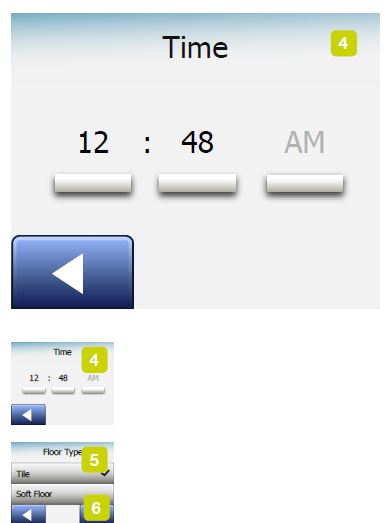
When the system has been installed and turned on for the first time, or after you have performed a factory reset, you must set Region, Language, Date, Time and Floor Type. The thermostat will automatically guide you through the process
- Region – set the time region in which the thermostat is located.
- This parameter is used, for example, to ensure correct use of Daylight Saving Time. Tap the time region you are in. Confirm with “√”
- Language – set the language to be used on the thermostat display.
- Tap the language you prefer. Confirm with “√”.
- Date – set the current date.
- Tap the parameter you want to change. Use the “Up Arrow” or “Down Arrow” button to set the day, month and year. Confirm each setting with “√”.
- Time – set the current time.
- Tap the parameter you want to change. Use the “Up Arrow” or “Down Arrow” button to set the hours and minutes. Confirm each setting with “√
- Floor Type – choose between:
- Tile: floors made of tile or stone.
- Soft Floor: wooden or other engineered floors.
- Confirm your choice with “√” or discard it with “X”.
General Operation
The thermostat has an ON/OFF switch on the left side of the thermostat. Otherwise, the thermostat is intuitively operated via the high-resolution colour touchscreen, which is used to navigate through the menus and to change the settings.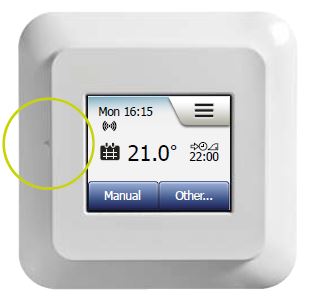
Accept/Back/Cancel
Whenever you change a parameter setting, you must tap the “Accept” button for the thermostat to acknowledge the change. “Accept” is shown on the screen as “√”. “Back” is shown on the screen as a button marked with an arrow pointing to the left. In this manual, it is also referred to as the “Left Arrow“ button. In the various menus and submenus, you will find the “Back” button in the lower left corner of the touchscreen. Tap the “Left Arrow” button to return to the previous menu. “Cancel” is shown on the screen as a button marked “X”. Although “Cancel” has the same effect as “Back”, it also results in all unsaved settings being discarded. As soon as you leave a home screen and enter one of the menus, either a “Back” button or a “Cancel” button will be shown. To return to the home screen, tap Back/Cancel once or multiple times depending on where you are in the menu structure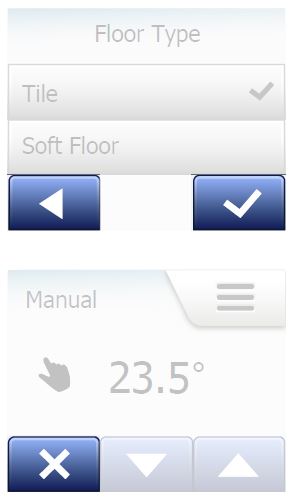
ICONS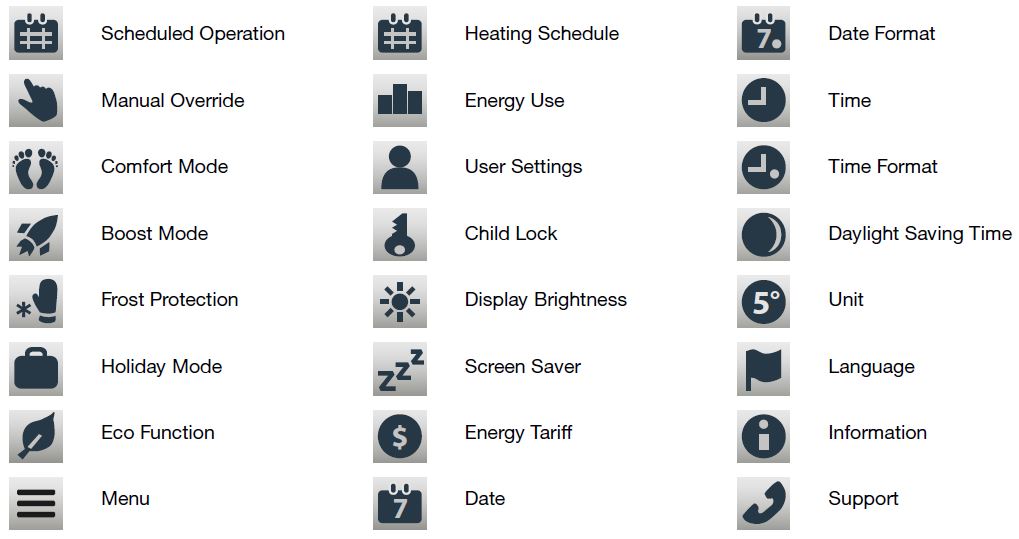
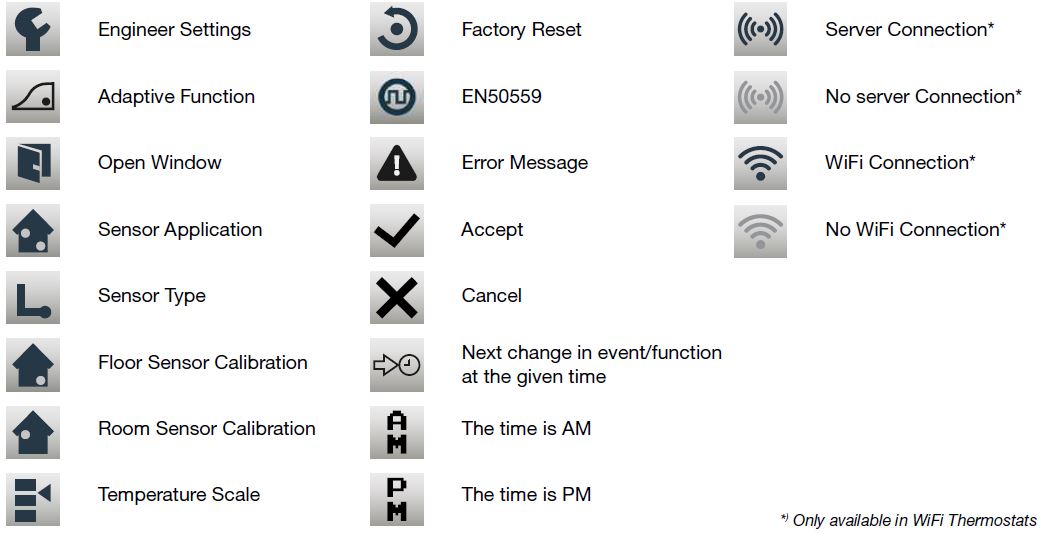
Programmed Heating Schedule
The thermostat allows you to control temperature automatically according to a weekly schedule of your choice. The thermostat comes with a pre-programmed schedule for easy and economic heating control of most homes, see Factory Settings: Preset Schedule. The schedule can be changed in the Heating Schedule menu.
Operating Modes
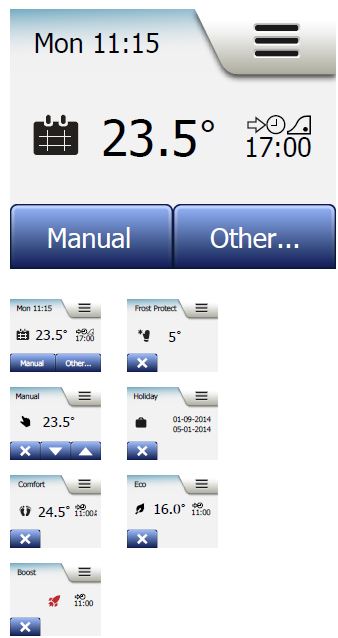
The thermostat offers seven different modes of temperature control, either from the “Other” menu on the home screen or from the home screen directly:
- Scheduled Operation
- Manual
- Comfort
- Boost
- Frost Protection
- Holiday
- Eco (this function must be enabled in the “User Settings” menu)
Scheduled Operation
The system will operate in Scheduled Operation unless you choose to override the scheduled events. During Scheduled Operation, the temperature is controlled automatically according to the programmed heating schedule – see “Heating Schedule”. During Scheduled Operation, “Manual” and “Other” modes are accessible from the home screen. If the Eco function is enabled, “Eco” and “Other” modes will be accessible from the home screen. “Manual” will then be found in the “Other” menu. The function of the buttons and symbols shown on the home screen varies according to the chosen operating mode.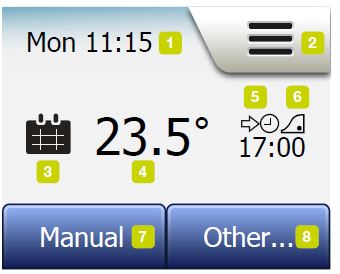
Scheduled Operation home screen:
- Day and time info.
- Tap here to access the menus.
- Icon indicating the current operating mode (calendar = Scheduled Operation).
- Current target/setpoint temperature (if shown in red, heating is being provided).
- Time of next scheduled event change.
- If shown, the adaptive function is enabled.
- Tap here to access Manual Override. Alternatively, if Eco Function is enabled, tapping here activates the function.
- Tap here to access alternative operating modes (Comfort, Boost, Frost Protection, Holiday). If “Eco” is enabled, “Manual” will be found here as well.
Manual
- Manual allows you to override Scheduled Operation and maintain a specified temperature around the clock.
- From the Scheduled Operation home screen, tap the “Manual” button to access manual override.
- Note: If Eco is enabled, “Manual” will be found in the “Other” menu.
- You can use “Manual” to override the programmed event schedule.
- The thermostat will continue to operate in Manual until you return it to Scheduled Operation.
- Use the “Up Arrow” or “Down Arrow” button to select the required temperature.
- Then simply leave the thermostat as it is.
- While in Manual Override, an “X” button is shown in the lower left corner of the home screen. Press this button to return the thermostat to Scheduled Operation.
- The function of the buttons and symbols shown on the home screen varies according to the chosen operating mode.
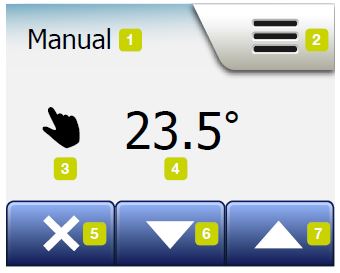
Manual home screen:
- Indication of Manual Override.
- Tap here to access the menus.
- Icon indicating the current operating mode (hand = Manual).
- Current target/setpoint temperature (if shown in red, heating is being provided).
- Tap here to return to Scheduled Operation.
- Tap here to decrease the target/setpoint temperature.
- Tap here to increase the target/setpoint temperature.
Comfort
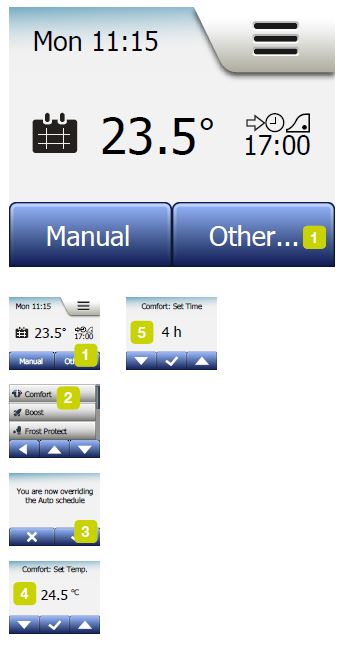
- You can use Comfort mode on special occasions when you want to override an event during Scheduled Operation, e.g. for a party or when you want to stay up late.
- You can manually set a comfort temperature, which the thermostat will maintain for a chosen period of time (from 1 to 23 hours) before returning to Scheduled Operation.
- From the Scheduled Operation home screen, tap the “Other” button to access the alternative operating modes.
- Choose “Comfort”.
- Tap “√” to confirm that you wish to override the auto heating schedule.
- Use the “Up Arrow” or “Down Arrow” button to select the required temperature. Confirm with “√”.
- Use the “Up Arrow” or “Down Arro1 w” button to set the required duration of Comfort mode. Confirm with “√”. The thermostat automatically enters the Comfort mode home screen.
- While in comfort mode an “X” button is shown on the home screen. Press this +-+ button to return the thermostat to Scheduled Operation.
- The function of the buttons and symbols shown on the home screen varies according to the chosen operating mode.
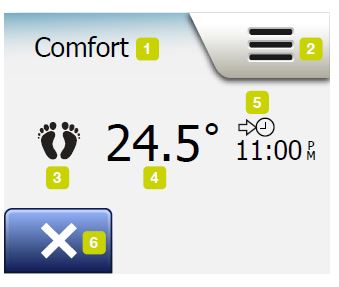
Comfort home screen:
- Indication of Comfort mode.
- Tap here to access the menus.
- Icon indicating the current operating mode (feet = Comfort).
- Current target/setpoint temperature (if shown in red, heating is being provided).
- The time at which the thermostat will return to Scheduled Operation.
- Tap here to quit Comfort mode and return to Scheduled Operation.
Boost
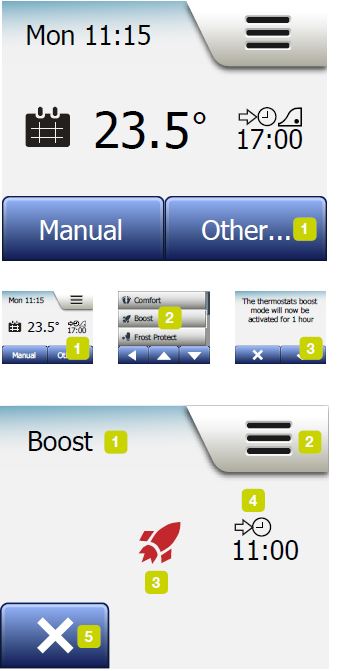
Boost mode is accessible from the “Other” menu. In Boost mode, the underfloor heating is constantly activated for one hour. After one hour, the thermostat returns to Scheduled Operation.
- From the Scheduled Operation home screen, tap the “Other” button to access the alternative operating modes.
- Choose “Boost”.
- Confirm that you wish the thermostat to activate Boost mode by tapping ”√”. The thermostat automatically enters the Boost home screen.
While in Boost mode, an “X” button is shown on the home screen. Press this button to return the thermostat to Scheduled Operation. The function of the buttons and symbols shown on the home screen varies according to the chosen operating mode.
Boost home screen:
- Indication of Boost mode.
- Tap here to access the menus.
- Icon indicating the current operating mode (red rocket = Boost).
- The time at which the thermostat will return to Scheduled Operation.
- Tap here to quit Boost mode and return to Scheduled Operation.
Frost Protection
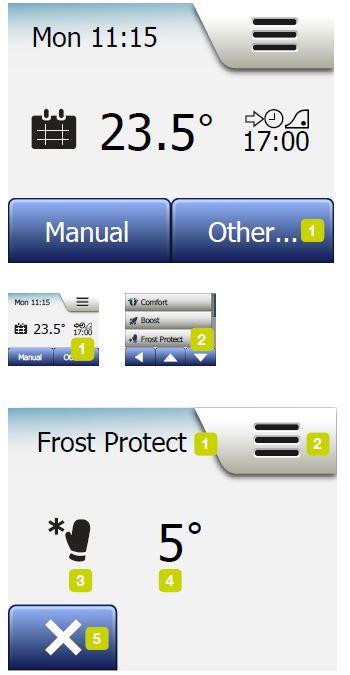
Frost Protection mode is used when heating is not needed but the temperature must be kept above freezing point until changed manually.
- Tap the “Other” button on the home screen.
- Tap the “Frost Protection” button.
Frost Protection home screen:
- Indication of Frost Protection mode.
- Tap here to access the menus.
- Icon indicating the current operating mode (ice crystal and glove = Frost Protection).
- Fixed target/setpoint temperature (if shown in red, heating is being provided).
- Tap here to return to Scheduled Operation.
Holiday
Holiday 1/2
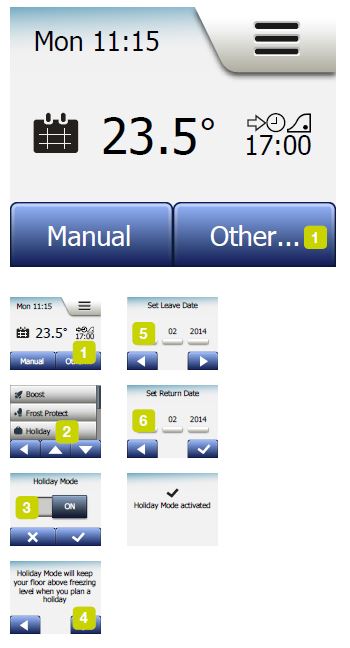
Holiday mode allows you to set the heating of your home to a minimum while you are away on holiday, thus saving energy and money. You must set the date you leave on holiday and the date you return. The thermostat will ensure that your floor is kept above freezing point and that your home is warm at your return. This is accomplished in just a few steps:
- From the Scheduled Operation home screen, tap the “Other” button to access the alternative operating modes.
- Tap the “Holiday” button.
- Tap the “OFF/ON” button to “ON” and confirm with the “√” button.
- Tap the “Right Arrow” button on the confirmation screen that appears.
- Set the date on which you are going on holiday. Tap the “Right Arrow” button.
- Set the date on which you plan to return. Tap the “Right Arrow” button.
- A confirmation screen will then be displayed briefly before the thermostat automatically enters the Holiday home screen.
Holiday 2/2
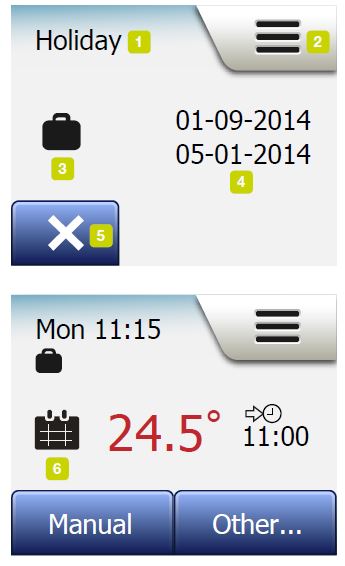
Holiday home screen:
- Indication of Holiday mode.
- Tap here to access the menus.
- Icon indicating the current operating mode (suitcase = Holiday).
- The date on which the thermostat entered Holiday mode and the date on which the thermostat will return to Scheduled Operation.
- Tap here to quit Holiday mode and return to Scheduled Operation.
- If leaving and returning dates have been entered but Holiday mode is not yet active, an alternative Scheduled Operation home screen will be displayed, featuring a suitcase.
Eco Function
Eco Function reduces the energy spent on unnecessary heating if you leave the room/house during a scheduled heating event. When the Eco Function is enabled, the thermostat enters an energy-saving state, in which the lowest setback temperature in the event schedule is used as the temperature setpoint. At the next scheduled event change, the thermostat returns to normal Scheduled Operation. To be able to use the Eco Function, it has to be enabled under User Settings/Eco Function
With Eco Function enabled in the User Settings:
- Tap the “Eco” button on the Scheduled Operation home screen to access the Eco Function.
- The thermostat will then display the Eco Function home screen.
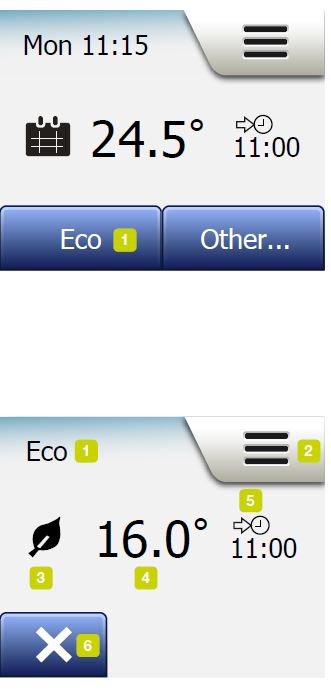
Eco Function home screen:
- Indication of Eco Function.
- Tap here to access the menus.
- Icon indicating the current operating mode (leaf = Eco Function).
- Current target/setpoint temperature (if shown in red, heating is being provided).
- The time at which the thermostat will return to Scheduled Operation.
- Tap here to return to Scheduled Operation
Thermostat Setup – Main Menu
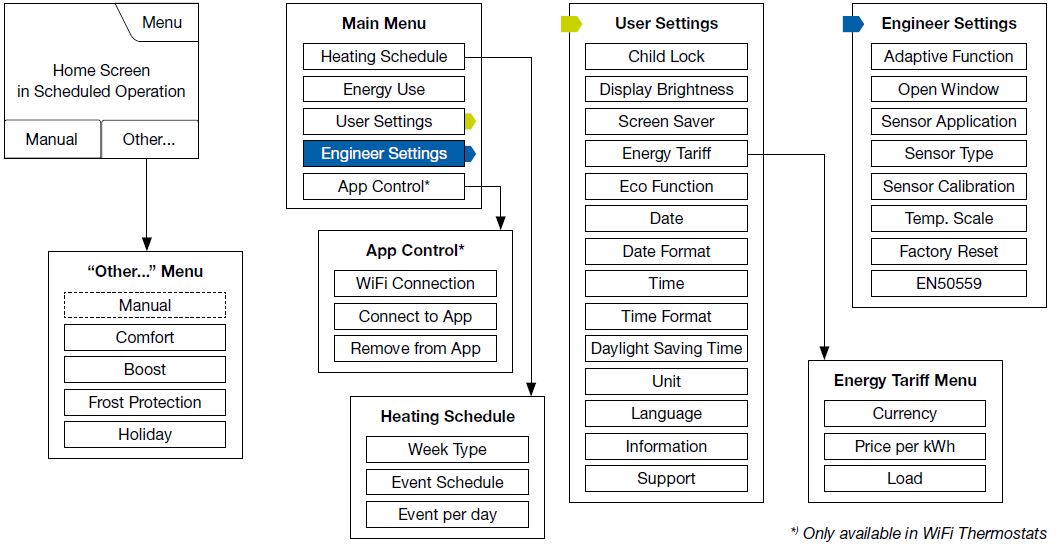
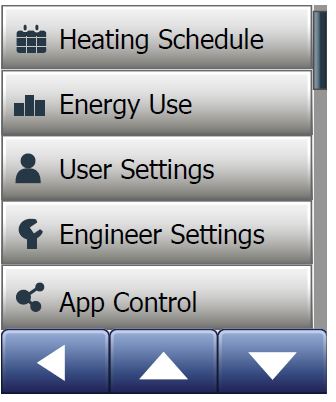
The main menu consists of four options which can be used to configure your thermostat. The main menu is accessed via the “Menu” button on the home screen.
- Heating Schedule
- Energy Use
- User Settings
- Engineer Settings
- App Control*
Heating Schedule 1/3
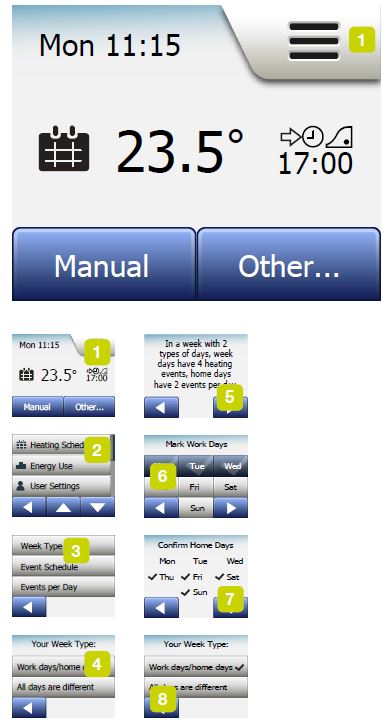
The heating schedule allows you to control temperature automatically according to a programmed schedule of your choice. The thermostat comes with a preprogrammed event schedule for easy and economic heating control, see Preset Schedule under Factory Settings. The heating schedule can easily be changed in the following way:
- Tap the “Menu” button on the home screen.
- Then tap the “Heating Schedule” button to access schedule options.
- Tap the “Week Type” button.
- Choose between “Work days/home days” and “All days are different”. “Work days/home days” is best if you have fixed working hours.
- If you chose “Work days/home days”, an information screen about the schedule will be shown.
- Tap the “Right Arrow” button to proceed.
- Select the days on which you work.
- Tap the “Right Arrow” button to proceed.
- The thermostat will automatically designate the remaining days as home days.
- Tap the “√” button to accept.
- Tap the “Left Arrow” button to return to the “Heating Schedule” menu. Proceed to step 10.
Heating Schedule 2/3
- Tap the “Left Arrow” button on the “Your Week Type” screen to exit.
- Tap the “Event Schedule” button to set up the target/setpoint temperature and start time for each event.
- Tap the temperature if you want to change it, then tap the “Up Arrow” or “Down Arrow” button to set the required temperature.
- Tap the time if you want to change it, then tap the “Up Arrow” or “Down Arrow” button to set the time in steps of 15 minutes. Confirm with “√”.
- Tap the “Left Arrow” or “Right Arrow” button to toggle through the various events.
- Once you have completed setting all the events, tap the “Right Arrow” button to view a confirmation screen and return to the Heating Schedule menu.
- The thermostat is preset to operate in Scheduled Operation with four events per work day and two events per home day.
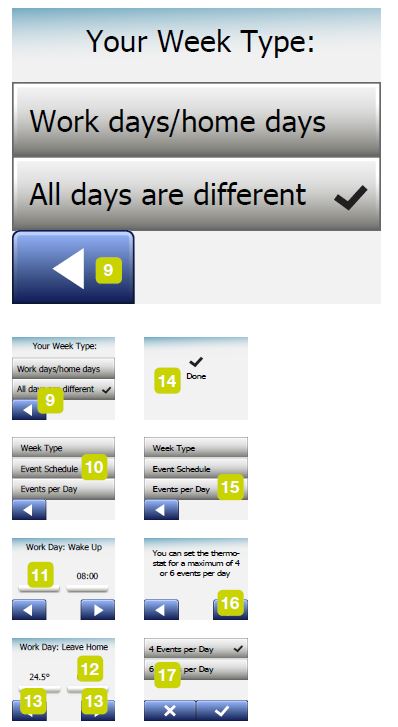
This can be changed to six events per work day and two events per home day in the following way:
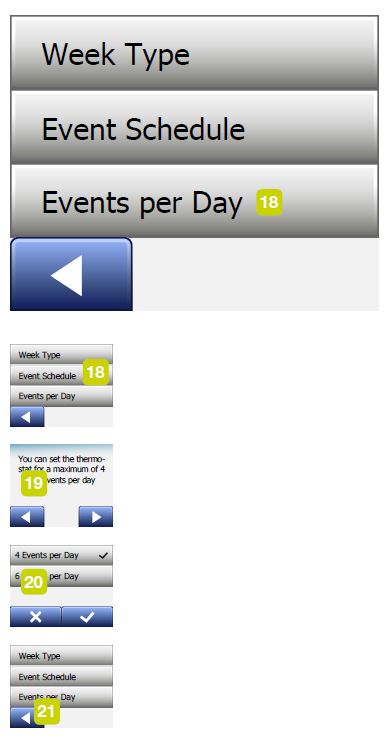
- In the “Heating Schedule” menu, tap the ”Events per Day” button.
- On the explanation screen, tap the “Right Arrow” button.
- Choose between four and six events per work day. Confirm with “√”.
- Steps 10 to 14 may need to be repeated to set the new events
Heating Schedule 3/3
An event is a scheduled time of day when the thermostat automatically changes the temperature setting You can choose between a four or six event schedule. The first event will switch the heating on, the following event will switch the heating off. Simply set the temperature of the second event to the minimum if you wish to switch it off and not maintain a temperature. Choose the setting that best fits your daily rhythm With a four event schedule, you can set four different events during work days and two different events during home days
- Perfect if your day is as follows: You get up in the morning, you go to work, you return home and you go to sleep
- With a six event schedule, you can set six different events during work days and two different events during home days.
- Perfect if your day is as follows: You get up in the morning, you go to work, you return home for lunch, you go back to work, you return home and finally you go to sleep.
- Tap the “Events per Day” button.
- On the confirmation screen tap the “Right Arrow” button.
- Tap the button with the number of events per day you wish to use.
Energy Use
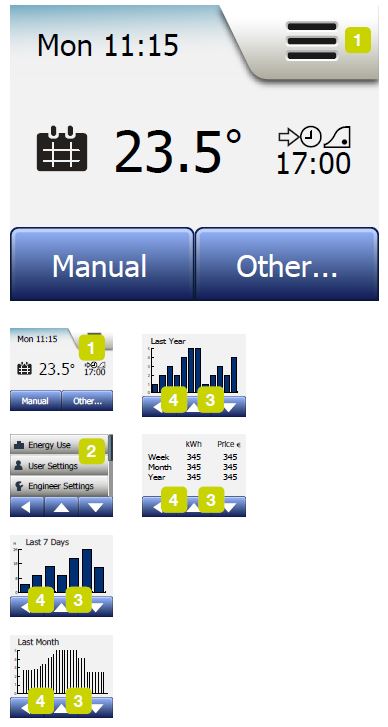
The “Energy Use” button allows you to read out energy usage data for your underfloor heating system.
- Tap the “Menu” button on the home screen.
- Then tap the “Energy Use” button to access schedule options. You can choose between four different readouts:
- Last 7 days: A graph of usage during each day of the past seven days will be displayed. The graph shows hours per day.
- Last month: A graph of usage during each day of the past month will be displayed. The graph shows hours per three days.
- Last year: A graph of usage during each month of the past year will be displayed. The graph shows hours per month.
- An overview of electricity consumption (kWh) and heating costs for the time periods specified above. (Note: actual load, currency and price per kWh must be set in the “Energy Tariff” menu under User Settings).
- You can toggle between the readouts using the “Up Arrow” or “Down Arrow” button.
- Tap the “Left Arrow” button to return to the “Main Menu”.
User Settings
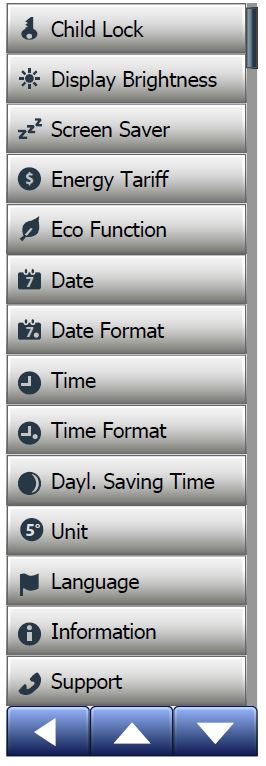
This menu allows you to set various parameters. The menu contains the following options:
- Child Lock
- Display Brightness
- Screen Saver
- Energy Tariff
- Eco Function
- Date
- Date Format
- Time
- Time Format
- Daylight Saving Time
- Unit
- Language
- Information
- Support
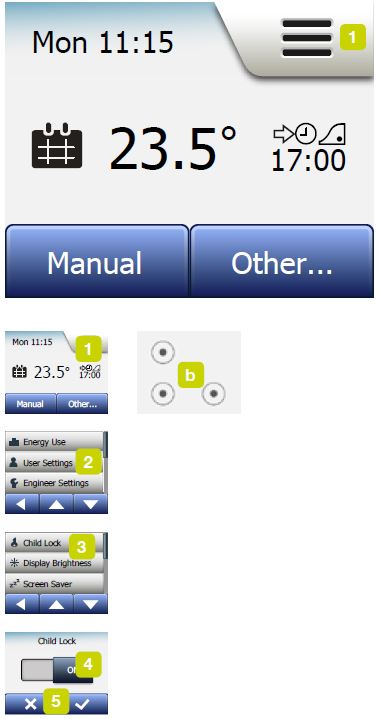
Child Lock
The child lock prevents children and others from tampering with the thermostat and changing any of its settings.
- Tap the “Menu” button on the home screen.
- Then tap the “User Settings” button to access the various user settings.
- Tap the “Child lock” button.
- Tap the “OFF/ON” button to the setting you prefer.
- Confirm your choice with “√” or discard it with “X”.
- The thermostat will automatically return to “User Settings”.
- The child lock is activated together with the screen saver if the thermostat has not been operated for about 3 minutes.
Before you can operate the thermostat again, you must unlock the child lock in the following way. From the idle home screen:
- Tap the screen to activate it.
- Three circles containing dots will be displayed on the screen.
- Draw an “L” on the screen in a single stroke without lifting your finger from the screen. Start by touching the dot in the circle in the upper left corner, then slide your finger downwards to the dot in the circle in the lower left corner and continue sliding your finger to the dot in the circle in the lower right corner, forming an “L”.
- If done correctly, the home screen will appear.
Display Brightness
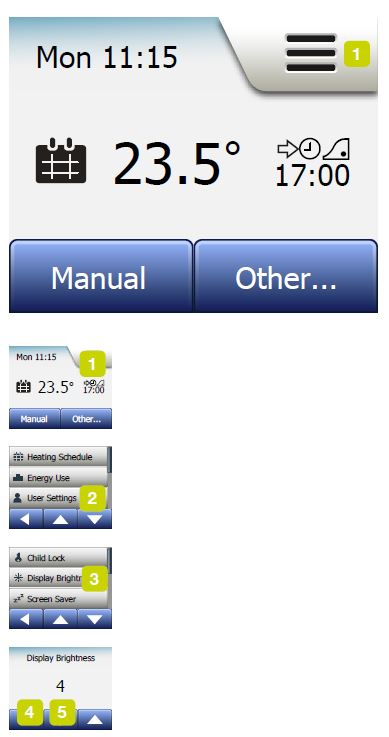
- This option allows you to change the brightness of the display.
- Tap the “Menu” button on the home screen.
- Then tap the “User Settings” button to access the various user settings.
- Scroll down and tap the “Display Brightness” button.
- Select one of the five levels of brightness using the “Up Arrow” or “Down Arrow” button.
- Confirm your choice with “√”.
- The thermostat will automatically return to “User Settings
Screen Saver
This option allows you to select the information to be shown on the idle home screen.
- Date, Time.
- Date, Time and Temperature (measured).
- Screen Off. This setting minimises energy consumption.
- Tap the “Menu” button on the home screen.
- Then tap the “User Settings” button to access the various user settings.
- Scroll down and tap the “Screen Saver” button.
- Tap the information you want to be shown in screen saver mode.
- Confirm your choice with “√” or discard it with “X”.
- The thermostat will automatically return to “User Settings”.
Energy Tariff
Energy Tariff 1/2
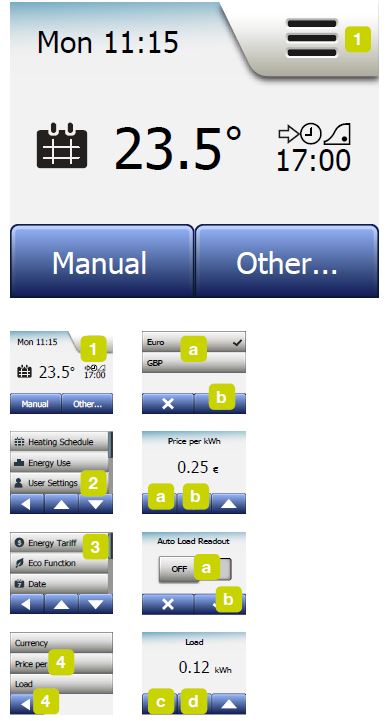
This option allows you to enter the various data used to calculate energy use. The “Energy Use” function uses this information to calculate electricity consumption and the cost of heating for a given period of time.
- Tap the “Menu” button on the home screen.
- Then tap the “User Settings” button to access the various user settings.
- Tap the “Energy Tariff” button.
- Tap the parameter you want to change.
- Currency
- Tap the currency you prefer.
- Confirm with “√”.
- The thermostat will automatically return to “Energy Tariff”.
- Price per kWh
- Tap the “Up Arrow” or “Down Arrow” button to set the price you pay per kWh.
- Confirm with “√”.
- The thermostat will automatically return to “Energy Tariff”.
- Load
- If you do not want the thermostat to automatically detect the load of your underfloor heating system, tap the “OFF/ON” button to “OFF”, otherwise leave it at “ON”.
Energy Tariff 2/2
- Confirm with “√”.
- If Auto Detection is set to “OFF”, tap the “Up Arrow” or “Down Arrow” button to set the kW load of your underfloor heating system.
- You should ask your heating engineer for this information.
- Confirm with “√”.
- The thermostat will automatically return to “Energy Tariff”.
- Tap the “Left Arrow” button to return to “User Settings”.
Eco Function
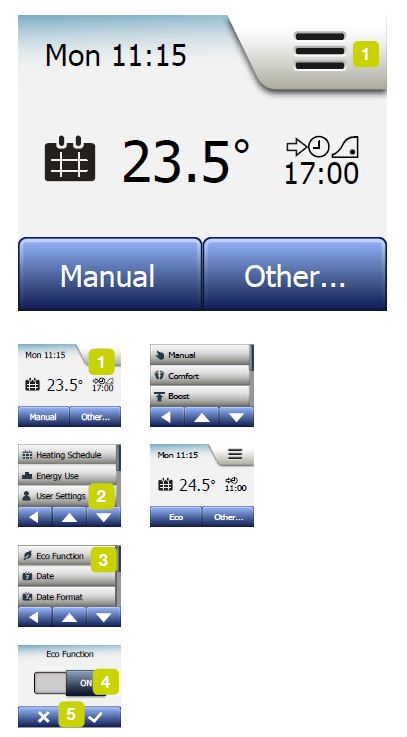
Eco Function reduces the energy spent on unnecessary heating if you leave the room/house during a scheduled heating event.
- Tap the “Menu” button on the home screen.
- Then tap the “User Settings” button to access the various user settings.
- Tap the “Eco Function” button.
- Tap the “OFF/ON” button to the setting you prefer.
- Confirm your choice with “√” or discard it with “X”.
- The thermostat will automatically return to “User Settings”.
- With Eco Function enabled, the Scheduled Operation home screen is altered.
- The lower left button, “Manual”, is changed to “Eco”.
- Tap the “Eco” button to activate the Eco Function.
- In Eco Mode, the thermostat enters an energy-saving state, in which the lowest setback temperature in the event schedule is used as the temperature setpoint.
- At the next scheduled event change, the thermostat returns to normal Scheduled Operation.
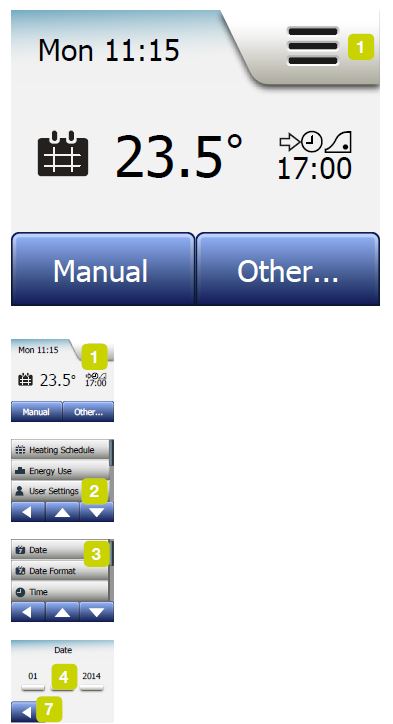
Date
This option allows you to change the date, which is sometimes shown on the home screen and is used for functions such as “Holiday” mode and “Daylight Saving Time”.
- Tap the “Menu” button on the home screen.
- Then tap the “User Settings” button to access the various user settings.
- Scroll down and tap the “Date” button.
- Tap the parameter you want to change.
- Tap the “Up Arrow” or “Down Arrow” button to set the day, month and year.
- Confirm each setting with “√”.
- Tap the “Left Arrow” button to return to “User Settings”.
Date Format
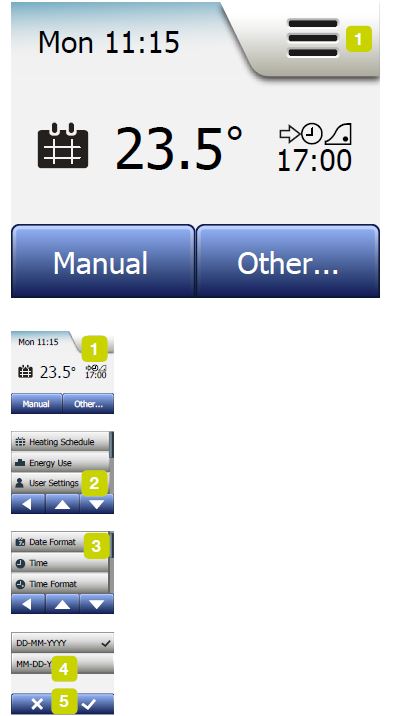
- Tap the “Menu” button on the home screen.
- Then tap the “User Settings” button to access the various user settings.
- Scroll down and tap the “Date Format” button.
- Tap the date format you prefer:
- DD/MM/YYYY
- MM/DD/YYYY
- Confirm your choice with “√” or discard it with “X”.
- The thermostat will automatically return to “User Settings”.
Time
This option allows you to change the time, which is used by the clock to control heating schedule events during Scheduled Operation.
- Tap the “Menu” button on the home screen.
- Then tap the “User Settings” button to access the various user settings.
- Scroll down and tap the “Time” button.
- Tap the parameter you want to change.
- Tap the “Up Arrow” or “Down Arrow” button to set the hours and minutes.
- Confirm each setting with “√”.
- Tap the “Left Arrow” button to return to “User Settings
Time Format
- Tap the “Menu” button on the home screen.
- Then tap the “User Settings” button to access the various user settings.
- Scroll down and tap the “Time Format” button.
- Tap the time format you prefer:
- 24 Hours
- 12 Hours AM/PM
- Confirm your choice with “√” or discard it with “X”.
- The thermostat will automatically return to “User Settings”.
Daylight Saving Time
When set to ON, the “Daylight Saving Time” function will automatically adjust the thermostat clock to the daylight saving time for the “Region” chosen in the “Startup Wizard”. Note! Only regions within North America and Europe are supported.
- Tap the “Menu” button on the home screen.
- Then tap the “User Settings” button to access the various user settings.
- Scroll down and tap the “Daylight Saving Time” button.
- Tap the “OFF/ON” button to the setting you prefer.
- Confirm with the “√” button.
- The thermostat will automatically return to “User Settings
Unit
- Tap the “Menu” button on the home screen.
- Then tap the “User Settings” button to access the various user settings.
- Scroll down and tap the “Unit” button.
- Tap the unit you prefer:
- Celsius
- Fahrenheit
- Confirm your choice with “√” or discard it with “X”.
- The thermostat will automatically return to “User Settings
Language
- This option allows you to change the language used on the screen.
- Tap the “Menu” button on the home screen.
- Then tap the “User Settings” button to access the various user settings.
- Scroll down and tap the “Language” button.
- Tap the language you prefer:
- English
- German
- French
- Finnish
- Polish
- Czech
- Swedish
- Dutch
- Lithuanian
- Russian
- Italian
- Spanish
- Norwegian
- Portuguese
- Confirm your choice with “√” or discard it with “X”.
- Tap the “Left Arrow” button to return to “User Settings”.
Information
Information 1/2
This option provides a read-out containing the following information:
- Application version
- Unit ID
- Sensor temperatures
- Tap the “Menu” button on the home screen.
- Then tap the “User Settings” button to access the various user settings.
- Scroll down and tap the “Information” button.
- Tap the “Left Arrow” button to return to “User Settings”. Or tap the “QR” button.
- If “QR” is selected, you can scan the QR Code with a suitable device with access to the Internet. Software supporting QR Code scanning is necessary, e.g. an app.
Scanning the QR Code provides the following data from the thermostat:
- Contact
- Serial Number
- Software Version
- Sensor Type
- Application
- Mode
- Adaptive Function
- Open Window
- Child Lock
- Time Format
Information 2/2
- Temperature Unit
- Heating Schedule
- Energy Use
- Tap on the QR Code to return to the Information screen.
- Tap the “Left Arrow” button to return to “User Settings”.
- QR Code is a registered trademark of DENSO WAVE INCORPORATED

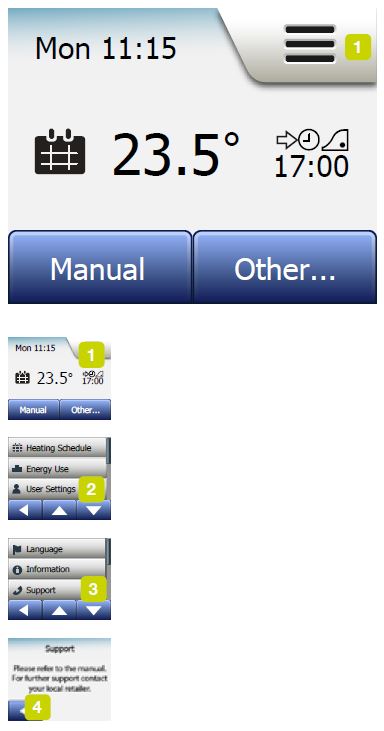
Support
This option provides information on obtaining support for the thermostat. Please consult the “Troubleshooting” section of this manual before calling for any support.
- Tap the “Menu” button on the home screen.
- Then tap the “User Settings” button to access the various user settings.
- Scroll down and tap the “Support” button.
- Tap the “Left Arrow” button to return to “User Settings
Engineer Settings
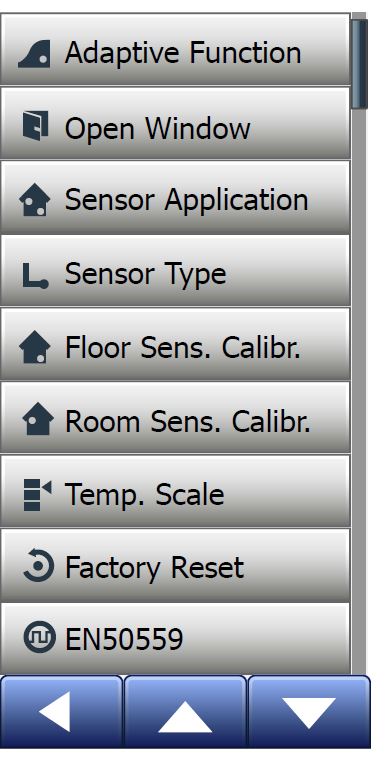
This menu contains all the parameters that must be set by the engineer during thermostat installation or service. The menu contains the following options:
- Adaptive Function
- Open Window
- Sensor Application
- Sensor Type
- Floor Sensor Calibration
- Room Sensor Calibration
- Temperature Scale
- Factory Reset
- EN50559
Adaptive Function
With this feature enabled the room will already have reached the target/setpoint temperature at the beginning of an event. After just a few days, the adaptive function will have automatically calculated how much earlier the heating must be turned on/off to achieve this. Select “OFF” if you simply want the heating to start at the beginning of an event.
- Tap the “Menu” button on the home screen.
- Scroll down and tap the “Engineer Settings” button.
- Tap the “Adaptive Function” button.
- Tap the “OFF/ON” button to the setting you prefer and confirm with the “√” button.
The thermostat will automatically return to “Engineer Settings”.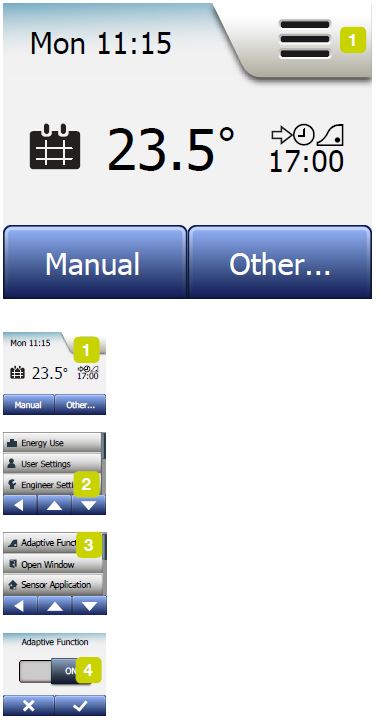
Open Window
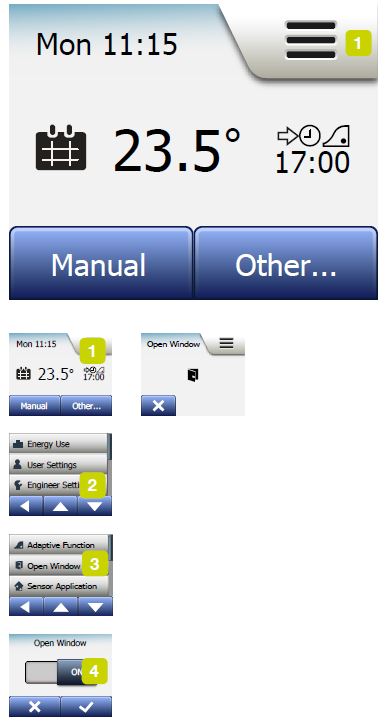
This option allows you to enable the “Open Window” function. The thermostat can detect an open window by registering a rapid drop in temperature. With the function enabled, the thermostat shuts off the heating for 30 minutes if an open window is detected.
- Tap the “Menu” button on the home screen.
- Scroll down and tap the “Engineer Settings” button.
- Tap the “Open Window” button.
- Tap the “OFF/ON” button to the setting you prefer and confirm with the “√” button.
- The thermostat will automatically return to “Engineer Settings”
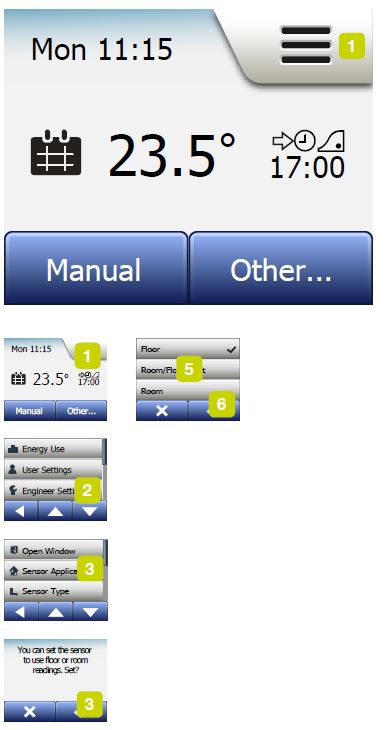
Sensor Application
This option allows you to choose which sensor is used to control the heating system.
- Floor (default): With this setting, the floor sensor controls the heating system.
- Room/Floor Limit (advanced): With this setting, the room sensor controls the heating system subject to maximum and minimum limits for floor temperature.
- The maximum temperature limit protects wooden floors from excessive heat.
- The minimum temperature limit prevents the floor from becoming uncomfortably cold when heating is not needed, e.g. in a bathroom. Note that this function will increase energy consumption.
- Floor Limit temperatures are set in the “Temperature Scale” menu.
- Room: With this setting, the room sensor inside the thermostat controls the heating system.
Maximum temperature depends on floor type and temperature scale.
- Tap the “Menu” button on the home screen.
- Then tap the “Engineer Settings” button.
- Tap the “Sensor Application” button.
- Confirm that you want to set the Sensor Application.
- Then tap the application you want to use.
- Confirm your choice with “√” or discard it with “X”.
- The thermostat will automatically return to “Engineer Settings”.
Sensor Type
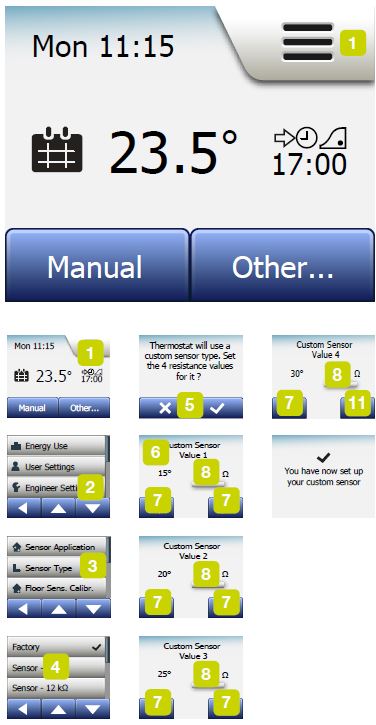
This option allows you to choose the type of floor sensor used with the thermostat. You can therefore choose to use an existing sensor with the thermostat, e.g. in renovation projects. Choose the sensor actually used from the list. The sensor supplied with the thermostat is an OJ sensor listed as: “Factory”.
- Factory (default)
- Sensor 10 kΩ
- Sensor 12 kΩ
- Custom
- Tap the “Menu” button on the home screen.
- Then tap the “Engineer Settings” button.
- Scroll down and tap the “Sensor Type” button.
- Tap the type of floor sensor actually used.
- Confirm your choice with “√” or discard it with “X”.
- If “Custom” is chosen, you must provide resistance values for the sensor concerned at four given temperatures: 15°C, 20°C, 25°C and 30°C – ask the supplier of your sensor for these values.
- Use the “Right Arrow” or “Left Arrow” button to toggle through the temperatures.
- Tap the resistance value to change it.
- Tap the “Up Arrow” or “Down Arrow” button to set the resistance.
- Then repeat steps 6-9 until all four resistance values have been set.
- Tap the “Left Arrow” button to return to “Engineer Settings”.
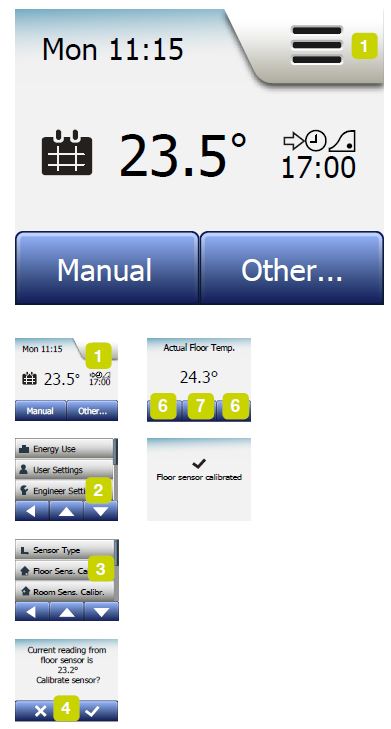
Floor Sensor Calibration
- This option allows you to calibrate the floor sensor.
- You should calibrate the sensor if the temperature reading differs from the actual floor temperature.
- Note that changes in the floor sensor characteristics may damage certain floors.
- You can calibrate the sensor with +/- 10°C in steps of 0.5°C in the following way:
- Tap the “Menu” button on the home screen.
- Then tap the “Engineer Settings” button.
- Scroll down and tap the “Floor Sensor Calibration” button.
- Confirm that you want to calibrate the sensor with “√” or cancel with “X”.
- If “√” is chosen, you must then offset the thermostat to reflect the floor temperature actually measured.
- Use the “Up Arrow” or “Down Arrow” button to set the measured floor temperature.
- Confirm the value with “√”. A confirmation screen will be displayed briefly.
- The thermostat will automatically return to “Engineer Settings”.
Room Sensor Calibration
- This option allows you to calibrate the room sensor.
- You should calibrate the sensor if the temperature reading differs from the actual room temperature.
- You can calibrate the sensor with +/- 10°C in steps of 0.5°C in the following way:
- Tap the “Menu” button on the home screen.
- Then tap the “Engineer Settings” button.
- Scroll down and tap the “Room Sensor Calibration” button.
- Confirm that you want to calibrate the sensor with “√” or cancel with “X”.
- If “√” is chosen, you must then offset the thermostat to reflect the room temperature actually measured.
- Use the “Up Arrow” or “Down Arrow” button to set the measured room temperature.
- Confirm the value with “√”. A confirmation screen will be displayed briefly.
- The thermostat will automatically return to “Engineer Settings”.
Temperature
Temperature Scale 1/3
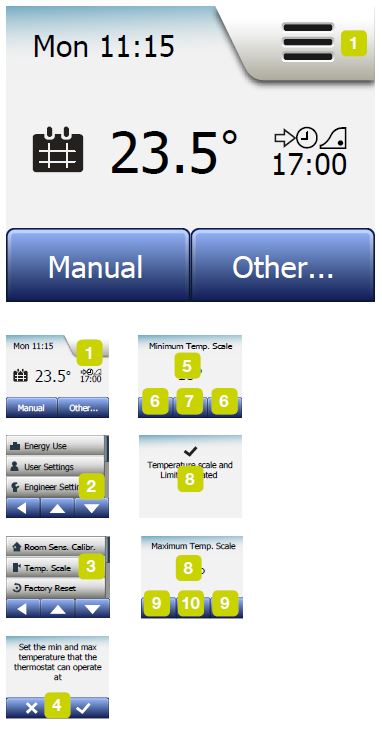
This option allows you to set the minimum and maximum temperature to which the thermostat can be set – as well as the minimum and maximum limits for floor temperature.
Operating temperatures:
- Minimum Temperature Scale can be set between 5°C and 15°C.
- Maximum Temperature Scale can be set between 20°C and 40°C.
- (If “Sensor Application” is set to “Floor”, a maximum temperature of 27°C can protect wooden floors from drying out. For precise information, please ask your flooring supplier).
Floor limit temperatures:
- Floor limit temperatures allow you to set the lowest (Minimum Temp. Limit) and highest (Maximum Temp. Limit) permissible floor temperature during normal room temperature control. If floor temperature drops below the Minimum Temp. Limit, the thermostat will activate the heating system to maintain the temperature above the set minimum. If floor temperature rises above the Maximum Temp. Limit, the thermostat will deactivate the heating system to maintain the temperature below the set maximum.
- Floor Limit temperatures are only available if “Room/Floor Limit” has been selected under “Sensor Application”.
Temperature Scale 2/3
- Minimum Temp. Limit – use this setting to maintain a comfort temperature on tile floors. Can be set between 5°C and 25°C.
- Maximum Temp. Limit – use this setting to protect wooden floors from excessive temperatures. Can be set between 10°C and 40°C.
- Tap the “Menu” button on the home screen.
- Then tap the “Engineer Settings” button.
- Scroll down and tap the “Temp. Scale” button.
- Confirm that you want to set minimum and maximum operating temperatures for the thermostat by tapping “√” or cancel with “X”.
- If “√” is chosen, you can set a Minimum Temp.Scale.
- Use the “Up Arrow” or “Down Arrow” button to change the Minimum Temp. Scale.
- Confirm the setting with “√”.
- You can now set a Maximum Temp.Scale.
- Use the “Up Arrow” or “Down Arrow” button to change the Maximum Temp. Scale.
- Confirm the setting with “√”.
- If “Room/Floor Limit” has been selected under “Sensor Application”, proceed to step 10. Otherwise, proceed to step 16.
Temperature Scale 3/3
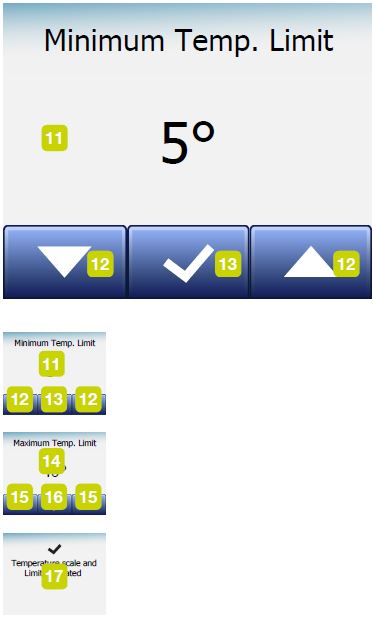
- You can now set a Minimum Temp. Limit.
- Use the “Up Arrow” or “Down Arrow” button to change the Minimum Temp. Limit.
- Confirm the setting with “√”.
- You can now set a Maximum Temp. Limit.
- Use the “Up Arrow” or “Down Arrow” button to change the Maximum Temp. Limit.
- Confirm the setting with “√”.
- A confirmation screen will be displayed.
- The thermostat will automatically return to “Engineer Settings
Factory Reset
This option allows you to restore the thermostat to factory settings.
- Tap the “Menu” button on the home screen.
- Scroll down and tap the “Engineer Settings” button.
- Tap the “Factory Reset” button.
- Tap “X” if you want to maintain your settings and return to “Engineer Settings”.
- Tap “Reset” if you want to restore the factory settings.
- The thermostat will then be reset and the “Startup Wizard” will appear on the screen.
EN50559 1/2
- This thermostat complies with EN 50559 (VDE 0705-559) for electrical floor heating.
- The regulation applies to electrical floor heating, with a maximum floor weight of 4 kN/m². To ensure that hotspots due to unintentionally covering up the surface are avoided, the heating function can be time-limited as per EN/DIN.
- Note that this function is not applicable to other heating applications such as wall and/or ceiling heating
- If it can be foreseen in advance that unintentional covering up of a floor might occur, then it is important to assess the correct period of time for which the floor heating must be time-limited.
- The heating can be limited using a set number between 0 – 20 minutes per hour.
Example:
- If obstacles could be present that cover up the floor, then the heating might need to be limited by some number of minutes so as to avoid hotspots in the floor.
- If you want the thermostat to heat a maximum of 90 % of the time, then the thermostat should be limited by 10 %.
- Ten percent of one hour is 6 minutes.
- Enter 6 min. in the EN50559 menu in order to lower the heating by 10 %.
EN50559 2/2
Equation to calculate number of minutes that could be entered in the EN50559 menu – when an average heating effect is desired:
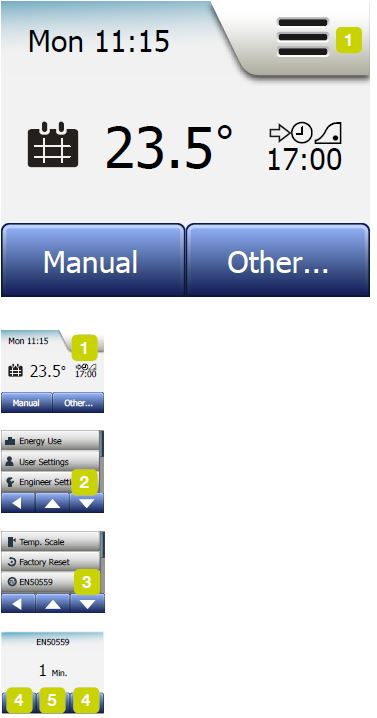
- Tap the “Menu” button on the home screen.
- Then tap the “Engineer Settings” button.
- Scroll down and tap the “EN50559” button.
- Use the “Up Arrow” or “Down Arrow” button to set the number of minutes – the thermostat should not heat per hour.
- Confirm the value with “√”.
- The thermostat will automatically return to “Engineer Settings”.
App Control*
These settings allow you to set up your thermostat for connection to your wireless network, through which the thermostat is able to connect to our thermostat cloud server. Server connectivity enables you to control your thermostat remotely using the SWATT® (Smart Wifi And Touch Thermostat) app from a smartphone or tablet with Internet connection.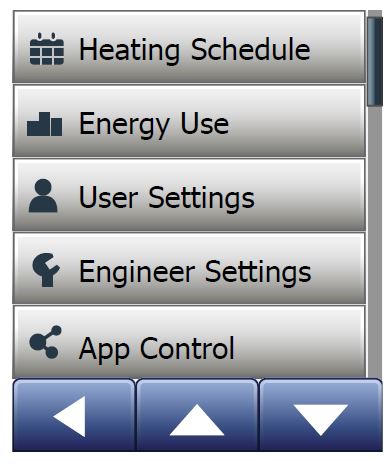
WiFi Connection
WiFi Connection* 1/4
You can set up a WiFi connection in the following way:
- Tap the “Menu” button on the home screen.
- Then tap the “App Control” button to access the app setup options.
- Tap the “WiFi Connection” button to set up the WiFi connection.
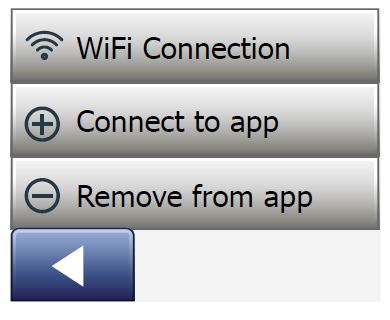
- Note that if a WiFi configuration is already made, the “Status” screen will be displayed showing the current status of the WiFi connection. In this case, tap the “Right Arrow” button to proceed, or the “Left Arrow” button to return to the main menu.
- Choose the desired connection type on the “Connection type ” screen:
- Tap “WPS” for automatic setup. Proceed to steps 5 to 6.
- Tap “Manual” for manual setup. Proceed to steps 7 to 10.
- Automatic setup requires that you can activate WPS on the router. For details about the location of the WPS button on your router, please check your router manual.
- Go to your WiFi router and activate WPS.
- On your thermostat, tap the “Right Arrow” button to start connecting the thermostat
WiFi Connection* 2/4
Manual connection:
- The “Searching networks” screen is displayed while the thermostat is searching for available networks. The detected networks are then displayed in a list.
- Tap the name of the desired network on the list.
- If you cannot see the name of your network on the list, you have to enter the network name manually in the following way:
- Tap “Other” at the bottom of the list of networks.
- You are now asked to enter the network name (SSID). Tap the “Right Arrow” button to proceed.
- Enter the network name (SSID) for your wireless network at the top of the screen.
- Confirm the network name with “√”
- See tips on using the keyboard in step 9 below.
- You are now asked to enter the network key (password). Tap the “Right Arrow” button to proceed.
- Enter the network key (password) for your wireless network at the top of the screen.
WiFi Connection* 3/4
Tips on using the keyboard:
- Tap the “Character set” button to the left to choose between different character sets, e.g. lowercase letters, uppercase letters, numbers and special characters.
- Tap the “Up Arrow” and “Down Arrow” buttons to scroll up and down in the selected character set.
- Tap the highlighted character to enter it at the top.
- Tap the “Delete” button to the right to delete the last character.
- If the key is too long to be displayed in the text field, you can tap the text to see the entire text. Tap it again to return to the keyboard.
- Confirm the network key with “√” to start connecting the thermostat.
- The thermostat will now attempt to connect to your wireless network. Please be patient, since this may take a while (several minutes).
- If the connection is successful, a confirmation screen will be displayed briefly.
- After that the “Status” screen will be displayed showing the current status of the
- WiFi connection. Tap the “Left Arrow” button to return to the menu.
- If the connection fails, the thermostat will tell you so. In this case, check troubleshooting, and then tap the “X” button to return to step 4 and try again
WiFi Connection* 4/4
If problems persist, or if anything unexpected happens during setup of the WiFi connection, please consult the “Troubleshooting” section in this manual. You can disconnect a WiFi connection in the following way:
- Tap the “Menu” button on the home screen.
- Then tap the “App Control” button to access the app setup options.
- Tap the “WiFi Connection” button to show the “Status” screen which displays the status of the current WiFi connection.
- Tap the “Right Arrow” button to proceed to the “Connection type” screen.
- Tap “Disconnect” to remove the current WiFi connection.
- Confirm with “√”. You will now return to the App Control menu.
- A confirmation screen will be displayed briefly.
- Note if you tap the “X” button you will return to the “Connection type” menu.
Connect to App*
Install the SWATT® (Smart Wifi And Touch Thermostat) app on your smart device. The SWATT® (Smart Wifi And Touch Thermostat) app can be downloaded from both Google Play and App Store
- When you have successfully set up a WiFi connection on your thermostat, you can connect it to SWATT® (Smart Wifi And Touch Thermostat) app in the following way:
- Tap the “Menu” button on the home screen.
- Then tap the “App Control” button to access the app setup options.
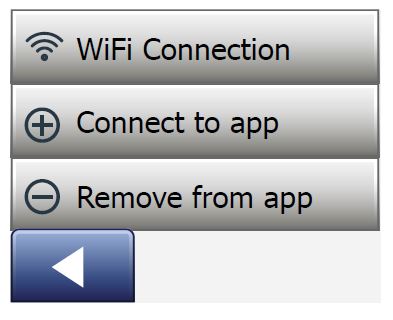
- Tap the “Connect to App” button to connect to your app.
- Choose how to connect to your app:
- Tap “QR Code” to display a QR code that you can scan with your mobile phone.
- Tap “Thermostat ID” to display the thermostat ID that you can enter in your app.
- Confirm with “√”.
Remove from App*
You can remove your thermostat from your app in the following way:
- Tap the “Menu” button on the home screen.
- Then tap the “App Control” button to access the app setup options.
- Tap the “Remove from App” button to remove the thermostat.
- Confirm with “√”.
- A confirmation screen will be displayed briefly.
- The thermostat will automatically return to the “App Control” menu.
Startup Wizard 1/2
- When the thermostat is powered up for the first time, or after a “Factory Reset” has been performed, the “Startup Wizard” will appear on the screen.
- This allows you to enter the basic data required by the thermostat in order to operate.
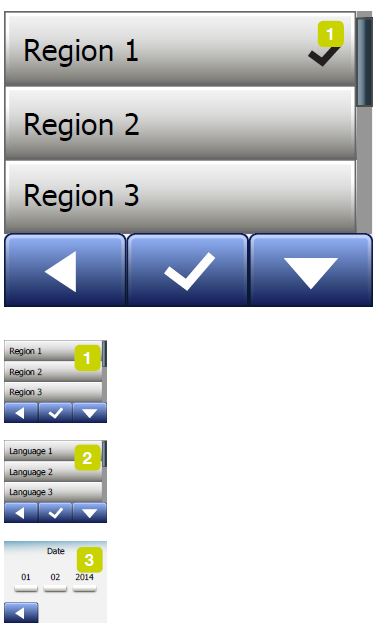
- Region – set the time region in which the thermostat is located.
- This parameter is used, for example, to ensure correct use of Daylight Saving Time.
- Tap the time region you are in.
- Confirm with “√”.
- Language – set the language to be used on the thermostat display.
- Tap the “Up Arrow” or “Down Arrow” button to scroll up and down.
- Tap the language you prefer.
- Confirm with “√”.
- Date – set the current date (is used for several functions).
- Tap the parameter you want to change.
- Tap the “Up Arrow” or “Down Arrow” button to set the day, month and year.
- Confirm each setting with “√”.
Startup Wizard 2/2
- Time – set the current time.
- Tap the parameter you want to change.
- Use the “Up Arrow” or “Down Arrow” button to set the hours and minutes.
- Confirm each setting with “√”.
- Floor Type – choose between:
- Tile: floors made of tile or stone.
- Soft Floor: wooden or other engineered floors.
- Confirm your choice with “√”.
Factory Settings
| Preset temperatures: | |
| Operating mode | Factory preset temperature |
| Scheduled Operation | See Preset Schedule* |
| Manual Override | 23°C* |
| Comfort Mode | 23°C* |
| Boost Mode | Max °C ≤ Maximum Limit |
| Holiday Mode | 5°C |
| Frost Protection | 5°C |
| Event name Event start Target/setpoint temperature dependent on “Sensor Application” | |||
| Work days: | Floor | Room/Floor Limit | |
| Wake up | 6:00 | 25°C | 20°C |
| Leave home | 8:00 | 20°C | 15°C |
| Daytime home* | 12:00 | 25°C | 20°C |
| Daytime leave* | 13:00 | 20°C | 15°C |
| Come home | 17:00 | 25°C | 20°C |
| Go to sleep | 23:00 | 20°C | 15°C |
| Home days: | Floor | Room/Floor Limit | |
| Wake up | 8:00 | 25°C | 20°C |
| Go to sleep | 23:00 | 20°C | 15°C |
Troubleshooting
|
Mode vs function |
Scheduled Operation |
Manual |
Boost |
Comfort |
Frost Pro- tection |
Holiday |
Eco |
|
Open Window detection |
Yes |
Yes |
Not available |
Yes |
Not available |
Not available |
Not available |
| Floor comfort override sensor application |
Yes |
Yes |
Not available |
Yes |
Not available |
Not available |
Not available |
|
Eco Function |
Changes the home screen to display the Eco button instead of Manual |
Not available |
Not available |
Not available |
Not available |
Not available |
Not available |
| I CAN’T CONNECT TO MY WIRELESS NETWORK* | |
| Possible causes | Solution |
| Insufficient WiFi signal | Try connecting another device, such as your mobile phone, to your wireless network . Stand next to your WiFi Thermostat, and access your phone’s wireless network settings . If the wireless network signal cannot be detected by your phone, or
it is very weak, other devices may also have trouble connecting to the network from that area of your home . You may be too far away from your WiFi router, or there may be a problem with it . If you are too far away from your WiFi router, you can purchase a WiFi signal repeater which will improve the range of the WiFi signal in your home for all devices . |
| You cannot connect to the WiFi router even though there is a good signal | Some WiFi routers limit the number of wireless devices that can connect to the Internet . To test whether this is the problem, shut down one of the other WiFi-enabled devices in your home . Once that device is completely shut down, try once again to connect your WiFi Thermostat to the network . If the WiFi Thermostat connects successfully, consult the documentation for your access to find out if you can increase the number of simultaneous connections to your WiFi network . |
| Other devices are interfering with the wireless signal | Try turning off other wireless devices (Bluetooth, WiFi, wireless phones/cameras) that may cause interference, then test the WiFi Thermostat’s network connection . |
| You have entered the correct SSID and network key, but connection cannot be established . | Please check the router manual for additional help on troubleshooting . |
| I CAN’T CONNECT TO MY WIRELESS NETWORK* | |
| Possible causes | Solution |
| Your WiFi router does not match the technical requirements supported by the Thermostat WiFi- module | The WiFi router has to match the technical specifications supported by the Thermostat WiFi-module:
• Wireless standard: 802 .11 b/g/n • Security Mechanisms: WPA-PSK/WPA2-PSK • Encryption: TKIP/AES • Frequency range: 2 .412GHz-2 .484GHz |
| Please check your router manual to confirm this .
Also make sure that no firewalls are blocking the communication from the thermostat to the Internet (port 9513) . New item . |
|
| Your WiFi router has insufficient security | With so many home devices now connected to the Internet, we want to make sure that your WiFi Thermostat is connected to a secure network so that hackers cannot gain control of devices in your home . WiFi routers utilize two main types of protective encryption: WEP and WPA . WEP is the original form of encryption and it offers very little security . Hackers can very easily break into your wireless network if your router is set up for WEP encryption . WEP encryption was replaced
with WPA encryption in 1999 and WPA2 in 2006 . WPA is a security protocol that makes it much more difficult to break into networks . Your WiFi Thermostat currently supports WEP, WPA and WPA2 encryption . If your router was manufactured after 2003, you should be able to change the setting from WEP to WPA by following the guide in the link: (http://www .tech-faq . com/how-to-change-wep-to-wpa .html) . Your WiFi Thermostat can still control your floor heating system without wireless network connection . As the best course of action, OJ Electronics recommends that you upgrade your security settings to properly protect your network from hackers . If that is not possible, contact your network administrator . |
| I CAN’T CONNECT TO MY WIRELESS NETWORK* | |
| Possible causes | Solution |
| Maybe your WiFi router requires a restart/reboot | The problem might be with your router (even if your other wireless devices are still connected) . A simple restart of the router will usually resolve such problems . While most routers simply have to be unplugged and then plugged back into their power source to restart them, you should refer to your router’s documentation for specific instructions . |
| Maybe your WiFi router firmware needs to be updated | Contact the router manufacturer for instructions on how to update the firmware . |
| Maybe your WiFi Thermostat has to be reset | Reset your WiFi Thermostat . For details on how to do this, place consult the “Factory Reset” section in this manual . Note! This action cannot be undone, and all your personal settings will be lost . |
| Maybe your thermostat has lost its WiFi connection | In the following situations, you have to reestablish the WiFi Connection from the thermostat: If you have performed a factory reset .
If you have changed the settings of your WiFi router, or if you have replaced your WiFi router . |
| I CAN’T CONNECT TO MY WIRELESS NETWORK* | |
| Possible causes | Solution |

|
Show in Home screen
Black icon: Connected to server Grey icon: Not connected to server Not connected to WiFi router No icon displayed: No WiFi configuration |
|
|
Shown in WiFi Connection, Manual Connection Black icon: Connected to WiFi router
Grey icon: No WiFi router connection No icon displayed: No WiFi configuration |

Error messages
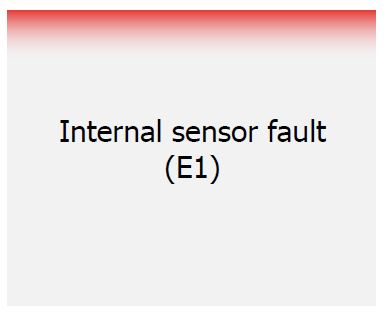
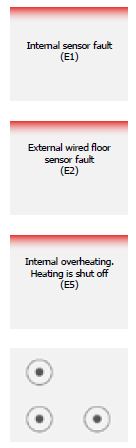
If a fault or error occurs, the thermostat will display one of the following error messages:
- E0: Internal failure. The thermostat is defective. Contact your heating engineer. The thermostat must be replaced.
- E1: Internal sensor defective or short-circuited. Contact your heating engineer. The thermostat must be replaced.
- E2: External wired floor sensor disconnected, defective or short-circuited.
- Contact your heating engineer for reconnection or replacement.
- E5: Internal overheating. Contact your heating engineer in order to have the installation inspected.
- Three circles containing dots are displayed on the screen; the thermostat cannot be operated.
- The thermostat is in “Child Lock” mode. See the section titled “Child Lock” in this manual for instructions on how to unlock it.
Why does a specific function not work in a specific mode?
Not all functions are available in all modes or make sense in all modes.
Hotwire Heating
- 1300 HOTWIRE
- www.hotwireheating.com.au
- [email protected]
Reference
Download Manual:
Hotwire HW-WiFi Smart Wif Thermostat Instruction Manual