Honeywell WEB -201 Thermostat

Overview
McDonald’s HEMS II Energy Management Control System & User Interface
The McDonald’s HEMS II energy management and control system runs on a WEB -201™ (Java Application Control Engine). TheWEB -201 is a compact, embedded controller/server platform. It combines integrated control, supervision, data logging, alarming, scheduling and network management functions with Internet connectivity and web serving capabilities in a small, compact platform. The WEB -201 makes it possible to control and manage external devices over your local network or the Internet and present real-time information to users in web-based graphical views.
The HEMS II system is complete in a 36” X 24” X 4” stainless steel panel with a local touch screen operator interface display. All system set points and changes can be made from this local display. With internet access provided to the HEMS II, all information and set points are available remotely from any PC browser interface. The system is designed to monitor and/or control the following items:
- (3) Roof Top Mounted HVAC Units.
- Freezer/Cooler Temperatures and associated Door Opened/Closed status.
- Outdoor air temperature.
- HVAC Unit Space Temperatures, Discharge Air (supply) Temperatures and Room Temperature Set Points.
- Electrical Demand and Electrical Consumption.
- Parking Lot Lights, Exterior Signage Lights, Customer (Dining Area) Lights.
- Employee/Kitchen Lights and Play Place Lights (if present).
- Outdoor Light Level from a Photocell.
Your installed system may have additional points of control or monitoring that are not covered or included in this document.
Additional points could be:
- Drive through heater control.
- Kitchen equipment monitoring.
- Interface to your security system for status.
- Water heater control.
- Additional Roof Top Mounted HVAC/Units.
- Bulk CO2 levels near beverage and CO2 storage tanks.
- Or additional monitoring & control points that have been customized for your facility.
Navigation to Login Page from Local or Remote Personal Computer location
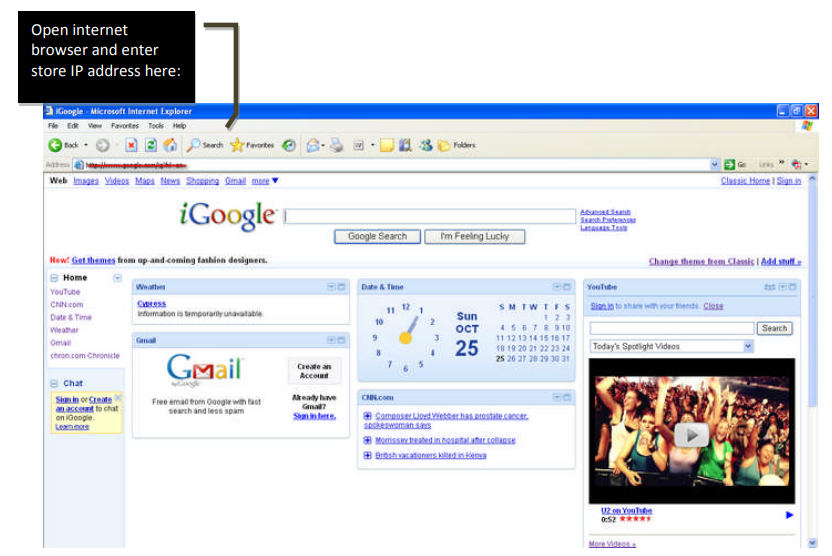
To begin: First open your internet browser and enter the WEBs Unit IP address in the “address bar”. The WEBs Unit IP address will be furnished to you by the installer of the system. Additionally, you may consider installing a short cut icon on your personal computer Desk Top that will direct you to the IP address of your system.
Navigation to Login Page from Local or Remote Personal Computer location
Login Page

The Login Page is where you enter your username (user) and password (pass). Then click the login icon. Please wait until the booting process completely loads, once it does, it will automatically route you to the Home Page. Note that the first time you access your system from any browser it could take several minutes to load the Home Page. Subsequent access to the system, from the same Personal Computer will load the Home Page must faster.
Below is the default Login Page from the Local Touch Screen located on the front of panel after unit has been powered “ON”or after the blank screen has been touched and unit returns to normal operation mode from power saving standby
mode.

The Login Page will be automatically populated with the Username & Password.
Touch the Login icon once and the system will automatically route you to the Home
Home Page

The Home Page will display your systems current conditions with any active alarms.

This area of Home Page shows the following:
- Your store number and physical location.
- Current outside air temperature. By touching or clicking on the CYAN colored area you will be directed to a trend log of accumulated outside temperature data. See page 18 of this document for more information on this.
- Current time and date in the control system.
- By touching or clicking on “Operating Instructions” icon you will be presented with a complete description and use of each section of displays and completed system electrical drawings and written sequence of operations. See pages 20-27 and 28-37 of this document for more information on this.
This area of Home Page shows the following:

- Current electrical peak demand and current electrical (KWH) consumption for the current month and current year. By touching or clicking on any CYAN colored area you will be directed to a trend log of accumulated electrical data. See page 18 of this document for more information on this.
- Current electrical demand set point. See page 19 of this document for more information this.
- Energy Demand Limiting: When active the box will say Active and the background will be RED. When Inactive the box will say Inactive and the background will be YELLOW. When Active the temperature set points for all HVAC Units will be automatically raised 3°F (when in cooling mode) or lowered 3°F (when in heating mode). HVAC Units automatically switch between Cooling/Heating modes to maintain room temperatures. Active condition exists when current electrical demand is within 2.5% of electrical demand set point.
- By touching or clicking on Electrical icon you will be directed to another page for set point adjustments. See page 19 of this document for more information on this.
This area of Home Page shows the following:

- Current freezer and cooler temperatures. By touching or clicking on any numeric value you will be directedto a trend log of accumulated freezer or cooler temperature data. See page 18 of this document for more information on this. RED bullet light (next to Freezer or Cooler) indicates an alarm condition. No alarm condition and the light will be GREEN. If freezer temperature is 25°F or greater for 5 minutes or more an alarm condition will exist. If cooler temperature is 42°F or greater for 5 minutes or more and alarm condition will exist. When in an alarm condition an internal panel alarm horn will sound continuously. Pressing the Alarm Silence icon causes the internal alarm horn to stop temporarily, yet will start up again if alarm condition exists after another 5 minutes.
- Current status of freezer and cooler doors. RED bullet light (next to Freezer or Cooler) indicates an alarm condition. No alarm condition and the light will be GREEN. With freezer or cooler doors closed the nomenclature to the right will indicate Door Closed with a gray background color. With freezer or cooler doors open for more than 5 continous minutes the nomenclature will read Door Opened with a RED background and the internal panel alarm horn will sound continuously. Pressing the Alarm Silence icon causes the internal alarm horn to stop temporarily, yet will start up again if alarm condition exists after another 5 minutes.
- Current bulk C02 reading in parts per million (PPM). RED bullet light (next to CO2) indicates an alarm condition. GREEN indicates unit is OK. When in alarm condition for more than five minutes (CO2 reading at 15,000 PPM or greater) an internal panel alarm horn will sound continuously and the NORMAL nomenclature to the right will change to ALARM with a RED background color. Pressing the Alarm Silence icon causes the internal alarm horn to stop temporarily, yet will start up again if alarm condition exists after another 5 minutes. CO2 point information and alarming is an option for the HEMS II panel and may or may not be included with your system based on what was ordered.
This area of Home Page shows the following:

- Current Lighting controls. RED bullet lights next to a lighting zone name indicates the lighting zone is commanded OFF by the associated time of day schedule or photocell. GREEN indicates the lighting zone is commanded ON by the associated time of day schedule or photocell. The photocells and their set points are only associated with Parking Lot and Signage lighting zones.
- By touching or clicking on Lighting icon you will be directed to another page for photocell set point adjustments. See page 19 of this document for more information on this.
- Each individual lighting zone has a separate AUTO or ON icon. By touching or clicking on the AUTO icon, that icon will turn GREEN and the associated lighting zone will start and stop based on a time of day chedule. By touching or clicking on the ON icon that lighting zone will be on continuously.
- Photocell for Parking and Signage indicate ON when outdoor light level is below the set point for each lighting zone and OFF when outdoor light level is higher than the set point for each lighting zone. See page 19 of this document for more information on this.
- There is a separate time of day schedule associated with each lighting zone. Touching or clicking on the associated schedule icon and you will be automatically routed to another page for schedule adjustments. See pages 14-17 of this document for more information on this.
- Schedule icons that show three people (in color) indicate that the schedule is currently in the Occupied Mode of operations. Schedule icons that show three people (in ghost white) indicate that the schedule is currently in the Unoccupied Mode of operation.
This area of Home Page shows the following:

- Current HVAC Units. RED bullet lights next to FAN indicate the HVAC Unit is commanded OFF by the associated time of day schedule. GREEN indicates the HVAC Unit is commanded ON by the associated time of day schedule.
- By touching or clicking on Kitchen Area, Dining Area or Playplace Area icons you will be directed to another page for additional information and set point adjustments. See page 13 of this document for more information on this.
- Each individual HVAC Unit has a separate AUTO or ON icon. By touching or clicking on the AUTO icon, that icon will turn GREEN and the associated HVAC Unit will start and stop based on a time of day schedule.
By touching or clicking on the ON icon that HVAC Unit will be on continuously. - There is a separate time of day schedule associated with each HVAC Unit. Touch or Click on the associated schedule icon and you will be automatically routed to another page for schedule adjustments. See page 14-17 of this document for more information on this.
- Schedule icons that show three people (in color) indicate that the schedule is currently in the Occupied Mode of operations. Schedule icons that show three people (in ghost white) indicate that the schedule is currently in the Unoccupied Mode of operation.
- Each HVAC Unit shows the current Room Temperature and current Heating and Cooling set points. These set points are adjustable. Refer to page 13 of this document to make adjustments.
HVAC Units
This area of the HVAC Unit page shows the following:

- Each HVAC Unit has a page similar to above associated with it. The current view is that of the Kitchen HVAC Unit (Kitchen RTU – Roof Top Unit).
- On the left side is the system information section that indicates current Outdoor Air Temperature, Schedule Status (Occupied or Unoccupied), Current HVAC Mode of Heat or Cool (this mode changes automatically based on space temperature verses space temperature set point), Current Space Temperature, Occupied Heating Set Point and associated raise and lower buttons, Occupied Cooling Set Point and associated raise and lower buttons, Unoccupied Heating Set Point and associated raise and lower buttons, Unoccupied Cooling Set Point and associated raise and lower buttons, Status of HVAC Unit controller and icons to return to Main (Home Page) or the associated Schedule for the selected HVAC Unit.
- This graphic also shows the commanded status of the Economizer (Enabled or Disabled), Unit Fan (On or Off) and number of Heating (1-4) or Cooling Stages (1-4) commanded ON. Additionally the current Discharge Air (supply air to area served by the HVAC Unit) Temperature and state of Electrical Demand Limiting (Inactive or Active) are shown.
- By touching or clicking on the CYAN colored background area of the Space Temperature or Discharge Air
temperature you will be directed to a trend log of values for these points. - Energy Demand Limiting: When Active the box will say Active and the background will be RED. When Inactive the box will say Inactive and the background will be YELLOW. When Active the temperature set points for the HVAC Unit will be automatically raised 3°F (when in Cooling Mode) or lowered 3°F (when in Heating Mode). HVAC Units automatically switch between Cooling/Heating Modes to maintain room temperatures. Active condition exists when current electrical demand is within 2.5% of electrical demand set point.
- The Occupied Cooling set point must ALWAYS be set 2-3°F higher than the Occupied Heating set point, otherwise a set point conflict will occur and the Controller Status indication will show ALARM state.
Time of Day Schedules & Holidays for HVAC Units and Lighting Zones

By touching or clicking on any HVAC Unit or Lighting Zone Schedule icon from the Home Page you will see the following:
- Each HVAC Unit and Lighting Zone has a separate and distinctive time of day schedule associated with it.
- In this case you are looking at the Kitchen HVAC Unit schedule. The green areas indicate the Occupied Schedule and the gray areas indicate an Unoccupied Schedule. In this case the Kitchen unit is set to the Occupied Mode of operation from 4am to12amMonday through Friday and on Saturdays and Sundays the Occupied Mode of operations is from 4am to 1am the next day. Otherwise the unit is in the Unoccupied Mode of operation. In Occupied Mode of operation the HVAC fan runs continuously to maintain room or area Occupied temperature set points. In the Unoccupied Mode the fan, heating and cooling stages all cycle to maintain Unoccupied temperature set points. See additional sections of this document for more information on this.
- Adjustments are easily made. See next page.
- For stores where the dining room is closed and yet the drive through is open 24 hours you will want to touch or click on the ON icon from the Home Page Schedule icon associated with the Dining Room HVAC Unit.
This will keep the HVAC Unit fan operating continuously for make up air to your hood exhaust system.
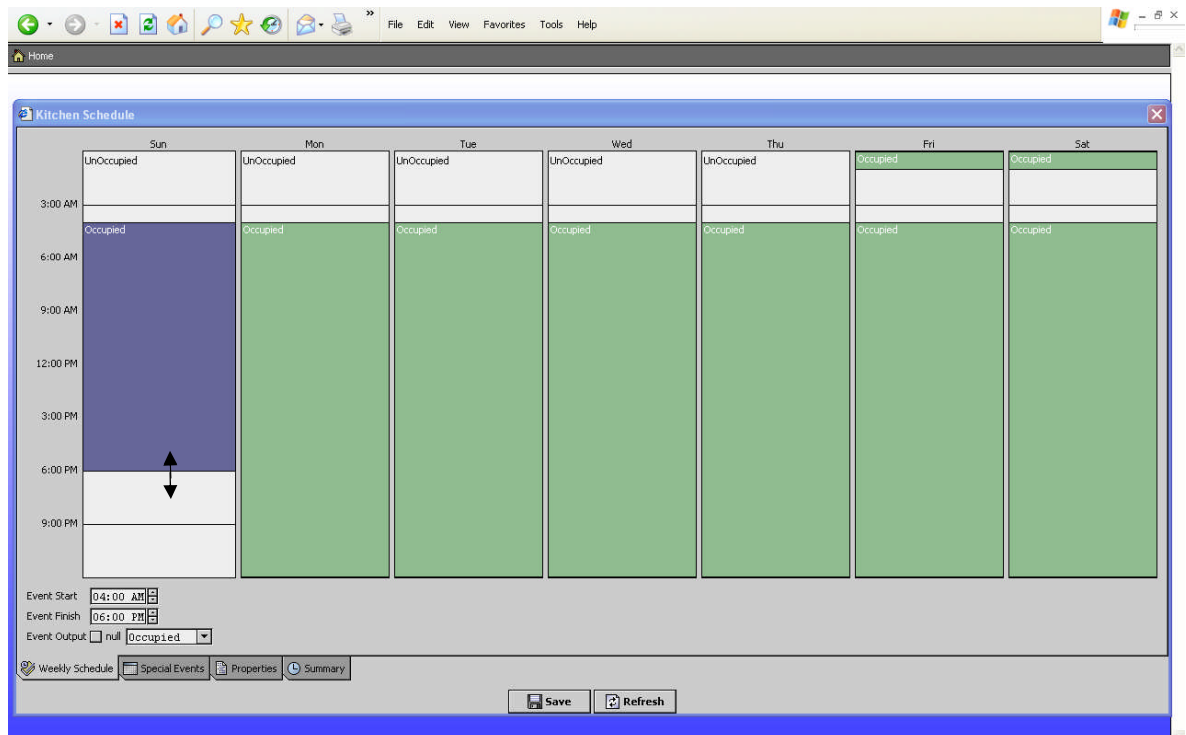
- By touching or left clicking your mouse on any green area of the schedule that section will then turn blue and you can edit it.
- Notice that Monday was touched or clicked on and the background color changed to blue for editing.
- You can drag your finger or mouse (double arrow) to a new Occupied start and/or stop time. In the case above the start was retained at 4am and the stop time has now been set to 6pm. The same adjustments for any day can also be made by using the up and down arrow keys in the lower left hand corner of screen.

By touching and holding your finger on any green area of the schedule or right-clicking your mouse that section will then turn blue and you are presented with a drop-down selection where you can: Delete the Event, Make an All Day Event, Apply the Schedule to M-F, Copy the Day to the next Day, Clear the Day or Clear the Week. This is very intuitive and easy to understand after just a few minutes.
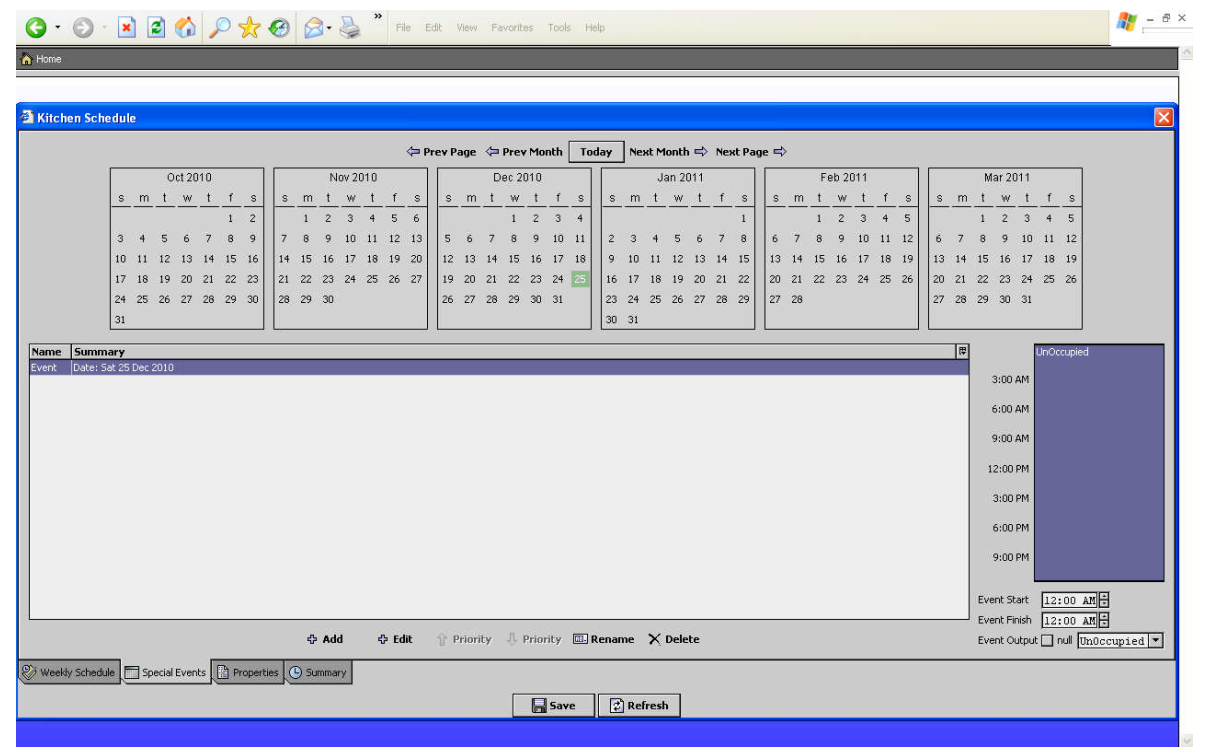
- By touching or clicking on the Special Events tab at the bottom left of the screen to can add and edit special events. The example above shows that on Sat December 25th of 2010 (Christmas) the schedule has been set to Unoccupied for the complete day.
- It is very easy and intuitive to add special events or holidays for any unit or lighting zone that has a schedule associated with it. Additionally, just like indicated on previous pages use your finger or mouse to adjust the time of day for these events, either in the box in the lower right-hand corner or through the up/down arrow keys in the lower right-hand corner.
Data Logging and Trended Points

- The following points are all selectable from the Home and/or HVAC Unit graphic pages by touching or clicking on the numeric value ( CYAN background color) shown for each: OSA Temperature (Outside Air Temperature), Peak Electrical Demand, KWH Monthly (monthly electrical consumption), KWH Yearly (yearly electrical consumption), Freezer (temperature), Cooler (temperature), Space Temp (space temperature for each area of building) and DA Temp (discharge or supply air temperature from each HVAC Unit).
- The information above shows the Cooler temperature as an example. Note that in the upper left hand corner a time range can be selected from a drop down menu. You can elect to review the trend information by specifying a certain time range or values for Today, Last 24 Hours, Yesterday, Week-to-Date, Last Week, Last 7 days, Month-to-Date, Last Month, Year-To-Date (data may not be available for this time period) and Last Year (data may not be available for this time period). See item 5 below.
- You can also place your finger or mouse at any point on the graphic line to see what an exact value was and the exact date and time that value was recorded.
- Note that each point is trended or logged every 60 minutes, 24 hours per day, 365 days per year. The exception is Peak Demand which is recorded every 15 minutes, 24 hours per day, 365 days per year and KWH Monthly and KWH Yearly which are continuously recorded.
- Also note that the WEBs controller has a limited amount of internal memory for holding and retaining logged or trended values. When this internal memory is full, older data values are overwritten by new recorded values. With this in mind you may not able to read data values from a long time ago. Typically the WEBs unit will retain the last 7-30 days of trended or logged data for each point. Honeywell offers a service that automatically retrieves and retains long term trended or logged data for you, as long as, a continuous internet connection to the WEBs unit is available. Consult with your Honeywell salesperson on the costs associated with additional service.
Electrical Demand Limiting and Lighting Photocell Adjustments

- You reach this page by touching or clicking on the Lighting or Electrical icons on the Home page.
- Demand set point is easily adjusted by touching or clicking on the plus or minus keys above. For retrofit sites a review of your past 12 months of utility bills will allow for a determination of what this value should be. Consult with your Honeywell sales person or local electrical utilities representative to help you make this initial setting. For new construction projects it may take 6 months to a year before this value can be accurately set based on a review of your utility bills. Once set there should be no need for further adjustment, unless there is a change in the way the utility company bills or charges you. When actual electrical demand is within 2.5% of the setting above the temperature set points for the HVAC unit will be automatically raised 3° (when in cooling mode) or lowered 3° (when in heating mode). HVAC units automatically switch between Cooling/Heating modes to maintain room temperatures.
- Parking Lot Lighting and Signage Lighting controls operate the same, but each has a separate adjustable “turn on” set point based on outdoor light levels as sensed by one common outdoor photocell. Typically the values above are set at 3450; this has proven to be a good setting for lighting to turn on based on outdoor light levels. You may want your signage to turn on earlier than parking lot lights that is why there is a separate darker/lighter adjustment for each. Touching or clicking on darker or lighter will adjust the start point for each. Parking and Signage each have a separate (adjustable) time of day schedule associated with them. See icons on Home page and refer to Time of Day Schedules & Holidays section of this document for adjustments to these schedules. The Parking or Signage lights will start based on outdoor light level and adjustments above. In a non 24 hour store the associated schedule is used to enable or shut lights off when the store is closed and employees are all gone, no matter what the light level is outside. An Example may be as follows: Your employees show up for work at 4am – parking lot lights turn on by time of day schedule. At 5am your drive through opens – signage lights turn on by time of day schedule. When outdoor light level is high enough say at 6am the parking lot lights shut off by the photocell set point. As outdoor light level increases maybe the signage should shut off by the photocell set point (but it does not have to). As light level decreases late in the day or evening the parking and signage lights come back on by photocell. Store closes at Midnight and signage shuts off on schedule. Employees leave at 1am after clean up, parking lot lights and employee lights shut off by schedule.
Embedded Touch Screen Operating Instructions


INSTALLATION DIAGRAM

- SYSTEM ARCHITECTURE
THE EMCS SYSTEM ARCHITECTURE CONSISTS OF A NEW CPU OPERATING ON THE WINDOWS XP-PRO PLATFORM, AND A NEW WEB-201, (JAVA APPLICATION CONTROL ENGINE) NETWORK AREA CONTROLLER (NAC). PROVIDING INTEGRATED CONTROL, SUPERVISION, AND NETWORK MANAGEMENT OF THE HONEYWELL LONMARK/LONWORKST OPEN SYSTEM” CONTROLLERS, COMMUNICATING USING THE ECHELONTM LONTALKTM PROTOCOL ON A 78KB FTT LOCAL AREA NETwORK.
THE WEB-201 A IS A MEMBER OF THE WEBs AX SUITE OF JAVA-BASED CONTROLLER/SERVER PRODUCTS WHICH ARE DESIGNED TO INTEGRATE A VARIETY OF DEVICES AND PROTOCOLS INTO UNIFIED, DISTRIBUTED SYSTEMS.
WEBs AX PRODUCTS ARE POWERED BY NIAGARA AX FRAMEWORK. NIAGARA SUPPORTS A WIDE RANGE OF PROTOcOLS INCLUDING LONWORKS, BACnet, Modbus, AND INTERNET STANDARDs. THE WEB-201 CONTROLLER SERVES DATA AND GRAPHICAL DISPLAYS TO A STANDARD WEB BROVwSER VIA AN ETHERNET LAN OR REMOTELY OVER THE INTERNET OR (OPTIONAL DIAL-UP CELLULAR MODEM). - DOOR CONTACTS
THE FREEZER AND CoOLER DOORS ARE MONITORED AND ALARMED (OPTIONS): MEN’S RESTROOM, AND WOMEN’S RESTROOM DOORS ARE MONITORED AND ALARMED. - DOMESTIC HOT WATER HEATER (OPTION)
THE WATER HEATER IS ENABLED AND DISABLED BY A TIME SCHEDULE. - MONITORING POINTS
THE FREEZER AND coOLER TEMPERATURES ARE MONITORED AND ALARMED. THE OUTSIDE AIR TEMPERATURE IS MONITORED 2 KITCHEN EQUIPMENT MONITORING POINTS ARE PROVIDED (OPTION). - LIGHTING CONTROL
- INTERIOR LIGHTING: THE CUSTOMER’S, EMPLOYEES, AND PLAYLAND LIGHTS ARE CONTROLLED BY TIME SCHEDULE
- EXTERIOR LIGHTING: SIGNAGE AND PARKING LOT LIGHTS ARE CONTROLLED BY TIME SCHEDULE AND AN INDIVIDUAL OUTDOOR PHOTOCELL SETPOINT ONE FOR EACH ZONE
- LIGHTING CcONTROL (POWERL INK G3 OPTION)
WITH THE SQUARE D POWERLINK G3 LIGHTING CONTROL PANEL OPTION, THE SEQUENCE OF CONTROL REMAINS THE SAME FOR THE INTERIOR AND EXTERIOR LIGHTING.- POWELINK G3 INTERFACE OPTIONS: OPTION 1 IS 5 DIGITAL INPUTSs. INTERFACE OPTION 2 IS VIA MODBUS COMMUNICATION.
- LIGHTING CONTROL (CONTACTOR OPTION)
- WITH THE LIGHTING CONTACTOR OPTION, THE SEQUENCE OF CONTROL REMAINS THE SAME FOR THE INTERIOR AND EXTERIOR LIGHTING LIGHTING CONTROL CONTACTORS ARE NOT FURNISHED AS PART OF THE HEMS II PRODUCT PANEL CONTACTORS MUST BE FURNISHED AND INSTALLED BY THE INSTALLING HEMS II CONTRACTOR OR OTHERS.
- POWER MONITORING OPTION)
THE ELECTRICAL POWER IS MONITORED AND LoGGED.- LOAD SHEDDING: AT THE OWNER’s DISCRETION, POWER cONSUMPTION LEVELS CAN BE SET TO SHED POWER LOAD BY INCREASING THE DEADBAND OF THE VENTILATION SYSTEMS HEATING AND COOLING TEMPERATURE SETPOINTS BY 3°F, WHEN THE LOAD IS WITHIN 2.5% OF THE SETPOINT. OPTIONAL DOMESTIC HOT WATER AND THE DRIVE-THRU HEATER ARE DISABLED WHEN THE LOAD IS WITHIN 2.5% OF THE SETPOINT.
- DRIVE THRU HEATER (OPTION)
THE HEATER IS ENABLED AND DISABLED BY THE TIME SCHEDULE. - Co2 GAS MONITORING AND ALARM SYSTEM (OPTION)
- STARTUP: THE START-UP SEQUENCE WILL VERIFY THE STROBE/ALARM AND CO SENSOR ARE WIRED CORRECTLY WHEN POWER 1S IS APPLIED TO THE SYSTEM. APPROXIMATELY 15 SECONDS AFTER POWER IS APPLIED OR THE TEST BUTTON ON THE POWER SUPPLY IS PRESSED, THE HORN WILL SOUND FOR ABOUT 2 SECONDS AND THE STROBE WILL CONTINUE TO FLASH FOR 5-10 SECONDS. MAKE SURE THE GREEN LED ON THE SENSOR IS LIT. CHECK WIRING AND POWER IF THIS DOES NOT OCCURAS DESCRIBED
- NORMAL OPERATION: THE PURPOSE OF THE CO2 ALARM SYSTEM IS TO ACTIVATE A WARNING TO BUILDING OCCUPANTS WHEN THE CO2 LEVEL INA SPACE WHERE TANKS OR BULK CO2 IS STORED APPROACHES A HARMFUL LEVEL THE CO SENSOR WILL CLOSE A RELAY WHEN 15,000 PPM co Is SENSED. THE STROBE/ALARM WILL FLASH WITH A WHITE LIGHT AT>30 FLASHES PER MINUTE TWO ADDITIONAL RELAYS WILL CLOSE WHEN THE CO, LEVEL HAS REACHED 30,000 PPM. THE SECOND RELAY ACTIVATES THE AUDIBLE ALARM. THE THIRD RELAY IS DEDICATED TO TWO-WIRE DRY CONTACT (BLUE AND GREEN WIRES). THIS THIRD RELAY CAN BE CONNECTED TO THE FIRE ALARM SYSTEM AT THE DISCRETION OF THE OWNER. THE CO SENSOR’S LINEAR 0-5-VDC/0-30.000 PPM CO SIGNAL IS MONITORED THE DDC SYSTEM. WHEN CO LEVELS DECREASE OR POWER IS REMOVED, THE RELAYS WILL OPEN AND THE AUDIBLE AND FLASHING ALARMS WILL STOP THE CO SENSOR HAS A SOLID ON GREEN LED WHEN POWER IS SUPPLIED TO THE SENSOR.
- FIELD ADJUSTMENTS:
THE SYSTEM IS NOT FIELD ADJUSTABLE. - CHECKOUT AND TROUBLESHOOTING:
IMPORTANT TEST SYSTEM MONTHLY BY DEPRESSING THE PUSH BUTTON ON THE POWER SUPPLY TO MAKE SURE SYSTEM HAS NOT BEEN TAMPERED WITH AND Is OPERATING NORMALLY. ONCE PER MONTH, TEST THE SYSTEM BY PRESENTING THE PUSH BUTTON ON THE PoWER SUPPLY TO RESET THE POWER. APPROXIMATELY 15 SECONDS AFTER POWER IS APPLIED OR THE TEST BUTTON ON THE POWER SUPPLY 1S PRESSED, THE HORN WILL SOUND FOR ABOUT 2 SECONDS AND THE STROBE WILL CONTINUE TO FLASH FOR 5 TO 10 SECONDS MAKE SURE THE GREEN LED ON THE SENSOR IS LT. THE SYSTEM IS WORKING PROPERLY. CHECK wIRING AND POWER IF THIS DOES NOT OCCUR AS DESCRIBED. THE CO SENSOR HAS AN AUTOMATIC BACKGROUND CALIBRATION. IF THE BACKGROUND CALIBRATION DRIFTS FROM THE FACTORY CALIBRATION BY 3,000 PPM, THE STROBE LIGHT WILL FLASH 10 SECONDS EVERY MINUTE IF THIS OCCURS IT cOULD INDICATE A SsLOW LEAK IN CO2 EQUIPMENT. VENTILATE THE SPACE. REPLACE THE SENSOR AND CHECK FOR SLOW LEAKS IN THE CO; EQUIPMENT. REPLACE ANY LEAKING EQUIPMENT IMPORTANT STROBE WILL FLASH FOR 10 SECONDS EVERY MINUTE WHEN OUT OF CALI1BRATION AND THE SENSOR NEEDS TO BE REPLACED. IF THE FLASHING REPEATS AFTER A PERIOD OF A FEW MONTHS WITH A REPLACEMENT SENSOR, THERE IS POSSIBLY A SLOW LEAK IN THE CO EQUIPMENT. INVESTIGATE THE LEAK AND REPLACE THE LEAKING EQUIPMENT. USE OF A POWER SUPPLY OTHER THAN THAT SUPPLIED WITH THE SYSTEM OR THE REPLACEMENT 50016095-001 POWER SUPPLY WILL NOT PERMIT PROPER OPERATION OF THE SYSTEM.
- ROOE TOP UNIT WITH PACKAGED ECONOMIZER
CONSTANT_ VOLUME ROOF TOP UNIT INCLUDES SUPPLY FAN. PACKAGED CONTROLLED, OUTSIDE AIR OCCUPIED AND UNOCCUPIED MODES OF OPERATION.- WARM-UP MODE: UPON THE CONTROLLER RECEIVING THE WARM-UP SIGNAL, THE SUPPLY FAN OPERATES CONTINUOUSLY, THE PACKAGED ECONOMIZER IS DISABLED, AND THE HEAT IS CYCLED TO ACHIEVE THE SPACE TEMPERATURE HEATING SETPOINT BY THE SCHEDULED OCCUPIED PERIOD.
- coOL-DOWN MODE: UPON THE CONTROLLER RECEIVING THE CoOL-DOWN SIGNAL, THE SUPPLY FAN OPERATES CONTINUOUSLY, THE PACKAGED ECONOMIZER IS ENABLED AND DX COOLING IS CYCLED TO ATTAIN THE SPACE TEMPERATURE COOLING SETPOINT BY THE OCCUPIED PERIOD.
- OCCUPIED MODE: UPON THE CONTROLLER RECEIVING THE OcCUPIED SIGNAL, THE SUPPLY FAN OPERATES CONTINUOUSLY AND THE PACKAGED ECONOMIZER IS ENABLED. ON A CALL FOR HEAT, THE HEAT IS CYCLED TO MAINTAIN THE OCCUPIED HEATING TEMPERATURE SETPOINT. ON A CALL FOR COOLING, THE COMPRESSOR IS DUTY-CYCLED (6 CYCLES/HR) TO MAINTAIN THE SPACE TEMPERATURE COOLING SETPOINT. THE OCCUPIED HEATING SETPOINT IS 70°F (ADJUSTABLE), AND THE OCCUPIED COOLING SETPOINT IS 74°F (ADJUSTABLE).
- UNOCCUPIED MODE: THE SUPPLY FAN REMAINS OFF AND THE PACKAGED ECONOMIZER IS DISABLED. ON A CALL FOR HEATING, THE SUPPLY FAN IS CYCLED ON, THE PACKAGED ECONOMIZER REMAINS DISABLED, AND THE HEAT IS CYCLED. WHEN THE SPACE TEMPERATURE RISES ABOVE THE UNOCCUPIED SPACE TEMPERATURE HEATING SETPOINT, THE FANS AND HEAT ARE CYCLED OFF. A CALL FOR COOLING THE SUPPLY FAN IS CYCLED ON AND THE PACKAGED ECONOMIZER IS ENABLED TO MAINTAIN THE SPACE TEMPERATURE COOLING SETPOINT. THE UNOCcUPIED HEATING SETPOINT IS 60°F (ADJUSTABLE), AND THE UNOCCUPIED COOLING SETPOINT ISs 85° F (ADJUSTABLE).
- THE FOLLOWING POINTS ARE DISPLAYED:
UNIT HEATING/COOLING STATUS SPACE TEMPERATURE DISCHARGE AIR TEMPERATURE OCCUPIED SPACE TEMPERATURE HEATING SETPOINT OCCUPIED SPACE TEMPERATURE COOLING SETPOINT UNOCCUPIED SPACE TEMPERATURE HEATING SETPOINT UNOCCUPIED SPACE TEMPERATURE COOLING SETPOINT SUPPLY FAN COMMANDED STATUS.


Reference
Download Manual:
Honeywell WEB -201 Thermostat User Guide
![]()