Honeywell TL9160AR Wireless Thermostat
Before you begin
Do you know your thermostat configuration?

To know whether your new thermostat is configured in programmable mode or non-programmable mode, look for the time and day display on the thermostat screen. If the time and day appear on the screen, the thermostat is configured as a programmable thermostat.
Refer to the table of contents on the next page for sections that apply to your thermostat configuration.
Need Help?
For assistance with this product please visit https://www.honeywellhome.com/us/en/support/, or call Honeywell Customer Care toll-free at 1-800-468-1502.
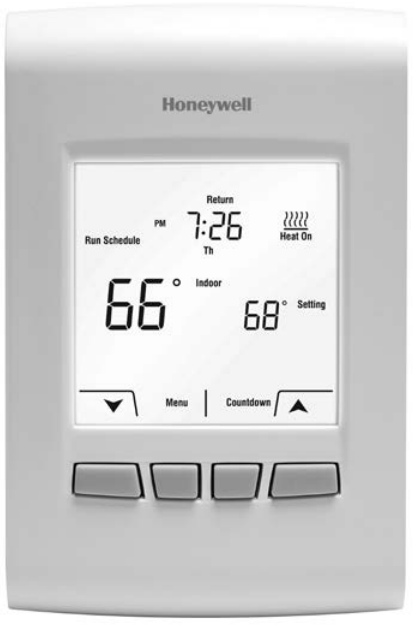
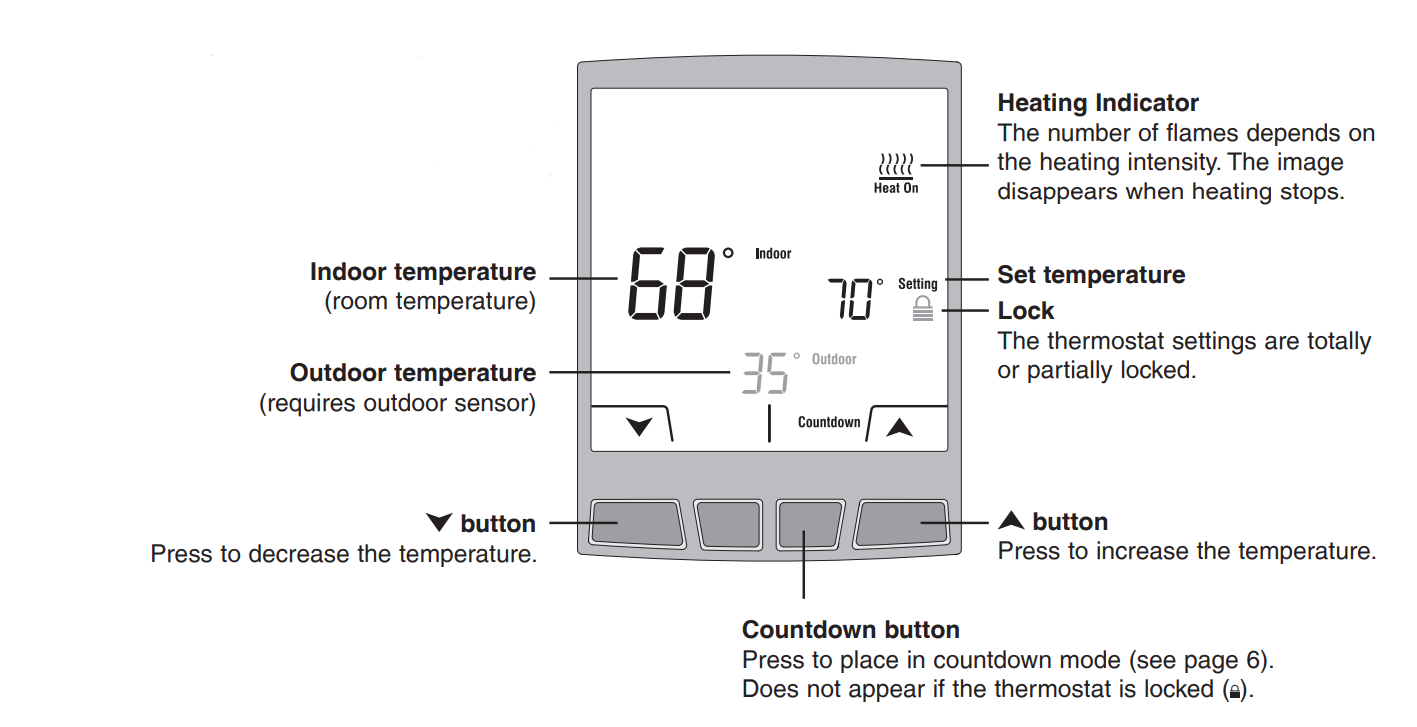
Thermostat display in non-programmable mode
If your thermostat is configured in programmable mode, see more description on page 8.\
Setting the temperature

Countdown mode
Press Countdown to set a new temperature and to select the time you wish to hold this temperature setting. The thermostat will return to its previous or programmed temperature setting at the end of the countdown time. The countdown time is selectable from 15 minutes to 14 days.
The Countdown mode is not available when the thermostat is locked.


Thermostat display in programmable mode
The thermostat displays the current time and day when the thermostat is configured in programmable mode. When the thermostat is following the schedule, it also displays the current period of the schedule: Wake, Leave, Return or Sleep. The period is not displayed when the thermostat is placed in Temporary Hold or Permanent Hold.

Following the heating schedule
Run Schedule appears on the screen when the thermostat is following the programmed schedule. Your thermostat has been programmed with an energy-saving schedule which can reduce your heating expenses.
| Monday to Friday (Mo, Tu, We, Th & Fr) | Saturday and Sunday (Sa & Su) | |||
| Period | Starting time | Temperature | Starting time | Temperature |
| Wake | 6:00 AM (6h) | 70°F (21.0°C) | 8:00 AM (8h) | 70°F (21.0°C) |
| Leave | 8:00 AM (8h) | 62°F (16.5°C) | – – – – | – – |
| Return | 6:00 PM (18h) | 70°F (21.0°C) | – – – – | – – |
| Sleep | 10:00 PM (22h) | 62°F (16.5°C) | 10:00 PM (22h) | 62°F (16.5°C) |
The schedule consists of 4 periods per day, which represents a typical weekday. However, you can program the thermostat to skip (cancel) the periods that do not apply to your situation. For example, Leave and Return periods are skipped for the weekend in the default schedule. You can choose a different program every day; i.e., each period can have a different starting time and a different temperature every day.
Setting the time and the date

* Copy will appear only if the thermostat is linked to a remote control or an outdoor sensor.

When this function is enabled, the thermostat switches to daylight savings time on the second Sunday of March and to normal time on the first Sunday of November. When the function is disabled, the thermostat keeps the normal time all year long.
Modifying the heating schedule

The groups are: Mo-Fr, Sa-Su and Mon-Su. Selecting a group will apply the changes to all the days within that group.

If you wish to clear a period (e.g., you may want to skip the Leave and Return periods if you stay home all day), select the period (step 4) and press and simultaneously. The time and temperature settings appear as dashes when the period is cleared.
The Wake period cannot be erased.
Temporary Hold
Use Temporary Hold mode to temporarily bypass the schedule and set a new temperature. The thermostat will hold the new temperature during the current period. The thermostat will resume the heating schedule when the next period starts or if you press Cancel.
- Press or until the desired temperature is displayed.
 Press Temporary.
- At any time, you can press Cancel to follow the schedule.

Permanent Hold
Use Permanent Hold mode to bypass the schedule and set a new temperature for an indefinite period of time. To resume the heating schedule, press Cancel.
- Press or until the desired temperature is displayed.

- Press Permanent.
- At any time, you can press Cancel to follow the schedule.

Copying the heating schedule
Use the Copy function to transmit the schedule settings of this thermostat to other EConnect™ wireless thermostats in your house.
This function is available only if the thermostat is connected to a remote control or to an outdoor sensor. The schedule settings are transmitted to any other thermostat connected to the same remote control or outdoor sensor.
- Press Menu.

- Select Copy.
- Press OK.

- Wait flashes when the schedule settings are transmitted to the other thermostats (this can last up to 2 minutes).

- Done appears when the transmission is completed.
- Press Exit twice to return to the home screen.

Advanced setup
| Setup functions | Default setting | Options |
| Temperature and time formats * | °F | °C / °F |
| 12h | 12h / 24h | |
| Adaptive Intelligent Recovery ** | On | On / Off |
| Programmable mode (Schedule) *** | On | On / Off |
- You can set the temperature display unit in °C or °F. You can set the time display format in 12-hour or 24-hour (military time) if the thermostat is in programmable mode.
- Accessible only if you use the thermostat in programmable mode.
When Adaptive Intelligent Recovery is on, the thermostat “learns” how long your heater takes to reach the set temperature. The thermostat will then determine when to activate heating so the desired temperature is attained at the desired time. The thermostat re-assesses the heating start time daily based on the previous day’s performance. When Adaptive Intelligent Recovery is off, heating starts at the set time. - Leave at On to use the thermostat in programmable mode. Place at Off to use the thermostat in nonprogrammable mode.

These parameters are available only if the thermostat is configured in programmable mode.
Replacing the batteries
Thermostat

Install 2 new alkaline AA batteries when the Low Battery warning starts flashing. It is recommended to replace batteries once a year, or when you will be away for more than a month.
To access the batteries, pull the thermostat from its mounting plate. You will need to set the time and date if new batteries are not inserted within 2 minutes after the old ones are removed. However, other settings are not erased.
After new batteries are installed, the thermostat will automatically restore communication with the wireless network within a few minutes.
Outdoor air sensor
Install 2 new AA lithium batteries when the Outdoor Air Sensor Low Battery warning starts flashing on the thermostat’s screen. To access the batteries, remove the sensor from the bracket and remove the sensor cover.
After new batteries are installed, the sensor will automatically restore communication with the wireless network within a few minutes.
In case of difficulty / Error codes
- Heating system does not respond
Check circuit breaker and reset if necessary - “Signal Lost” appears on the screen
The thermostat has lost communication with the wireless network (usually due to power outage). Otherwise, check circuit breaker and reset if necessary. When power is restored, the wireless communication will be restored within a few minutes. - The thermostat displays “LO”
The indoor temperature is below 32°F (0°C). - The thermostat displays “HI”
The indoor temperature is above 140°F (60°C). - The thermostat displays “- -”
The temperature reading is currently unavailable or the sensor is defective.
ELECTRICAL HAZARD
The servicing or rewiring of any equipment interface module (EIM) linked to this thermostat must be done by a certified electrician.
Three-year limited warranty
Honeywell warrants this product, excluding battery, to be free from defects in the workmanship or materials, under normal use and service, for a period of three (3) years from the date of purchase by the consumer. If at any time during the warranty period the product is determined to be defective or malfunctions, Honeywell shall repair or replace it (at Honeywell’s option).
If the product is defective,
- return it, with a bill of sale or other dated proof of purchase, to the place from which you purchased it; or
- call Honeywell Customer Care at 1-800-468-1502. Customer Care will make the determination whether the product should be returned to the following address: Honeywell Return Goods, Dock 4 MN10-3860, 1885 Douglas Dr. N., Golden Valley, MN 55422, or whether a replacement product can be sent to you.
This warranty does not cover removal or reinstallation costs. This warranty shall not apply if it is shown by Honeywell that the defect or malfunction was caused by damage that occurred while the product was in the possession of a consumer.
Honeywell’s sole responsibility shall be to repair or replace the product within the terms stated above. HONEYWELL SHALL NOT BE LIABLE FOR ANY LOSS OR DAMAGE OF ANY KIND, INCLUDING ANY INCIDENTAL OR CONSEQUENTIAL DAMAGES RESULTING, DIRECTLY OR INDIRECTLY, FROM ANY BREACH OF ANY WARRANTY, EXPRESS OR IMPLIED, OR ANY OTHER FAILURE OF THIS PRODUCT. Some states do not allow the exclusion or limitation of incidental or consequential damages, so this limitation may not apply to you.
THIS WARRANTY IS THE ONLY EXPRESS WARRANTY HONEYWELL MAKES ON THIS PRODUCT. THE DURATION OF ANY IMPLIED WARRANTIES, INCLUDING THE WARRANTIES OF MERCHANTABILITY AND FITNESS FOR A PARTICULAR PURPOSE, IS HEREBY LIMITED TO THE THREE-YEAR DURATION OF THIS WARRANTY.
Some states do not allow limitations on how long an implied warranty lasts, so the above limitation may not apply to you. This warranty gives you specific legal rights, and you may have other rights which vary from state to state.
If you have any questions concerning this warranty, please write to Honeywell Customer Relations, 1985 Douglas Dr, Golden Valley, MN 55422 or call 1-800-468-1502
Regulatory information
FCC Compliance Statement (Part 15.19) (USA only)
This device complies with Part 15 of the FCC Rules. Operation is subject to the following two conditions:
- This device may not cause harmful interference, and
- This device must accept any interference received, including interference that may cause undesired operation.
FCC Warning (Part 15.21) (USA only)
Changes or modifications not expressly approved by the party responsible for compliance could void the user’s authority to operate the equipment.
FCC Interference Statement (Part 15.105 (b)) (USA only)
This equipment has been tested and found to comply with the limits for a Class B digital device, pursuant to Part 15 of the FCC Rules. These limits are designed to provide reasonable protection against harmful interference in a residential installation. This equipment generates uses and can radiate radio frequency energy and, if not installed and used in accordance with the instructions, may cause harmful interference to radio communications. However, there is no guarantee that interference will not occur in a particular installation. If this equipment does cause harmful interference to radio or television reception, which can be determined by turning the equipment off and on, the user is encouraged to try to correct the interference by one of the following measures:
- Reorient or relocate the receiving antenna.
- Increase the separation between the equipment and receiver.
- Connect the equipment into an outlet on a circuit different from that to which the receiver is connected.
- Consult the dealer or an experienced radio/TV technician for help.
- Equipment interface module, thermostats and outdoor sensor
To comply with FCC and Industry Canada RF exposure limits for general population/ uncontrolled exposure, the antenna(s) used for these transmitters must be installed to provide a separation distance of at least 20 cm from all persons and must not be co-located or operating in conjunction with any other antenna or transmitter.
Remote Control
This portable transmitter with its antenna complies with FCC and Industry Canada RF exposure limits for general population/uncontrolled exposure. This device must not be co-located or operating in conjunction with any other antenna or transmitter.
Section 7.1.3 of RSS-GEN
Operation is subject to the following two conditions:
- this device may not cause interference, and
- this device must accept any interference, including interference that may cause undesired operation of the device.
Section 7.1.2 of RSS-GEN
Under Industry Canada regulations, this radio transmitter may only operate using an antenna of type and maximum (or lesser) gain approved for the transmitter by Industry Canada. To reduce potential radio interference to other users, the antenna type and its gain should be so chosen that the equivalent isotropically radiated power (e.i.r.p.) is not more than that necessary for successful communication.
Automation and Control Systems
Honeywell International Inc.
1985 Douglas Drive North Golden Valley, MN 55422
http://customer.honeywell.com
Honeywell Limited 705 Montrichard
Saint-Jean-sur-Richelieu, Quebec, J2X 5K8
REFERENCE:
Download Manual:
Honeywell TL9160AR Wireless Thermostat Operating Manual
![]()