
Honeywell T8000C Programmable Thermostat

Features
- Program up to four time periods and temperature settings to complement your lifestyle.
- Set different schedules for weekdays and weekends.
- Programs are permanently held in non-volatile memory in the event of a power failure.
- Indefinite temperature hold.
- PIreprogrammed for your convenience.
Welcome to the world of comfort and energy savings with your new Honeywell programmable thermostat.
Your new Programmable Thermostat is designed to provide you with reliable, precise temperature control. When you follow the simple programming instructions in this manual, your thermostat automatically controls the temperature in your home, saving energy and allowing you to awake (or return home) to a comfortable level of heating or air conditioning.
Direct questions concerning the operation of this thermostat to Honeywell Customer Assistance at 1-800-468-1502, Monday-Friday, 7:00 a.m.-5:30 p.m., Central time.
The thermostat display shows day, time, program period, and temperature. The thermostat can be set for four time periods per day for weekdays and week-ends.
Before programming the thermostat, you can use the following chart on page 5, to organize your program schedule.
Fill in the times and temperatures you desire for weekdays and weekends. If you decide not to program the thermostat, it will follow the preprogrammed time and temperature settings shown in Table 1.
Table 1. Preprogrammed Time and Temperature Settings.
|
Period |
Time |
Heat Setpoint | Cool Setpoint |
| Wake | 6:00 AM | 21°C (70°F ) | 26°C (78°F ) |
| Leave | 8:00 AM | 17°C (62°F ) | 29°C (85°F ) |
| Return | 6:00 PM | 21°C (70°F ) | 26°C (78°F ) |
| Sleep | 10:00PM | 17°C (62°F ) | 28°C (82°F ) |
Program Schedule

WAKE and RETURN start times should include extra lead time, based on outside temperature and equipment response time, to give your equipment a head start to heat or cool the house. The temperatures cannot be set any higher than 37°C (99°F) or any lower than 4°C (40°F).
Programming
The thermostat is flexible and can be program-med for different schedules for weekdays and weekends, to meet your lifestyle needs. Use the personal Program Schedule for planning your time and temperature settings for various times of the day. See page 5. Four time periods are available during weekdays and weekends —WAKE, LEAVE, RE-TURN, and SLEEP.
- WAKE is the time the thermostat turns on the heating/cooling equipment after an energy saving period. When deciding what time to set for your WAKE period, include extra lead time, depending on the outside temperature and your equipment response time, to give the equipment a head start to heat or cool the house before you get up.(This will be a higher temperature during heating season, and a lower temperature during cooling season.)
- LEAVE is the time period you can set for an energy-saving temperature while you are away at work or school. (This will be a lower temperature during heating season, and a higher temperature during cooling season.)
- RETURN is the time the thermostat turns on the heating/cooling equipment after an energy saving period. When deciding what time to set for your RETURN period, include extra lead time, depending on the outside temperature and your equipment response time, to give the equipment a head start to heat or cool the house before you arrive home.
- SLEEP is the time period you can set for an energy-saving temperature while you are sleeping. (For more comfortable sleeping, some people choose not to raise the cool temperature during the night.)
IMPORTANT Always press the keys with your fingertip or similar blunt tool. Sharp instruments like pens and pencil points can damage the keys.
Setting the Current Time and Day
- To Set Current Time Press Select twice. Press ▲ or ▼to set current time.

While setting the current time, the word SET is flashing. - To Set Day of Week. Press Select again. Press ▲ or ▼ to set current day.

To use the preprogrammed time and tempera-ture settings (see Table 1), press Hold now, to exit the programming mode. To enter a custom program to fit you life style, continue to step 3.
Setting the Weekday Program
Slide the SYSTEM switch to the position, heat or cool, you want to program. A flame (heating) or a snowflake (cooling) will appear in the lower right corner of the display, when setting the program temperature.
 - Wake
a. Press Select. Press ▲ or ▼ to set Wake time.
b. Press Select. Press ▲ or ▼ to set Wake temperature.
- Leave
Press Select. Press ▲ or ▼ to set Leave time.
b. Press Select. Press ▲ or ▼ to set Leave temperature.
- Return
a. Press Select. Press ▲ or ▼ to set Return time.
b. Press Select. Press ▲ or ▼ to set Return temperature.
- Sleep
a. Press Select. Press ▲ or ▼ to set Sleep time.
b. Press Select. Press ▲ or ▼ to set Sleep temperature. Setting the Weekend Program
 - Wake
a. Press Select. Press ▲ or ▼ to set Wake time.
b. Press Select. Press ▲ or ▼ to set Wake temperature.
- Leave
a. Press Select. Press ▲ or ▼ to set Leave time.
b. Press Select. Press ▲ or ▼ to set Leave temperature.
- Return
a. Press Select. Press ▲ or ▼ to set Return time.
b. Press Select. Press ▲ or ▼ to set Return temperature.
- Sleep
a. Press Select. Press ▲ or ▼ to set Sleep time.
b. Press Select. Press ▲ or ▼ to set Sleep temperature.
- Press Select. End is displayed. Programming is complete. The thermostat will revert to displaying the current day time and temperature in five seconds.

Temporary Temperature Hold
- Press ▲ or ▼ key to set a temporary temperature setting.
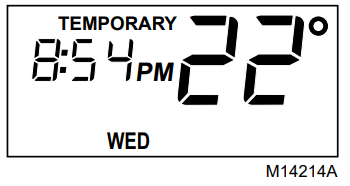 NOTE: The temporary temperature setting remains in effect until the next program period. To cancel press Hold twice.
Indefinite Temperature Hold
The Hold key allows you to indefinitely hold a temperature. When Hold is active, the letters Hld are displayed continuously. Hold can be canceled by pressing the Hold key again.
- Press Hold
- Press ▲ or ▼ key to set indefinite temperature setting.

Setting System and Fan
Use the SYSTEM and FAN switches to change the settings. SYSTEM settings control the thermostat operation as follows:
- Heat: The thermostat controls the heating.
- Off: Both the heating and cooling are off.
- Cool: The thermostat controls the cooling.
Slide the SYSTEM switch in the lower right corner of the thermostat to select the desired system setting. FAN settings control the system fan as follows:
- On: Fan operates continuously.
- Auto: Fan operates with equipment.
Slide the FAN switch in the lower left corner of the thermostat to select the desired fan setting.
Heat and Cool Indicators
- Indicates a call for heat.
 Indicates a call for cool.
NOTE: In the programing mode the![]() and
and![]() indicate system setting.
indicate system setting.
Minimum Off-Timing
A minimum off-timer in the T8000C assures that the compressor does not come on again for at least five minutes after it turns off. The minimum off-timer is triggered when the compressor turns off and when the SYSTEM switch position is changed. If the compressor turns off when the setpoint is changed, the minimum off-timer is triggered. Power interruption and power restoration also trigger the minimum off-timer. The minimum off-timer operates in cooling on the T8000C. A flashing snowflake indicates the minimum off time is in effect.
Troubleshooting Guide
| Symptom | Action |
| Display does not come on. | • Check if the thermostat is mounted and latched on the wallplate—mount and latch the thermostat on the wallplate.
• Check if the circuit breaker is tripped—reset the circuit breaker. • Check if the fuse is blown—replace the fuse. • Check if the switch at the equipment is in the Off position—set to the On position. |
| Temperature settings do not change (Example: cannot set the heating higher or the cooling lower). | • Check that the temperature setpoints are: between 4 to 37°C (40 to 99°F ). |
| Symptom | Action |
| Heating does not come on. | • Check if the circuit breaker is tripped—reset the circuit breaker.
• Check if the fuse is blown—replace the fuse. • Check if the switch at the equipment is in the Off position—set to On position. • Wait five minutes for the system to respond. • Set SYSTEM switch to Heat. |
| Cooling does not come on. | • Check if the circuit breaker is tripped—reset the circuit breaker.
• Check if the fuse is blown—replace the fuse. • Check if the switch at the equipment is in the Off position—set to On position. • Wait five minutes for the system to respond. • Set SYSTEM switch to Cool. |
| Symptom | Action |
| System on indicator
or is lit, but no warm or cool air is coming from the registers. |
Wait a couple minutes after seeing the flame or snowflake and then check the registers. |
| System on indicator is flashing | Minimum off timer is in effect. Wait five minutes until the minimum off timer is complete. See p[age 13 for minimum off-timing description. |
Limited One-Year Warranty
Honeywell warrants this product, excluding battery, to be free from defects in the workmanship or materials, under normal use and service, for a period of one (1) year from the date of purchase by the consumer. If, at any time during the warranty period, the product is defective or malfunctions, Honeywell shall repair or replace it (at Honeywell’s option) within a reasonable period of time.
If the product is defective,
- return it, with a bill of sale or other dated proof of purchase, to the retailer from which you purchased it, or
- package it carefully, along with proof of purchase (including date of purchase) and a short description of the malfunction, and mail it, postage prepaid, to the following address:
Honeywell Return Goods Dock 4 MN10-3860 1885 Douglas Drive North Golden Valley, MN 55422
In Canada: Honeywell Limited/Honeywell Limitée Product Services ON15-FFE
740 Ellesmere Road
Scarborough, Ontario M1P 2V9
This warranty does not cover removal or reinstallation costs. This warranty shall not apply if it is shown by Honeywell that the defect or malfunction was caused by damage that occurred while the product was in the possession of a consumer. Honeywell’s sole responsibility shall be to repair or replace the product within the terms stated above. HONEYWELL SHALL NOT BE LIABLE FOR ANY LOSS OR DAMAGE OF ANY KIND, INCLUDING ANY INCIDENTAL OR CONSEQUENTIAL DAMAGES RESULTING, DIRECTLY OR INDIRECTLY, FROM ANY BREACH OF ANY WARRANTY, EXPRESS OR IMPLIED, OR ANY OTHER FAILURE OF THIS PRODUCT. Some states do not allow the exclusion or limitation of incidental or consequential damages, so this limitation may not apply to you.
THIS WARRANTY IS THE ONLY EXPRESS WARRANTY HONEYWELL MAKES ON THIS PRODUCT. THE DURATION OF ANY IMPLIED WARRANTIES, INCLUDING THE WARRANTIES OF MERCHANTABILITY AND FITNESS FOR A PARTICULAR PURPOSE, IS HEREBY LIMITED TO THE ONE YEAR DURATION OF THIS WARRANTY. Some states do not allow limitations on how long an implied warranty lasts, so the above limitation may not apply to you.
This warranty gives you specific legal rights, and you may have other rights which vary from state to state.
If you have any questions concerning this warranty, please write our Customer Assistance Center, Honeywell 1985 Douglas Drive North, Golden Valley, MN 55422 or call 1-800-468-1502, Monday-Friday, 7:00 a.m. to 5:30 p.m., Central time. In Canada, write Retail Products ON15-02H, Honeywell Limited/Honeywell Limitée, 35 Dynamic Drive, Scarborough, Ontario M1V 4Z9.
Home and Building Control Honeywell
1985 Douglas Drive North Golden Valley, MN 55422
Home and Building Control Honeywell Limited-Honeywell Limitée 35 Dynamic Drive
Scarborough, Ontario
M1V 4Z9
Copyright © 2000 Honeywell All Rights Reserved ® U.S. Registered Trademark 69-1437EF 9-00 G.H. Printed in Mexico
Reference
Download Manual
Honeywell T8000C Programmable Thermostat Owner Guide
OTHER MANUALS
Honeywell T8000C Programmable Thermostat Installation Instruction