
Honeywell RTH7600D1030/E Touchscreen Programmable Thermostat

This manual covers the RTH7600 model.
(Pull thermostat from wallplate and turn over to find model number) This thermostat contains a Lithium battery which may contain Perchlorate material.
Perchlorate Material—special handling may apply, See www.dtsc.ca.gov/hazardouswaste/perchlorate
CAUTION: EQUIPMENT DAMAGE HAZARD. To prevent possible compressor damage, do not operate the cooling system when the outdoor temperature is below 50°F (10°C).
Need Help?
For assistance with this product please visit http://DIYthermostats.honeywell.com or call Honeywell Customer Care toll-free at 1-800-468-1502
® U.S. Registered Trademark. Patents pending.
US Patent No. 6,595,430; 7,114,554; 7,274,972; 7,225,054 and other patents pending
Copyright © 2011 Honeywell International Inc. All rights reserved. Read and save these instructions.
About your new thermostat
Congratulations! You’ve just purchased the world’s most advanced, easy-to-use thermostat. It has been designed to give you many years of reliable service and climate control.
Features
- Large touchscreen display with backlight is easy to read—even in the dark.
- Daily program schedules maximize comfort and economy.
- One-touch temp control overrides the program schedule at any time.
- Precise comfort control keeps the temperature within 1°F of the level you set.
- Change/check reminder lets you know when to replace the furnace filter
This thermostat is ready to go!
Your new thermostat is pre-programmed and ready to go. All you have to do is set the time and day. Then check the settings below and change if needed:
- Set clock:
- Select fan setting: Preset to Auto:To change.
- Select system setting: Preset to Heat:To change.
- Program schedules: Preset to energy-saving levels while you’re at work or asleep (assumes you wake at 6 am, leave at 8 am, return at 6 pm and go to bed at 1pm).:To change, ONE-TOUCH TEMP CONTROL: You can override the program schedule at any time, and manually adjust the temperature.
A quick reference to controls
- Arrow keys
Press to adjust the temperature, or to make selections from screen menus. - System & Fan
Press to select fan operation or system. - Clock & More
Press to set the clock or furnace filter reminder. - Schedule
Press to set the program schedule.
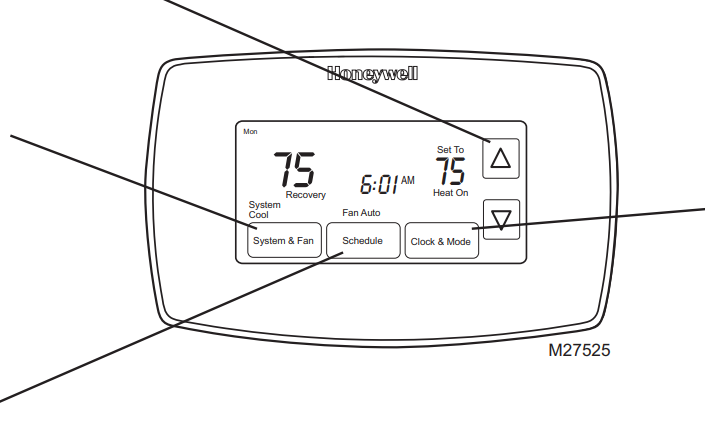
A quick reference to the status display

Clock setting
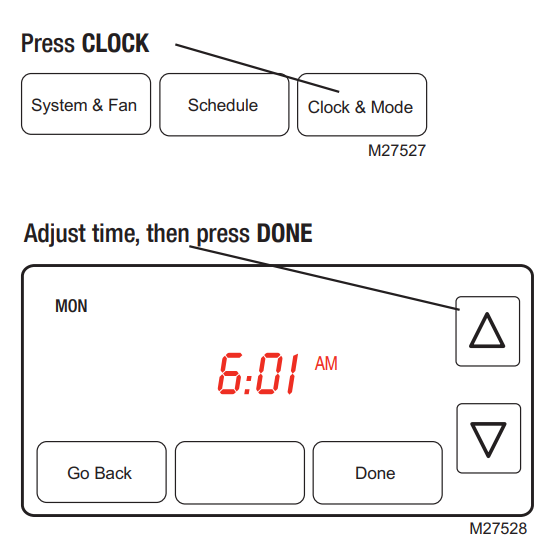
To set the current time display, press CLOCK, then ![]() press s or t to adjust the time. Press and hold
press s or t to adjust the time. Press and hold ![]() to advance the time more quickly.
to advance the time more quickly.
Press DONE to save & exit (or press GO BACK to exit without changing the time).
Note: The real-time clock should never require adjustment since it automatically updates for daylight savings time, and stores all date/time information.
Note: To change the current weekday display, see System Setup in your Installation Guide.
Fan setting
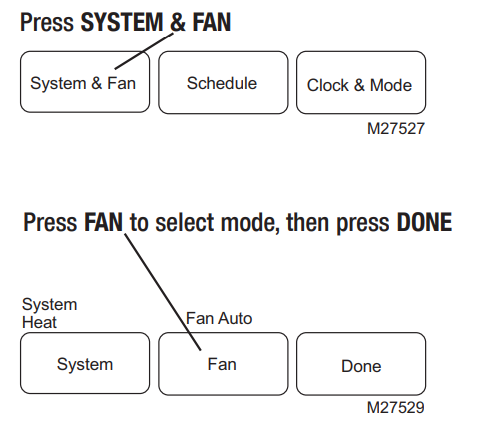
Press SYSTEM & FAN, then FAN to select fan operation:
- On Fan is always on.
- Auto: The fan runs only when the heating or cooling system is on.
System setting
Follow steps at left to select system:

- Heat: The thermostat controls only the heating system.
- Cool: The thermostat controls only the cooling system.
- Auto: The thermostat automatically selects heating or cooling depending on the indoor temperature.
- Off: All systems are off.
- Em Heat (only for heat pumps with auxiliary heat): The thermostat controls Emergency and Auxiliary Heat. The compressor is locked out
Note: The Auto and Em Heat system settings may not appear, depending on how your thermostat was installed.
Save money by setting program schedules
It’s easy to program your system for maximum energy savings. You can program four time periods each day, with different settings for weekdays and weekends.
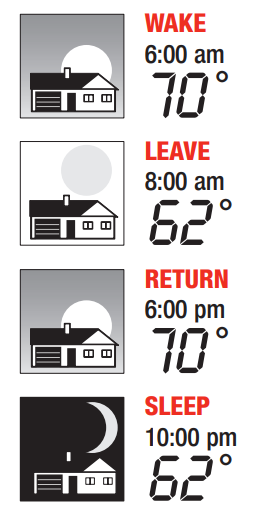
Set to the time you awaken and the temperature you want during the morning, until you leave for the day
Set to the time you leave home and the temperature you want while you are away (usually an energy-saving level).
Set to the time you return home and the temperature you want during the evening, until bedtime.
Set to the time you go to bed and the temperature you want overnight (usually an energy-saving level).
To adjust program schedules
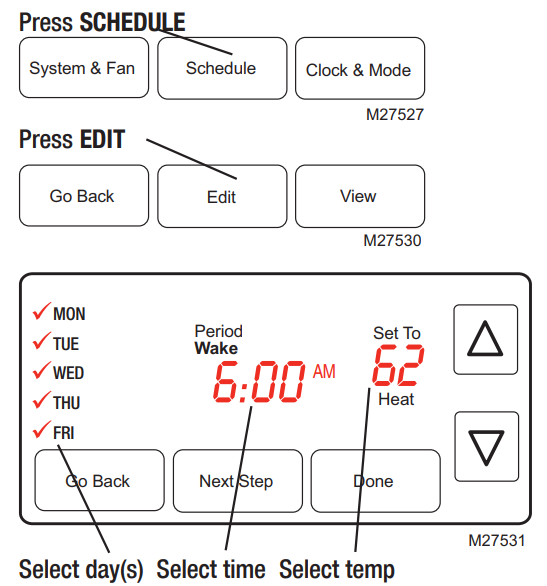
- Press SCHEDULE, then EDIT to see weekdays.
- Press SELECT DAY. You can select multiple days to program with the same settings.
- Press NEXT STEP twice, then press
 to set the Wake time for the selected day(s).
 - Press NEXT STEP, then set the Heat temperature for this time period.
- Press NEXT STEP, then set the Cool temperature for this time period.
- Repeat steps 3-5 to program other time periods (LEAVE, RETURN, SLEEP), then press DONE.
- Repeat steps 1-6 to program Saturday/Sunday. (Press until the desired day is flashing, then press SELECT DAY.)
- Press DONE to save & exit.
Program schedule override (temporary)
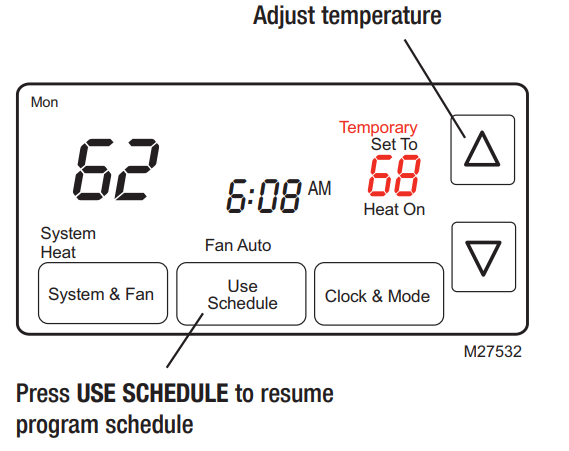
Pressto immediately adjusts the temperature. This will temporarily override the temperature setting for the current time period.
The new temperature will be maintained until the next time period.
When the timer expires, the program schedule will resume and set the temperature to the level you’ve programmed for the current time period.
To cancel the temporary setting at any time, press USE SCHEDULE.
Program schedule override (permanent)
Press to adjust the temperature, then press HOLD. This will turn off the program schedule.
Whatever temperature you set will be maintained 24 hours a day, until you manually change it, or press USE SCHEDULE to cancel “Hold” and resume the program schedule
About your new thermostat
Use this feature in climates where both air conditioning and heating are used on the same day. When the system mode is in Auto, the thermostat automatically selects heating or cooling depending on the indoor temperature.
While in the Auto mode, if a schedule override takes place (temporarily or permanently) the thermostat will automatically adjust the cooling and heating settings to maintain a 3-degree separation between the cool and heat settings.
For example, if the heat temperature is raised to where it gets within 3 degrees of the cool setting, the display will show an up arrow next to “cool” to show the thermostat is raising the cool setup to maintain a 3-degree separation.
The display will also show both “Auto” and either “Heat” or “Cool” for which temperature setting you are currently adjusting. Press the system button to select between heat and cool to view/adjust either mode.
Auto Changer
If the coolant temperature is lowered to where it gets close to the heat setting, an arrow next to heat will show the thermostat is lowering the heat setting down to maintain a 3-degree separation.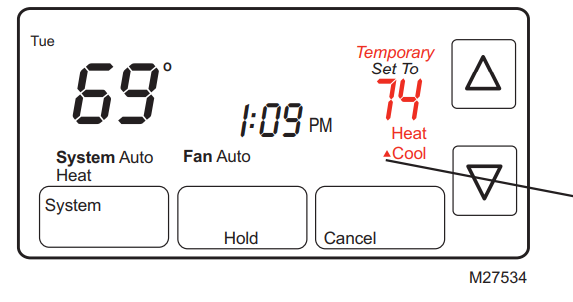
The triangle indicates the cool temperature is increasing to maintain 3 degrees between heat and cool settings.
CAUTION: To avoid possible compressor damage, do not use Auto Changeover if the outside temperature drops below 50°F (10°C).
Furnace filter reminder

If activated during installation, the furnace filter reminder alerts you when it is time to replace your filter.
Press RESET after changing the filter, to restart the timer.
To reset the reminder interval before it expires:
- Press MORE, then NEXT.
- Press RESET.
- Press DONE to save and exit.
Special features
- Smart Response® Technology: This feature allows the thermostat to “learn” how long the furnace and air conditioner take to reach programmed temperature settings, so the temperature is reached at the time you set.
For example: Set the Wake time to 6 am and the temperature to 70°. The heat will come on before 6 am, so the temperature is 70° by the time you wake at 6. The message “Recovery” is displayed when the system is activated before a scheduled time period. - Compressor Protection: This feature forces the compressor to wait a few minutes before restarting, to prevent equipment damage. During the wait time, the message “Wait” is displayed on the screen.
- Auto Changeover: This feature is used in climates where both air conditioning and heating are used on the same day. When the system is set to Auto, the thermostat automatically selects heating or cooling depending on the indoor temperature. Heat and cool settings must be at least 3 degrees apart. The thermostat will automatically adjust settings to maintain this 3-degree separation.
CAUTION: To avoid possible compressor damage, do not use Auto Changeover if the outside temperature drops below 50°F (10°C).
Battery replacement/Customer Assistance
Grasp thermostat and pull to remove from wallplate
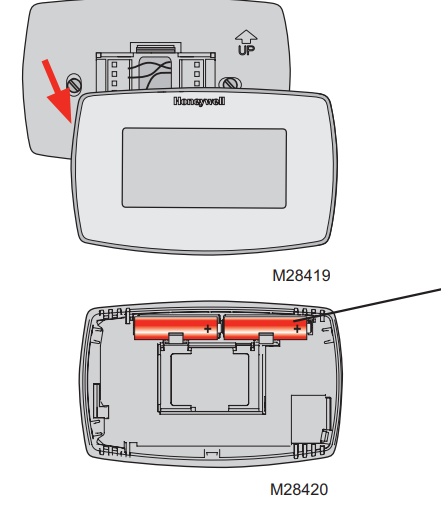 Insert 2 fresh AA alkaline batteries
Batteries are optional (to provide backup power) if your thermostat was wired to run on AC power when installed.
Install fresh batteries immediately when the LO BATT warning begins flashing. The warning flashes about 30 days before batteries are depleted.
Even if the warning does not appear, you should replace batteries once a year, or before leaving home for more than a month.
For assistance with this product, please visit http://DIYthermostats.honeywell.com or call Honeywell Customer Care toll-free at 1-800-468-1502.
In case of difficulty
If you have difficulty with your thermostat, please try the following suggestions. Most problems can be corrected quickly and easily.
Display is blank
- Check the circuit breaker and reset it if necessary.
- Make sure the power switch at the heating & cooling system is on.
- Make sure the furnace door is closed securely.
- If the thermostat is battery-powered, make sure fresh AA alkaline batteries are correctly installed.
No response to key presses (or temperature will not change)
Make sure heating and cooling temperatures are set to acceptable ranges:
- Heat: 40° to 90°F (4.5° to 32°C).
- Cool: 50° to 99°F (10° to 37°C).
The heating or cooling system does not respond
- Press SYSTEM to set the system to Heat. Make sure the temperature is set higher than the Inside temperature.
- Press SYSTEM to set the system to Cool. Make sure the temperature is set lower than the Inside temperature.
- Check the circuit breaker and reset if necessary.
- Make sure the power switch at the heating & cooling system is on.
- Make sure the furnace door is closed securely.
- If “Wait” is displayed, the compressor protection timer is on. Wait 5 minutes for the system to restart safely, without damaging the compressor.
1-year limited warranty
Honeywell warrants this product, excluding battery, to be free from defects in the workmanship or materials, under normal use and service, for a period of one (1) year from the date of purchase by the consumer. If at any time during the warranty period, the product is determined to be defective or malfunctions, Honeywell shall repair or replace it (at Honeywell’s option).
If the product is defective,
- return it, with a bill of sale or other dated proof of purchase, to the place from which you purchased it; or
- call Honeywell Customer Care at 1-800-468-1502. Customer Care will make the determination whether the product should be returned to the following address: Honeywell Return Goods, Dock 4 MN10-3860, 1885 Douglas Dr. N., Golden Valley, MN 55422, or whether a replacement product can be sent to you.
This warranty does not cover removal or reinstallation costs. This warranty shall not apply if it is shown by Honeywell that the defect or malfunction was caused by damage that occurred while the product was in the possession of a consumer.
Honeywell’s sole responsibility shall be to repair or replace the product within the terms stated above. HONEYWELL SHALL NOT BE LIABLE FOR ANY LOSS OR DAMAGE OF ANY KIND, INCLUDING ANY INCIDENTAL OR CONSEQUENTIAL DAMAGES RESULTING, DIRECTLY OR INDIRECTLY, FROM ANY BREACH OF ANY WARRANTY, EXPRESS OR IMPLIED, OR ANY OTHER FAILURE OF THIS PRODUCT. Some states do not allow the exclusion or limitation of incidental or consequential damages, so this limitation may not apply to you.
THIS WARRANTY IS THE ONLY EXPRESS WARRANTY HONEYWELL MAKES ON THIS PRODUCT. THE DURATION OF ANY IMPLIED WARRANTIES, INCLUDING THE WARRANTIES OF MERCHANTABILITY AND FITNESS FOR A PARTICULAR PURPOSE, IS HEREBY LIMITED TO THE ONE-YEAR DURATION OF THIS WARRANTY.
Some states do not allow limitations on how long an implied warranty lasts, so the above limitation may not apply to you. This warranty gives you specific legal rights, and you may have other rights which vary from state to state.
If you have any questions concerning this warranty, please write Honeywell Customer Relations, 1985 Douglas Dr, Golden Valley, MN 55422 or call 1-800-468-1502. In Canada, write Retail Products ON15-02H, Honeywell Limited/ Honeywell Limitée, 35 Dynamic Drive, Toronto, Ontario M1V4Z9
Automation and Control Solutions
Honeywell International Inc.
1985 Douglas Drive North Golden Valley, MN 55422
http://DIYthermostats.honeywell.com
Printed in the U.S.A. on recycled
paper containing at least 10% post-consumer paper fibers
® U.S. Registered Trademark.
© 2011 Honeywell International Inc.
69-2207ES—03 M.S. Rev 03-11
Honeywell Limited
35 Dynamic Drive
Toronto, Ontario M1V 4Z9
Reference
Download manual:
Honeywell RTH7600D1030-E Touchscreen Programmable Thermostat Operating Manual
Other Manuals:
Honeywell RTH7600D1030/E Touchscreen Programmable Thermostat Installational Instruction
![]()
Honeywell RTH7600D1030/E Touchscreen Programmable Thermostat Operating Manual
Leave a Reply