
Honeywell RTH4300B Programmable Thermostat

TURN OFF POWER at the heating/cooling system or the fuse/circuit breaker panel before you begin.
MERCURY NOTICE: Do not place your old thermostat in the trash if it contains mercury in a sealed tube. Contact your local waste management authority for instructions regarding recycling and proper disposal.
Need Help?
For assistance with this product please visit https://www.honeywellhome.com/us/en/support/ or call Honeywell Customer Care toll-free at 1-800-468-1502
Read and save these instructions.
® U.S. Registered Trademark. Patents pending.
Copyright © 2006 Honeywell International Inc. All rights reserved.
Installation
Installation is easy -even if you’ve never done it before!
Your new thermostat has been designed for fast, easy installation. Just follow the simple, step-by-step instructions in the following pages.
Install in three simple steps
- Label wires and remove your old thermostat (see pages 5-8).
- Install and wire your new thermostat (see pages 9-16).
- Set your new thermostat to match your heating/cooling system (see pages 17-20).
Installation tips
- Have everything you need ready to go before you begin (see pages 3-4).
- Do not use wire color as a guide. Use wire labels instead (see page 8).
Pre-Installation Checklist
Check to make sure your package includes the following items:

Required tools & supplies
- No. 2 Phillips screwdriver
- Small pocket screwdriver
- Drill
- Drill bit (3/16” for drywall, 7/32” for plaster)
- Hammer
- Pencil
- Electrical tape
- Level (optional)
- Two fresh AA alkaline batteries
Remove your old Thermostat
- Turn off power at heating/cooling system (or fuse/circuit-breaker panel).
- Remove cover and thermostat, but leave wallplate with wires attached.

Did you purchase right thermostat?
Count wires to check. Count the number of wires coming out of the wall and attached to terminals in your old thermostat. If any of them are attached to a terminal marked “C” or “C1” do not count that wire in your total.
If the total (not counting C or C1) is 5 wires or less, proceed to the next page. If you have 6 or more wires, your new thermostat may not be compatible with your system. Stop installation and call 1-800-468-1502 for advice.
Identify Wires you will not use
If any wires are not attached to terminals in your old thermostat, do not connect them to your new thermostat. If a wire is attached to a terminal marked “C” or “C1,” disconnect it. You will not connect it to your new thermostat.
Wrap the bare metal ends of each unused wire with electrical tape, so it cannot touch and short out other wires.
Label wires and remove old thermostat
Use a screwdriver to disconnect wires one by one. As you disconnect each wire, wrap it with the label matching the letter on your old thermostat. (Adhesive labels are supplied in your thermostat package.)
Remove the old wallplate only after all wires are labeled. Be careful not to let loose wires fall into the wall opening.
IGNORE WIRE COLORS: Use only letter designations to identify wire types.
Remove Wall Plate and install Quick reference card
Pull at bottom to remove thermostat from wallplate.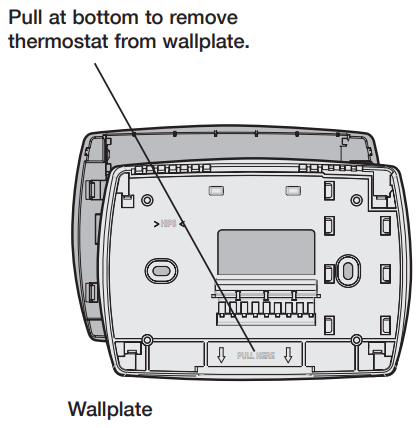
Insert quick reference card after wallplate is mounted (see mounting instructions on page 11).

Mark Wallplate mounting position

Mount Wallplate
Connect Wires (Typical Installation)
Labels don’t match?
If labels do not match letters on thermostat, see next page.
Connect wires (less common wire designations)
If labels do not match letters on the thermo-stat, check the chart at right and connect to terminal as shown here (see notes, below).
- If wires will be connected to both R and Rc terminals, remove metal jumper (see page 12).
- Do not use C, X, or B. Wrap bare end of wire with electrical tape.
- Do not connect both O and B if you have a heat pump. Connect O wire to O. Wrap B wire with electrical tape and do not use.
Install Batteries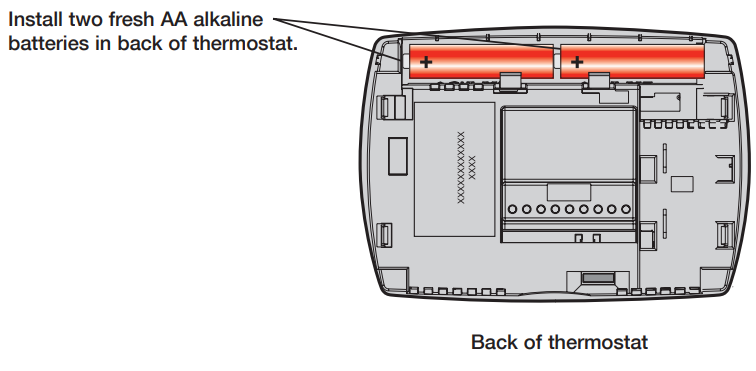
Set Fan operation Switch
Move the switch to the proper setting:
- F: For gas or oil heating systems, leave the fan operation switch in this factory-set position (for systems that control the fan in a call for heat).
- E: Change the switch to this setting for heat pump or electric heat systems. (This setting is for systems that allow the thermostat to control the fan in a call for heat, if a fan wire is connected to the G terminal.)

Mount thermostat and restore electrical power
- Align the 4 tabs on the wallplate with corresponding slots on the back of the thermostat, then push gently until the thermostat snaps into place.
- Restore electrical power at the heating/cooling system, or at the fuse/circuit-breaker panel.
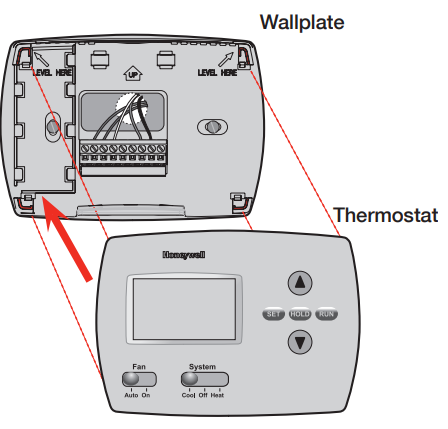
TIP: If wires interfere when you try to mount the thermostat, push excess wire back into the wall opening.
System Setup
Set thermostat to match your system
Next, you must set the thermostat to match the heating/cooling system in your home. Press and hold the  buttons to enter system setup.

Function 1: System Type
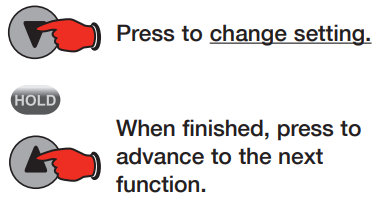
Press the  button to select the type of climate control system you have in your home:
- 0 Heating & cooling: Gas, oil or electric heating with central air conditioning.
- 1 Heat pump: Outside compressor
Function 5: Heating Cycle Rate

Press the button to select your heating sys-tem and optimize its operation:
- 5 Gas or oil furnace: Use this setting if you have a standard gas or oil furnace that is less than 90% efficient.
- 9 Electric furnace: Use this setting if you have any type of electric heating system.
- 3 Hot water or high-efficiency furnace: Use this setting if you have a hot water system or a gas furnace of greater than 90% efficiency.
- 1 Gas/oil steam or gravity system: Use this setting if you have a steam or gravity heat system.
NOTE: If Function 5 does not appear, please turn to the next page to continue.
Function 14: Temperature Display
Press thebutton to select Fahrenheit or Celsius temperature display:
- 0 Fahrenheit temperature display (°F)
- 1 Celsius temperature display (°C)
In Case Of Difficulty
If you have difficulty with your thermostat, please try the following suggestions. Most problems can be corrected quickly and easily.
Display is blank
- Check circuit breaker and reset if necessary.
- Make sure heating & cooling power switches are on.
- Make sure furnace door is closed securely.
- Make sure fresh AA alkaline batteries are correctly installed (see page 14).
Heating or cooling system does not respond
- Set System switch to Heat. Make sure the temperature is set higher than the Inside temperature.
- Set System switch to Cool. Make sure the temperature is set lower than the Inside temperature.
- Check circuit breaker and reset if necessary.
- Make sure heating & cooling power switches are on.
- Make sure furnace door is securely closed.
- Wait 5 minutes for the system to respond.
Make sure heating and cooling temperatures are set to acceptable ranges:
- Temperature settings do not change:
- Heat: 40° to 90°F (4.5° to 32°C).
- Cool: 50° to 99°F (10° to 37°C).
- “Cool On” or “Heat On” is flashing:
Compressor protection feature is engaged. Wait 5 minutes for the system to restart safely, without damage to the compressor. - “Heat On” is not displayed:
Set the System switch to Heat, and set the temperature level above the current room temperature. - “Cool On” is not displayed: Set the System switch to Cool, and set the temperature level below the current room temperature.
Customer Assistance
For assistance with this product, please visit https://www.honeywellhome.com/us/en/support/. Or call Honeywell Customer Care toll-free at 1-800-468-1502.
To save time, please note your model number and date code before calling.
Accessories
To order, please call Honeywell Customer Care toll-free at 1-800-468-1502.
- Cover plate* ……………. Part No. 50002883-001
- Use to cover marks left by old thermostats.
1 year limited warranty
Honeywell warrants this product, excluding battery, to be free from defects in the workmanship or materials, under normal use and service, for a period of one (1) year from the date of purchase by the consumer. If at any time during the warranty period the product is determined to be defective or malfunctions, Honeywell shall repair or replace it (at Honeywell’s option).
If the product is defective,
- return it, with a bill of sale or other dated proof of purchase, to the place from which you purchased it; or
- call Honeywell Customer Care at 1-800-468-1502. Customer Care will make the determination whether the product should be returned to the following address: Honeywell Return Goods, Dock 4 MN10-3860, 1885 Douglas Dr. N., Golden Valley, MN 55422, or whether a replacement product can be sent to you.
This warranty does not cover removal or reinstallation costs. This warranty shall not apply if it is shown by Honeywell that the defect or malfunction was caused by damage which occurred while the product was in the possession of a consumer.
Honeywell’s sole responsibility shall be to repair or replace the product within the terms stated above. HONEYWELL SHALL NOT BE LIABLE FOR ANY LOSS OR DAMAGE OF ANY KIND,INCLUDING ANY INCIDENTAL OR CONSEQUENTIAL DAMAGES RESULTING, DIRECTLY OR INDIRECTLY, FROM ANY BREACH OF ANY WARRANTY, EXPRESS OR IMPLIED, OR ANY OTHER FAILURE OF THIS PRODUCT. Some states do not allow the exclusion or limitation of incidental or consequential damages, so this limitation may not apply to you.
THIS WARRANTY IS THE ONLY EXPRESS WARRANTY HONEYWELL MAKES ON THIS PRODUCT. THE DURATION OF ANY IMPLIED WARRANTIES, INCLUDING THE WARRANTIES OF MERCHANTABILITY AND FITNESS FOR A PARTICULAR PURPOSE, IS HEREBY LIMITED TO THE ONE-YEAR DURATION OF THIS WARRANTY.
Some states do not allow limitations on how long an implied warranty lasts, so the above limita-tion may not apply to you. This warranty gives you specific legal rights, and you may have other rights which vary from state to state.
If you have any questions concerning this warranty, please write Honeywell Customer Relations, 1985 Douglas Dr, Golden Valley, MN 55422 or call 1-800-468-1502. In Canada, write Retail Products ON15-02H, Honeywell Limited/ Honeywell Limitée, 35 Dynamic Drive, Toronto, Ontario M1V4Z9.
Automation and Control Systems
Honeywell International Inc. 1985 Douglas Drive North Golden Valley, MN 55422 https://www.honeywellhome.com/us/en/support/
Printed in U.S.A. on recycled paper containing at least 10% post-consumer paper fibers.
® U.S. Registered Trademark.
© 2006 Honeywell International Inc. 69-1772ES M.S. 08-06
Reference
Download Manual:
Honeywell RTH4300B Programmable Thermostat User Guide
Other Manual:
Honeywell RTH4300B Programmable Thermostat Installation Guide