Honeywell Home RTH2310B Programmable Thermostat

CAUTION: EQUIPMENT DAMAGE HAZARD
To prevent possible compressor damage, do not use Cooling mode when the outdoor temperature is below 50 °F (10 °C).
Need Help?
For assistance with this product please visit http://yourhome.honeywell.com or call Honeywell Customer Care toll-free at 1-800-468-1502.
Read and save these instructions.
® U.S. Registered Trademark. Patents pending.
© 2011 Honeywell International Inc. All rights reserved.
Your new thermostat is pre-programmed and ready to go! See page 6 for quick start.
About your new thermostat
Your new Honeywell thermostat has been designed to give you many years of reliable service and easy-to-use, push-button climate control.
Features
- Backlit display is easy to read
- Displays ambient (measured) temperature at all times
- One-touch access to setpoint temperature
- Energy-saving settings for maximum cost savings
- Separate programmable weekday/weekend schedules (5+2 day programming)
- Temporary and permanent override of schedule
- Early Start ensures right temperature at the right time
- Built-in compressor protection
Early Start
Early Start allows the thermostat to “learn” how long your furnace or air conditioner takes to reach the set temperature. Simply program the desired times and desired temperatures into the schedule. The thermostat will determine when to activate heating or cooling so that the desired temperature is attained at the desired time.
Example: If you set the Wake time to 6 a.m. and the temperature to 70 °F (21 °C), the heat will come on before the set time, so the temperature is 70 °F (21 °C) by the time you wake at 6 a.m.
Built-in compressor protection
Your thermostat has a feature that helps prevent damage to the compressor of your air conditioning. Because damage can occur if the compressor is restarted too soon after shutdown, this feature forces the compressor to wait 5 minutes before restarting. During the wait time, flashes on the screen. When the safe wait time has elapsed, the icon stops flashing and the compressor turns on.
Quick reference to controls

Quick reference to display screen

Note: Flashes when the compressor protection is engaged (see page 3).
This thermostat is ready to go
Simply perform the three steps below and the thermostat is in operation:
- Set the clock (see page 7)
- Select whether to heat or cool (see page 8)
- Select whether to keep the fan on continuously or only when needed (see page 9)
This thermostat is pre-set with energy-saving program settings (see page 11). If you do not wish to use these settings, you can:
- Modify the schedule and temperature setpoints (see page 12)
- Temporarily override the temperature setpoint (see page 14)
- Permanently override the temperature setpoint (see page 15)
Set the clock
- Press Clk. The hour will flash.
- Press
 to set the hour.
 - Press Clk. The minutes will flash.
- Pressto set the minutes.
- Press Clk. The day will flash.
- Press or to set the day.
- Press Exit.
NOTE: The time display flashes when the clock has lost its settings.
Select the system setting
Use the System switch to place the system in one of the following modes:
- Heat: System is in Heating mode.
- Off: System is off.
- Cool: System is in Cooling mode.

NOTE: When you place the thermostat in Cooling mode, you might need to wait up to five minutes before cooling can start. This is a safety feature for the compressor. will flash on the screen until cooling starts.
CAUTION: EQUIPMENT DAMAGE HAZARD
Do not use Cooling mode when the outdoor temperature is below 50 °F (10 °C).
Select the fan setting
Use the Fan switch to select the fan mode of operation.
- Auto The fan runs only when heating or cooling is activated. However, if you have a gas or fuel oil furnace, when heating is activated, the fan will start only when the air coming out of the vents is warm enough. The fan will keep on running after heating stops until the air is no longer warm enough.
- On The fan is always running. Use this setting for improved air circulation or for more efficient air cleaning.
NOTE: The Fan switch is not used if the fan is not connected to the thermostat.
Save money by using the schedule
The thermostat automatically adjust its temperature setpoint according to the programmed schedule. You can program up to four periods per day, with different settings for weekdays and weekends. For example, you can program all four periods for the weekdays but only two periods (Wake and Sleep) for the weekends.
 |
Wake |
Set the time you wake up and the temperature you want in the morning until you leave (usually a comfortable level). |
 |
Leave |
Set the time you leave home and the temperature you want while you are away (usually an economical level). |
|
Return |
Set the time you return home and the temperature you want during the evening until bedtime (usually a comfortable level). | |
 |
Sleep |
Set the time you go to bed and the temperature you want overnight (usually an economical level). |
To program a period, you need to set its start time and its two temperature settings (one when the thermostat is in cooling mode and another one when it is in heating mode).
Energy saving default schedule
This thermostat is pre-set with energy-saving program settings. These settings can reduce your energy bills by 33%. See the next page if you wish to modify the settings.
|
Period |
Weekdays | Weekends | ||||
| Start time | Heat | Cool | Start time | Heat | Cool | |
| Wake | 6:00 am | 70 °F (21 °C) | 78 °F (25.5 °C) | 6:00 am | 70 °F (21 °C) | 78 °F (25.5 °C) |
| Leave | 8:00 am | 62 °F (16.5 °C) | 85 °F (29.5 °C) | – – | – – | – – |
| Return | 6:00 pm | 70 °F (21 °C) | 78 °F (25.5 °C) | – – | – – | – – |
| Sleep | 10:00 pm | 62 °F (16.5 °C) | 82 °F (28 °C) | 10:00 pm | 62 °F (16.5 °C) | 82 °F (28 °C) |
To modify the schedule
- Press Pgm. The settings for period 1 for Monday through Friday are displayed.
- Press Day to switch between MO TU WE TH FR (Monday through Friday) and SA SU (Saturday and Sunday).
NOTE: Press Day for 3 seconds to select all 7 days. - To select another period, press P# until the desired period number is displayed.
NOTE: To skip the displayed period, press Clr. For example, periods 2 and 3 have been skipped for Saturday and Sunday in the default schedule.
- While the time display is flashing, press or to set the time (in increments of 15 minutes).
- Press P#.
- While the temperature display is flashing, place the System switch on Heat and press or to set the heat temperature. Place the System switch on Cool and press or to set the cool temperature.
- Repeat steps 2 to 6 to set another period.
- Press Exit.

Temporary override of schedule
To temporarily override the schedule, press or until the desired temperature is displayed. The period number will flash to indicate that the current period has been overridden. The new temperature will be used for the next 2 hours.
NOTE: Pressing or once will display the setpoint temperature. To change the setpoint temperature, press either button more than once.
Press the Mode button if you wish to cancel the temporary setting.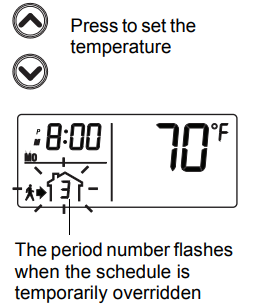
Permanent override of schedule
To permanently override the schedule, press the Mode button so that the period number disappears. Press or to manually set the temperature.
Press the Mode button again if you wish to cancel the override and resume the schedule. The current period number will appear and the thermostat will be set to the temperature programmed for that period.
Filter replacement
After 500 hours of heating or cooling time, an icon appears to indicate that the filter needs replacement. Once the filter is replaced, press the Filter but-ton for 3 seconds to remove the icon and reset the counter.
Battery replacement
Set the System switch to Off before removing the batteries. Otherwise, the heating/cooling system might remain activated even when batteries are removed. Install two fresh AA batteries when the low-battery icon flashes on the screen. The icon will flash for 120 days, then the thermostat will cut power to the heating/cooling unit. The icon disappears once the batteries are
replaced.
Replace batteries once a year or before leaving home for more than a month.
After replacing the batteries, set the time and the day (see page 7). The other settings are not erased when the thermostat is without power.
In case of difficulty
- Screen is blank: Ensure two fresh AA alkaline batteries are correctly installed.
- Temperature settings cannot be changed: You are setting the temperature outside its allowable range:
- Heat: 41 °F to 82 °F (5 °C to 28 °C )
- Cool: 59 °F to 95 °F (15 °C to 35 °C
 is flashing: The compressor protection delay is underway. Wait for the delay to end (maximum of 5 minutes).
- HI appears on the screen: The ambient (measured) temperature is above 122 °F (50 °C).
- LO appears on the screen: The ambient (measured) temperature is below 23 °F (-5 °C)
Customer Assistance
For assistance with this product, please visit http://yourhome.honeywell.com.
Or call Honeywell Customer Care toll-free at 1-800-468-1502.
To save time, please note your model number and date code before calling.
1-year limited warranty
Honeywell warrants this product, excluding battery, to be free from defects in the workmanship or materials, under normal use and service, for a period of one (1) year from the date of purchase by the consumer. If at any time during the warranty period the product is determined to be defective or malfunctions, Honeywell shall repair or replace it (at Honeywell’s option).
If the product is defective,
- return it, with a bill of sale or other dated proof of purchase, to the place from which you purchased it; or
- call Honeywell Customer Care at 1-800-468-1502. Customer Care will make the determination whether the product should be returned to the following address: Honeywell Return Goods, Dock 4 MN10-3860, 1985 Douglas Dr. N., Golden Valley, MN 55422, or whether a replacement product can be sent to you.
This warranty does not cover removal or reinstallation costs. This warranty shall not apply if it is shown by Honeywell that the defect or malfunction was caused by damage which occurred while the product was in the possession of a consumer.Honeywell’s sole responsibility shall be to repair or replace the product within the terms stated above. HONEYWELL SHALL NOT BE LIABLE FOR ANY LOSS OR DAMAGE OF ANY KIND, INCLUDING ANY INCIDENTAL OR CONSEQUENTIAL DAMAGES RESULTING, DIRECTLY OR INDIRECTLY, FROM ANY BREACH OF ANY WARRANTY, EXPRESS OR IMPLIED, OR ANY OTHER FAILURE OF THIS PRODUCT. Some states do not allow the exclusion or limitation of incidental or consequential damages, so this limitation may not apply to you. THIS WARRANTY IS THE ONLY EXPRESS WARRANTY HONEYWELL MAKES ON THIS PRODUCT. THE DURATION OF ANY IMPLIED WARRANTIES, INCLUDING THE WARRANTIES OF MERCHANTABILITY AND FITNESS FOR A PARTICULAR PURPOSE, IS HEREBY LIMITED TO THE ONE-YEAR DURATION OF THIS WARRANTY.
Some states do not allow limitations on how long an implied warranty lasts, so the above limitation may not apply to you. This warranty gives you specific legal rights, and you may have other rights which vary from state to state.
If you have any questions concerning this warranty, please write Honeywell Customer Relations, 1985 Douglas Dr, Golden Valley, MN 55422 or call 1-800-468-1502. In Canada, write Retail Products ON15-02H, Honeywell Limited/Honeywell Limitée, 35 Dynamic Drive, Toronto, Ontario M1V4Z9.
REFERENCE:
Download Manual:
Honeywell Home RTH2310B Programmable Thermostat Operating Manual
Other manuals:
Honeywell Home RTH2310B Programmable Thermostat Installation Guide
![]()
Honeywell Home RTH2310B Programmable Thermostat Operating Manual