Honeywell Electronic Programmable Thermostat

Programming Your Thermostat
When batteries are installed, your thermostat can be programmed in your hand before it is installed or after it is mounted on the wall. For instructions on installing or replacing the batteries, refer to the Maintaining Your Thermostat section.
Refer to the personal Program Schedule on page 3 to program your time and temperature settings for various times of the day.
Four time periods are available during weekdays — WAKE, LEAVE, RETURN, and SLEEP. During weekends, only the WAKE and SLEEP time periods are available. View these periods individually on the display when you press the Set Schedule key.
- WAKE is the time the thermostat turns on the heating/cooling equipment after an energy-saving period. When deciding what time to set for your WAKE period, include extra lead time, depending on the outside temperature and your furnace response time, to give the furnace a head start to heat the house before you get up. (This will be a higher temperature during the heating season, and a lower temperature during the cooling season.)
- LEAVE is the time period you can set for an energy-saving temperature while you are away at work or school. (This will be a lower temperature during the heating season, and a higher temperature during the cooling season.)
- RETURN is the time the thermostat turns on the heating/cooling equipment after an energy saving period. When deciding what time to set for your RETURN period, include extra lead time, depending on the outside temperature and your furnace response time, to give the furnace a head start to heat the house before you arrive home.
- SLEEP is the time period you can set for an energy-saving temperature while you are sleeping. (For more comfortable sleeping, some people choose not to raise the cool temperature during the night.)
You will set one schedule for weekdays and another for weekends because your requirements will probably be different for each.
Fill in the times and temperatures you desire for weekdays and weekends. If you decide notto program the thermostat, it automatically controls heating at 68°F (20°C), and cooling at 78°F (26°C), 24 hours a day. Also, you do not need to enter a time and temperature program for all periods if your schedule does not require it. For example, a house that is occupied during weekdays would only require programs for WAKE and SLEEP.
When pressing the keys, use the ball of your finger or a soft pencil eraser.
NOTE: Use of sharp fingernails or pencil points can damage the keypad. If you make an error at any time during programming, just press the Run Program key, and continue again at the last step.
Program Schedule
HEATING PROGRAM SCHEDULE
- Weekdays Start Time Heating Temperature Cooling Temperature
- WAKE __________ ____________________ ____________________
- LEAVE __________ ____________________ ____________________
- RETURN __________ ____________________ ____________________
- SLEEP __________ ____________________ ____________________
- Weekends
- WAKE __________ ____________________ ____________________
- SLEEP __________ ____________________ ____________________
- WAKE and RETURN start times should include extra lead time, based on outside temperature and furnace response time, to give your furnace a head start to heat the house.
- The temperatures cannot be set higher than 88°F (31°C) or lower than 45°F (7°C).
NOTE: If you decide not to program the thermostat, it will automatically control heating at 68°F (20°C), and cooling at 78°F (26°C), 24 hours a day. This guide can be used for programming your new thermostat.
IMPORTANT
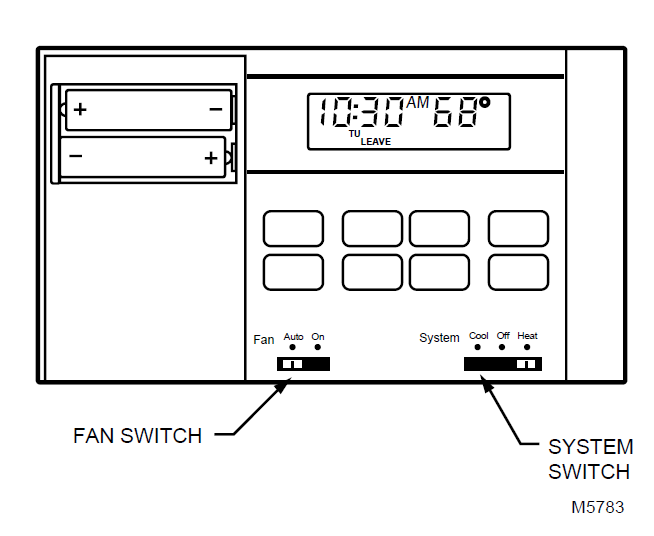
Batteries are required for operation and programming. When inserting batteries, set the system switch to OFF. Remove the battery door (on the thermostat’s left side) using a coin at the bottom. SeeMaintaining Your Thermostat section.
SET CURRENT TIME/DAY
To set the time, press and release the Set Clock/Day key once. Press the Time keys until the current time shows.
To set the day, press and release the Set Clock/Day key again. Press the Time keys until the current day shows. Press the Run Program key.
HEATING PROGRAM
With the system switch at HEAT, press and release the Set Schedule key once. WAKE, Mon-Fri and SET appear on the display.
Use Time keys to program WAKE time and Temp keys to program WAKE temperature for Mon-Fri. Repeat sequence for LEAVE, RETURN, and SLEEP.

Press the Set Schedule key until WAKE, SA SU and SET appear on the display. Use Time keys to program WAKE time and Temp keys to program WAKE temperature for Sat-Sun. Repeat the sequence for SLEEP.
COOLING PROGRAM
With the system switch at COOL, follow the same instructions as for the Heating Program. After programming, adjust the fan and system switches, as desired. Press and release Run Program key to start the program.
Operating Your Thermostat
USING PROGRAMMING FEATURES
- Temporarily Change temperature for the current period only— Press the Temp keys to set the desired temperature. The change cancels itself at the next scheduled program change; to cancel sooner, press the Run Program key.
- Hold a temperature indefinitely—Press the Hold Temp key once. Press the Temp keys until the display shows desired temperature. Press Run Program key once to return to the program.
- Check Current Temperature Setting—Press Run Program key once. If using TEMPORARY CHANGE or HOLD features, pressing this key cancels your change.
- Check Programs—Press Set Schedule key repeatedly to see each time and temperature. Press Run Program key once to return to the program.
- Cancel a program—Press Set Schedule key until the program to cancel shows. Pressing the two Time keys together cancels the program.
- Permanently Change a program—Repeat the steps in the Heating Program or Cooling Program sections, as applicable.
- Return to the normal program or the starting program—Press Run Program key once.
SETTING FAN SWITCH
Fan switching positions are:
- FAN AUTO: Normal setting for most homes. A single-speed fan turns on automatically with the air conditioner or furnace. A two-speed fan usually runs on high with the air conditioner and runs on low with the furnace.
- FAN ON: The fan runs continuously. Use for improved air circulation during special occasions or for more efficient electronic air cleaning.
SETTING SYSTEM SWITCH
System switching positions control thermostat operation as follows:
- COOL: The thermostat controls the air conditioning system.
- OFF: Both the heating and air conditioning systems are off.
- HEAT: The thermostat controls the heating system.
Maintaining Your Thermostat
INSTALLING BATTERIES
IMPORTANT
Batteries must be installed for the programming and operation of the thermostat and heating/ cooling system.
- Purchase two AA alkaline batteries; non-alkaline batteries do not last as long and can leak, causing damage to the thermostat or wall surface. We recommend Energizer® batteries.
- Make sure the thermostat is set in the OFF position.
- Use a coin to remove the battery door.
- Install the fresh batteries, making sure the positive and negative terminals are oriented correctly.
- Replace the battery door.
As the batteries are running low, the Bat Lo indicator flashes for one to two months before the batteries run out completely. Replace the batteries as soon as possible after the indicator starts flashing.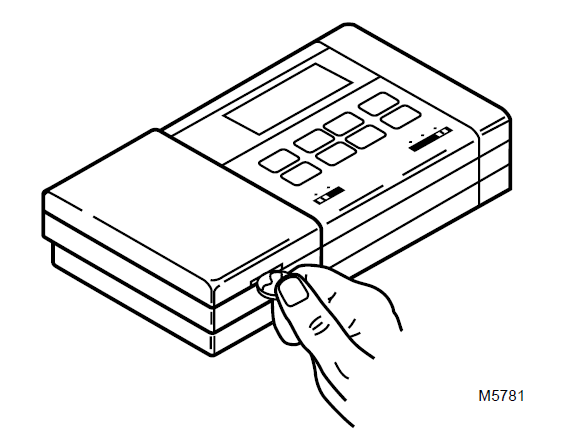

If the batteries are not replaced sometime during the flashing bAt Lo, the indicator eventually stops flashing. bAt Lo stays on without flashing, indicating the thermostat and heating/cooling system stopped working and the batteries are almost completely dead. After the batteries are completely dead, the bAt Lo indicator disappears, leaving a completely blank display.
To remove, press down on left ends of the batteries. If the new batteries are installed within 20 to 30 seconds of removing the old ones, the thermostat does not have to be reprogrammed. If the display is blank, the batteries are dead or incorrectly installed, the thermostat has to be reprogrammed. See the Programming Your Thermostat section for instructions.
Troubleshooting Guide
- IF… THEN…
- The display will not come on.
- Set the system switch to OFF. Remove batteries. Insert backward for at least five seconds to reset the thermostat.
Correctly replace batteries. The display should come on. - Make sure batteries are fresh and installed correctly.
- Gently clean battery contacts using a soft pencil eraser.
Do not use anything abrasive on the clips.
- Set the system switch to OFF. Remove batteries. Insert backward for at least five seconds to reset the thermostat.
- The temperature display will not go lower than 45°F (7°C) or higher than 88°F (31°C) during programming.
- The temperature setting limit is reached. The setting range is 45°F to 88°F (7°C to 31°C).
- Temperature change occurs at the wrong times.
- Check program times for the period in question. Be sure that AM and PM indications are correct. Make sure the current day and time are correct. Reprogram if necessary.
- The heating will not come on.
- Check that switch on the thermostat is set to HEAT. Allow a minimum of five minutes for time-guard protection to expire.
- Check the system fuse or circuit breaker and replace or reset, if necessary.
- If the display is blank or displays bAt Lo, install fresh batteries.
- If the temperature setting is higher than the current temperature, and the SYSTEM ON indicator is lit, contact your local dealer.
- Cooling will not come on.
- Check that switch on the thermostat is set to COOL. Allow a minimum of five minutes for time-guard protection to expire.
- Check the system fuse or circuit breaker and replace or reset it, if necessary.
- If the display is blank or displays bAt Lo, install fresh batteries.
- The thermostat has a built-in time delay on cooling. Allow at least five minutes after changing the setting before the air conditioner starts.
- Make sure the outdoor disconnect is engaged (on).
- If the temperature setting is lower than the current temperature, and the SYSTEM ON indicator is lit, move the system switch from COOL to OFF for ten minutes. After ten minutes, return switch to the COOL position. If the air conditioner comes on, the compressor could have reached its high-limit temperature protection and shut down. If air conditioner does not come on after ten minutes and the SYSTEM ON indicator is lit, contact your local dealer.
- If 2- or 4-wire installation, verify that the R-Rc jumper is installed.
- Too warm or too cool.
- Press the Run Program key to check the current temperature setting.
- If desired, change the temperature setting. See Programming Your Thermostat section.
- SYSTEM ON indicator is lit, but no heat is coming from registers.
- Allow time for the furnace to heat up and the fan to come on before checking for heat at the register.
- The thermostat current temperature setting does not match the display temperature to within ± 1°.
- Check that the wiring hole in the wall behind the wallplate was plugged with insulation to prevent drafts that might adversely affect thermostat operation.
- Be aware that it is normal for the current setting and display temperature to differ on occasion.
- During recovery from setback or setup, setting and display temperatures can differ for up to 30 minutes after the recovery period.
- Incorrect temperature showing on thermostat display.
- The thermostat is factory-calibrated and cannot be adjusted.
- bAt Lo remains on display after fresh batteries are installed.
- Remove the batteries. Wait one hour. Install fresh alkaline batteries.
NOTICE
This equipment is a Class B digital apparatus, which complies with Canadian Radio Interference Regulations, CRC c.1374.
Limited One-Year Warranty
Honeywell warrants this product to be free from defects in the workmanship or materials, under normal use and service, for a period of one (1) year from the date of purchase by the consumer. If, at any time during the warranty period, the product is detective or malfunctions, Honeywell shall repair or replace it (at Honeywell’s option) within a reasonable period of time.
If the product is defective,
- return it, with a bill of sale or other dated proof-of-purchase, to the dealer or contractor from which you purchased it, or
- package it carefully, along with proof-of-purchase (including date of purchase) and a short description of the malfunction, and mail it, postage prepaid, to the following address:
Honeywell Inc.
Return Goods Department 1050 Berkshire Lane
Plymouth, MN 55441-4437
This warranty does not cover removal or reinstallation costs. This warranty shall not apply if it is shown by Honeywell that the defect or the malfunction was caused by damage that occurred while the product was in the possession of a consumer.
Honeywell’s sole responsibility shall be to repair or replace the product within the terms stated above. HONEYWELL SHALL NOT BE LIABLE FOR ANY LOSS OR DAMAGE OF ANY KIND, INCLUDING ANY INCIDENTAL OR Consequential DAMAGES RESULTING, DIRECTLY OR INDIRECTLY FROM ANY BREACH OF ANY WARRANTY, EXPRESS OR IMPLIED, OR ANY OTHER FAILURE OF THIS PRODUCT. Some states do not allow the exclusion or limitation of incidental or consequential damages, so this limitation may not apply to you. THIS WARRANTY IS THE ONLY EXPRESS WARRANTY HONEYWELL MAKES ON THIS PRODUCT. THE DURATION OF ANY IMPLIED WARRANTIES, INCLUDING THE WARRANTIES OF MERCHANTABILITY AND FITNESS FOR A PARTICULAR PURPOSE, IS HEREBY LIMITED TO THE ONE-YEAR DURATION OF THIS WARRANTY. Some states do not allow limitations on how long an implied warranty lasts, so the above limitation may not apply to you.
This warranty gives you specific legal rights, and you may have other rights which vary from state to state.
If you have questions concerning this warranty, please write our Customer Assistance Center, Honeywell Inc., P.O. Box 524, Minneapolis, MN
55440-0524 or call 1-800-468-1502, Monday – Friday, 7:00 a.m. to 5:30 p.m., Central time.
Reference
Download Manual:
Honeywell Electronic Programmable Thermostat Owner’s Manual