Honeywell 2000 Microelectronic Thermostat

Product OVERVIEW

FEATURES
- Program up to two Occupied and two Unoccupied time periods for each daily schedule.
- Set different schedules for each day of the week.
- Temporary temperature overrides.
- Program copy key.
PROGRAMMING
The keyboard is located behind the thermostat cover. Sixteen keys are used to set, review and modify programmed times and temperature settings.
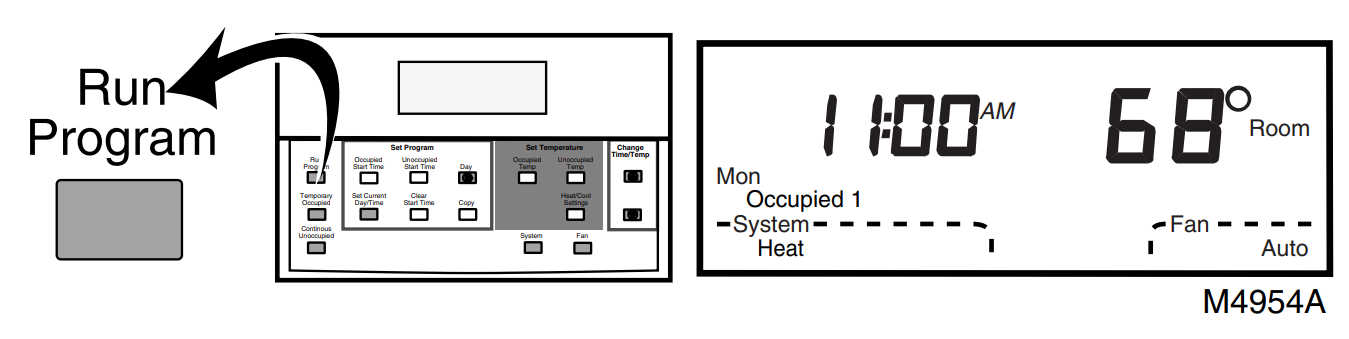
The thermostat display shows a day, time, program period, and temperature.
The thermostat can be set for two Occupied and two Unoccupied times for each day of the week (28 independent time settings). Temporary Occupied key provides quick temporary temperature changes for increased occupant comfort. The Continuous An unoccupied key provides energy-efficient operation for extended periods of time.
Before starting the program procedure, use the the following chart to organize the program schedule.
|
Day |
Occupied Period 1 | Unoccupied Period 1 | Occupied Period 2 | Unoccupied Period 2 |
| Monday | ||||
| Tuesday | ||||
| Wednesday | ||||
| Thursday | ||||
| Friday | ||||
| Saturday | ||||
| Sunday |
The program has four temperature settings, Occupied and Unoccupied heat, and cool. The thermostat will operate at the Unoccupied temperature setting unless the thermostat is programmed. The following chart shows the default temperature settings.
|
Control |
Occupied Setpoint | Unoccupied Setpoint | ||
| Default | Desired | Default | Desired | |
| Heating | 70°F (21°C) | 55°F (13°C) | ||
| Cooling | 78°F (25.5°C) | 90°F (32°C) | ||
Setting Current Day and Time
- Press Set Current Day/Time.
NOTE: On initial power-up or after an extended power loss, 1:00 pm flashes on the LCD until a key is pressed.
- Press Day until the current day is displayed.
NOTE: Sun = Sunday, Mon = Monday, Tue = Tuesday, Wed = Wednesday, Thu = Thursday, Fri = Friday, Sat = Saturday.
- Press the increase ▲ or decrease ▼ key until the current time is displayed.
NOTE: Tapping the Set Current Day/Time will change the time in one-hour increments.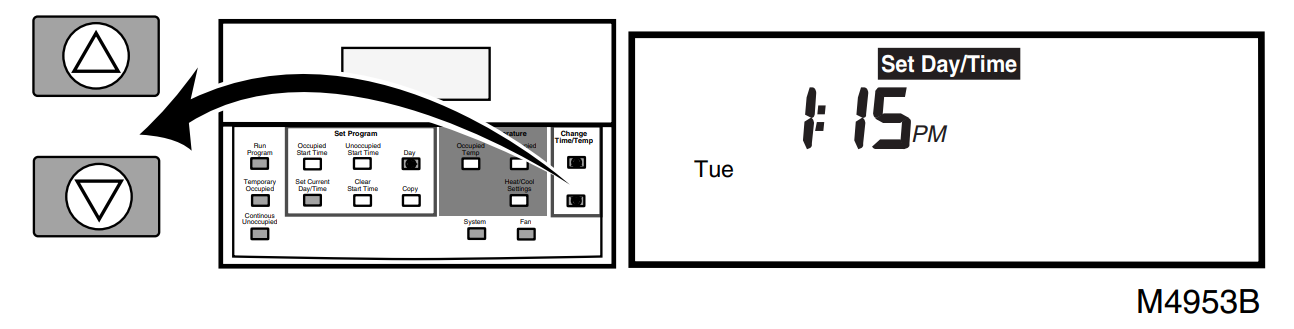
- Press Run Program.

Setting Program Times
- Press Occupied Start Time.
NOTE: Anytime a start time is not required, press the Clear Start Time.
- Press Day until the desired day is displayed.

- Press the increase ▲ or decrease ▼ key until the desired start time is displayed.
NOTE: The program times are in fifteen-minute intervals. (Example: 8:00, 8:15, 8:30).
- Press Occupied Start Time a second time to set a second Occupied Start Time.

- Press the increase ▲ or decrease ▼ key until the desired start time is displayed.

- Press Unoccupied Start Time.

- Press the increase ▲ or decrease ▼ key until the desired start time is displayed.

- Press Unoccupied Start Time a second time to set a second Unoccupied Start Time.

- Press increase ▲ or decrease ▼ key until the desired start time is displayed.

Copying a Day
NOTE: The thermostat must be in program mode to use the copy feature. Go to step 2 if the thermostat is already in the program mode.
- Press Occupied Start Time.

- Press Day to select the day to be copied if different from the day displayed.

- Press Copy.

- Press Day until the day to be copied is displayed.

- Press Copy.
NOTE: donE will be displayed for two seconds and then the normal program display will be shown.
- Repeat steps 2 through 5 for all the days desired.
- Press Run Program.

Setting Program Temperature Setpoints
NOTE: The setpoint temperature range is 40 to 90°F (7 to 31°C) for heating and 45 to 99°F (9 to 37°C) for cooling.
- Press Occupied Temp.

- Press the increase ▲ or decrease ▼ key until the desired temperature is displayed.

- Press Heat/Cool Settings to change between heat and cool settings.

- Press the increase ▲ or decrease ▼ key until the desired temperature is displayed.
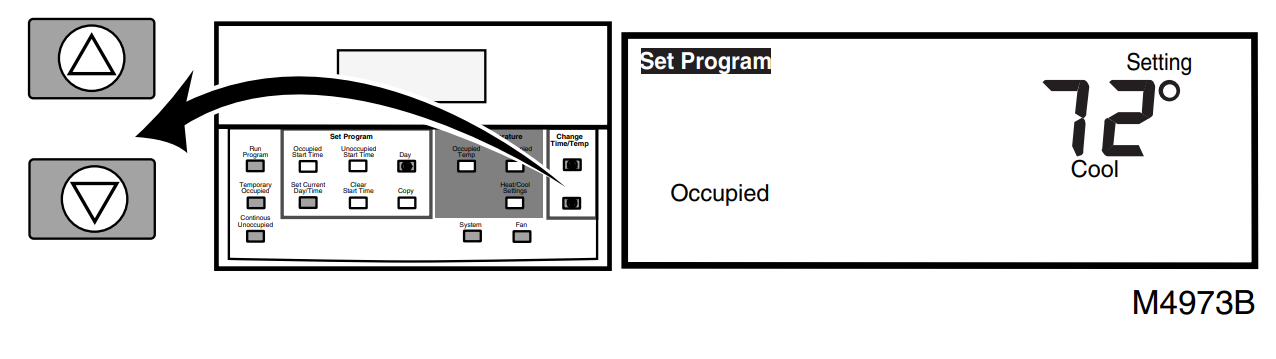
- Press Unoccupied Temp.

- Press increase ▲ or decrease ▼ key until the desired temperature is displayed.

- Press Heat/Cool Settings to change between heat and cool settings.

- Press the increase ▲ or decrease ▼ key until the desired temperature is displayed.

- Press Run Program.

Clearing Program Start Times
- Press Occupied Start Time or Unoccupied Start Time until the start time to be cleared is displayed.

- Press Day until the desired day is displayed

- Press Clear Start Time.

- Repeat steps 1 through 3 for all the start times to be cleared.
- Press Run Program.

Temporary Occupied Override
Setting Temperature Offset for Temporary Override
- Press Occupied Temp.

- Press Temporary Occupied.

- Press the increase ▲ or decrease ▼ key until the desired temperature offset is displayed (range is 0° to 5°F).

- Press Run Program.

Using Temporary Override
- Press Temporary Occupied.
NOTE: The default temperature setting is the Occupied setpoint.
- Press the increase ▲ or decrease ▼ key to change the default setting by the offset (range is 0° to 5°F), if desired.
NOTE: If the offset is zero, the default setting changes in one-degree increments. If the offset is 1 through 5, the default setting changes by plus or minus the offset.
- Press Run Program to cancel the override.

Using Continuous Unoccupied
- Press Continuous Unoccupied.
NOTE: The default temperature setting is the Unoccupied setpoint. The default appears for five seconds and then the display shows the room temperature.
- Press the increase ▲ or decrease ▼ key to change the default setting if desired.

- Press Heat/Cool Setpoint to change between heat and cool settings. Use the increase ▲ or decrease ▼ key to adjust temperature settings.
- Press Run Program again to cancel the Hold and to return to the program.
Changing Temperature Setpoint Until Next Program Period
- Press the increase ▲ or decrease ▼ key until the desired temperature is displayed.
NOTE: If ▼ or ▲ appear under the temperature display, it means that both the heating and cooling setpoints are being adjusted. Tapping the key will change both the heat and cool setpoints by one degree. Press Heat/Cool Settings after the desired setpoint is reached to review the settings.
- Press Run Program to cancel the temporary setpoint and to return to the program.

TROUBLESHOOTING GUIDE
| Symptom | Action |
| Display will not come on. | • Check if the circuit breaker is tripped—reset the circuit breaker.
• Check if the fuse is blown—replace the fuse. • Check if the system switch at the equipment is in the Off position— set to the On position. • Check wiring between thermostat and HVAC equipment—replace any broken wires. • If 24 Vac is present, proceed with troubleshooting. |
| Temperature settings will not change (Example: cannot set the heating higher or the cooling lower). | • Check that the temperature setpoints are:
– heating: 40 to 90°F (7 to 31°C) – cooling: 45 to 99°F (9 to 37°C). • Keyboard is locked. Contact the installer. |
| Heating will not come on. | • Check if the circuit breaker is tripped—reset the circuit breaker.
• Check if the fuse is blown—replace the fuse. • Check if the system switch at the equipment is in the Off position— set to On position. • If 24 Vac is present, proceed with troubleshooting. • Wait five minutes for the system to respond. • Set system selection to Heat. |
| Symptom | Action |
| Cooling will not come on. | • Check if the circuit breaker is tripped—reset the circuit breaker.
• Check if the fuse is blown—replace the fuse. • Check if the system switch at the equipment is in the Off position— set to On position. • If 24 Vac is present, proceed with troubleshooting. • Wait five minutes for the system to respond. • Set system selection to Cool. |
| System on indicator (flame=heat, snowflake=cool) is displayed, but no warm or cool air is coming from the registers. | Wait a minute after seeing the flame or snowflake and then check the registers. |
Automation and Control Solutions
Honeywell International Inc.
1985 Douglas Drive North
Golden Valley, MN 55422-4386
Honeywell Limited-Honeywell Limitée
35 Dynamic Drive
Scarborough, Ontario M1V 4Z9
www.honeywell.com/buliding/components
Reference
Download Manual
Honeywell 2000 Microelectronic Thermostat User Manual
![]()