
Honeywell Home TH1000E1 Pro Non-Programmable Thermostat

This manual covers the following models
- TH1100DH: For Heat only systems
- TH2110DH/TH1110E1/TH1110DH: For 1 Heat/1 Cool systems
- TH2210DH/TH1210DH: For 2 Heat/1 Cool heat pump systems only
(Pull thermostat from wallplate and turn over to find model number.)
System Types
TH2110DH/TH1110DH/TH1110E1:
- Gas, oil, or electric heat with air conditioning
- Warm air, hot water, high-efficiency furnaces, 1 Heat/1 Cool heat pumps, steam, gravity
- Heat only
- Heat only with fan
- Cool only
- 750 mV heating systems
TH2210DH/TH1210DH:
- 2 Heat/1 Cool heat pumps
TH1100DH:
- Gas, oil, or electric heat
- Warm air, hot water, steam, gravity
- Heat only
- 750 mV heating systems
Must be installed by a trained, experienced technician
Read these instructions carefully. Failure to follow these instructions can damage the product or cause a hazardous condition.
Need Help?
For assistance with this product please visit http://customer.resideo.com or call Resideo Customer Care toll-free at 1-800-468-1502
Wallplate installation

Remove the wallplate from the thermostat as shown at left, then follow directions below for mounting.
- Pull wires through wire hole.
- Position wallplate on wall, level and mark hole positions with pencil.
- Drill holes at marked positions as shown below, then tap in supplied wall anchors.
- Place wallplate over anchors, insert and tighten mounting screws.

CAUTION: ELECTRICAL HAZARD
Can cause electrical shock or equipment damage. Disconnect power before beginning installation.
MERCURY NOTICE
If this product is replacing a control that contains mercury in a sealed tube, do not place the old control in the trash. Contact the Thermostat Recycling Corporation at www.thermostat-recycle.org or 800-238-8192 for information on how and where to properly and safely dispose of your old thermostat.
Power options
Wiring
Terminal designations
TH2110DH/TH1110E1/TH1110DH:
- B: Changeover valve energized in heating
- O: Changeover valve energized in cooling
- G: Fan relay
- Y: Compressor contactor
- W: Heat relay
- C: 24 Vac common. For 2-transformer systems, use common wire from cooling transformer.
- R: 24 Vac power from heating transformer
- Rc: 24 Vac power from cooling transformer
TH2110DH/TH1110E1/TH1110DH:
TH1100DH:
- W: Heat relay
- C: 24 Vac common
- R: 24 Vac power

TH2210DH/TH1210DH:
- B: Changeover valve energized in heating
- O: Changeover valve energized in cooling
- G: Fan relay
- Y: Compressor contactor
- Aux/E Auxiliary heat relay
- C: 24 Vac common
- R: 24 Vac power

Conventional and heat pump systems
2H/1C Heat Pump System
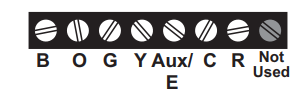
TH2210DH/TH1210DH
- B: Changeover valve energized in heating (5)
- O: Changeover valve energized in cooling (5)
- G: Fan relay
- Y: Compressor contactor
- Aux/E Auxiliary heat relay
- C: 24 Vac common (3)
- R: Vac power (1)
1H/1C System TH2110DH/TH1110E1/ TH1110DH
(1 transformer)

- G Fan relay
- Y Compressor contactor
- W Heat relay
- C 24 Vac common [3]
- R [R+Rc joined by jumper]
- Rc Power [1]
1H/1C System TH2110DH/ TH1110E1/ TH1110DH
(2 transformers)
- G Fan relay
- Y Compressor contactor
- W Heat relay
- C 24 Vac common [3, 4]
- R Power (heating transformer) [1, 2]
- Rc Power (cooling transformer) [1, 2]
Heat Only System
TH1100DH
- W Heat relay
- C 24Vac common [3]
- R Power [1]
See [notes] below
1H/1C Heat
Pump System
TH2110DH/ TH1110E1/TH1110DH [7]
- B Changeover valve energized in heating [5]
- O Changeover valve energized in cooling [5]
- G Fan relay
- Y Compressor contactor [6]
- W [W+Y joined by jumper]
- C 24 Vac common [3]
- R [R+Rc joined by jumper]
- Rc Power [1]

Heat Only System
TH2110DH/TH1110E1/TH1110DH
- W Heat relay
- C 24Vac common [3]
- R [R+Rc joined by jumper]
- Rc Power [1]
Heat Only System with Fan
TH2110DH/TH1110E1/TH1110DH
- G Fan relay
- W Heat relay
- C 24 Vac common [3]
- R [R+Rc joined by jumper]
- Rc Power [1]
Cool Only System
TH2110DH/TH1110E1/TH1110DH
- G Fan relay
- Y Compressor contactor
- C 24 Vac common [3]
- R [R+Rc joined by jumper]
- Rc Power [1]

NOTES
Wire specifications:
Use 18- to 22-gauge thermostat wire. Shielded cable is not required.
- Power supply. Provide disconnect means and overload protection as required.
- Remove jumper for 2-transformer systems.
- Optional 24 Vac common connection.
- The common connection must come from cooling transformer.
- Use either O or B terminals for the changeover valve.
- Use a small piece of wire (not supplied) to connect W and Y terminals.
- Set fan operation switch to Heat Pump (see page 5).
Fan operation settings
TH2110DH/TH1110E1/ TH1110DH only:
- Gas or Oil: For gas or oil heating systems, leave the fan operation switch in this factory-set position.
(This setting is for systems that control the fan in a call for heat.) - Electric or Heat Pump: Change the switch to this setting for heat pump or electric heat systems.
(This setting is for systems that allow the thermostat to control the fan in a call for heat, if a fan wire is connected to the G terminal.)
Thermostat mounting
Align the 2 tabs at the top of the wall plate with corresponding slots on the back of the thermostat, then push gently until the thermostat snaps in place.
Installer setup
Follow the procedure below to configure the thermostat to match the installed heating/cooling system, and customize feature operation as desired.
To begin, press and hold the  buttons until the display changes.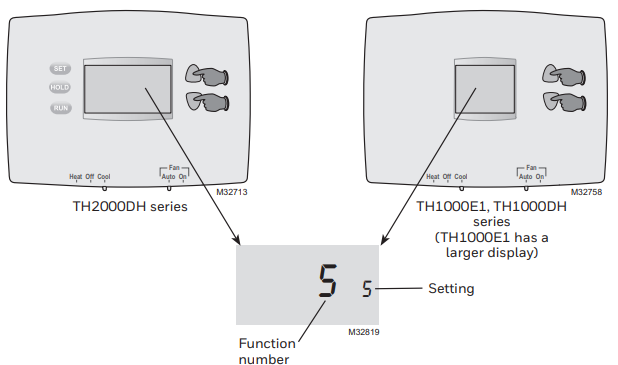
Press the  button to change the setting.
Press thebuttons simultaneously for one second to advance to the next function.
Press and hold the buttons to exit and save settings.
NOTE: If you do not press any button for 60 seconds while you are in the setup menu, the thermostat automatically saves any changes made and exits the menu.
Installer setup
Setup function Settings & options (factory default in bold)
5 Heating cycle rate (CPH: cycles/hour) TH2110DH, TH1110E1, TH1110DH and TH1100DH:
- 5 For gas or oil furnaces of less than 90% efficiency
- 1 For steam or gravity systems
- 3 For hot water systems & furnaces of over 90% efficiency
- 6 For electric furnaces
[Other cycle rate options: 2 or 4 CPH]
6 Auxiliary heat cycle rate (CPH)TH2210DH and TH1210DH
- 5 For gas or oil furnaces of less than 90% efficiency
- 1 For steam or gravity systems
- 3 For hot water systems & furnaces of over 90% efficiency
- 6 For electric furnaces
[Other cycle rate options: 2 or 4 CPH]
9 Compressor cycle rate (CPH)
- 3 Recommended for most compressors
[Other cycle rate options: 1, 2, 4, 5, or 6 CPH]
13 Early Start (TH2110DH and TH2210DH)
- 1 On **See page 8
- 0 Off
14 Temperature display
- 0 Fahrenheit
- 1 Celsius
15 Compressor protection
- 1 Five-minute compressor off time (See page 8)
- 0 No compressor off time
20 Clock display
(TH2110DH and TH2210DH)
- 0 12-hour display
- 1 24-hour display
25 Lower temperature range (TH1100DH only)
- 0 Standard range 40°F to 90°F (4.5°C to 32°C)
- 1 Lower range (for garage mode) 35°F to 90°F (1.5°C to 32°C)
40 Restore program schedule to default
(TH2110DH and TH2210DH)
- 0 Off
- 1 On – program schedule default settings are listed in the operating manual
CAUTION: EQUIPMENT DAMAGE HAZARD
Compressor protection is bypassed during testing. To prevent equipment damage, avoid cycling the compressor quickly
Special functions
Early Start (Setup Function 13): Early start allows the heating or cooling to turn on before the program start time, so the temperature is reached at the time you set.
Compressor Protection (Setup Function 15): Forces the compressor to wait a few minutes before restarting, to prevent damage. During the wait time, the message Cool On (or Heat On for TH2210DH & TH1210DH) will flash on the display.
Accessories & replacement parts
Please contact your distributor to order replacement parts.
- Cover plate assembly* ……………………………………….. Part Number 50002883-001
Use to cover marks left by old thermostats.
Specifications
- Temperature Ranges
- Cool: 50° to 99°F (10° to 37°C)
- Heat: 40° to 90°F (4.5° to 32°C)*
Note: TH1100DH heat can be set to 35°F to 90°F (1.5°C to 32°C)
- Operating Ambient Temperature: 32° to 120°F (0° to 48.9°C)
- Shipping Temperature: -20° to 120°F (-28.9° to 48.9°C)
- Operating Relative Humidity: 5% to 90% (non-condensing)
- Physical Dimensions:
- 3-7/16”H x 4-10/16”W x 1-3/16”D
- 87mm H x 119mm W x 30mm D
Electrical Ratings
System Voltage (50/60Hz) Running Current
- Heat (1st stage) 20-30 Vac 0.02-1.0 A
- (Powerpile) 750 mV DC 100 mA DC
- Auxiliary heat 20-30 Vac 0.02-1.0 A
- Cooling 20-30 Vac 0.02-1.0 A
The product should not be disposed of with other household waste. Check for the nearest authorized collection centers or authorized recyclers. The correct disposal of end-of-life equipment will help prevent potential negative consequences for the environment and human health.
Resideo Technologies Inc.
1985 Douglas Drive North, Golden Valley, MN 55422
1-800-468-1502
69-2609EFS—15 M.S. Rev. 05-22 | Printed in United States
www.resideo.com
© 2022 Resideo Technologies, Inc. All rights reserved. The Honeywell Home trademark is used under license from Honeywell International, Inc. This product is manufactured by Resideo Technologies, Inc. and its affiliates.
REFERENCE
Download Manual:
Honeywell Home TH1000E1 Pro Non-Programmable Thermostat Installation Guide
Honeywell Home TH1000E1 Pro Non-Programmable Thermostat Installation Guide