
Honeywell Home T6 Pro Wi-Fi Programmable Thermostat

Thermostat Features
- Flexible scheduling: You can choose to use location-based temperature control (geofence technology), program a set schedule or use a combination of both to make sure your home is always comfortable.
- Location-based temperature control: Using geofence technology, the T6 Pro Smart thermostat will automatically use your smartphone’s location, which can save energy when you leave and make your home comfortable by the time you return. See page 13 for more.
- Smart scheduling: Adds a Sleep period to location-based temperature control. See page 13 for more.
- Time-based scheduling: You can program a schedule where every day is different, a schedule where weekdays and weekends are different or a schedule where every day is the same. There are four adjustable periods per day: Wake, Away, Home and Sleep. See page 15 for more.
- No schedule: You can also choose not to set a schedule and adjust the thermostat manually. See page 18 for more.
Tip: The Resideo App can be used to manage multiple thermostats and multiple users in a household. - Smart Alerts: The T6 Pro Smart thermostat will send alerts for things like extreme indoor temperatures and reminders for things like filter changes.
- Auto change from heat to cool: When Auto mode is selected, the T6 Pro Smart thermostat can automatically determine whether your home needs heating or cooling to reach the desired temperature.
- Adaptive Intelligent Recovery: The T6 Pro Smart thermostat learns your heating and cooling cycle times to make sure the system delivers the temperature you want, when you want it.
Thermostat overview

Resideo App overview

To see all the products connected by the Resideo App, visit honeywellhome.com
The Resideo App is regularly enhanced and may change.
Adjusting the temperature
To adjust the desired temperature up or down, touch ![]() on the thermostat home screen. If you’re using location-based temperature control or a time-based schedule, adjusting the temperature will override the current set point until the next schedule period or geofence event, unless you want to use one of the schedules overrides below.
on the thermostat home screen. If you’re using location-based temperature control or a time-based schedule, adjusting the temperature will override the current set point until the next schedule period or geofence event, unless you want to use one of the schedules overrides below.

Schedule overrides
Hold Until (temporary hold): Overrides the current temperature set point for a maximum of 12 hours. You might use this feature to hold a temperature until a specific time.
- Permanent hold: Overrides the current temperature set point permanently until you manually change it or reactivate a schedule.
- Vacation hold: Overrides the current temperature set point for a longer period of time.
You might use this feature when you know you’ll be gone for awhile. (Note: Vacation hold can only be activated using the Resideo App.)
Setting temporary hold (for use with time-based schedules only)
- Touch
 on the thermostat home screen to set your desired temperature. Hold Until will appear together with the time the hold will end.
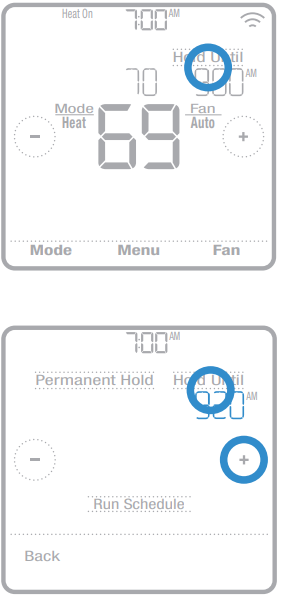
- To change when the hold will end, touch the time and wait until the time starts blinking. Then, touch to set when you want the hold to end. Touch Hold Until once more to confirm changes and return to the home screen.
After the hold period ends, the thermostat will automatically return to the program schedule. If you want to cancel the hold, touch Hold Until and then touch Run Schedule.
Setting permanent hold
- Touch on the thermostat home screen to reach your desired temperature. Hold Until will appear together with the time you want the hold to end.
- Touch Hold Until. Permanent Hold will appear on screen. Touch Permanent Hold to hold this temperature until you manually change it.
To end permanent hold and return to the program schedule, touch Permanent Hold and then touch Run Schedule.

Setting vacation hold (must be set using the Resideo App)

- Open the Resideo App. Tap the Menu icon
 in the upper-left corner of the screen, then tap Vacation.
 - Turn Vacation Settings on, then choose a From date/time and a To date/time.
- Review the settings for each device listed. Tap each device to change its settings. When you’re done, tap the back arrow to save your changes.
You can manually adjust the temperature set point during vacation hold using the Resideo App or by touching or on the thermostat. This new set point will remain in effect until the end of vacation hold. To cancel vacation hold, touch Run Schedule on the thermostat screen to return to the program schedule, or tap Vacation
Until in the app and then tap End Vacation.
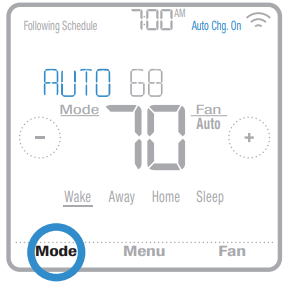
Adjusting the temperature in Auto mode
Auto mode (when the thermostat automatically chooses heating or cooling to reach your desired temperature) is disabled by default. If your heating or cooling professional enabled it, you’ll see Auto appear as an option under Mode on the thermostat home screen. To choose your preferred temperatures for both heating and cooling in Auto mode, follow the steps below.


- Touch Mode on the thermostat home screen Following Schedule until Auto appears. Then touch to choose your preferred temperature for the mode that’s currently active (heating or cooling).
- Next, touch the text area where the active mode is displayed to switch to the inactive mode.
- Touch to choose your preferred temperature in the other mode. After 5 seconds of inactivity, your setting will take effect, and the thermostat screen will show the set point of the active mode.
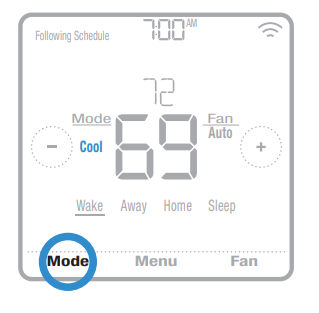
Selecting system mode
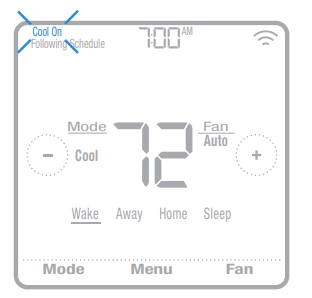
The current system mode (Heat, Cool, Off, Em Heat) is displayed to the left of the current indoor temperature on the thermostat home screen. The mode that’s currently running (Heat On, Cool On, Em Heat On) is displayed in the upper-left corner of the thermostat home screen. To cycle through the available modes, touch Mode on the thermostat home screen and select the appropriate mode for your desired temperature.
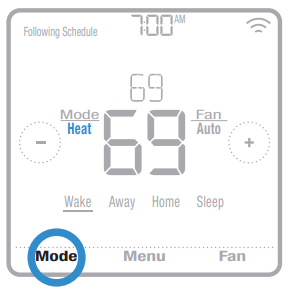
- Heat: Controls the heating system.
- Cool: Controls the cooling system.
- Off: Turns the heating and cooling systems off.
- Auto: When enabled, the thermostat will automatically use heating or cooling to reach the desired temperature.
- Em Heat: Controls auxiliary or emergency heat; only available on systems with a heat pump.
Notes:
- Em Heat and Auto modes may not appear on the thermostat screen or in the app depending on your equipment and how your thermostat was installed.
- Em Heat is only available for heat pump systems. The thermostat must also be configured to control a heat pump and an auxiliary/emergency heat stage.
- When Auto mode is selected, Auto Chg. On will appear in the upper-right corner of the thermostat home screen, and the active mode (Heat or Cool) will display under Mode. To set your temperature preferences in Auto mode, see page 7.
Built-in compressor protection
If the compressor is restarted too soon after a shutdown, system damage can occur. The built-in compressor protection feature forces the compressor to wait a few minutes before restarting, helping to prevent damage to the heating or cooling system.
During the brief wait period, the thermostat will flash Cool On (or Heat On if you have a heat pump) until the wait period is over, at which point the compressor will turn back on.
Note: The flashing Cool On or Heat On message is also used for startup delay protection if AC power loss occurs.
Setting the fan
Touch Fan on the thermostat home screen to cycle through available fan modes until the desired mode is displayed. Your changes will save automatically.
Available fan modes:
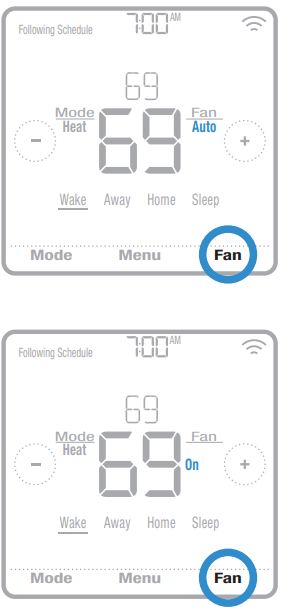

- On: The fan will run continuously.
- Auto: The fan will run only when the heating or cooling system is on.
- Circ: The fan will run at random intervals at least 35% of the time to keep air circulating throughout your home.
Connecting to a WiFi network
To configure and control your T6 Pro Smart thermostat remotely, the thermostat needs to be connected to the Resideo App through your home’s WiFi network. Follow the simple steps below to get connected.
- Make sure your smartphone or tablet is connected to a 2.4 GHz WiFi signal. (Many WiFi routers broadcast both a 2.4 GHz signal and a 5.0 GHz signal. If given the option, choose the 2.4 GHz signal.)
- Download the Resideo App from the App Store or Google Play if you haven’t already.
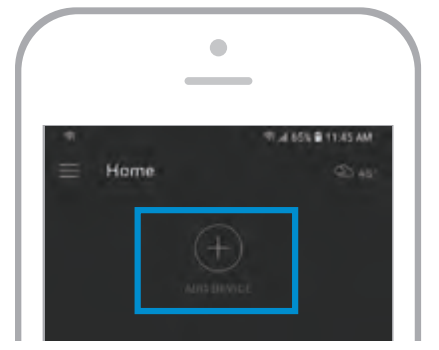
- Open the Resideo App. Log in to your account, if needed create an account. Tap Add Device and follow the prompts in the App.
WiFi connection status
The thermostat’s WiFi connection status is located in the upper-right corner of the screen. To troubleshoot WiFi connectivity issues, see the FAQs on page 31.
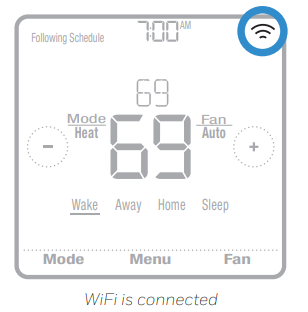
- WiFi is connected

- WiFi is disconnected or WiFi isn’t set up

- WiFi is turned off

Disconnecting and reconnecting to a WiFi network
If you need to disconnect the thermostat from one WiFi network and reconnect it to another (because you’re replacing your WiFi router, for example), follow the steps below.
- Select the device to disconnect from the network.
- Tap the settings button
 at the top-right, and then tap Thermostat Configuration.
 - Tap Delete Thermostat.
- Tap Add Device and follow the prompts in the Resideo App.


Touch Menu on the thermostat home screen and then use the ![]() arrows to page through the following options.
arrows to page through the following options.
- SCHEDULE
Create and edit a schedule for your thermostat to follow. - SCREEN LOCK
Lock the screen to limit access to thermostat settings. - VENTILATION
Set ventilation preferences. (Not available on all thermostats.) - WIFI
Configure or change the thermostat’s WiFi settings. - BRIGHTNESS
Set the brightness of the thermostat display. - RECOVERY
Enable or disable the Adaptive Intelligent Recovery feature. - CLOCK / DATE
Manually set the clock, clock format, and daylight saving time in the - CLOCK sub-menu, and date in the DATE sub-menu. (The thermostat will automatically display this information and the CLOCK and DATE sub-menus won’t be available when connected to WiFi.)
- CLEAN SCREEN Disable the touchscreen for 30 seconds so you can clean it.
- TEMP SCALE Choose Fahrenheit or Celsius.
- RESET
Schedule: Resets to the default Monday-Friday, Saturday-Sunday schedule. - HomeKit: Clears your Apple® HomeKit™ credentials (provided HomeKit was previously configured).
- WiFi: Clears your WiFi router credentials (provided a WiFi router was previously configured).
- EQMP STATUS
View the current status of your heating or cooling equipment. - DEVICE INFO
View your thermostat’s device information, such as MAC ID, model number and firmware version. - ALERTS
View, snooze or dismiss active alerts and reminders (available only when you see the active alert symbol on the thermostat home screen).
Navigating the menus
- Menu: Touch to access all options and sub-menus.
 : Touch to page through options and sub-menus.
- : Touch to adjust things such as temperature, time and date.
- Back or Cancel: Touch to discard changes or go back to the previous menu.
- Select: Touch to access a sub-menu.
- Done: Touch to confirm selection.
- Tip: You can touch Select to access a sub-menu, or you can touch the text in the\ message area (the word SCHEDULE, for example).
Scheduling options
The T6 Pro Smart thermostat offers flexible scheduling options that include:
- Location-based temperature control
- Smart scheduling
- Time-based schedule
- No scheduling
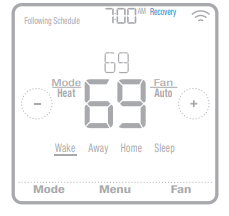
On the thermostat home screen, you’ll be able to see what kind of schedule is currently running, as well as which schedule period you’re currently in.
Schedule status
Indicates if the thermostat is using location-based temperature control ![]() or following a time-based schedule.
or following a time-based schedule.

Schedule period
Shows current schedule period (Wake, Away, Home or Sleep).

Location-based temperature control and smart scheduling
Location-based temperature control uses geofence technology and your smartphone’s GPS location to automatically adjust your thermostat as you come and go. When you leave the geofence boundary, the thermostat will change to your preferred Away temperature, and when you enter the geofence boundary, the thermostat will change to your preferred Home temperature.
Setting location-based temperature control and smart scheduling in the Resideo App
These two options can only be activated using the Resideo App. To enable location-based temperature control and/or set a smart schedule, follow the steps below.
- Open the Resideo App and tap the Schedule (calendar)
 icon .
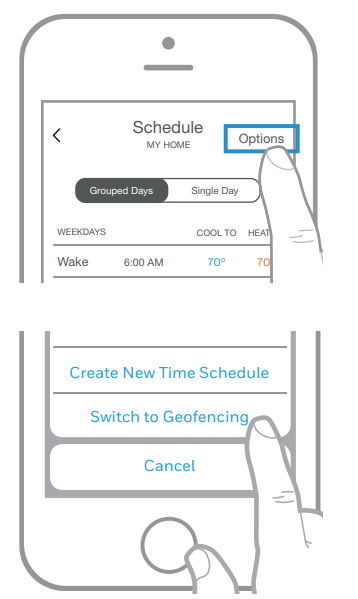
 - Tap Options in the upper-right corner.
- Tap Switch to geofencing and then Use Geofencing.
- Choose the temperatures you prefer when you’re home (one for cooling and one for heating). Use the up and down arrows to select your preferred temperatures, then tap NEXT.
- Choose the temperatures you prefer when you’re away, then tap NEXT.

- You’ll then be asked if you want to set a time and temperature for sleep. (Adding a Sleep period to location-based temperature control is what we call a smart schedule.) To change the Sleep Start and Sleep End times, tap the time next to each setting. To change your preferred temperatures for sleeping, tap the up or down arrows for each temperature setting. Tap NEXT to continue.
- Review your preferences. If you need to make edits, tap the period you want to edit, then tap Done when finished.
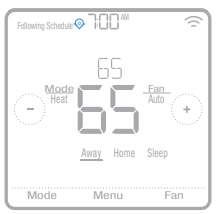
When location-based temperature control is active, you’ll see ![]() a symbol in the upper left corner of the thermostat screen, along with Home or Away status and your preferred temperature. If you set an additional Sleep period in the Resideo App, you’ll also see the Following Schedule in the upper-left corner of the thermostat screen.
a symbol in the upper left corner of the thermostat screen, along with Home or Away status and your preferred temperature. If you set an additional Sleep period in the Resideo App, you’ll also see the Following Schedule in the upper-left corner of the thermostat screen.
If you manually change the temperature when location-based temperature control is active, the new temperature will remain in effect until you cross the geofence.
To adjust the geofence boundary, follow the steps below.
- Open the Resideo App, tap the menu icon in the upper-left corner and then tap Geofence.
- Tap Geofence Radius, and when the map and current geofence appear, touch, hold and drag the black dot to adjust the geofence boundary.
- Tap SAVE to finish.
Editing location-based temperature control and smart scheduling on the thermostat
To edit your preferred Home, Away and Sleep temperatures or your Wake and Sleep times while location-based temperature control is active, follow the steps below. You can also make edits in the Resideo App.
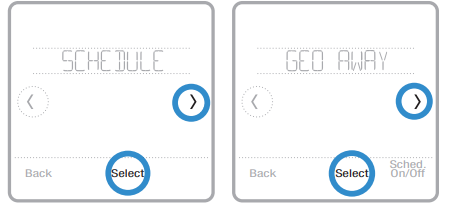
- Touch the Menu on the thermostat home screen.
- Touch the or arrows until you see SCHEDULE, then touch Select.
- Touch the arrows until you see the period you want to view or edit, then touch Select. Touch the time or temperature you want to edit and use the or buttons to adjust up or down. Touch Select to confirm.
- Touch the or arrows to edit additional periods, then touch Back twice to return to the thermostat home screen.
To learn more about location-based temperature control, check out these FAQs.

Time-based scheduling
With time-based scheduling, you can program your thermostat to follow a predictable schedule based on time of day or day of the week. Here are the programming options:
- Everyday: Every day (Mon-Sun) has the same schedule
- Weekday & Weekend: Weekdays (Mon-Fri) have the same schedule and weekends (Sat-Sun) have the same schedule
- Individual Days: Each day has a different schedule.
There are also four adjustable periods per day: Wake, Away, Home and Sleep. Your T6 Pro Smart thermostat comes with the following default Weekday & Weekend schedule that can help reduce your heating and cooling expenses. To change schedule types (from Weekday & Weekend to a different option) you must use the Resideo App. See page 13 for instructions.
| Period | Start Time | Heat
(Mon-Fri) |
Cool
(Mon-Fri) |
Heat
(Sat-Sun) |
Cool
(Sat-Sun) |
| Wake | 6:00 am | 70 ° | 78 ° | 70 ° | 78 ° |
| Away | 8:00 am | 62 ° | 85 ° | 62 ° | 85 ° |
| Return | 6:00 Pm | 70 ° | 78 ° | 70 ° | 78 ° |
| Sleep | 10:00 Pm | 62 ° | 82 ° | 62 ° | 82 ° |
Setting a time-based schedule in the Resideo App
To select a schedule type and set a time-based schedule in the Resideo App, follow the steps below.

- Tap the Schedule (calendar) icon , tap OPTIONS in the upper-right corner and then tap Create new time schedule.
- Choose the schedule type that best matches your weekly routine.
- A default schedule will appear. Tap the period you want to edit (Wake, for example), then choose the time you want the period to start and your preferred temperatures for cooling and heating. Tap SAVE to finish and move on to other periods.
- After you’re done editing your schedule, tap DONE.
Setting a time-based schedule on the thermostat
To edit a time-based schedule on the thermostat, follow the steps below.


- Touch the Menu on the thermostat home screen.
- Touch the arrows until you see SCHEDULE, then touch Select.
- Touch the arrows to select a period in a day or set of days, then touch Select on the period you want to edit. (You can only edit a period of days according to the schedule type selected. To change schedule type, use the Resideo App.)
- Touch the time area, then touch or to adjust when the period starts. Touch Select to confirm.
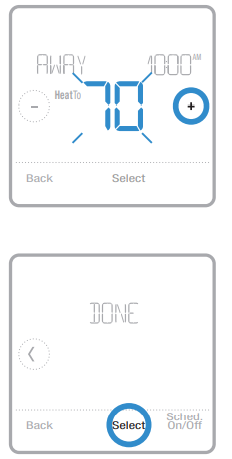
- Touch the temperature area, then touch or to adjust your preferred temperature for the mode that’s currently active (either heating or cooling). Touch Select to confirm. Then touch or to adjust your preferred temperature for the inactive mode. Touch Select to confirm.
- Edit the next period or use them until you see DONE, then press Select to save changes and go to the home screen.
Note: To temporarily cancel a scheduled period (such as Saturday-Sunday Away, for example, because you’ll be home), go to the SCHEDULE option and touch the or arrows to select a period. Touch Select on the period you want to cancel, then touch Cancel Period. To reactive, the period you canceled, touch Cancel Period again to select the period start time and preferred temperature.

Changing schedule type on the Resideo App
To change from a Weekday & Weekend Schedule to an Everyday or Individual Days schedule (for example), follow the steps below. You must use the Resideo App to change schedule types.

- Open the Resideo App and tap the Schedule (calendar) icon.
- Tap OPTIONS in the upper-right corner. Then tap Create new time schedule and choose a schedule type (Everyday Schedule or Weekday & Weekend).
- Preferences are changed through Grouped Days by default (Monday – Friday and Saturday – Sunday or every day). If you want to edit individual days, tap SINGLE DAY. Set your time and temperature preferences for the new schedule type. Touch DONE to finish.
Resetting the thermostat to the default schedule
To reset your thermostat to the default Monday- Friday, Saturday-Sunday schedule, follow the steps below.
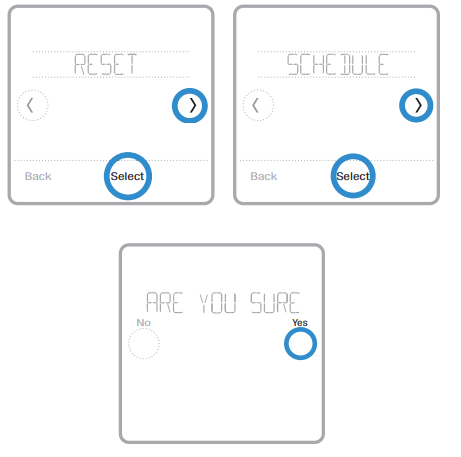
- Touch the Menu on the thermostat screen.
- Touch the arrows until you see RESET, then touch Select.
- Touch the arrows until you see SCHEDULE, then touch Select.
- Touch Yes to confirm.
Turning off scheduling
To turn off scheduling and control the temperature manually, follow the steps below.
- Touch the Menu on the thermostat screen.
- Touch the arrows until you see SCHEDULE, then touch Select.
- Touch Sched. On/Off to toggle between Schedule On and Schedule Off. (It may take a few seconds for your selection to become active.)
- Then, touch Back twice to return to the thermostat home screen.

Screen lock settings
To prevent unauthorized access to the thermostat, or to limit changes to the system settings, there are two screen lock settings you can apply.
- Partial lock: Only the temperature can be changed.
- Full lock: No access is allowed without a PIN number.
Applying a screen lock setting
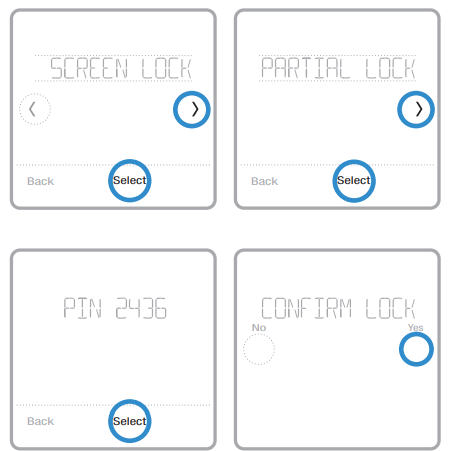
- Touch the Menu on the thermostat home screen.
- Touch the arrows until you see SCREEN LOCK, then touch Select.
- Touch the arrows to select your desired screen lock setting, then touch Select.
- A PIN number will appear on the screen. Write it down and keep it in a safe place.
- Touch Select, and confirm your screen lock setting by touching Yes.
A partially or fully locked screen will be indicated by a lock symbol at the bottom of the thermostat screen.
Unlocking the screen


- Touch the lock symbol on the thermostat home screen.
- When prompted to enter a PIN number, touch to select the first number of the PIN code. Touch Select to confirm, and repeat for the remaining numbers.
When you enter the correct PIN, you’ll return to the thermostat home screen. To re-lock the screen after you’re done making changes, follow the steps above to apply a lock set.
Ventilation settings
Depending on your thermostat model number and how your system was configured, the following ventilation settings may be available:

- Vent mode: Turns ventilation on and off.
- Auto: Ventilation will run as programmed by the installer.
- On: Ventilation is always on.
- Off: Ventilation will remain off unless turned on using the timer.
- Boost: Provides temporary ventilation (for 20-180 minutes) for situations such as strong cooking smells or when you’d like a little more fresh air.
- Lockout: Prevents ventilation from running during the Sleep period.
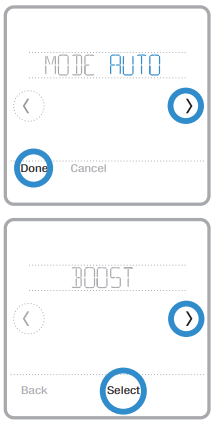
To change your ventilation settings, follow the steps below.

- Touch Menu on the thermostat home screen.
- Touch the or arrows until you see VENTILATION, then touch Select.
- Touch the or arrows to choose VENT MODE, BOOST or LOCKOUT, then touch Select.
- Vent mode: Touch the or arrows to select AUTO, ON or OFF, then touch Done to confirm.
- Boost: Touch or to choose how many minutes ventilation will run, then touch Done to confirm. To cancel a temporary boost, go into the Boost menu again, where you’ll be asked if you want to enter a new value in minutes. Touch Yes to enter a new value, then touch the button to set the value to 0. Touch Done to confirm.
- Lockout: In the lockout menu, you’ll be prompted to confirm whether you want to prevent ventilation from running during the Sleep period. Touch Yes or No to confirm.
WiFi settings
To access the WiFi settings option, follow the steps below.

- Touch Menu on the thermostat home screen.
- Touch the or arrows until you see WIFI, then touch Select.
- Touch the or arrows to cycle through the following options SETUP WIFI, WAC SETTING and WIFI ON/OFF, and touch Select on the option you want to edit.
Choose the SETUP WIFI option to get your thermostat connected to your home’s WiFi network (see instructions on page 10 for more). For WAC SETTING and WIFI ON/OFF information, see below.
WAC setting
The Wireless Accessory Configuration (WAC) setting is an iOS-specific setting that enables WiFi credentials to be securely transferred from an iOS device to the thermostat. The WAC setting is enabled by default to simplify the WiFi connection process. If you choose to disable it (not recommended), you’ll have to use a different process to get your thermostat connected to WiFi.
Turning thermostat WiFi on and off
If you want to disconnect your thermostat from WiFi, follow the steps below.

- Touch Menu on the thermostat home screen.
- Touch the arrows until you see WIFI, then touch Select.
- Touch the arrows until you see WIFI ON/OFF, then touch Select.
- Touch the arrows to choose WIFI ON or WIFI OFF. Then touch Done to confirm.
Adjusting backlight brightness
When the thermostat is in idle mode, you can adjust how bright you’d like the screen. You can choose a brightness level from 00 (display backlight is off, which is the default) up to 05 (maximum brightness). To adjust backlight brightness, follow the steps below.
- Touch Menu on the thermostat home screen.
- touch the arrows until you see BRIGHTNESS, then touch Select.
- Touch to adjust the brightness level, which will change immediately.
- Touch Done to confirm.

Enabling/disabling Adaptive Intelligent Recovery
Over time, your T6 Pro Smart thermostat will learn how long it takes your system to reach the desired temperature. It can then turn on your heating or cooling equipment at the right time to make sure your home is comfortable by the time you expect. This feature is enabled by default. To disable it, follow the steps below.
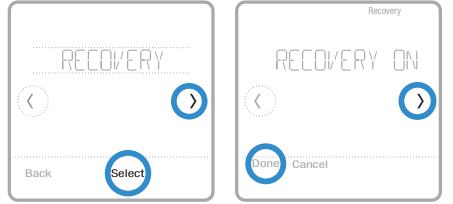
- Touch Menu on the thermostat home screen.
- Touch the or arrows until you see RECOVERY, then touch Select.
- Touch the or arrows to select RECOVERY ON or RECOVERY OFF, then touch Done to confirm.
When Adaptive Intelligent Recovery is active, you’ll see the recovery symbol in the upper-right corner of the thermostat screen.
Setting the time and date
When the thermostat is connected to WiFi and registered to your Resideo App account, it will set the time and date and adjust for daylight saving time automatically. (The CLOCK and DATE sub-menus won’t be available.) If your thermostat is not connected, you’ll need to set the time and date manually using the steps below.
Setting the time
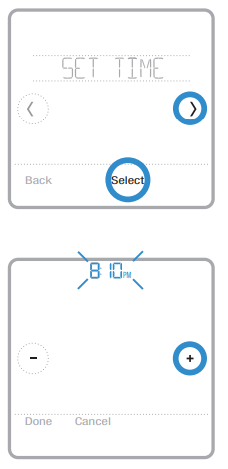
- Touch Menu on the thermostat home screen.
- Touch the or arrows until you see CLOCK, then touch Select.
- Touch the or arrows until you see SET TIME, then touch Select.
- Press or to set the time (or press and hold the buttons to move more quickly). Touch Done when finished.
- set clock format (12 hours or 24 hours) and daylight saving time in the same CLOCK sub-menu.
Setting the date

- Touch Menu on the thermostat home screen.
- Touch the or arrows until you see DATE, then touch Select.
- Touch or to set the month, then touch Select to confirm.
- Continue to set day and year in the same way. Touch Select to save your changes.
Cleaning the thermostat screen
With the clean screen option, you can lock the thermostat screen so you don’t accidentally change your settings when you clean. Follow the steps below to activate clean screen mode.
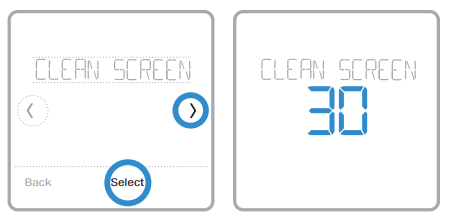
- Touch the Menu on the thermostat home screen.
- Touch the arrows until you see CLEAN SCREEN, then touch Select.
- The screen will deactivate for 30 seconds. A countdown timer will display the amount of time until screen reactivation.
Tip: To clean the thermostat screen, spray water or household cleaner onto a cloth, then use the cloth to clean the screen. Avoid abrasive cleaners and do NOT spray liquid directly on the thermostat.
Choosing Fahrenheit or Celsius
To select a temperature scale, follow the steps below.

- Touch Menu on the thermostat home screen.
- Touch the or arrows until you see TEMP SCALE, then touch Select.
- Touch the or arrows to select FAHRENHEIT or CELSIUS then touch Done to save your changes.
- Touch Back to return to the thermostat home screen.
Reset options
To clear your settings or device credentials, use one of the reset options below.
- Schedule reset: Resets your schedule back to the default Monday-Friday, Saturday-Sunday schedule.
- HomeKit: Clears your Apple® HomeKit™ device credentials (provided HomeKit was previously configured).
- WiFi reset: Clears your WiFi router credentials (provided a WiFi router was previously configured).
Selecting a reset option

- Touch Menu on the thermostat home screen.
- Touch the or arrows until you see RESET, then touch Select.
- Touch the or arrows to choose a reset option, then touch Select.
- Touch Yes to complete the reset or No to return to the reset sub-menu.
Viewing equipment status
You can check the status of your heating or cooling equipment and fan by following the steps below. Please note that system data may vary depending on the thermostat model and how the thermostat was installed.
- Touch Menu on the thermostat home screen.
- Touch the or arrows until you see EQMT STATUS, then touch Select.
- Touch the or arrows to select which system you want status information on.
After 3 seconds, system status information will scroll on the screen.

Viewing thermostat information
To see your thermostat’s technical information, follow the steps below.
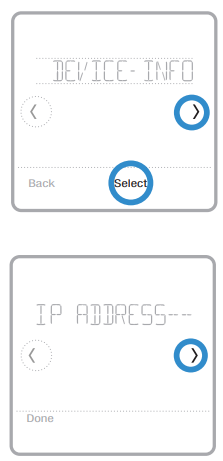
- Touch Menu on the thermostat home screen.
- Touch the or arrows until you see DEVICE INFO, then touch Select.
- Touch the or arrows to view information such as:
- MAC ID
- IP address
- Date code
- Model number
- Build
- Stat app
- Stat app boost
- Firmware
- WiFi radio app
- WiFi radio boot
Alerts and maintenance reminders
The T6 Pro Smart thermostat comes with a set of Smart Alerts that help keep your heating and cooling system running correctly and efficiently. You’ll get reminders when it’s time to change the filter, for example, and notifications in the event of extreme indoor temperatures. Non-critical alerts and maintenance reminders can be snoozed for up to 7 days and/ or dismissed. Some critical alerts cannot be snoozed or dismissed as your heating or cooling system may require service.
To turn off/on alerts and notifications in the Resideo App:
- Log into the app and select your thermostat
- Tap the settings button at the top-right, then tap Manage Alerts to set your preferences and manage alerts.
Note: To turn off/on alerts and notifications on the thermostat, contact your heating or cooling professional.
When there’s an active alert or maintenance reminder, you’ll see the alert symbol on the thermostat home screen. To see alert information, follow the steps below.
- Touch Menu on the thermostat home screen, then you’ll see the ALERTS sub-menu. (The ALERTS sub-menu will only be available when there’s an active alert.)
- Touch Select to view the alert. A 3-digit alert code will appear by the thermostat’s clock and a description of the alert will scroll on the screen.
- If the alert is non-critical, you’ll have the option to Snooze or Dismiss it. If you have multiple alerts, touch the or arrows to page through the list of active alerts and follow steps 1 and 2 above.
To see what each 3-digit alert code means and the action you should take, refer to the chart below.
| Number | Alert/Reminder | Recommended action |
| 164 | Heat Pump Needs Service | Contact your heating or cooling professional to diagnose and service the heat pump. |
| 168 | WiFi Radio Error | The wireless module isn’t operating, and wireless features aren’t available. Contact your heating or cooling professional for assistance. |
| 170 | Internal Memory Error | The thermostat’s memory has encountered an error. Contact your heating or cooling professional for assistance. |
| 171 | Set the Date and Time | Please set the time and date on the thermostat to ensure features like scheduling can operate. See page 23 for instructions. |
| 173 | Thermostat Temperature Sensor Error | The temperature sensor on the thermostat has encountered an error. Contact your heating or cooling professional for assistance. |
| 175 | AC Power Resumed | AC power to the thermostat has been restored after power loss. You don’t need to take any action. |
| 177 | Indoor Temperature Sensor Error | The wired indoor temperature sensor is not connected or there is a wiring short. Contact your heating or cooling professional for assistance. |
| Number | Alert/Reminder | Recommended action |
| 178 | Outdoor Temperature Sensor Error | The wired outdoor temperature sensor is not connected or there is a wiring short. Contact your heating or cooling professional for assistance. |
| 181 | Replace Air Filter (1) | Replace the air filter or contact your heating or cooling professional. Reset the air filter timer by touching Dismiss on the thermostat screen after replacement. |
| 182 | Replace Air Filter (2) | Replace the air filter or contact your heating or cooling professional. Reset the timer by touching Dismiss on the thermostat screen after replacement. |
| 183 | Clean Humidifier Tank and Replace Water Filter | Clean humidifier tank and replace the water filter, or contact dealer to do this for you. Reset the timer by touching the Dismiss button on the thermostat screen after it is replaced. |
| 184 | Replace Humidifier Pad | Replace the humidifier pad or contact your heating or cooling professional. Reset the timer by touching Dismiss on the thermostat screen after replacement. |
| 185 | Replace Dehumidifier Filter | Replace the dehumidifier filter or contact your heating or cooling professional. Reset the timer by touching Dismiss on the thermostat screen after replacement. |
| 186 | Clean Ventilator Core | Clean the ventilator core or contact your heating or cooling professional. Reset the timer by touching Dismiss on the thermostat screen after you’re done. |
| 187 | Clean or Replace Ventilator Filter | Clean or replace the ventilator filter or contact your heating or cooling professional. Reset the timer by touching Dismiss on the thermostat screen after you’re done. |
| 188 | Replace UV Bulb (1) | Replace the UV bulb or contact your heating or cooling professional. Reset the timer by touching Dismiss on the thermostat screen after you’re done. |
| 189 | Replace UV Bulb (2) | Replace the UV bulb or contact your heating or cooling professional. Reset the timer by touching Dismiss on the thermostat screen after you’re done. |
| 210 | Register Online For Outdoor Temperature | You need to register online to receive outdoor temperature information from the Internet. Based on the installation settings, this information is required for correct operation of your system. Please download the Resideo App and register your thermostat. |
| 388 | Register Online for Remote Access and Outdoor Temperature | You need to register online for remote thermostat access and outdoor temperature information. Please download the Resideo App and register your thermostat. |
| 399 | No Internet | The internet connection has been lost. Please check your network settings. |
| 400 | No WiFi Signal | The WiFi signal has been lost. Please wait for the thermostat to reconnect or select a new WiFi network. See page 11 for WiFi reconnection instructions. |
| 508 | WiFi Not Configured | Please download the Resideo App and follow the steps to connect your thermostat to WiFi. See page 11 for WiFi connection instructions. |
General system information
CAUTION: MERCURY NOTICE
If the T6 Pro Smart thermostat is replacing a thermostat that contains mercury in a sealed tube, do not place the old thermostat in the trash. Please contact your local waste management authority for proper recycling or disposal instructions.
CAUTION: EQUIPMENT DAMAGE HAZARD
Compressor protection is bypassed during testing. To prevent equipment damage, avoid cycling the compressor quickly.
CAUTION: ELECTRICAL HAZARD
Can cause electrical shock or equipment damage. Disconnect power before beginning installation.
Compatibility
- The T6 Pro Smart thermostat is compatible with most single-stage and multi-stage conventional and heat pump heating and cooling systems
- 24 VAC power (via a “C” or common wire) is required
- Does not work with electric baseboard heat (120-240V)
- Does not work with millivolt systems
- rovides remote thermostat control through iOS or Android smartphones and tablets
- Compatible with Apple® HomeKit™ and Amazon Echo®
WiFi Communication
2.4GHz range, 802.11 b/g/n home wireless router
Temperature Ranges
Adjustable Heat Temperature Range Setting: 40-90 °F (4.5-32.0 °C)
Adjustable Cool Temperature Range Setting: 50-99 °F (10.0-37.0 °C)
Temperature Sensor Accuracy
± 1.5 °F at 70 °F (0.85 °C at 21.0 °C)
Electrical Ratings
| Terminal | Voltage (50/60Hz) | Running Current |
| W Heating | 20-30 Vac | 0.02-1.0 A |
| (Powerpile) | 750 mV DC | 100 mA DC |
| W2 (Aux) Heating | 20-30 Vac | 0.02-1.0 A |
| E Emergency Heat | 20-30 Vac | 0.02-0.5 A |
| Y Compressor Stage 1 | 20-30 Vac | 0.02-1.0 A |
| Y2 Compressor Stage 2 | 20-30 Vac | 0.02-1.0 A |
| G Fan | 20-30 Vac | 0.02-0.5 A |
| O/B Changeover | 20-30 Vac | 0.02-0.5 A |
| L/A Input | 20-30 Vac | 0.02-0.5 A |
| U | 20-30 Vac | 0.02-0.5 A |
Power Consumption
Typical (Backlight On, WiFi On): 1.0VA
Maximum (Backlight On, WiFi installation): 1.5VA
Troubleshooting
If the thermostat screen is blank:
- Check the circuit breaker or fuse that’s connected to your heating or cooling system and turn it on if it’s switched off.
- Make sure the power switch at the heating or cooling system is on.
- Make sure the furnace door is closed securely.
If the screen is difficult to read:
- Increase screen brightness (see page 22 for instructions).
If the heating or cooling system isn’t responding:
- Touch Mode on the thermostat home screen and set the system to Heat. Make sure the temperature set point (the smaller of the two numbers) is higher than the indoor temperature (the large number in the center of the screen).
- Touch Mode on the thermostat home screen and set the system to Cool. Make sure the temperature set point (the smaller of the two numbers) is lower than the indoor temperature (the large number in the center of the screen).
- Check the circuit breaker or fuse that’s connected to your heating or cooling system and turn it on if it’s switched off.
- Make sure the power switch at the heating or cooling system is on.
- Make sure the furnace door is closed securely.
- After making these changes, wait 5 minutes for the system to respond.
If the temperature setting doesn’t change:
- Make sure the heating and cooling set points are within the operating range.
- Heat: 40 ºF to 90 ºF (4.5 ºC to 32.0 ºC)
- Cool: 50 ºF to 99 ºF (10.0 ºC to 37.0 ºC)
If Cool On or Heat On is flashing:
The compressor protection feature is engaged. Wait a few minutes for the system to safely restart to avoid damaging the compressor. See page 9 for more information.
Frequently asked questions
WiFi connection questions
- Will the thermostat still work if the WiFi connection is lost?
Yes, you can still manually adjust the temperature at the thermostat. However, some features such as location-based temperature control (geofence technology) can only be managed through the Resideo App and will not function without a WiFi connection. The thermostat will automatically reconnect to WiFi once the network is restored. - Why is the thermostat not finding my WiFi network?
The T6 Pro Smart thermostat operates in the 2.4GHz range. Smartphones operate in both the 2.4 and 5.0 GHz ranges, so your smartphone may “see” your WiFi network when your thermostat does not. Most WiFi routers will broadcast two networks: 2.4 GHz and 5.0 GHz. If you have an option, make sure your smartphone is connected to the 2.4 GHz network. - Is there a way to extend the strength of my WiFi signal?
The range (distance) of your WiFi signal is determined by your router. Try moving your router closer to the location of the thermostat, or use a router with a stronger signal range. - There’s an alert that says “WiFi Signal Lost” – what should I do?
Wait 5 minutes for the thermostat to reconnect or select an alternate network (if you have one) in the Resideo App configuration menu. If the thermostat isn’t able to reconnect, you’ll need to troubleshoot the router to determine the cause. - Why is there an offline symbol (WiFi icon with a strikethrough) in the upper-right corner of the thermostat screen?
- The thermostat has lost its connection to the WiFi network. First, make sure your WiFi router is plugged in and broadcasting a signal. If it is, try resetting the router (consult the router’s manual for instructions). When the WiFi network has been restored, the thermostat will automatically reconnect.
Home account and app questions - Why haven’t I received an account activation email?
A: If you haven’t received an activation email after 5 minutes, check your Spam folder and look for an email from [email protected]. If you don’t see it, tap Resend to have the activation email resent. If you still don’t receive it, please contact the Technical Support team at 1-800-633-3991. - Can I set up my thermostat with multiple users?
Yes. To add users, log into the Resideo App and tap the menu icon in the upper-left corner. Select Add Users, tap add user and type in the email addresses of the people you’d like to invite. If they already have a Home account set up, the thermostat and its location will automatically be added to their account. If they don’t have an account, they’ll receive anemail prompting them to download the Resideo App and create a new account. - Can I set up location-based temperature control with multiple users?
Yes. Location-based temperature control (geofence technology) will activate based on the last person who leaves and the first person to return. Each user will need to create their own Home account with a login ID and password. Two users should not share the same account. Each user will then need to enable location-based temperature control. See page 13 for instructions. - Why doesn’t a change I made in the app show up on the thermostat?
There may be a short delay when you make temperature and settings changes in the Resideo App. Wait a few minutes, and if you still don’t see your changes on the thermostat, make sure the thermostat is still connected to WiFi and restart your Resideo App.
Alerts and maintenance notification questions - What should I do when the alert symbol appears on the thermostat home screen?
When you see the alert symbol on the thermostat screen, touch Menu and the ALERTS submenu will appear. Touch Select to view alert information. Or, you can view alert information in the Resideo App. See page 27 for a list of all alert codes, what they mean and the action you should take.
Software and security questions - How can I be sure my thermostat is running the most up-to-date firmware?
When your thermostat is connected to WiFi, it will automatically receive over-the-air firmware updates from Resideo. These firmware updates contain things such as new features as well as security upgrades. Keep your thermostat connected to WiFi to ensure it receives these updates. - How can I prevent a cybercriminal from making unauthorized changes to my thermostat?
If a cybercriminal gains access to your WiFi router, they can tamper with a wide range of online activities, including the settings on your connected devices. Make sure you change the default password on your WiFi router, and when you select a new password, make sure it uses multiple upper- and lower-case letters and special characters.
Thermostat removal questions - How can I safely remove my thermostat?
Thermostat removal should ideally be handled by a trained professional as improper removal can cause electrical shock and equipment damage. If you wish to remove the thermostat yourself, be sure to turn off the circuit breaker that controls your heating or cooling equipment before you disconnect any wires. If you don’t know which breaker controls your equipment, you can shut off the main breaker. - How can I uninstall my T6 Pro Smart thermostat?
If you want to replace your T6 Pro Smart thermostat, or if you’re moving out of your home and leaving the thermostat behind, you’ll first want to clear out the personal settings that are stored on the thermostat. (Even when disconnected from power, the thermostat will keep your settings and home router information in memory.) We recommend resetting the thermostat’s schedule, WiFi, and HomeKit settings (if previously connected). See page 25 for more information on reset options.
Regulatory information
FCC REGULATIONS
§ 15.19 (a)(3)
This device complies with part 15 of the FCC Rules. Operation is subject to the following two conditions:
- This device may not cause harmful interference, and
- This device must accept any interference received, including interference that may cause undesired operation.
IC REGULATIONS
RSS-GEN
This device complies with Industry Canada’s license-exempt RSS.
Operation is subject to the following two conditions:
- This device may not cause interference; and
- This device must accept any interference, including interference that may cause undesired operation of the device.
FCC Warning (Part 15.21) (USA only)
Changes or modifications not expressly approved by the party responsible for compliance could void the user’s authority to operate the equipment.
5-year limited warranty
Resideo warrants this product, excluding battery, to be free from defects in workmanship or materials, under normal use and service, for a period of five (5) years from the date of first purchase by the original purchaser. If at any time during the warranty period, the product is determined to be defective due to workmanship or materials, Resideo shall repair or replace it (at Resideo’s option). If the product is defective,
- return it, with a bill of sale or other dated proof of purchase, to the place from which you purchased it; or
- call Resideo Customer Care at 1-800-633-3991. Customer Care will make the determination whether the product should be returned to the following address:
Resideo Return Goods, 1985 Douglas Dr. N., Golden Valley, MN 55422, or whether a replacement product can be sent to you.
This warranty does not cover removal or reinstallation costs. This warranty shall not apply if it is shown by Resideo that the defect was caused by damage that occurred while the product was in the possession of a consumer. Resideo’s sole responsibility shall be to repair or replace the product within the terms stated above. RESIDE SHALL NOT BE LIABLE FOR ANY LOSS OR DAMAGE OF ANY KIND, INCLUDING ANY INCIDENTAL OR CONSEQUENTIAL DAMAGES RESULTING, DIRECTLY OR INDIRECTLY, FROM ANY BREACH OF ANY WARRANTY, EXPRESS OR IMPLIED, OR ANY OTHER FAILURE OF THIS PRODUCT. Some states do not allow the exclusion or limitation of incidental or consequential damages, so this limitation may not apply to you. THIS WARRANTY IS THE ONLY EXPRESS WARRANTY RESIDEO MAKES ON THIS PRODUCT. THE DURATION OF ANY IMPLIED WARRANTIES, INCLUDING THE WARRANTIES OF MERCHANTABILITY AND FITNESS FOR A PARTICULAR PURPOSE, IS HEREBY LIMITED TO THE FIVE-YEAR DURATION OF THIS WARRANTY. Some states do not allow limitations on how long an implied warranty lasts, so the above limitation may not apply to you. This warranty gives you specific legal rights, and you may have other rights which vary from state to state. If you have any questions concerning this warranty, please write Resideo Customer Care, 1985 Douglas Dr, Golden Valley, MN 55422 or call 1-800- 633-3991.
© 2022 Resideo Technologies, Inc. All rights reserved. The Honeywell Home trademark is used under license from Honeywell International, Inc. This product is manufactured by Resideo Technologies, Inc. and its affiliates.
REFERENCE:
Honeywell Home T6 Pro Wi-Fi Programmable Thermostat User Guide
Other Manual: Honeywell Home T6 Pro Wi-Fi Programmable getting started Guide
Honeywell Home T Series Thermostate Guard Installation Instruction
Honeywell Home T6 Pro Wi-Fi Programmable Thermostat User Guide
Leave a Reply