Honeywell Home T3 PROGRAMMABLE THERMOSTAT

Instruction
Warning Must be installed by a competent person. To ensure your safety make sure the mains power is switched OFF before accessing wiring.
To prevent a short circuit from a loose wire:
- Multi-core cables: Only remove enough outer insulation to allow secure fixing of the cores into the terminal block.
- Single core cables: Secure them together with a cable tie as close as possible to the terminal block.
Online Guides
Installation
- Install the Thermostat


Wiring
On/off boiler (230V)
Combi boiler
2-Port Zone Valve
Parameters
(UK Only) Boiler Service Reminder
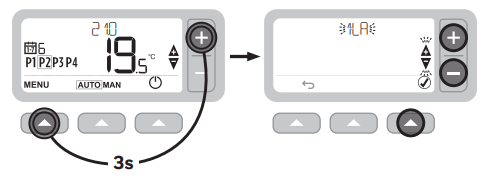
To access the service timer parameters:
- Press and hold the
 and
and  buttons together for 3 seconds.
 - Enter the PIN (default = 1234) by selecting 0 to 9 for each of the four segments and press
 to confirm.
 - OK will be displayed once the correct PIN is entered.
To set the service timer:
- Press
 to select the parameter you would like adjust
 - Press
 or
or  to adjust the parameter and press
  to confirm
 - Follow the same step for the rest of the parameters or press
 to exit the service timer.
Note: Default value in bold
No Description Settings
- 1LA Language: 1=EN, 2=NL, 3=FR, 4=DE, 5=IT, 6=ES
- 2CR Cycle Rate: 1, 3, 6, 9, 12
- 3OT Min. On Time: 1- 5min
- 4LL Lower Limit: 5 – 21 °C
- 5UL Upper Limit: 21 – 35 °C
- 6SO Schedule: 1 = 7 Day / Dag / Jour / Tag / Giorno / Dia 2 = 5+2
- 8SS Wired Sensor: 0 = Disabled 1 = Enabled
- 9LC Fail Safe: 0 = Disabled 1 = Enabled
- 10BL Backlight: 0 = Disabled 1 = Enabled
- 11CL Clock: 0 = 24h 1 = 12h
- 12DS Daylight Saving: 0 = Disabled 1 = Enabled
- 13TO Temp. Offset: – 3 / + 3 °C
- 15SD Reset Schedule 1 = Reset
- 16FS Factory Reset 1 = Reset
- 17OP Optimum Start 0 = Deactivate 1 = Optimum Start 2 = Delayed Start
- 18OS Optimum Stop 0 = Disabled 1 = Enabled
- 19LK Lock Options 1 = Partial 2 = Full
Manufactured for and on behalf of the Environmental & Energy Solutions Division of Honeywell Technologies Sàrl, E&ES, Z.A., La Pièce 16, 1180 Rolle, Switzerland by its Authorised Representative Honeywell Inc.
Conforms to protection requirements of the following directives:
EMC: 2014/30/EU,
LVD: 2014/35/EU.
The full text of the EU Declaration of Conformity is available at the following Internet address: http://hwll.co/DoC
WEEE Directive 2012/19/EU
At the end of the product, life dispose of the packaging and product in a corresponding recycling center. Do not dispose of the unit with the usual domestic refuse. Do not burn the product.
Other Manuals:
Honeywell Home T3 PROGRAMMABLE THERMOSTAT PRODUCT SPECIFICATION SHEET
Honeywell Home T3 PROGRAMMABLE THERMOSTAT User Guide
Honeywell Home T3 PROGRAMMABLE THERMOSTAT Installation Instruction

Leave a Reply