Heatmisser neoAir V2-M WiFi Smart Thermostat

Installation Procedure
 Do
Do
- Mount the thermostat at eye level.
- Read the instructions fully so you get the best from our product.
 Don’t
Don’t
- Do not install near to a direct heat source as this will affect functionality.
- Do not push hard on the LCD screen as this may cause irreparable damage.
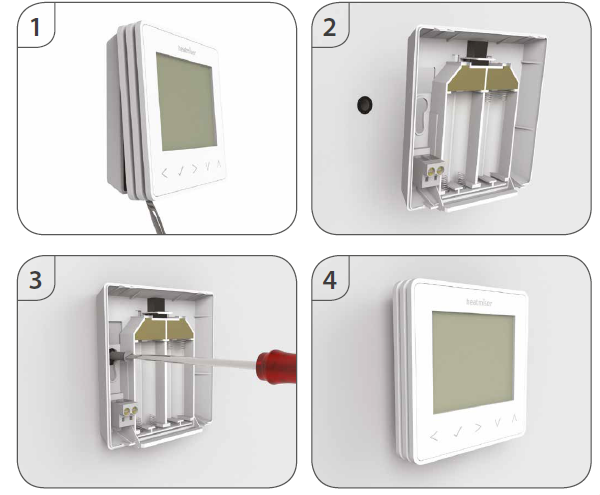
This wireless thermostat is designed to be surface mounted.
- Step 1 Carefully separate the front half of the thermostat from the back plate by placing a small at head terminal driver into the slots on the bottom face of the thermostat.
- Step 2 Mark 2 hole positions on the wall using the back plate as a positioning template. Drill at the marked positions and insert a wall plug into each hole.
- Step 3 Screw the thermostat back plate securely on the wall.
- Step 4 Clip the front of the thermostat back onto the thermostat back plate.
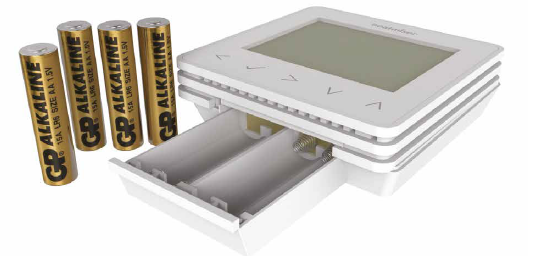
Installing the Batteries
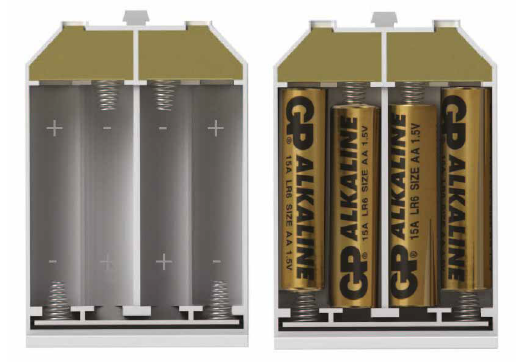
x AAA batteries have been supplied with the neoAir V2-M. To access the battery holder, push and release the compartment door located on the bottom face of the thermostat. The thermostat will inform you when the batteries need to be replaced by displaying the battery icon on screen. Do not use rechargeable batteries with this product
Mode Select
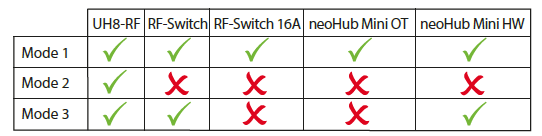
Before pairing the neoAir V2-M to your receiver, set the correct mode for your installation. Three different modes are available
- Mode 1 = Thermostat
- Mode 2 = Timer
- Mode 3 = Thermostat & HW Timer
Check the compatibility table below for the receiver you are using
To change the mode on your neoAir V2-M;
- Use the Left arrow key to highlight
 on the menu. . ………………………………………………………..
- Press
 and hold for 3 seconds ……………… ……………………………………………………………………………….
- SETUP is now highlighted, press and hold for 10 sec onds (Until all icons appear)…
- 1, 2 or 3 is shown in the lower left corner, this represents the current mode
- Use the left/right arrow keys to change the mode…………….. ………………………………………………..

- Press once to confirm…………………………………………………………………………………………………..
Receiver Type
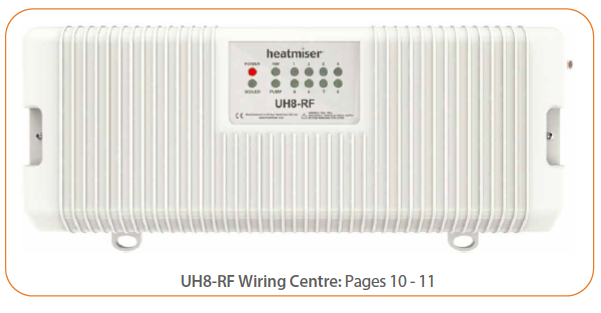
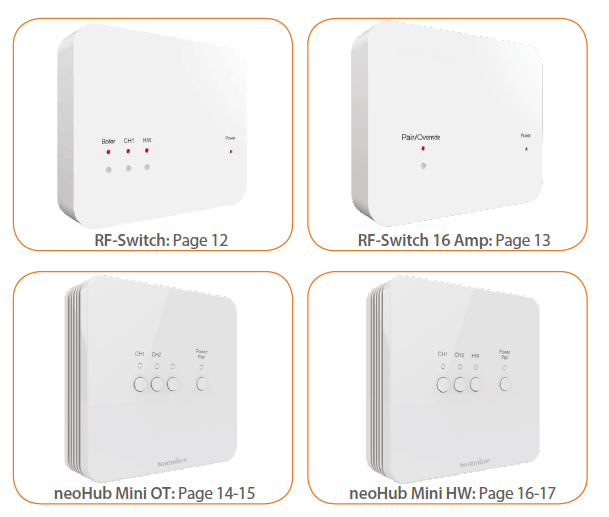
The neoAir V2-M will send a wireless signal to a receiver to switch on the heating or hot water*. Select the receiver type you are using from the list shown here on pages 8 – 9 and follow the pairing instructions on the relevant page.
Pairing
Pairing with the UH8-RF Wiring Centre
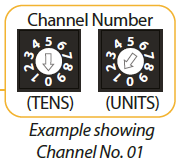 Remove the cover from the UH8-RF. The current channel number is set inside on the two dials, these dials are at the top of the circuit board and look like this
(You need to set a unique channel number for each UH8-RF)
- To control heating only, configure the neoAir in mode 1.
- To control heating & hot water, configure the neoAir in mode 3. (See page 7)
On the neoAir:
- Use the Left arrow key to highlight on the menu. . …………………………………………………….
- Press and hold for 3 seconds ……………… ……………………………………………………………………………….
- SETUP is now highlighted, press once to access the setup menu…………………………..
- The display will show the number 01 in the top right hand corner.
- Press the Down arrow key twice, P2 is displayed in the top right corner………………………..

- Press once… ………………………………………………………………………………………………………………………………..
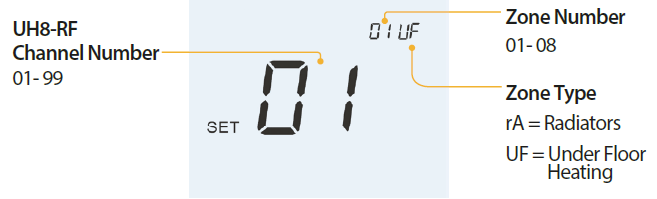
- The two large numbers in the centre will flash, use the up/down arrow keys to set this to the channel number of your UH8-RF………………. ……………………………………………….

- Press once to confirm…………………………………………………………………………………………………………
- The two small letters at the top will flash, this represents the zone type;
- rA = Radiators
- UF = Underfloor Heating
- Use the up/down arrow keys to adjust between the two types………………………….
- Press once to confirm…………………………………………………………………………………………………………
- The two small numbers at the top will flash, this represents the zone number the neoAir will be switching, use the up/down arrow keys to adjust………………………….
- Press once to confirm the settings, this will exit the setup menu and return to the main display……………………………………………………………………………………………………………………….
Pairing with the RF-Switch
To control heating only, configure the neoAir in mode 1.
To control heating & hot water, configure the neoAir in mode 3. (See page 7)
On the neoAir:
- Use the Left arrow key to highlight on the menu ………………………………………………………….
- Press and hold for 3 seconds ……………… ………………………………………………………………………………..
- SETUP is now highlighted, press once to access the setup menu……………………………
- The display will show the number 01 in the top right hand corner.
- Press the Down arrow key once, P1 is displayed in the top right corner…………………………
- Press once… ………………………………………………………………………………………………………………………………..
- The display will start counting down from 99, pairing mode is now active on the neoAir…
On the RF-Switch
- Press and hold the CH1 button for 5 seconds, the CH1 light will start flashing, pairing mode is now active on the RF-Switch.
- Once the RF-Sw itch detects the pairing signal from the neoAir, the CH1 light will turn of.
On the neoAir:
- Press to confirm pairing, this will exit the setup menu and return to the main display.
- Pairing complete
Pairing with the RF-Switch 16 Amp
On the neoAir:
- Use the Left arrow key to highlight on the menu ………………………………………………………….
- Press and hold for 3 seconds ……………… ………………………………………………………………………………..
- SETUP is now highlighted, press once to access the setup menu……………………………
- The display will show the number 01 in the top right hand corner.
- Press the Down arrow key once, P1 is displayed in the top right corner…………………………
- Press once… ………………………………………………………………………………………………………………………………..
- The display will start counting down from 99, pairing mode is now active on the neoAir..
On the RF-Switch 16 A:
- Press and hold the pair button for 5 seconds, the pair light will start flashing, pairing mode is now active on the RF-Switch.
- Once the RF-Sw itch detects the pairing signal from the neoAir, the pair light will turn ofl.
On the neoAir:
- Press to confirm pairing, this will exit the setup menu and return to the main display………………
- Pairing complete
Pairing with the neoHub Mini OT
Configure the neoAir in mode 1, as explained on page 7. To control a single heating zone, pair the neoAir to the CH1 output. To control a second heating zone, pair the next neoAir to the CH2 output. As explained below
On the neoHub Mini OT
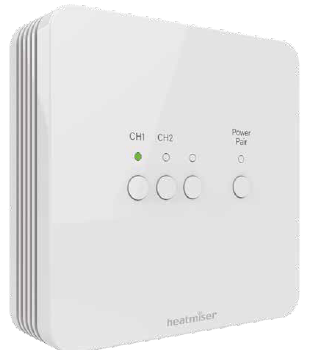
Press and hold the CH1 or CH2 button for 6 seconds. The zone light on the hub will flash green to indicate pairing mode is active, example shown below pairing to CH1;
On the neoAir V2-M
- Use the Left arrow key to highlight on the menu……………………………………………………
- Press and hold for 3 seconds…………… …………………………………………………………………………..
- SETUP is now highlighted, press once to access the s etup menu……………………………..
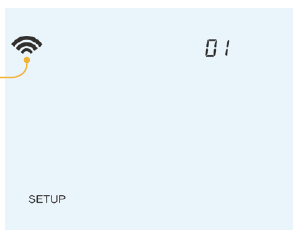
- The display will show the number 01 in the top right corner.
- Press once… ………………………………………………………………………………………………………………………
- The mesh sym bol will flash in the top left corner of the display………………………………..

- Once paired to the hub, the mesh symbol will be permanently displayed, the zone light on the neoHub Mini will turn
- Navigate to on the menu.
- Press once to return to the main neoAir display.
- The next step is to pair the neoHub Mini OT with the neoApp.
- Download the neoApp and register your account.
- Once signed in to the app, select the ‘Add neoHub Mini’ option in the app and follow the simple step by step pairing instructions.
Pairing with the neoHub Mini HW
- To control a single heating zone & hot water, configure the neoAir in mode 3 (see page 7), then pair the neoAir to the CH1 output.
- The neoAir will automatically pair to the HW output at the same time.
- To control a second heating zone, configure the neoAir in mode 1 (see page 7), then pair the neoAir to the CH2 output.
On the neoHub Mini HW
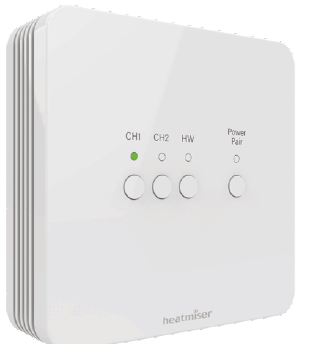
- Press and hold the CH1 button for 6 seconds.
- The zone light on the hub will flash green to indicate pairing mode is active, example shown below pairing to CH1
On the neoAir V2-M:
- Use the Left arrow key to highlight on the menu……………………………………………………
- Press and hold for 3 seconds…………… …………………………………………………………………………..
- SETUP is now highlighted, press once to access the s etup menu……………………………..
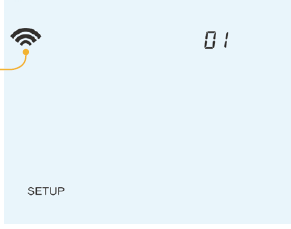
- The display will show the number 01 in the top right corner.
- Press once… ………………………………………………………………………………………………………………………
- The mesh sym bol will flash in the top left corner of the display………………………………..
- Once paired to the hub, the mesh symbol will be permanently displayed, the zone light on the neoHub Mini will turn of.
- Navigate to on the menu.
- Press once to return to the main neoAir display.
- The next step is to pair the neoHub Mini HW with the neoApp.
- Download the neoApp and register your account.
- Once signed in to the app, select the ‘Add neoHub Mini’ option in the app and follow the simple step by step pairing instructions
Pairing with the neoHub
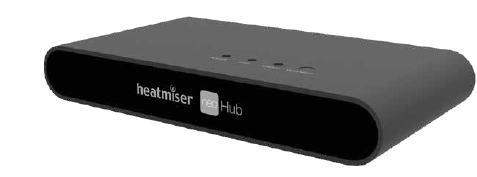
- Connect the neoHub to your router with the ethernet cable provided.
- Connect the neoHub power supply also provided with the hub.
- Download the neoApp and register your account.
- Sign in to your account, select the ‘Add neoHub’ option and follow the simple step by step pairing instructions.
- Once you’ve paired the hub to your account, the next step is to add the neoAir V2-M.
- The app will prompt you to ‘Add Zone’. Follow the instructions in the app by entering a title for the zone & when the pairing countdown in the app begins, follow the steps below
On the neoAir V2-M:
- Use the Left arrow key to highlight on the menu……………………………………………………
- Press and hold for 3 seconds…………… …………………………………………………………………………..
- SETUP is now highlighted, press once to access the s etup menu………………………………
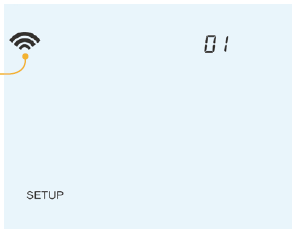
- The display will show the number 01 in the top right corner.
- Pressonce…………………………………………………………………………………………………………………………
- The mesh symbol will flash in the top left corner of the display………………………………..
- Once paired to the hub, the mesh symbol will be permanently displayed, the app will confirm that zone has been paired.
- Navigate to on the menu.
- Press once to return to the main neoAir display
- Press ADD ANOTHER for additional zones or press FINISH to complete setup.
NeoAir and MESH
- The neoAir V2-M is not capable of relaying signals from one thermostat to another (MESH).
- To create an extension of the wireless mesh network you will need to add a neoPlug* or Heatmiser Boost to the system.
- The neoAir V2-M can also communicate via wired (MESH capable) neoStats
- *The neoPlug is a compatible repeater for the neoAir V2-M, when used with the neoHub, UH8-RF, RF-Switch or RF-Switch 16A
- The neoPlug is not a compatible repeater for the neoAir V2-M when used with the neoHub Mini HW or neoHub Mini OT.
Modes 1 & 3 –
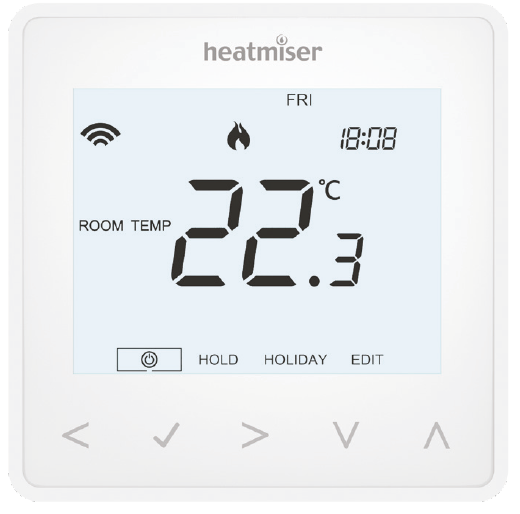
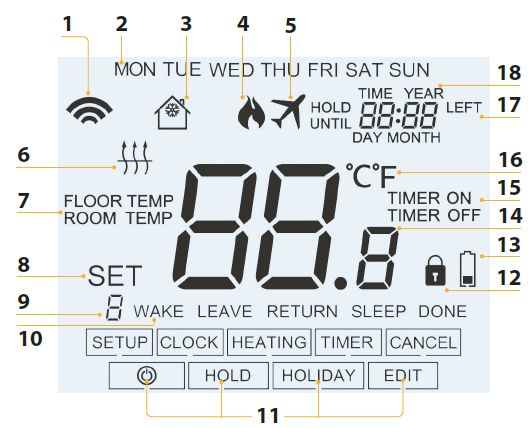
LCD Display
- Mesh Symbol – Displayed when connected to the neoHub, neoHub Mini HW/OT
- Day Indicator – Displays the day of the week.
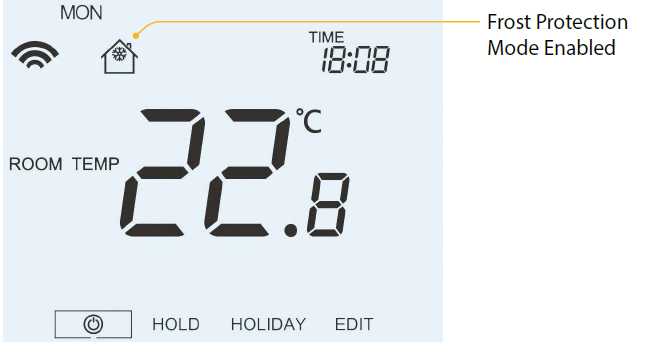
- Frost Symbol – Displayed when frost protection/standby mode is active.
- Flame Symbol – Displayed when the thermostat is calling for heat.
- Holiday – Displayed when the thermostat is in holiday mode.
- Floor Limit – Displayed when remote floor probe has reached max temp limit.
- Floor/Room Temp – Indicates the current sensor mode.
- Set – Displayed when changes are being made to the program schedule or current set point.
- Program Indicator – Displayed during programming (6 level mode) to show which period is being altered.
- Program Indicator – Displayed during programming (4 level mode) to show which period is being altered.
- Main Menu – Displays which option is currently selected.
- Key Lock Indicator – Displayed when the touch keys are Locked.
- Battery Indicator – Shown when batteries need replacing.
- Temperature – Displays the current sensor temperature.
- Timer Status – Displays the current state of the timed output.
- Temperature Format – Degrees Celsius or Fahrenheit.
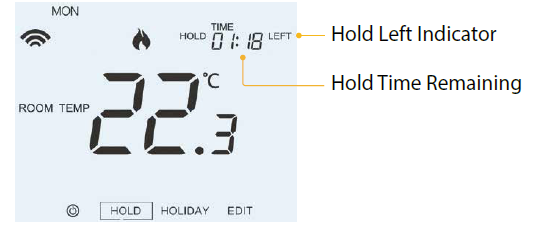
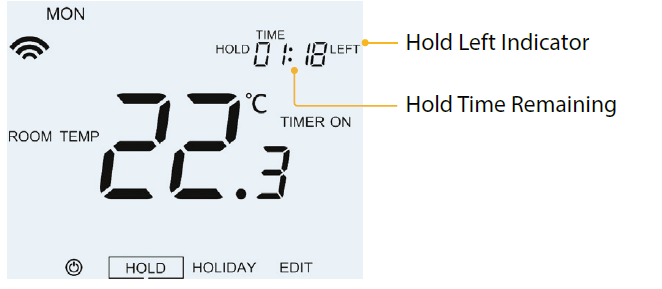
- Hold Left – Displayed when a temperature hold is active, the remaining time will be shown.
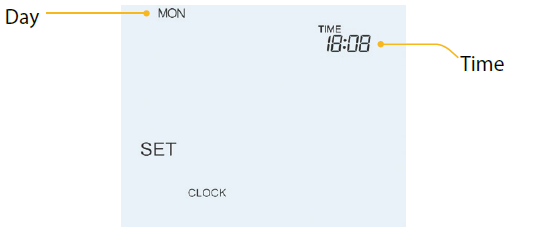
- Time/Day/Month/Year – Displays when setting the Clock/Calendar or a Holiday Period.
Setting the Clock
- Use the Left / Right arrow keys to highlight on the menu …………………………
- Press and hold to turn of the display . ……………………………………………………………..
- Use the right arrow key to select CLOCK ……………………………………………………………..

- Press to confirm selection ………………………………………………………………………………..
- Use Up / Down keys to set the year ……………………………………………………………………..
- Press to confirm …………………………………………………………………………………………………
- Repeat the steps to set the Month, Day & Time ………………………………………………….
- Press to confirm the new clock settings …………………………………………………………
- Use the down arrow to scroll to highlight on the menu …………………………..
- Press to turn the display on ……………………………………………………………………………
Comfort Levels Explained
- The neoAir V2-M offers the following program mode options;
- Weekday/Weekend (Mon-Fri/Sat-Sun)
- 7 Day (Each day programmed differently)
- 24 Hour (All days the same)
- Non-Programmable (Simple up/down temperature control, no timing
- Follow the optional settings instructions to first set your prefered program mode.
- When neoAir’s are paired to a neoHub, the program mode is set within the neoApp.
- The neoAir has default comfort levels already programmed.
- Each comfort level is a time & temperature setting to maintain, from that time onwards until the next level For any levels you dont want to use, change the time to –:–
- The default times and temperature settings are;
- 07:00 – 21°C (Wake) 09:00 – 16°C (Leave) 16:00 – 21°C (Return) 22:00 – 16°C (Sleep)
- To program the comfort levels, use the Left / Right keys to scroll to EDIT ……………..
- Press
 to confirm …………………………………………………………………………………………..
 - Use the Left / Right keys to select day / period of week (the selection will ash
- Press to confirm………………………………………………………………..
- WAKE will now flash and the current time and temperature setting will be shown.
- Press to alter WAKE settings ………………………………………………………………………………………..
- Use the Up / Down keys to set the hours ……………………………………………………..
- Press to confirm………………………………………………………………
- Use the Up / Down keys to set the minutes …………………………………………………
- Press to confirm ………………………………………………………………………………………………….
- Use the Up / Down keys to set the temperature …………………………………………
- Press to confirm ………………………………………………………………………………………………….
- Press the right arrow key ……………………………………………………………………………………….

- LEAVE will now flash and the current settings will be displayed.
- Press to alter LEAVE settings
- Repeat these steps to program all remaining comfort levels
- For any unused levels set the time to –:–
- Use the Left / Right keys to scroll to DONE and press ………………………
Temperature Control
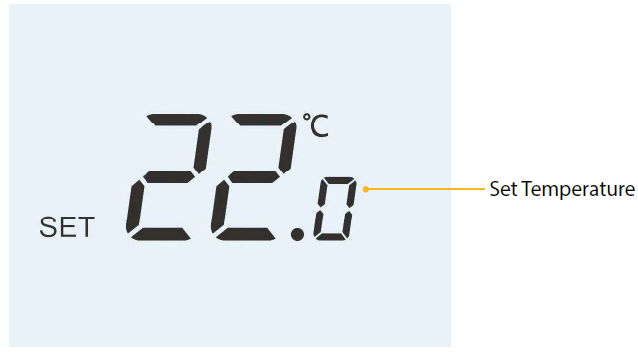
- The Up / Down keys allow you to adjust the set temperature.. ………………………….
- When you press either key, you will see the word SET and the desired temperature value.
- Use the Up / Down keys to adjust the SET value… ……………..
- Press to confirm settings and return to the main display .. …………………………………..
Temperature Hold(Mode 01 Heating only)
- Use the Left / Right keys to scroll to HOLD …………………………………………………
- Press to confirm …………………………………………………………………………………………………..
- Use the Up / Down keys to set the desired Hold period ……………………………
- Press to confirm …………………………………………………………………………………………………..
- Use the Up / Down keys to set the desired Hold temperature ………………….
- Press to confirm …………………………………………………………………………………………………..
- You will see the HOLD LEFT indication is displayed on screen.
- The time will countdown the set duration and then revert to the normal program
Temperature Hold(Mode 03 Heating and Hot Water)
- Use the Left / Right keys to scroll to HOLD …………………………………………….
- Press to confirm …………………………………………………………………………………
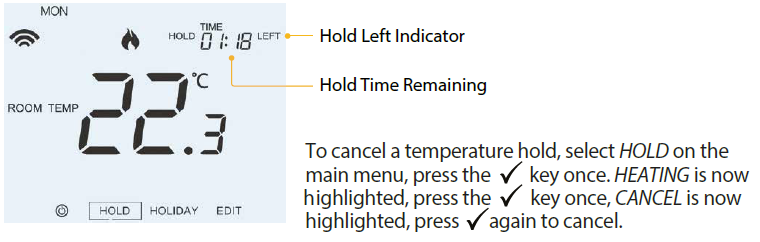
- The word “Heating” is highlighted press to confirm…………………………………..
- Use the Up / Down keys to set the desired Hold period …………………………….
- Press to confirm …………………………………………………………………………………….
- Use the Up / Down keys to set the desired Hold temperature ………………….
- Press to confirm …………………………………………………………………………………………………..
You will see the HOLD LEFT indication is displayed on screen. The time will countdown the set duration and then revert to the normal program.
Hot Water Boost (Mode 03 Heating and Hot Water
- Use the Left / Right keys to scroll to HOLD ……………………………………………………..
- Press to confirm …………………………………………………………………………………………………..
- The word “Heating” is highlighted, use the Left / Right keys to select TIMER then press to confirm …………………………………………………………………….
- Use the Up / Down keys to set the boost duration e.g. 02:00 hours …………..
- Press to confirm settings and return to main display ……………………………………
Locking the neoAir V2-M
- Use the Left / Right keys to scroll to HOLD & press for 10 seconds.
- The display will show 00:00 and you will need to enter a four digit pin number.
- Use the Up / Down keys to enter the first two digits ………………………………..
- Press to confirm …………………………………………………………………………………………………..
- Use the Up / Down keys to enter the second two digits ………………………….
- Press to confirm …………………………………………………………………………………………………..
Unlocking the neoAir V2-M
- To unlock the neoAir pressonce. The display will show 00:00 and you will need to enter the four digit pin number you previously entered.
- Use the Up / Down keys, enter the first two digits then press ………….
- Use the Up / Down keys, enter the second two digits then press …….
Frost Protection/Standby Mode
- Use the Left arrow key to highlight on the menu. . ………………………………………………….
- Press once to enable frost protection, the symbol appears as shown below………….
- Press once to disable frost protection, the frost symbol will disappear…………………….
Power On/Off
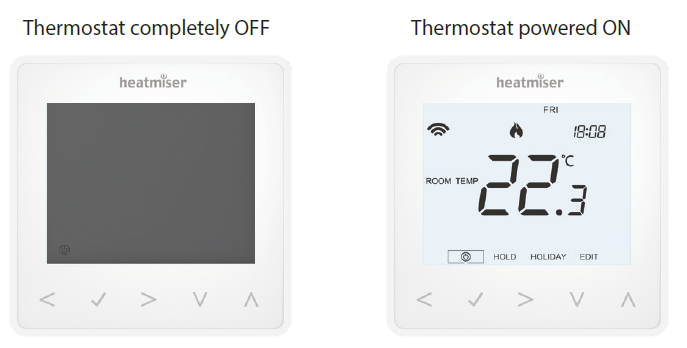
- To turn of the neoAir V2-M’s display;
- Use the Left arrow key to highlight on the menu………………………………………………………….
- Press and hold for 3 seconds ……………………………………………………………………………………………….
- The display will show , the temperature display & heating output is now turned OFF.
- To turn on the neoAir V2-M, press once………………………………………………………………….
Holiday
In thermostat mode, the holiday function reduces the set temperature in your home to the frost protection temperature setting (see page 34). The thermostat will maintain this temperature for the duration of the holiday and will then automatically return to the program mode on your return. In time clock mode, the holiday function maintains the timed output as OFF. Set a date & time for the holiday period to end, using the steps below
- Use the Left / Right keys to scroll to HOLIDAY and press ………………………….
- Use the Up / Down keys to set the year ………………………………………………………………..
- Press to confirm …………………………………………………………………………………………………..
- Use the Up / Down keys to set the month …………………………………………………………….
- Press to confirm …………………………………………………………………………………………………..
- Repeat the steps to set the Date & Time ………………………………………………………………..
- Pressing to confirm ………………………………………………………………………………………………
- Use the Left / Right keys to scroll to HOLIDAY and press ………………………………
- C ANCEL is now highlighted, Press to cancel ………………………………………………………….
Optional Features Explained
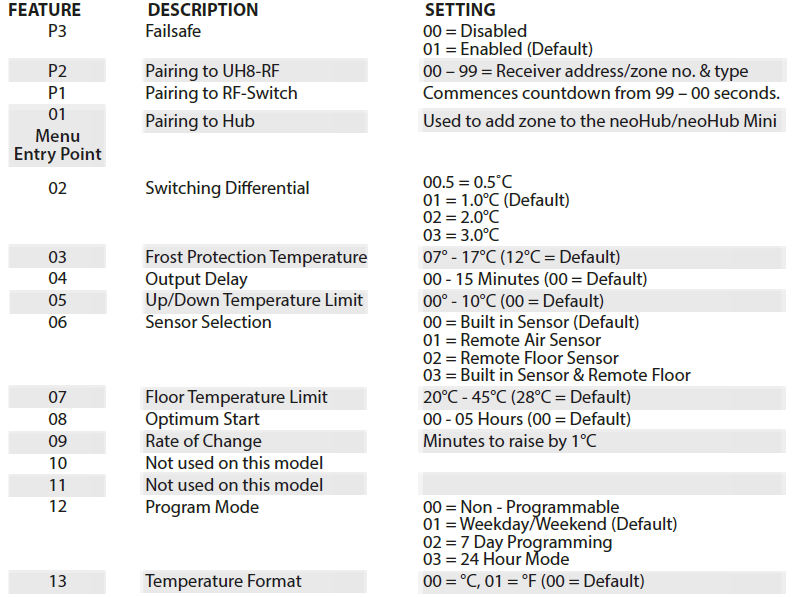
- Feature 01 – Pairing To Hub: This function is used to pair the neoAir V2-M to the following; neoHub / neoHub Mini HW / neoHub Mini OT
- Feature 02 – Switching Differential: This function allows you to increase the switching differential of the thermostat.
- The default is 1°C which means that with a set temperature of 20°C, the thermostat will switch the heating on at 19°C and of at 20°C. With a 2°C differential, the heating will switch on at 18°C and of at 20°C.
- Feature 03 – Frost Protect Temperature: This is the temperature maintained when the thermostat is in Frost Mode. The range is 07 – 17°C. The default is 12°C and is suitable for most applications.
- Feature 04 – Output Delay: To prevent rapid switching, an output delay can be entered. This can be set from 00 – 15 minutes. The default is 00 which means there is no delay.
- Feature 05 – Temperature Up/Down Limit: This function allows you to limit the use of the up and down temperature arrow keys. This limit is also applicable when the thermostat is locked and so allows you to give others limited control over the heating system.
- Feature 06 – Sensor Selection: On the neoAir V2-M, you can select which sensor should be used. You can select between air temperature only, floor temperature, or both. When you enable both sensors, the floor sensor is used as a floor-limiting sensor and is designed to prevent the floor from overheating.
- Feature 07 – Floor Temp Limit: This function is available when feature 06 is set to 03. You can set a floor limiting temperature between 20-45°C (28°C is the default setting). Note: neoAir V2-M MUST NOT be used to control electric under-floor heating.
- Feature 08 – Optimum Start: Optimum start will delay the start-up of the heating system to the latest possible moment to avoid unnecessary heating and ensure the building is warm at the programmed time. The thermostat uses the rate of change information to calculate how long the heating needs to raise the building temperature 1°C (with a rate of change of 20, the thermostat has calculated the heating needs 20 minutes to raise the building temperature 1°C) and starts the heating accordingly.
- Feature 09 – Rate of Change: Number of minutes for 1°C temperature rise.
- Feature 10 – Not used on this model.
- Feature 11 – Not used on this model.
- Feature 12 – Program Mode: The neoAir V2-M offers the following program mode options;
- Weekday/ Weekend – 4 comfort levels for Monday – Friday.
- 4 different comfort levels for Saturday – Sunday.
- 7-Day Program – Each day of the week has 4 comfort levels that can be programmed independently.
- 24 Hour program – All days of the week are programmed with the same levels. Non-programmable – Simple up/down temperature control, no timing
- Feature 13 – Temperature Format: This function allows you to select between °C and °F.
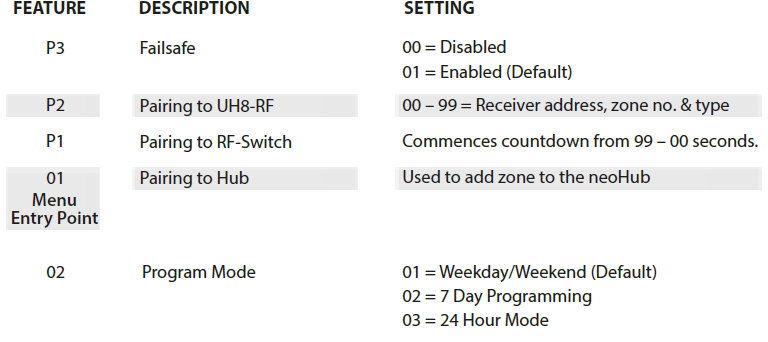
- Feature P1 – Pairing: to the RF-Switch, RF-Switch 16 Amp.
- Feature P2 – Setting the UH8-RF address: This is the number set on the rotary dials inside the UH8-RF unit, the zone number & zone type.
- Feature P3 – Failsafe: If the receiver fails to receive a signal from the neoAir V2-M within 40 minutes, it will activate the output for 12 minutes every hour. The receiver will continue to do this until it receives a signal from the neoAir V2
Adjusting the Optional Settings
- Use the Left arrow key to highlight on the menu. . ………………………………………………………..
- Press and hold for 3 seconds ……………… ……………………………………………………………………………….
- SETUP is now highlighted, press once to enter the s etup menu……………………………….
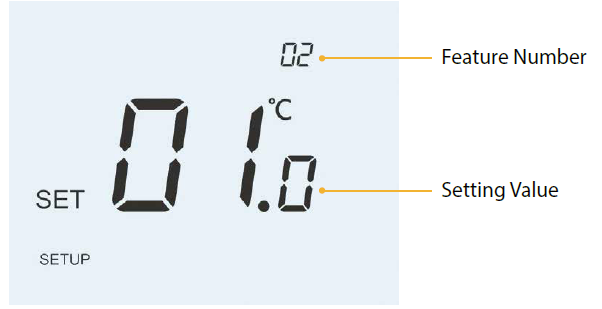
The small number at the top right is the feature number. The large number in the centre is the setting within the feature, as shown below;
Optional Settings – Feature Table
Re-calibrating the Thermostat
- Use the Left arrow key to highlight on the menu. . …………………………………………
- Press and hold for 3 seconds to turn of the display…………………………………….
- Press and hold and Down arrow keys together for 10 seconds…………….
- The current temperature will appear on the display.
- Use the Up / Down keys to configure the new temperature value ………….
- Press the key to confirm the change and the display will go blank ……
- Press the down arrow to highlight the ………………………………………………….
- Press the key once to turn the thermostat ON ………………………………………
Error Codes
- The internal sensor has developed a fault.
- E2 = The remote probe has not been connected.
- The remote probe has not been wired correctly.
- The remote probe is faulty.
Factory Reset
To factory reset your neoAir V2-M to default settings;
- Use the Left arrow key to highlight on the menu. . ………………………………………………………..

- Press and hold for 3 seconds ……………… ……………………………………………………………………………….
- SETUP is now highlighted, press and hold for 10 seconds (Until all icons appear)…
- 1, 2 or 3 is shown in the lower left corner, this represents the current mode
- Mode 1 = Thermostat
- Mode 2 = Timer
- Mode 3 = Thermostat & HW Timer
- Use the left/right arrow keys to select the mode………………… …………………………………………….
- Press once to confirm…………………………………………………………………………………………………..
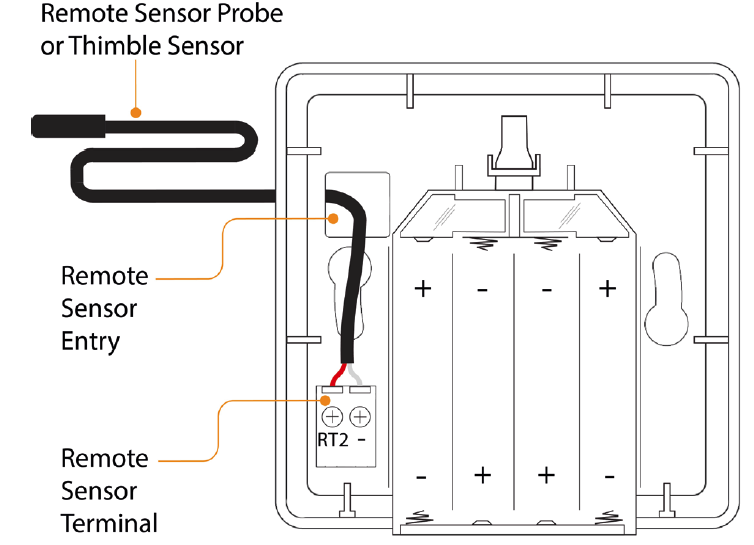
Remote Sensor Probe Wiring
Mode 2 – Time Clock
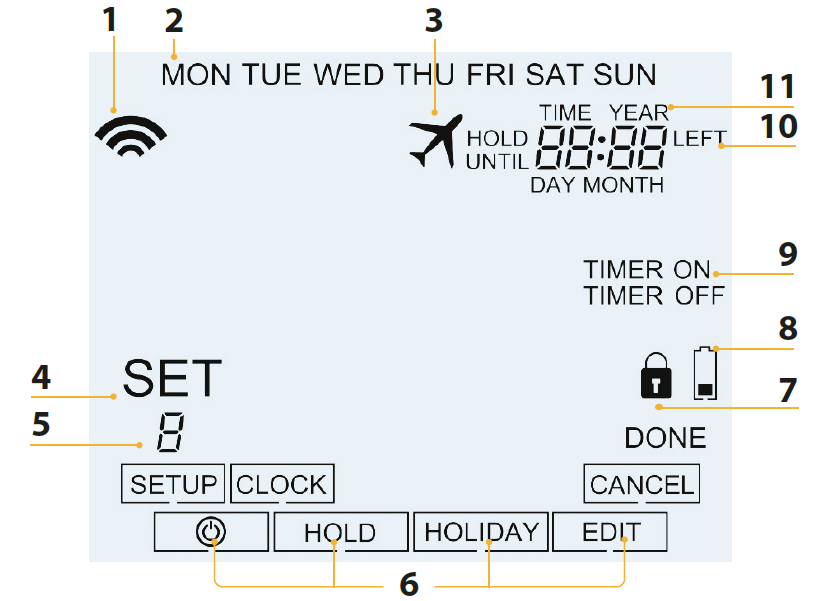
LCD Display
- Comms Symbol – Displayed when connected to the neoHub.
- Day Indicator – Displays the day of the week.
- Holiday – Displayed when the time clock is in holiday mode.
- Set – Displayed when changes are being made to the current set point.
- Program Indicator – Displayed during programming to show which level is being altered.
- Main Menu – Displays which option is currently selected.
- Keypad Lock Indicator – Displayed when the keypad is locked.
- Battery Indicator – Shown when batteries need replacing.
- Timer Status – Displays the current state of the timed output.
- Hold Left – Displayed when a timer hold is active, the remaining time will be shown.
- Time/Day/Month/Year – Displays when setting the Clock/Calendar or a Holiday Period.
Setting the Switching Times
- Use the Left / Right keys to scroll to EDIT and press ……………………………..
- Use the Left / Right keys to select day/the week ……………………..
- Press to confirm selection ………………………………………………………………………..
- The number 1 will now flash and the ON time will be displayed……………
- Press to adjust the ON time ………………………………………………………………………
- The hours will flash, use the Up / Down keys to set the HOURS………………
- Press to confirm …………………………………………………………………………………………
- The minutes will flash, use the Up / Down keys to set the MINUTES……..
- Press to confirm …………………………………………………………………………………………
- The OFF time is now shown, use the Up / Down keys to set HOURS………
- Press to confirm …………………………………………………………………………………………
- The minutes will flash, use the Up / Down keys to set the MINUTES………
- Press to confirm…………………………………………………………………………………………
- Press the Right arrow key ………………………………………………………………………………
- The number 2 will now flash and the ON time will be displayed
- Press to adjust the ON time, repeating the steps above for all levels…
- The number 2 will now flash and the ON time will be displayed…………….
- For any levels you dont want to use, change the time to –:–
- To confirm all changes use the Right key to select DONE and press …..
Timer Override
- To override the timed output on, follow these steps.
- Use the Up / Down keys to set the override duration e.g. 02:00 hours ………
- Press to confirm settings and return to main display ………………………………..
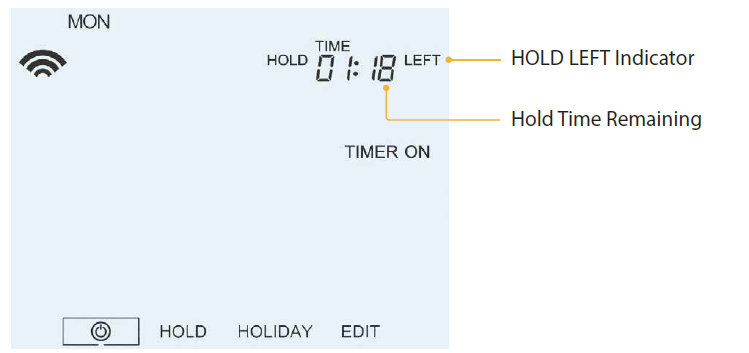
- Hold Left and the remaining time will now be displayed.
Optional Features Explained
- Feature 01 – Pairing To neoHub: This function is used to connect the timeclock to the neoHub.
- Feature 02 – Program Mode: The time clock offers three programming modes Weekday/ Weekend – 4 Switching times for Monday – Friday.
- 4 different switching times for Saturday – Sunday.
- 7 Day Program – Each day of the week has 4 switching times that can be programmed independently.
- 24 Hour program – All days of the week are programmed with the switching times
- Feature P1 – Pairing: to the RF-Switch.
- Feature P2 – Setting the UH8-RF address: This is the number set on the rotary dials inside the UH8-RF unit, the zone number and zone type.
- Feature P3 – Failsafe: If the RF-Switch or UH8-RF fails to receive a signal from the timeclock within 40-minute periods, it will activate to output for 12 minutes every hour.
- The RF-Switch/UH8-RF will continue to do this until it receives a new signal from the time clock.
Optional Settings – Feature Table
Heatmiser
Want More Information?
- Call our support team on: +44 (0)1254 669090
- Or view technical specications directly on our website:
- www.heatmiser.com
- Heatmiser UK Ltd
- Units 1-5 Hurstwood Court, Mercer Way
- Shadsworth Business Park, Blackburn,
- Lancashire, BB1 2QU, United Kingdom.
Reference
Download manual:
Heatmisser neoAir V2-M WiFi Smart thermostat User manual
Other Manual:
Heatmisser neoAir V2-M WiFi Smart thermostatProduct Specification Guide
