
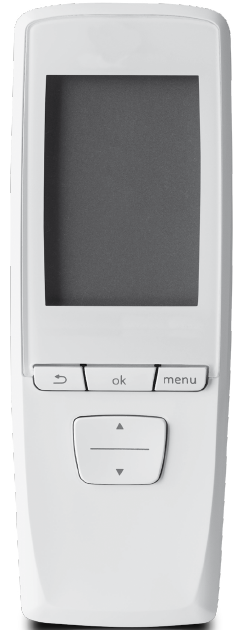
Glow-Worm Climapro2 RF Wireless Room Thermostat
INTRODUCTION
Instructions guidance
Product Documentation
The instructions are an integral part of the Climapro2 RF and must be handed to the user on completion of the installation in order to comply with the current regulation.
- Carefully read the manual, to enable safe installation, use and servicing. No liability can be accepted in the event of damage for not complying with the guidance in this instruction manual.
- Associated documents
- User instructions
Explanation of symbols
- DANGER: Risk of electric shock.
- ATTENTION: Risk of damage to the Climapro2 RF or to its vicinity.
- IMPORTANT: Useful information.
Climapro2 RF description
Regulation and statutory requirements
CE Mark
The CE mark indicates that the appliances described in this manual are in compliance with the following directives:
- European Directive Num. 2004-108 of the European Parliament and the Council regarding electromagnetic compatibility
- European Directive Num. 2006-95 of the European Parliament and the Council regarding low voltage
- Directive relating to telecommunications equipment (Council of the European Community directive R&TTE 99/5/CEE).
Operational Diagram
The room thermostat communicates with a control unit via a wireless connection.
Legend
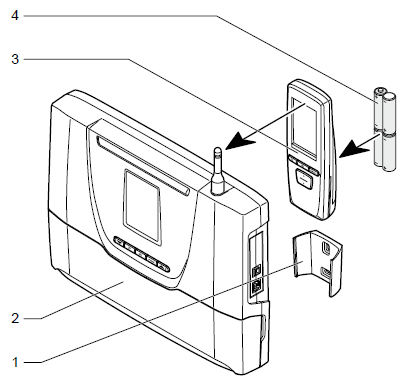
- Wall support for Climapro2 RF
- Control unit
- Room thermostat
- Batteries
Safety instructions and regulations
Safety instructions
All work inside Climapro2 RF must be carried out by a qualified professional or Glow-worm’s After-Sales Service. Climapro2 RF must only be installed by a qualified and responsible professional. Respect the basic safety instructions:
- Turn off the control unit’s power supply.
- When work on the appliance is completed, perform an operational test and check for safety.
Regulations
During the installation and activation of the appliance, the decrees, directives, technical regulations, standards and clauses hereafter must be complied with in the versions that are currently in force.
Recycling
The recycling of the packaging must be carried out by the qualified professional who installed the room thermostat.
Climapro2 RF
- Most of the appliance is made of recyclable materials.
 This symbol indicates that this unit must not be disposed of with household waste. It should be selectively collected for energy recovery, reuse or recycling.
- Take the unit to an appropriate collection point for processing, energy recovery and recycling of waste.
- By complying with this directive, you will contribute to the preservation of natural resources and the protection of human health.
Packaging
We recommend that you recycle the packaging of Climapro2 RF in a responsible fashion.
- Sort the waste in order to separate those elements which can be recycled (cardboard, plastics) and those which cannot be recycled.
- Dispose of the waste in accordance with existing regulations.
Installation location
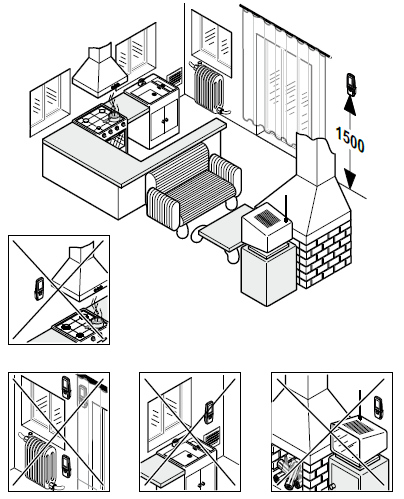
- Explain the following requirements to the user.
Install Climapro2 RF
- in a room protected from frost,
- on an interior wall of the main room in the home,
- at approximately 1.50 metres from the floor (according to the regulations in force).
Do not install Climapro2 RF
- near sources of heat, such as radiators, chimney walls, televisions or solar radiation,
- above a cooker that is likely to give off steam and grease,
- on cold walls,
- between units or behind curtains or other objects that might disturb temperature recording for the ambient air in the room,
- in a room that is heavily loaded with dust or where the atmosphere is corrosive,
- near air currents that may come from doors or windows.
Climapro2 RF Installation
- All of the measurements in this chapter are expressed in mm.
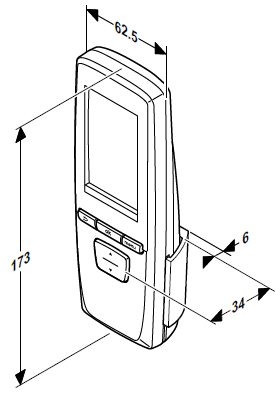
Dimensions
Room thermostat
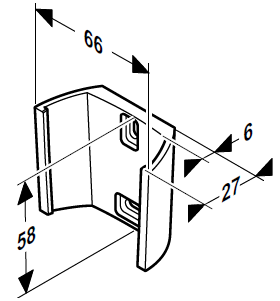
Wall support for Climapro2 RF
List of contents
- This list contains the following:
- Climapro2 RF programmable room thermostat
- wall support for Climapro2 RF
- packet containing 2 fixing screws with rawlplugs
- 4 “AA LR6 ” alkaline batteries.
Fixing
Fixing the room thermostat
- Determine the installation location. See the “Installation location” chapter.
Legend
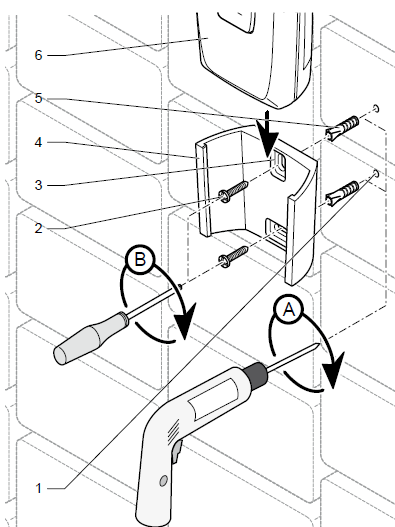
- Drilling
- Fixing screw
- Fixing holes
- Room thermostat support
- Plugs
- Room thermostat
- Position the room thermostat support (4) on a wall.
- Drill (A) the screw holes (1) in accordance with 2 mounting holes (3) in the wall support (4).
- Insert the rawlplugs (5) in the holes (1).
- Secure (B) the room thermostat support (4) with screws (2).
- Slide the room thermostat (6) into its support (4).
Electrical connections
Pairing (recognition)
- See the installation manual control unit.
- The Climapro2 RF and the Systempro control unit must be paired.
Commissioning
Appliances included in the installation
- Turn on the appliances that make up the installation (see the installation manuals).
Room thermostat
Legend
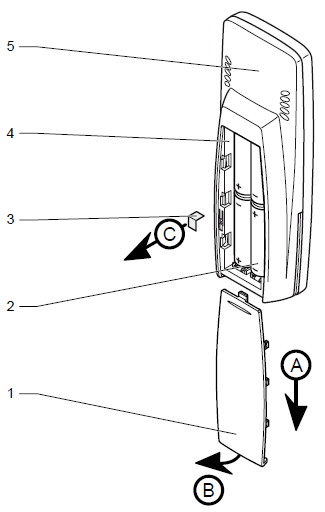
- Battery cover
- Batteries
- Insulating strip
- Battery compartment
- Room thermostat
- Remove the insulating strip (3) located in the battery compartment, respecting the order of operations (A) to (C).
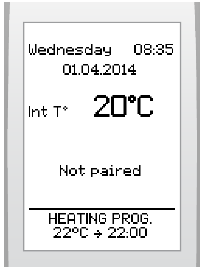
- The room thermostat shows it is not connected.
- Perform the pairing of the room thermostat based on your installation (see pairing section).
Specific settings
Accessing the installer menu allows for some adjustments to be made to the installation (room thermostat and wireless outdoor sensor) and the room thermostat’s user menu.
Main settings
| function | Title | Action |
| Heating | Maximum room temperature | Choose a value between 5 °C and 30 °C. (factory setting: 30 °C). |
| Room temperature correction | Choose a value between-5 °C and 5 °C with a step of0.5 °C. (factory setting: 0 °C). | |
| Hot water | On/Off | Activate (ON) or deactivate (OFF) (default setting: ON). |
| Program | Enable (YES) or disable (NO) (default setting: ON). | |
| Cooling function | On/Off | Activate (ON) or deactivate (OFF) (default setting: OFF). |
| Program | Enable (YES) or disable (NO) (default setting: OFF). | |
| Efficient energy use | Energy efficiency index | Enable (YES) or disable (NO) (default setting: OFF). |
Access to the installer menu
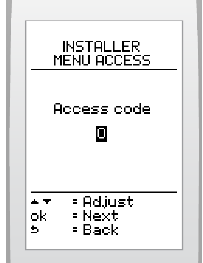
- Press button
 for 7 seconds.
 - Enter the installer access code 96.
Description of the installer menu
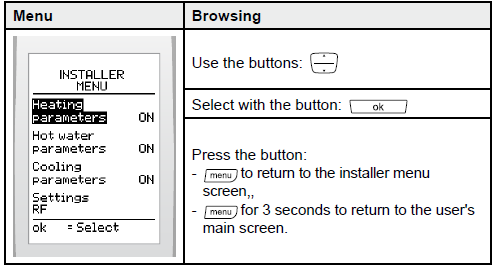
- Showing/enabling and disabling of functions is reflected in the user menu.
Heating function
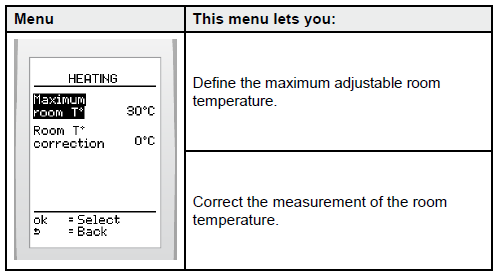
To set the maximum room temperature
This function lets you adjust the maximum room temperature that can be set by the user (value adjustable between 5 and 30 °C – factory setting: 30 °C).
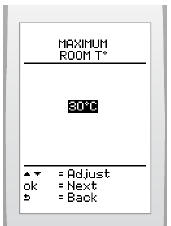
- From the installer menu (see access to the installer menu) > select on the screen > heating function > maximum room temp.
- Increase or decrease with the buttons
 to display the initial cooling temperature and press the button
 .
.
Correcting the room temperature
This function lets you rectify the temperature measured by the room temperature thermostat (by +/- 5 °C with a step of 0.5 °C – (factory setting : 0).
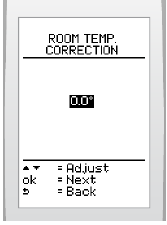
- From the installer menu (see access to the installer menu) > select on the screen > heating parameters > correction room TO correction.
- Increase or reduce with the buttons to display the desired correction and validate with button.
Domestic hot water function
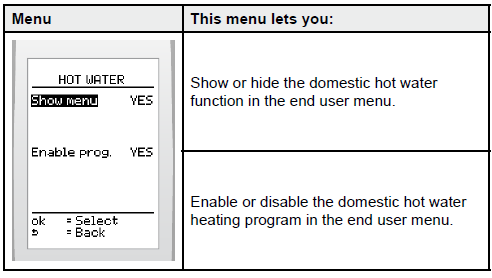
Activate or deactivate the hot water function
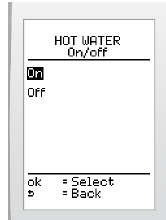
- This function lets you activate or deactivate the hot water menu for the user. When the function is activated, the function will be shown in the end user menu.
- If the function is deactivated, the domestic hot water settings are adjusted via the appliance.
- From the installer menu (see access to the installer menu) > select on the screen > hot water > on/off.
- Press to highlight your choice (activate or deactivate) and press the button to confirm.
To activate or deactivate the domestic hot water heating program
The hot water function must be activated before the program can be set up. Depending on the appliance, deactivation cuts off the hot water heating as well as the production of hot water (see the appliance installation manual).
This function makes it possible to allow the user to program domestic hot water heating.
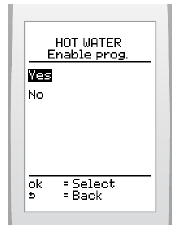
- From the installer menu (see access to the installer menu) > select on the screen > hot water > enable the program.
- Press to highlight your choice (enable or disable) and press the button to confirm.
Cooling function
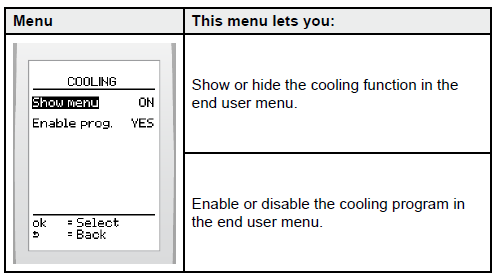
Activate or deactivate the cooling function
This function allows the user to activate or deactivate the cooling menu. When the function is activated the function will be shown in the end user menu.
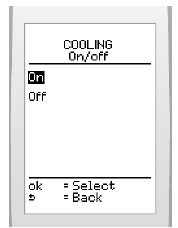
- From the installer menu (see access to the installer menu) > select on the screen > cooling > on/off.
- Press to highlight your choice (activate or deactivate) and press the button to confirm.
Enable or disable the cooling program
The cooling function must be activated before the program can be set up.
This function makes it possible to allow the user to program cooling.
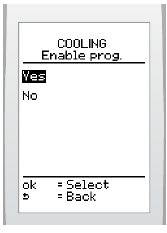
- From the installer menu (see access to the installer menu) > select on the screen > cooling > enable program.
- Press to highlight your choice (activate or deactivate) and press the button to confirm.
Options
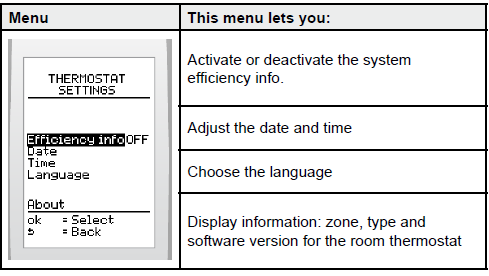
System efficiency information
This function allows the user to activate or deactivate the system efficiency information.
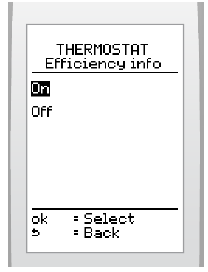
- Via the installer menu (see installer menu) > select > settings > effic. info on the screen.
- Press to highlight your choice (activate or deactivate) and press the button to confirm.
Setting the current date
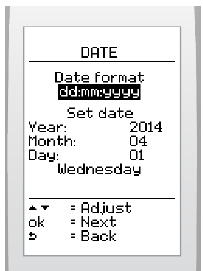
- From the installer menu (see access to the installer menu) > select on the screen > options > date.
- Set the display format of the current date by pressing and pressing to confirm. There is a choice between the factory setting day/month/year and year/month/day.
- Set the current date by pressing and pressing the button to confirm.
Setting the current time
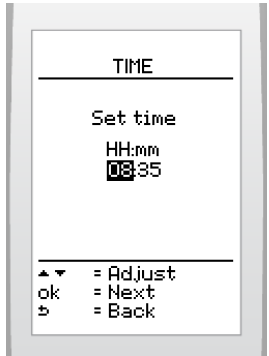
- From the installer menu (see access to the installer menu) > select on the screen > settings > time
- Set the time by pressing and pressing the button to confirm.
Choose the language for the menus
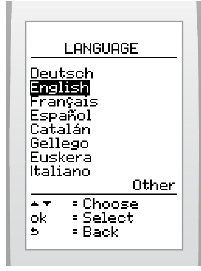
- From the installer menu (see access to the installer menu) > select on the screen > settings > language
To display the additional languages
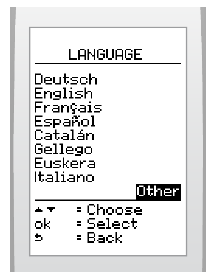
- From the installation menu (see access to the installer menu) > select on the screen > other
- Choose the language with the button and press the button to confirm.
Climapro2 RF General information
- This feature allows you to display the following information: area, software type and version.
- From the installer menu (see access to the installer menu) > select on the screen > options > about.
Radio
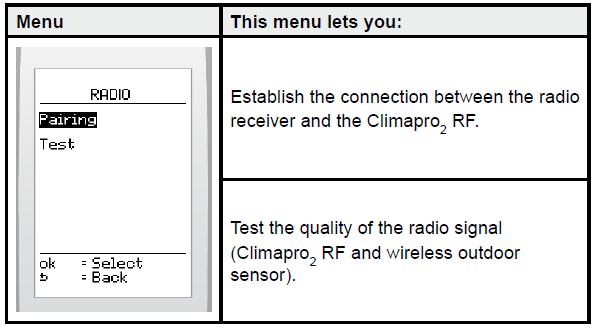
Recognition
This function lets you perform the pairing between the Climapro2 RF and the radio receiver.
- From the installer menu (see access to the installer menu) > select on the screen > RF > pairing
- Consult the control unit installation manual.
Test
- This function allows you to test the signal quality between the Climapro2 RF and the control unit.
- If the heating system includes a wireless outdoor sensor, the Climapro2 RF will also indicate the quality of the signal between the sensor and the control unit.
Wait about fifteen minutes after activating the thermostat and remote sensor before testing.
| Signal Quality | Comment |
| Excellent |
Normal functioning |
| Average | |
| Poor | Operating limit* |
| Null | Inoperative* |
(*) Check the room thermostat’s batteries (see the instructions). If the signal quality does not improve. Change the location of the appliances, reducing distances and removing obstacles.
- From the professional menu (see access to the professional menu) > select on the screen > RF > test
Control / Commissioning
After installing Climapro2 RF
- Start the appliance according to the operating instructions and check for correct operation.
User information
At the end of the installation
- explain the operation of the appliance and its safety devices to the user, if necessary provide a demonstration and answer any questions;
- give the user all the required documentation,
- fill in the documents where necessary;
- advise the user of the precautions necessary to prevent damage to the system, appliance and the building;
- remind the user to service the appliance annually.
MAINTENANCE
Fault diagnosis
- Faults described in this chapter should be carried out by a qualified engineer and if needed by the After Sales Service.
- You will find a list of certain error codes in the user manual.
In the event of a problem
- Check the error messages in the thermostat’s display zone.
Technical data
Climapro2 RF
| Description | Unit | Climapro2 Rf |
| Transmission/reception frequency | MHz | 868 |
| Transmission / reception frequency between the outdoor sensor and the room thermostat (via the control unit) | min | 15 |
| Transmission / reception frequency between the control unit and the room thermostat | min | 10 |
| Average unobstructed working range (*) | m | 100 |
| Average range within the home (*) | m | 25 |
| {*) Can vary according to installation conditions and electromagnetic environment | ||
| Room thermostat | ||
| Room temperature authorized in the room where the appliance is installed | °C | 50 |
| Dimensions: | ||
| Height | mm | 173 |
| Width | mm | 62,5 |
| Depth | mm | 34 |
| Supply: 4 “AA LR6 ” alkaline batteries | V | 4 x 1.5 |
| Battery life (**) | month | 18 |
| (**) Under normal conditions of use | ||
| Room thermostat support | ||
| Dimensions: | ||
| Height | mm | 58 |
| Width | mm | 66 |
| Depth | mm | 27 |
| Spacing between the room thermostat (in support) and the wall | mm | 6 |
Because of our constant endeavor for improvement, details may vary slightly from those shown in these instructions.
Glow-worm
- Nottingham Road, Belper, Derbyshire. DE56 1JT
- www.glow-worm.co.uk
0020094581_01 – 08/10

Reference
Download Manual:
Glow-Worm Climapro2 RF Wireless Room Thermostat Installation Guide
Glow-Worm Climapro2 RF Wireless Room Thermostat Installation Guide