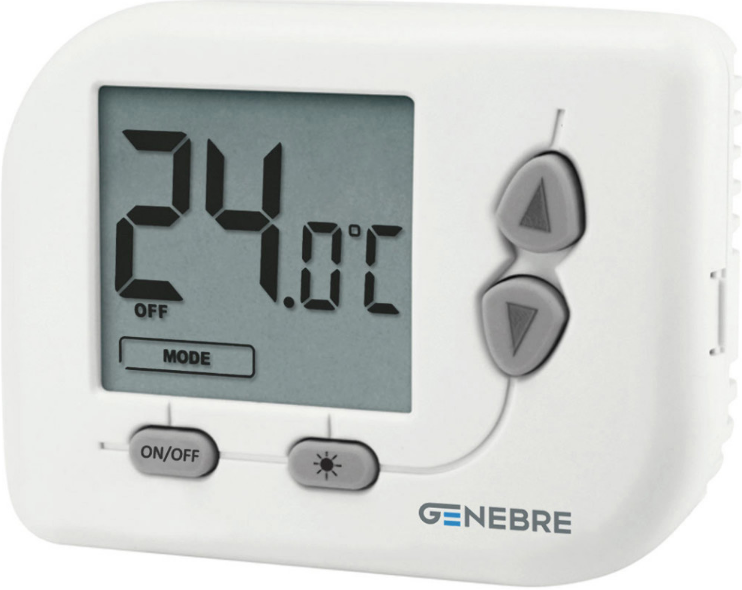
Genebre 3912 Wall-Mounted Electronic Thermostat
Features
- The 3912 wall digital thermostat is mainly used in central air-conditioning heating and cooling. It works with NTC series temperature sensor. It provides temperature control air-conditioning fan coil for cooling/ heating motorized valve or another electric actuator by the control signal which produced by comparison of actual tested ambient temperature and setting temperature. This product has been designed according to EN 60730-2-9, in compliance with the applicable EC directives.
- Power supply by alkaline batteries 2×1,5V LR03 (AAA).
- LCD display showing ambient temperature, set temperature and state.
- Temperature-sensitive element (NTC thermistor)
- Protection degree IP20. Insulation class Type II (double insulation).
- Installation on wall.
Technical Data
- Power supply: Alkaline batteries 2×1.5 V LR03 (AAA)
- Output: 5A (1A) 250 VAC
- Maximum ambient temperature: 50ºC
- Display temperature range: 0ºC ~ 39ºC
- Regulation temperature range: 5ºC ~ 35ºC
- Temperature resolution: 0,1ºC
- Temperature differential: 0,1ºC a 2,0ºC (est. 0,2ºC)
- Temperature sensor: NTC 10kΩ (a 25ºC)
- Protection degree: IP20
- Insulation class: Type II (double insulation)
- Heat and fire resistance: Category D
- Storage Temperature: -25 ~ 60ºC
Installation
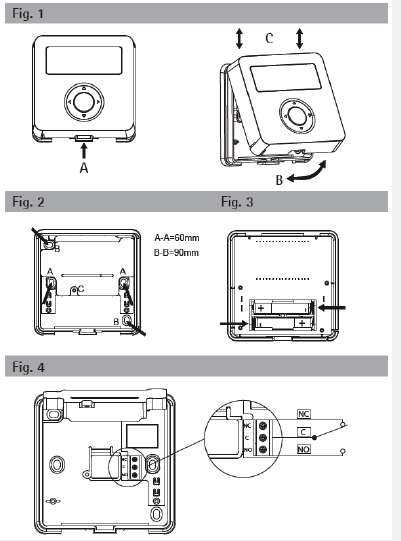
Place this device far from any heat source or air flow, at about a 1,5 m. height from the floor. Open the device pushing the clip on the base bottom side (Fig.1 A). Rotate the front cover upward (Fig.1 B) and lift slightly to unfasten it. (Fig. 1 C). Remove the inner protection cover for the electrical connections unscrewing (Fig.2 C) then rotating upward to release it. Fix the base onto the wall, using the horizontal (Fig.2 A-A) or diagonal holes (Fig.2 B-B). Dispose the cables through the window on the bottom and connect the wires to the terminal block (Fig. 4) then put the inner protective cover back and fix the screw again (Fig.2 C). insert the batteries in their compartment on the display board (Fig. 3). Close the device proceeding like before reversing the operation order: match the upper side of the two parts (Fig.1 C) then rotate the front cover downward (Fig.1 B) until the clip on the base clacks (Fig1 A).
Description of commands and operations
Command keys are accomplished on a four-position ring each one identified by the arrows ◄►▲▼and an additional key in the middle, hereafter named OK. Press the ring exactly on the arrows to avoid multiple keys activations. Press OK key in the middle. Use arrow keys to modify time and temperature values or select the available options. OK key is usually to confirm settings.
FIRST START (Fig. 5)
- Setting the clock
- Set 12H or 24H hours format by ▲▼, then OK.
- Set hours by ▲▼, then OK.
- Ser minutes by ▲▼, then OK.
The display shows OFF and the clock.
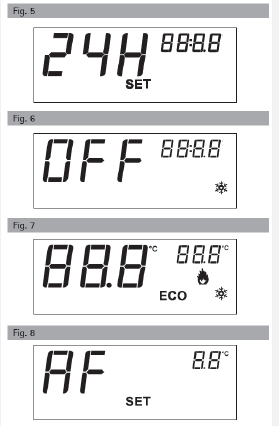
OFF MODE
- Anti-Frost function is active
- Hold the following keys for 3 seconds to:
- ▼ set the clock (see “Setting the clock”)
- ▲ set the season mode (Summer / Winter)
- ◄ switch back and forth between active modes and OFF
- Hold OK for 10 seconds to enter the installation Menu
ACTIVE MODE
- Ambient temperature is always in the foreground.
- Press OK to show the clock or the set-point temperature in the upper ring corner.
- Press ► to select Comfort o Economy (ECO) temperatures.
- Press▲▼ to change and save the temperature setpoints.
SEASON MODE WINTER
- Comfort temperature is greeting than Economy (t1>t2).
- When Tamb < Tset heating turns on heating.
SEASON MODE SUMMER
- Comfort is smaller than Economy (t1<t2)
- When Tamb > Tset cooling turns on refrigeration
 .
.
INSTALLER MENU
- In OFF mode, hold OK for 10 seconds to enter the installation menu.
- Press ◄► to select the options.
- Press ▲▼to modify the values.
- AF = Anti-Frost threshold (standard 6.0ºC);
- HYS = Switching differential (standard 0,2ºC);
- OFS = Offset temperature correction (standard 0.0ºC);
- ºC = Celsius / Fahrenheit degrees selection
- CLR = Choose YES and wait for 4 seconds to reset and restore factory settings automatically.
- Press OK to quit the installer menu.
WIRING CONNECTION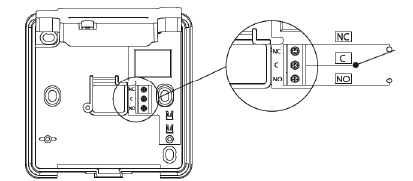
REFERENCE:
DOWNLOAD MANUALS:
Genebre 3912 Wall-mounted electronic thermostat Product Specifications Guide
![]()
Genebre 3912 Wall-Mounted Electronic Thermostat Product Specifications Guide