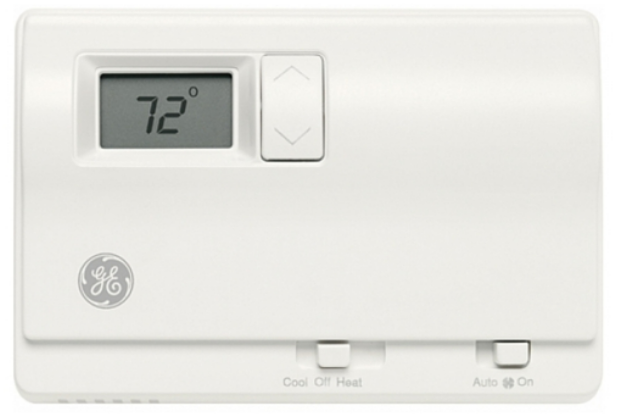
GE Appliances RAK163P1 Cooling Programmable Thermostat
You can find them on a label on the thermostat.
Using your thermostat
The digital programmable series of thermostats offer an economical remote control solution for single-stage heat/cooling and multi-stage heat pump applications. System selections include heat, cool, off or auto mode, as well as a fan on or fan auto selections.Thermostats are available in the following selections: RAK163P1 (1 heat/1 cool) and RAK147P1 (2 heat/1 cool heat pump)
Thermostat Overview
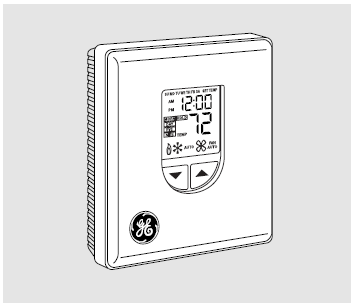
General Features
| FEATURE | DESCRIPTION |
| No batteries required for general operation. | Saves programmed setpoints in the event of a power loss. |
| 24V AC/DC Compatible | Switch selection for either 24 VAC or 24 VDC operation. |
| Temperature Safety Circuit | Auto cut-off in heat mode if room temperature > 90°F and auto cut-off in cool mode if room temperature
< 60°F. |
| °F or °C compatible | Switch selection for either Fahrenheit or Celsius degrees. |
| Backlit display | Display is backlit whenever a button is pressed. |
| Programming Modes | 5+2- and 7-day programming flexibility. |
| Auto changeover from Heat to Cool | Automatically changes from heating to cooling. |
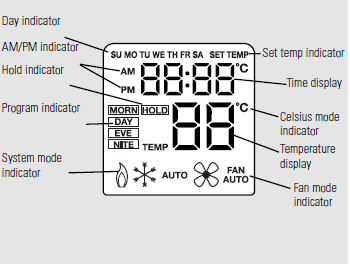
Display Description
| LCD SEGMENT | DESCRIPTION |
| Day indicator | Indicates the day of week. |
| AM/PM indicator | Indicates AM or PM. |
| Time display | Displays time, program time or set temperature. |
| Program indicator | Indicates the operating or editing program (Morning, Day, Evening and Night), flashes when temporary hold. |
| Hold indicator | Indicates that the thermostat is in hold mode. |
| System mode indicator | Shows whether heat, cool, auto or off system is selected and operating. |
| Fan mode indicator | Indicates that the fan is in ON or Auto mode. |
| Temperature display | Displays room temperature, program temperature or span. |
| Set temp indicator | Indicates that the set temperature is shown. |
| Celsius mode indicator | Indicates that the temperature displayed is in Celsius scale. Default is Fahrenheit. |
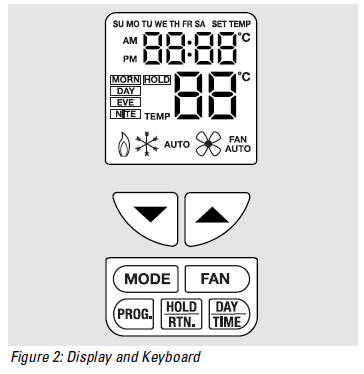
Keyboard Functions
| KEY | FUNCTION |
| ▲ | • Increases data (time, temperature, etc.).
• Press with ▼ to enter span setting mode. |
| ▼ | • Decreases data (time, temperature, etc.).
• Press with ▲ to enter span setting mode. |
| HOLD/RETURN | • Enters hold.
• Terminates hold or temporary override. • Returns from Day/Time or Program setting modes to Normal mode. |
| DAY/TIME | • Enters day and time setting mode.
• Advances through setting of day of week, hour and minutes. |
| PROGRAM | • Enters program setting mode.
• Advances through setting of program day, time and temperature. • Changes time display format when in day and time setting mode. |
| SYSTEM MODE | Selects the system mode of the thermostat from AUTO, HEAT, OFF and COOL. |
| FAN MODE | Selects the operation mode of the FAN between AUTO & ON. |
| RESET | Hardware resets signal to reset the thermostat. |
Initial Power Up
- The thermostat will reset after powering up or if the reset button is pressed.
- During reset, all LCD segments and the LCD backlight will be turned on. After one second and when all keys are released, the thermostat will start. At the same time, the memory and I/O ports of the MCU will be set to their default values.
- After initial power-up or reset, both the weekday and weekend programs are initialized as shown in the following table.
Default Program
| Program | MORN | DAY | EVE | NITE | ||||
| Program Setpoint | HEAT 68°F | COOL 78°F | HEAT 65°F | COOL 80°F | HEAT 68°F | COOL 78°F | HEAT 66°F | COOL 78°F |
| (TIME) | (TIME) | (TIME) | (TIME) | |||||
| Monday | 6 a.m. | 8 a.m. | 5 p.m. | 11 p.m. | ||||
| Tuesday | 6 a.m. | 8 a.m. | 5 p.m. | 11 p.m. | ||||
| Wednesday | 6 a.m. | 8 a.m. | 5 p.m. | 11 p.m. | ||||
| Thursday | 6 a.m. | 8 a.m. | 5 p.m. | 11 p.m. | ||||
| Friday | 6 a.m. | 8 a.m. | 5 p.m. | 11 p.m. | ||||
| Saturday | 6 a.m. | 8 a.m. | 5 p.m. | 11 p.m. | ||||
| Sunday | 6 a.m. | 8 a.m. | 5 p.m. | 11 p.m. | ||||
Temperature Scale Selection
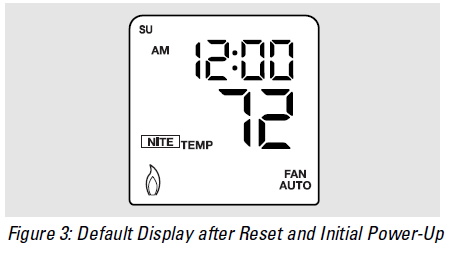
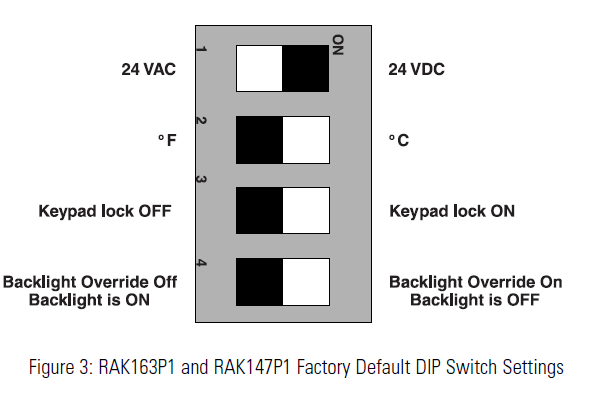
The temperature scale can be selected by the C/F dip switch inside the unit. Please refer to Figure 3 in the Installation Instructions for the identification of the correct switch. n If the C/F switch is set at “F,” the temperature scale after reset is Fahrenheit. If the C/F switch is set at “C,” the temperature scale after reset is Celsius. n Figure 3 shows the LCD right after reset. The Fahrenheit scale is the default.
Default Mode
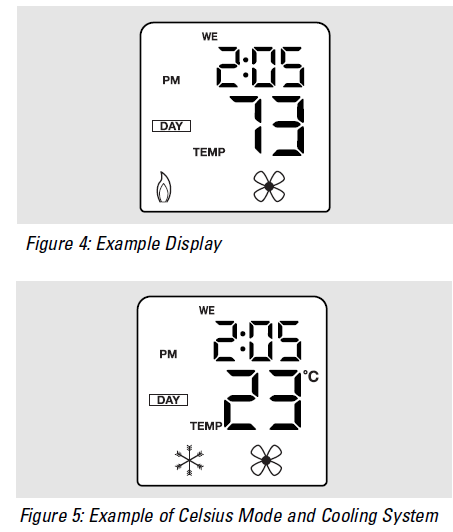
- The LCD shows the time, day of the week, room temperature, operating program number or hold status, and the system and fan status.
For the example at left: - The time is 2:05 PM Wednesday.
- The room temperature is 73°F. If the Celsius scale is selected, the C indicator will be displayed.
- The current operating program is DAY. If the indicator is flashing, a temporary hold is active.
- Icon explanation:
- If heating is selected: the FLAME icon will be displayed.
- If a call for heating is made: the FLAME icon will be flashing.
- If cooling is selected: the SNOWFLAKE icon will be displayed.
- If a call for cooling is made: the SNOWFLAKE icon will be flashing.
- If Auto-changeover is selected and the system is in heating mode:
- AUTO and FLAME icons will be displayed.
- If heating is called while in AUTO mode: the FLAME icon will flash.
- If Auto-changeover is selected and the system is in cooling mode:
- AUTO and SNOWFLAKE icons will be displayed.
- If cooling is called while in AUTO mode: the SNOWFLAKE icon will flash.
- All icons will be off if OFF is selected.
- The fan is in ON mode.
Time Format
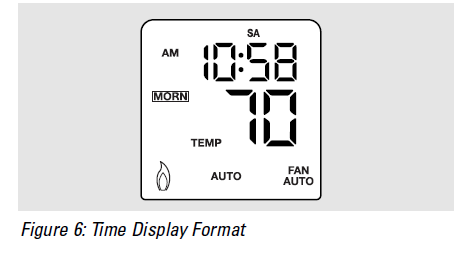
- Time is displayed in AM/PM format.
- AM/PM format is <AM|PM>hh: mm where the leading zero of the hour will be suppressed. The time displayed will be in the range of 12:00 AM to 11:59 AM and 12:00 PM to 11:59 PM.
Review and Change the Setpoint Temperature
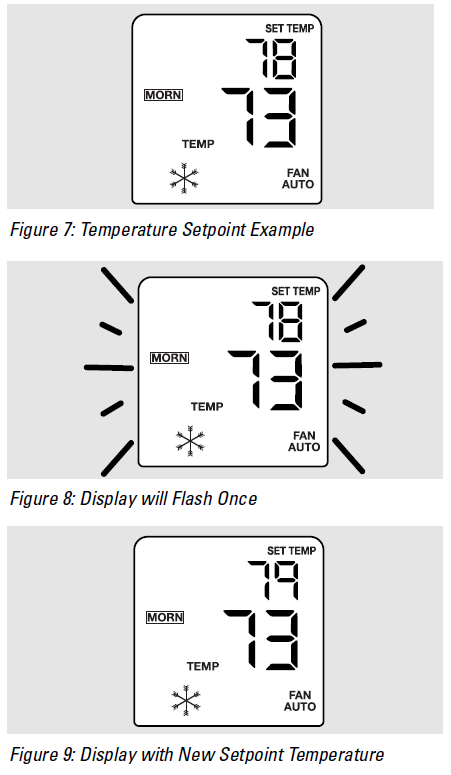
- In NORMAL mode, press sort. The clock and the day of the week indicator will be cleared. The setpoint temperature and SET TEMP indicator will be displayed. The HEAT, COOL or AUTO indicator will turn on indicating the current operating system.
- To change the setpoint temperature, press and hold either s or for more than 1 second. The entire display will flash once and the setpoint temperature can be changed. Continue to hold the key or release it and press again to adjust the setpoint temperature.
- Press and hold the key for 2 seconds for fast advance.
- Press the HOLD/RETURN button to return to NORMAL mode immediately or wait 5 seconds to return to NORMAL mode automatically.
Hold and Temporary Override
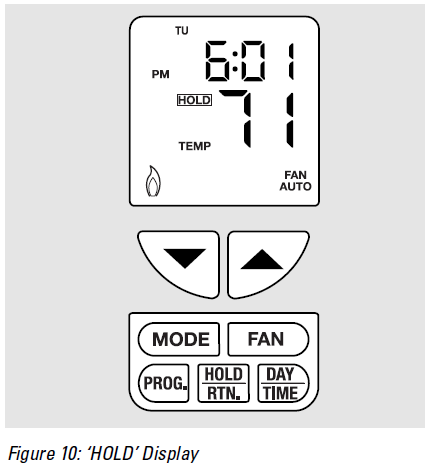
- The hold is the permanent bypass of program temperature setpoints. Manual release is required to return to active program mode.
- Press HOLD/RETURN in NORMAL mode for hold. The current setpoint temperature will be used. The HOLD icon will be displayed and the program numbers will be cleared.
- The HOLD temperature setpoint can be changed by following the directions for changing the normal temperature in the previous section.
- To release the hold, press HOLD/RETURN again in NORMAL mode to return to the programmed operation. The HOLD icon will disappear.
- Temporary override is the temporary change of the setpoint temperature until the next program time. Refer to the previous section on changing temperature setpoints for information on adjusting the temperature.
- To release a temporary override before the next setpoint comes, press HOLD/RETURN twice in NORMAL mode (the first press will change to hold and the second press will release the hold and temporary override).
Day/Time Setting Mode
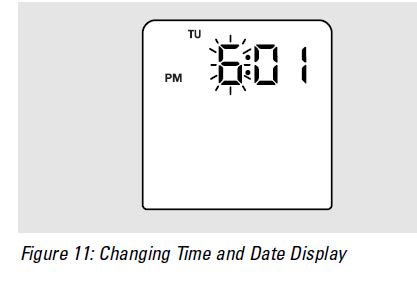
- In NORMAL mode, press DAY/TIME to enter the DAY/TIME SETTING mode. The LCD will be cleared except for the time and day of week indicator.
- When the hour is flashing, press s(increase setting) or t (decrease setting) to adjust hour.
- Press DAY/TIME again. Minutes will be flashing. Press sor tto djust minutes.
- Press DAY/TIME again. The day will be flashing. Press sor tto adjust day.
- Press DAY/TIME again. The thermostat will return to NORMAL mode.
- When adjusting the day or time, press and hold sor for 2 seconds for fast advance. During fast advance, the data will stop flashing. At any time you may press the HOLD/RETURN button or wait 5
seconds to return to NORMAL mode. - The clock seconds will be reset to zero whenever the time is changed. The clock seconds will not be affected if only the day is changed.
- The time display will be frozen in DAY/TIME setting mode.
- However, the internal clock is still running. If nothing is changed, then the frozen time will be replaced by the internal clock when you return back to the NORMAL mode
Programming Mode
The RAK163P1 and RAK147P1 are capable of programming in either 5+2 or 7 day formats. The table below is the default program for both the heating and cooling programs. If nothing is changed, these will be the times and temperatures that are active.
Default Program
| Program | MORN | DAY | EVE | NITE | ||||
| Program Setpoint | HEAT 68°F | COOL 78°F | HEAT 65°F | COOL 80°F | HEAT 68°F | COOL 78°F | HEAT 66°F | COOL 78°F |
| (TIME) | (TIME) | (TIME) | (TIME) | |||||
| Monday | 6 a.m. | 8 a.m. | 5 p.m. | 11 p.m. | ||||
| Tuesday | 6 a.m. | 8 a.m. | 5 p.m. | 11 p.m. | ||||
| Wednesday | 6 a.m. | 8 a.m. | 5 p.m. | 11 p.m. | ||||
| Thursday | 6 a.m. | 8 a.m. | 5 p.m. | 11 p.m. | ||||
| Friday | 6 a.m. | 8 a.m. | 5 p.m. | 11 p.m. | ||||
| Saturday | 6 a.m. | 8 a.m. | 5 p.m. | 11 p.m. | ||||
| Sunday | 6 a.m. | 8 a.m. | 5 p.m. | 11 p.m. | ||||
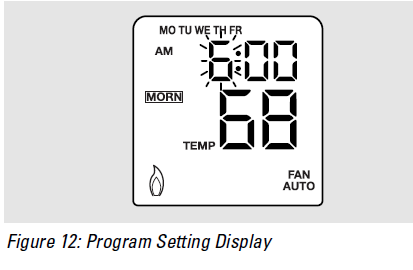
To review or change the program, press PROGRAM in NORMAL mode. The time period MORNING of the Weekday Program will be displayed first. The system icon in Figure 12 indicates it is in the heating program. If the cooling program is needed, press the MODE button as shown in Figure 10 to change to the SNOWFLAKE icon and the cooling program. All other segments are cleared.
Programming Steps
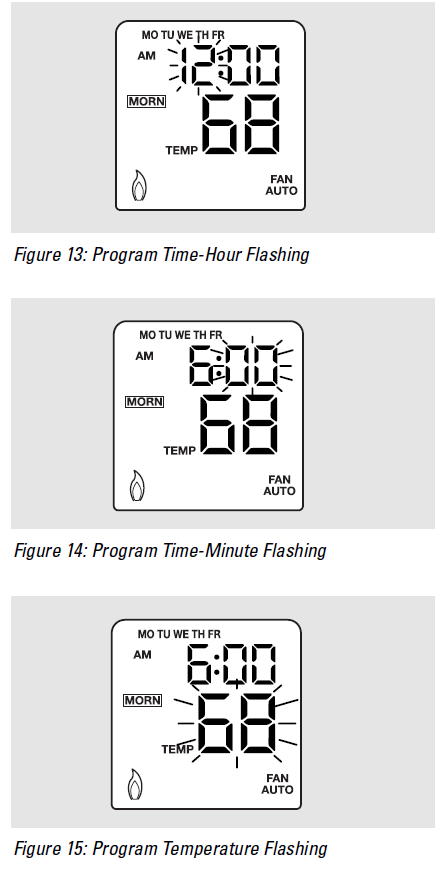
- Press PROGRAM from the NORMAL mode. The program time hour will be flashing and the MORNING time period will be active. Press to adjust the time. To change programming days press the DAY/TIME button. The order of the day programming is:
- Weekday Program (i.e. Monday through Friday)
- Weekend Program (i.e. Saturday and Sunday)
- 7-Day Program (i.e. Monday through Sunday on individual days)
- Press PROGRAM again. The program time-minute will be flashing. Press or to adjust. Program time-minute advances 10 minutes per step.
- Press PROGRAM again. The programmed temperature will be flashing. Press sort to adjust.
- Press PROGRAM again. The next program time period will be displayed. The order of the time periods within one day are:
- Morning
- Day
- Evening
- Night (Nite)
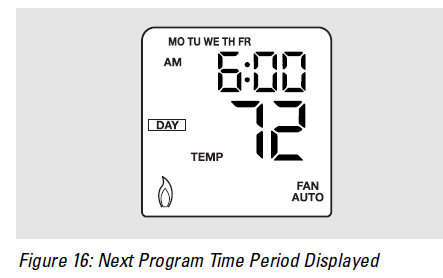
Additional Instructions
- After programming, all four time periods for the weekday program, the weekend program will be displayed. Repeat steps 1–5 for the weekend program.
- After programming all four time periods for the weekend the program, the individual day program will be displayed. If the programming is complete, press the HOLD/RETURN button to return to the NORMAL display and to activate the program. If any changes or additional programming are required, follow steps 1–5 for the individual 7-day programming.
- When adjusting the program time or temperature, press and hold sor for 2 seconds for fast advance. During the fast advance, the data will stop flashing.
- To return to NORMAL mode at any time, press the HOLD/RETURN button or wait 5 seconds with no action and the display will return to NORMAL mode.
- The setpoint temperature cannot be set beyond the thermostat’s control range of 60°F to 90°F (15°C to 32°C).
- Switching between the heating and cooling programs is done by pressing the MODE button. The FLAME icon will be displayed when heating is selected, and the SNOWFLAKE icon will be displayed when cooling is selected. When AUTO is selected and the AUTO icon is displayed, the unit will use both of the heating and cooling programs in the auto-changeover mode of operation.
- There is no ‘OFF Program’ that can be selected. The program will always be active unless the thermostat is turned off.
Fan Control
If FAN AUTO is selected, the fan will cycle On/Off with the system. If FAN ON is selected, the Fan will be on all the time.
Auto Changeover
The auto changeover feature is a special operation of the thermostat that does not require the user to change the system mode from heating to cooling. Once the programs are set and the thermostat is put in the AUTO mode, the switching from heating to cooling is accomplished completely by the thermostat.
LCD Backlight
- LCD backlight is activated when any key is pressed. Any subsequent key press or switch change will extend the period. When there is no key pressed for five seconds, the backlight will automatically turn off.
- The LCD backlight will not operate when there is no external 24 VAC or 24 VDC power supplied.
Verification
 To verify that the thermostat is operating correctly:
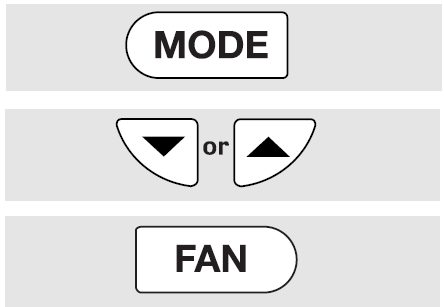
- Press the MODE button to select the heat or cool system.
- Press the or to adjust the setpoint temperature above or below the current ambient temperature. The thermostat should call for either heating or cooling and the fan should turn on.
- Press the FAN button to change from FAN AUTO to FAN ON. The fan should come on automatically. If the thermostat does not operate correctly, proceed to the Troubleshooting section.
Installation Instructions
If you have questions, call 800-GECARES or visit our Website at: www.GEAppliances.com
BEFORE YOU BEGIN
Read these instructions completely and carefully.
- IMPORTANT – Save these instructions for the local inspector’s use.
- IMPORTANT – Observe all governing codes and ordinances.
- Note to Installer – Be sure to leave these instructions with the Consumer.
- Note to Consumer – Keep these instructions for future reference.
- Skill level – Installation of this appliance requires basic mechanical skills.
- Completion time – 1 hour
- Proper installation is the responsibility of the installer.
- Product failure due to improper installation is not covered under the Warranty.
THERMOSTAT LOCATION
- On an interior wall, since the temperature of an exterior wall varies with outdoor conditions, approximately 5 ft (1.5 m) above the floor.
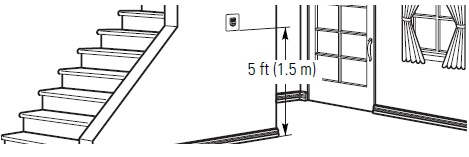
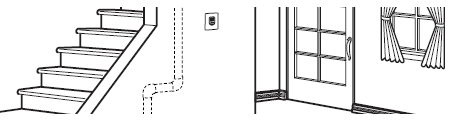
- No less than 18 inches from the junction of an outside wall and away from direct sunlight, radiant heat, air discharge grilles, stairwells, outside doors or behind doors.
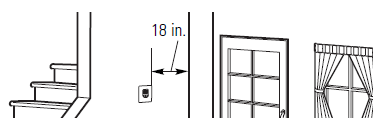
- Away from steam pipes, water pipes or warm-air stacks in adjacent rooms.
TOOLS REQUIRED

MOUNTING AND WIRING
REMOVE BASE FROM THERMOSTAT
Open the cover on the thermostat and insert a small coin or flat-bladed screwdriver in the slot on the top of the thermostat and twist 1/4 turn. Grasp the base from the side and remove it from the thermostat.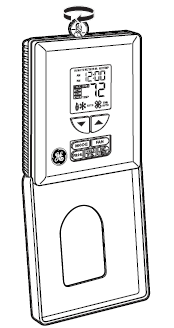
FEED THROUGH WIRES
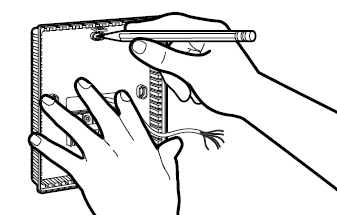
Feed the thermostat control wires through the rectangular opening in the base and, using the base as a template, mark the location of the two vertical mounting holes.
MOUNT BASE TO WALL
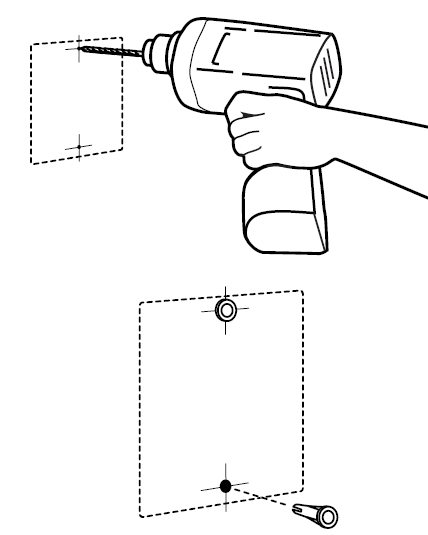
Use the supplied anchors and screws to mount the base to the wall by drilling two 3/16″ (4.7 mm) holes at the marked locations, and tap the nylon anchors flush to the wall surface.
CONNECT WIRES
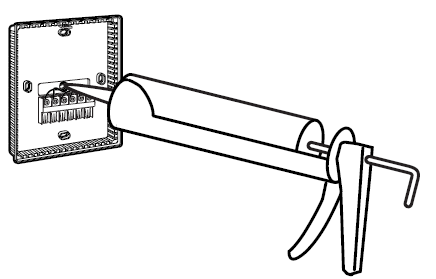
Connect the wires from the existing system to the thermostat terminals according to the wiring diagrams in Table 1 and Table 2. Push any excess wire back into the wall and seal the hole with putty or a caulking material to prevent drafts from affecting the ambient temperature of the sensor. All wiring must comply with local electrical codes and such National codes as they apply.
RE-INSTALL THERMOSTAT TO BASE
To re-install the thermostat to the base, attach the tabs on the bottom of the thermostat front to the small slots on the base bottom and push up until they snap in place.
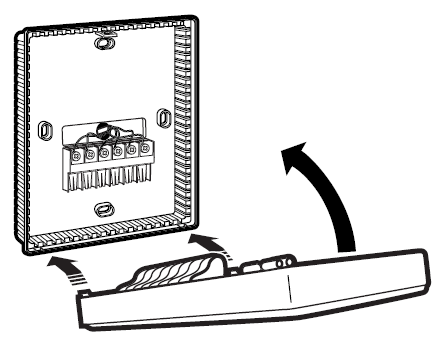
TABLE 1: TERMINALS FOR FIVE WIRES HEAT/COOL SYSTEM (RAK163P1 ONLY)
| TERMINAL NO. | TERMINAL NAME | FUNCTION |
| 1 | W | Heating |
| 2 | C | Common |
| 3 | R | 24 VAC or VDC |
| 4 | Y | Cooling |
| 5 | G | Fan |
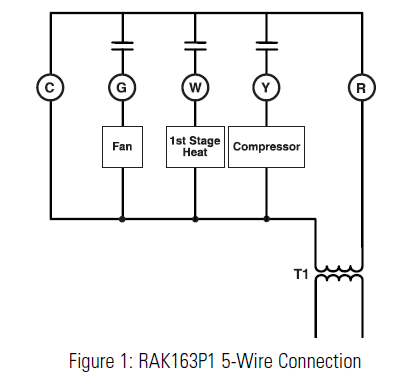
TABLE 2: TERMINALS FOR SIX WIRES 2 HEAT/1 COOL SYSTEM (RAK147P1 ONLY)
| TERMINAL NO. | TERMINAL NAME | FUNCTION |
| 1 | W | Auxiliary Heating |
| 2 | C | Common |
| 3 | R | 24 VAC or VDC |
| 4 | Y | Cooling |
| 5 | G | Fan |
| 6 | B | Heat Pump Reversing Valve |
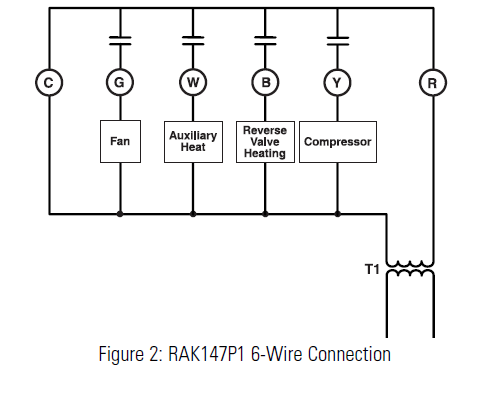
TABLE 3: DIP SWITCH FUNCTION
| DIP SWITCH | SWITCH SELECTION | FUNCTION |
| 1 | ON | DC Voltage: 24 VDC |
| OFF | AC Voltage: 24 VAC | |
| 2 | ON | °C |
| OFF | °F | |
| 3 | ON | Keypad locked |
| OFF | Keypad unlocked | |
| 4 | ON | Backlight Override. Backlight does not operate if this switch is on. |
| OFF | Backlight is operating. Anytime a button is pressed, the backlight display will turn on. |
SPECIFICATIONS
| THERMOSTAT COVERED | RAK163P1, RAK147P1 |
| Power Requirements | 18–30 VAC or VDC electronic thermostat for 5-wire
1H/1C systems (RAK163P1) and 6-wire 2H/1C systems (RAK147P1) |
| Temperature Measurement Range | 50 to 99°F with 1°F display resolution (10 to 37°C with 1°C display resolution) |
| Temperature Control Range | 60 to 90°F with 1°F display resolution (15 to 32°C with 1°C display resolution) |
| Storage Temperature Range | -4 to 131°F (-20 to 50°C) |
| Time Display Format | 12 hour with AM/PM |
| Program | • 5+2 and 7-day program with 4 time periods per day
• 10 Minute resolution for both heating and cooling programs • Independent heating and cooling programs • Auto Changeover Feature |
| Temperature Override | • Temporary program temperature override
• Permanent program temperature override with HOLD feature |
| Recommended Wire Size | 24–18 Gauge |
| Safety Circuit | 1) Auto cut-off in heat mode if room temperature > 90°F
2) Auto cut-off in cool mode if room temperature < 60°F |
| Memory Backup | Lithium Battery CR2032 Battery life > 10 years |
| Others | EL type LCD backlight |
| Dimensions | 4² x 4-5/8² x 1-5/16² (101.6 x 117.5 x 33.3 mm) |
| Shipping Weight | Approximately 0.5 lb. (0.231 kg) |
Troubleshooting tips…
Save time and money! Review the chart on this page first and you may not need to call for service.
| Problem | Possible Causes | What To Do | |
| No display/faint display | Supply voltage not correct. | • Using a voltmeter, check the supply voltage to the thermostat. Voltage operating range for the thermostat is 18-30 VAC/VDC. If measured voltage is out of this range, troubleshoot the supply voltage to the unit. | |
| Thermostat is damaged. | • Replace with a new thermostat. Check the supply voltage to the unit before connecting second thermostat (see above). | ||
| Power wiring to unit is incorrect. | • Refer to Figures 1 & 2 in the Installation Instructions for correct wiring. | ||
| Keypad buttons do not work. | No power to the unit. | • Make sure the display is working correctly. If not, follow step one above. | |
| The thermostat is damaged. | • Replace with a new thermostat. Check the supply voltage to the unit before connecting the second thermostat (see above). | ||
| Thermostat will not call for heat. | Thermostat setpoint is satisfied. • Raise the temperature setpoint more than 2° above
current temperature. |
||
| Unit wiring is incorrect. | • Refer to Figures 1 & 2 in the Installation Instructions for correct wiring. | ||
| Unit is ‘OFF.’ | • Make sure the FLAME icon is displayed and blinking. If not, push the MODE button until it is displayed. | ||
| Thermostat will not call for cooling. | Thermostat setpoint is satisfied. • Lower the temperature setpoint more than 2°
below current temperature. |
||
| Unit wiring is incorrect. | • Refer to Figures 1 & 2 in the Installation Instructions for correct wiring. | ||
| Unit is ‘OFF.’ | • Make sure the SNOWFLAKE icon is displayed and blinking. If not, push the MODE button until it
is displayed. |
||
| Short cycle delay still active. | • Wait 4 minutes. The unit’s short cycle timer is in operation. | ||
| Fan does not turn on with the system. | Fan failure. | • Place a jumper between the R and G terminals. The fan should come on. If it does, replace the thermostat. | |
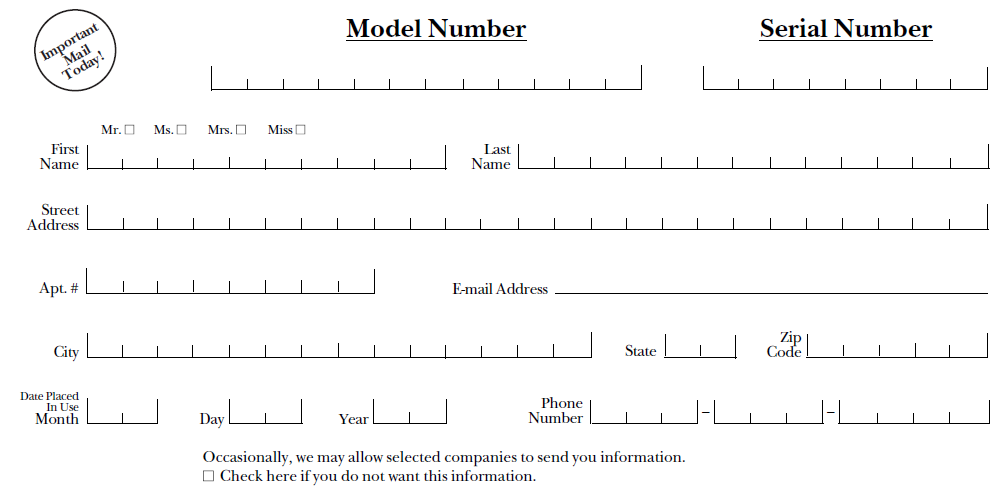
Consumer Product Ownership Registration
Thermostat Warranty
Staple your receipt here. Proof of the original purchase date is needed to validate the warranty.
| For The Period Of: | GE Will Replace: |
| One Year
From the date of the original purchase |
Full Replacement of the thermostat which fails due to a defect in materials or workmanship. |
What GE Will Not Cover
- Service trips to your location.
- Improper installation. If you have an installation problem, contact your installer. You are responsible for providing adequate electrical connections to the product.
- Failure of the product resulting from modifications to the product or due to unreasonable use, including failure to provide reasonable and necessary maintenance.
- In commercial locations, the labor is necessary to move the unit, after it has been initially installed, to a location where it is accessible for service by an individual technician or if the instructions included in this manual have been disregarded.
- Replacement of location fuses or the resetting of circuit breakers.
- Damage to the product caused by improper power supply voltage, accident, fire, floods or acts of God.
- Incidental or consequential damage caused by possible defects with this thermostat.
This warranty is extended to the original purchaser and any succeeding owner for products purchased for home use within the USA. In Alaska, the warranty excludes the cost of shipping or service calls to your home. Some states do not allow the exclusion or limitation of incidental or consequential damages. This warranty gives you specific legal rights, and you may also have other rights which vary from state to state. To know what your legal rights are, consult your local or state consumer affairs office or your state’s Attorney General. Warrantor: General Electric Company. Louisville, KY 40225
Reference:
Download Manual:
GE Appliances RAK163P1 Cooling Programmable Thermostat Installation Manual

GE Appliances RAK163P1 Cooling Programmable Thermostat Installation Manual